
94 F2 project


Senior Member
Joined: Mar 2013
Posts: 121
Likes: 0
Yeah bro taking good care of it, had got in a very bad state look wise and worked on it to bring it back to presentable state. There is a thread i have created for my F2. Network in India is very poor, nothing available locally. Yes this network on the forum is very helpfull and i take the threads as case studies and work accordingly.
Thread Starter
|
Welcome Crew
Joined: Feb 2013
Posts: 688
Likes: 1
From: Waycross, Ga
been kinda slow around here lately, good news is alot of parts came in so I'll be able to get back to it. Only lacking the tailight now. I'm gonna try and get out there today, but my fiancees bday is wed and I have to work so gotta spend her time today....
Thread Starter
|
Welcome Crew
Joined: Feb 2013
Posts: 688
Likes: 1
From: Waycross, Ga
Tailight is in, hids are in, hmmm.... seems I have everything to get busy. Been doing a little here and there, nothing to brag about. its been high 90s here for the last few days and I have a big case of the Idontwannas. Still need to get the lowers for finally fit so I can figure out what blend panels and brackets I need to fabricate. On that note, the Cheetah street fairings I have leave a bit to be desired in fitment. The headlight housing cutouts are... well off... too big a gap crooked lines etc. Fiberglass so should be easy to correct. Have to get gas to fire her up and check my wiring where I reran things. Then I'm gonna throw the front fairing on and ride her while I can. Ill end up modifying all the fiberglass pieces I have for better fit, finish, and personal preference. Should be posting with pics soon, so keep your eyes out.
****update*****
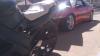
Well it cooled off quickly seeing as how its gonna rain. Went out and wired up my taillight, zip tied my stay to the front and threw up a side to look for mounting location/position. I'm still trying to figure out how high or low I want to mount it, but heres a pic

of course it has to be forward and high enough to allow full turn. I think perhaps it should be slid back some. I found I'm either going to have the radiator peeking or the bar with the notor mount peeking. The frame will be semi gloss black. The fairings I'm really leaning towards fords sonic blue or a darker metallic blue like on a lexus or kia (ha what a difference huh?) I think I could handle the bar, but would paint it flat black to try and hide it.
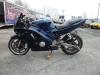
Anyway, heres a front shot.

You can see where the fairing isnt exactly cut right. I plan to fill it in with glass and make it look better. I wouldnt feel right half doing it after this much time is involved. This I also think needs to be raised abit. maybe a half inch or so.
and the tail.

Of course, I havent made any brackets for the rear yet. still trying to get it level and at a height I like. Like a couple others, I prefer the pillon seat almsot even with the tank height.
and here lies my issue with the tail. I used the Cheetah tail with the covers made into it. Financial reasons, got an offer for the tail that paid for the fairings and then some. No brainer to my budget. That said the molded covers are causing issues with the way I want the seat.

I want the seat snug against the tank. The gaps I can fill. But I'm thinking it may be easier and come out better if I cut the molded covers off, position the tail how I want, and just make some new covers with the gap fill panels built in, if that make sense. I think it would look better, one big triangular fill piece versus a couple of pieces. Plus I'm thinking I can drop the front edge of the tail down to help hide the lower subframe bar, and also pull it up closer to the seat.
Ok guys, thoughts and opinions please. To cut or not to cut. I need opinions and suggestions. All I can manage around here is "its yours do what ya like"......smh
****update*****
Well it cooled off quickly seeing as how its gonna rain. Went out and wired up my taillight, zip tied my stay to the front and threw up a side to look for mounting location/position. I'm still trying to figure out how high or low I want to mount it, but heres a pic
of course it has to be forward and high enough to allow full turn. I think perhaps it should be slid back some. I found I'm either going to have the radiator peeking or the bar with the notor mount peeking. The frame will be semi gloss black. The fairings I'm really leaning towards fords sonic blue or a darker metallic blue like on a lexus or kia (ha what a difference huh?) I think I could handle the bar, but would paint it flat black to try and hide it.
Anyway, heres a front shot.
You can see where the fairing isnt exactly cut right. I plan to fill it in with glass and make it look better. I wouldnt feel right half doing it after this much time is involved. This I also think needs to be raised abit. maybe a half inch or so.
and the tail.
Of course, I havent made any brackets for the rear yet. still trying to get it level and at a height I like. Like a couple others, I prefer the pillon seat almsot even with the tank height.
and here lies my issue with the tail. I used the Cheetah tail with the covers made into it. Financial reasons, got an offer for the tail that paid for the fairings and then some. No brainer to my budget. That said the molded covers are causing issues with the way I want the seat.
I want the seat snug against the tank. The gaps I can fill. But I'm thinking it may be easier and come out better if I cut the molded covers off, position the tail how I want, and just make some new covers with the gap fill panels built in, if that make sense. I think it would look better, one big triangular fill piece versus a couple of pieces. Plus I'm thinking I can drop the front edge of the tail down to help hide the lower subframe bar, and also pull it up closer to the seat.
Ok guys, thoughts and opinions please. To cut or not to cut. I need opinions and suggestions. All I can manage around here is "its yours do what ya like"......smh
Last edited by gtcole; Jun 4, 2013 at 06:17 PM. Reason: *****update******
Thread Starter
|
Welcome Crew
Joined: Feb 2013
Posts: 688
Likes: 1
From: Waycross, Ga
Well fun stuff. Put some gas in her cause I had emptied the tank to clean it good and wouldn't ya know it, fuel leak. It seems to be coming from the petcock. But not the diaphragm side. The riveted side. Just what I wanted. Also pouring out of the carbs, even in the off position. So, snatched the tank back off. Gonna have to figure out if I can rebuild it or just bite the bullet, take a chance, and order a new one from ebay (china). Anyone have experience with the chinese petcocks? Gonna bench test the carbs to make sure the gaskets there aren't leaking too. Looks like I'll be stuck in the lincoln for a few weeks.

Welcome Crew and ROTY 2014
Joined: Dec 2010
Posts: 2,059
Likes: 6
From: Kansas
I hate it when "the hits just KEEP ON coming"!!
It stinks you're having petcock issues... I've not known anyone personally that has tried one of the Chinese units, so I cannot comment on that.
It stinks you're having petcock issues... I've not known anyone personally that has tried one of the Chinese units, so I cannot comment on that.
Thread Starter
|
Welcome Crew
Joined: Feb 2013
Posts: 688
Likes: 1
From: Waycross, Ga
Yeah me too. So close but yet so far. I think I may try it. I mean 19 plus 9 shipping, not too much of a waste if it doesn't work..I dunno
Senior Member
Joined: Apr 2012
Posts: 249
Likes: 1
From: Laredo, Tx
Looks good man. Finally had a little process going on her. The nose definitely needs to be pulled back man. It looks like mine before haha. I cut the middle plate and went with the stock position, I think it turned out great now. Keep it posted man, although you now have mechanical issues :/ . I had issues also because I hadn't started/used my bike in 4 days, I guess one of the carbs had an issue getting stuck, gas poured out thru the breather hoses, so I just tapped all 4 with a hammer and screwdriver and it did the job man. 
Last edited by campos_motorsports; Jun 8, 2013 at 11:32 PM.
Thread Starter
|
Welcome Crew
Joined: Feb 2013
Posts: 688
Likes: 1
From: Waycross, Ga
Looks good man. Finally had a little process going on her. The nose definitely needs to be pulled back man. It looks like mine before haha. I cut the middle plate and went with the stock position, I think it turned out great now. Keep it posted man, although you now have mechanical issues :/ . I had issues also because I hadn't started/used my bike in 4 days, I guess one of the carbs had an issue getting stuck, gas poured out thru the breather hoses, so I just tapped all 4 with a hammer and screwdriver and it did the job man.
Thanks. Yeah, I slide it back a little bit, and up more importantly. Now I may have to trim the stay, seems to be contacting my ignition switch. I still have to get the lowers so I'm kinda on hold for perfect fitment.
I ordered the petcock from china. 30 bucks with shipping, then came home, and set the tank (which I took off when I noticed the leak and set on end) on the garbage can to check the leak again. Well, no friggin leak.......
Thread Starter
|
Welcome Crew
Joined: Feb 2013
Posts: 688
Likes: 1
From: Waycross, Ga
With the fairing alignment on hold temporarily, I decided to mess with the tail yesterday after work. I have three different positions I tried. My main concern at the moment is rear tail height, and most important to me, is seat alignment. Like I said, I want the seat as close to the tank as I can get it. The tank mount pushes the front of the seat up about a quarter to half inch. So today I will shave a bit of plastic from the front of the seat and see if I can get it to come down some. Also, for those that are curious, The rear mounts for the front seat are about 10 inches apart or so. Well, the subframe is only 9 something. So the seat, at the rear at least, is a lil bit wider. Anyways, here are the pics. Of course I marked them all up lol. I'm working with a member that has done this on an F1, and his suggestions have proved invaluable, so any input is appreciated. I also marked where I would cut the cover off. Seriously thinking this may be the easiest way to get a good fit and finish.
Position 1

here you can see how the tail is too far forward, and the seat doesn't match the tail. The red line is where I would cut it to move the cover up like its suppose to be.
Position 2

Here the seat matches good but there are all kinds of other issues I'm dealing with. The covers hit the tank, and I don't know how it could be filled and not look piece meal.
Position 3

This is the position I like the most, I think. Rear of the seat matches the tail great. It covers almost all of the lower subframe bar, which surprised me. All id have to do is tack a mount to the lower subframe bar there, makes it alot easier. The cover, if I separate it at the blue line, I can move the cover flush with the seat like its suppose to be and then extend the cover to fill the whole gap. The angles of the cover should be close to stock. The rear height is just slightly below the top of the tank. So it still has the look I like.
So, there it is. I should be mounting the tail today, figuring out the brackets for the rear seat and such. Opinions anyone?
I also found I can't push the tail as far forward as I'd like because it pushes the back of the seat up.
Position 1
here you can see how the tail is too far forward, and the seat doesn't match the tail. The red line is where I would cut it to move the cover up like its suppose to be.
Position 2
Here the seat matches good but there are all kinds of other issues I'm dealing with. The covers hit the tank, and I don't know how it could be filled and not look piece meal.
Position 3
This is the position I like the most, I think. Rear of the seat matches the tail great. It covers almost all of the lower subframe bar, which surprised me. All id have to do is tack a mount to the lower subframe bar there, makes it alot easier. The cover, if I separate it at the blue line, I can move the cover flush with the seat like its suppose to be and then extend the cover to fill the whole gap. The angles of the cover should be close to stock. The rear height is just slightly below the top of the tank. So it still has the look I like.
So, there it is. I should be mounting the tail today, figuring out the brackets for the rear seat and such. Opinions anyone?
I also found I can't push the tail as far forward as I'd like because it pushes the back of the seat up.
Last edited by gtcole; Jun 9, 2013 at 08:31 AM.
Welcome Crew and ROTY 2014
Joined: Dec 2010
Posts: 2,059
Likes: 6
From: Kansas
There are definitely pros and cons with each option, but as much as I would like to "vote" so to speak, on one of the positions, I really can't since the pictures you've got there are focusing so tight on that area, and we can't see how the bikes overall lines are affected by each mounting... if by chance you cropped each of those three, post up the originals so we can see "the big picture"!
No matter what, you're making some progress!
No matter what, you're making some progress!