
94 F2 project

Thread Starter
|
Welcome Crew
Joined: Feb 2013
Posts: 688
Likes: 1
From: Waycross, Ga
Not much accomplished so far. I work 6 days a week so progress seems slower then I would like. This weekend I plan to fix the nest of wires and clean her up so I can figure out exactly whats good and whats not. Still waiting on stands to ****** the wheels. Checked the rotors and the are still within specs so ordered fresh pads. Alot of safety wire remnants. I'm hoping that is a good sign for internal mechanics. However, judging from what I've found so far I'm not holding my breath. Also plan to ****** the carbs and clean them if I have time. Not sure they need it seeing as how she starts and runs strong, but, being a new to me bike, I think I'd rather do it and not need it then need it and not do it. I'll be sure to take pics along the way. Progress may be slower then I'd like for the net couple weeks, but waiting on parts, or in some cases more accurately, waiting on budget to approve said parts. If theres a better way to proceed feel free.... I'm open to suggestions.

Thread Starter
|
Welcome Crew
Joined: Feb 2013
Posts: 688
Likes: 1
From: Waycross, Ga
Why yes... yes it is. Still scratching my head over that one. Not quite sure how to fix it yet. Guess I'll get a better idea after I remove the rear wheel.
Thread Starter
|
Welcome Crew
Joined: Feb 2013
Posts: 688
Likes: 1
From: Waycross, Ga
Heres a question. The alternator cover thats leaking, anyone used rtv to seal it instead of a gasket? I ordered the missing bolts but forgot to get the gasket. Really don't want to have to wait longer, but I will if there is a chance it would mess something up. Of course I also have the gasket paper at work so perhaps I could just make my own? I know the pulse generator cover has been sealed with black rtv before by someone without leaks.
Thread Starter
|
Welcome Crew
Joined: Feb 2013
Posts: 688
Likes: 1
From: Waycross, Ga
Hey all. Finally got around to getting some work done. Gotta love beautiful sundays. So far, I have a love hate relationship with this process. I love it because, well, after working all week fixing cars, I find working on my bike therapeutic and relaxing. Weird, possibly but whatever. I also love getting things done that need doing. The hate part comes in when I find crazy, irresponsible, negligent, or just plain ignorant things done (more on this later). I mean is reading a manual too much to ask? How about asking for help? I do it, most everyone here does it, and best of all, from what I've seen, everyone here is more then willing to help. any-who, rant over. on to progress.... I took a short, crappy video of her running.... sounds okay but something is definitely amiss methinks..... so with that said, here we go. as always feel free to comment, help, laugh at my expense 
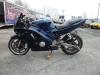
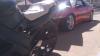
First thing I did, of course, was replace the side stand with a full length one.... yay no more brick.... graduated to a plate lol. Had to, there is no concrete just sand so it keeps it from sinking.

Stripped the front wiring, fairng stay, and gauges to get at the wiring better and for prep for my ignition switch


Discovered broke screw number one

Then managed to take the tank and airbox off and to my surprise, found a k&n.... still undecided about keeping it....


Found the rest of my gas cap lock cylinder too... inside my tank!
after all that, decided to yank the carbs, good thing I did too. Here is the reason for my rant lol I don't know if you can see it, but cylinder 3 and 4 boots, not only were they loose, no big deal, accidents do happen. They didn't even have the screws in the clamps


That being said, they came off way easy, so apparently they have been off recently. To remove the throttle cables I just flipped em over to get better access. Not too bad that way.
And a just because shot of the 10mm nut for the throttle cable

Carbs didn't look too bad, and a look down the intake, the valves look pretty clean too... at least this side of them, so maybe there is hope..


and yes, the boots say carb side up, for dummies like me
pretty obvious a new valve cover gasket is in order

also leaking down into the spark plug holes

speaking of which.... time for new ones

Well thats about all I got done today... managed to hose her off clean her up some, thats gonna take awhile I see.... Til next time...

First thing I did, of course, was replace the side stand with a full length one.... yay no more brick.... graduated to a plate lol. Had to, there is no concrete just sand so it keeps it from sinking.
Stripped the front wiring, fairng stay, and gauges to get at the wiring better and for prep for my ignition switch
Discovered broke screw number one
Then managed to take the tank and airbox off and to my surprise, found a k&n.... still undecided about keeping it....
Found the rest of my gas cap lock cylinder too... inside my tank!
after all that, decided to yank the carbs, good thing I did too. Here is the reason for my rant lol I don't know if you can see it, but cylinder 3 and 4 boots, not only were they loose, no big deal, accidents do happen. They didn't even have the screws in the clamps
That being said, they came off way easy, so apparently they have been off recently. To remove the throttle cables I just flipped em over to get better access. Not too bad that way.
And a just because shot of the 10mm nut for the throttle cable
Carbs didn't look too bad, and a look down the intake, the valves look pretty clean too... at least this side of them, so maybe there is hope..
and yes, the boots say carb side up, for dummies like me
pretty obvious a new valve cover gasket is in order
also leaking down into the spark plug holes
speaking of which.... time for new ones
Well thats about all I got done today... managed to hose her off clean her up some, thats gonna take awhile I see.... Til next time...
Senior Member
Joined: Apr 2012
Posts: 249
Likes: 1
From: Laredo, Tx
Well now I see why you asked about the 1000rr conversion, your missing the right side fairings which are the same that I needed. Looks like you have alot of work on your hands but some of the stuff can be replaces for new or better ones and you will be good. Also congrats on having a fiance that is okay with you working on the bike, my wife gets mad, well kind of when i work on my bike, she didnt really believe me when I said have a passion to work on cars and bikes, lol.
Thread Starter
|
Welcome Crew
Joined: Feb 2013
Posts: 688
Likes: 1
From: Waycross, Ga
Yeah. luckily mine believed me lol. I think it helps that her dad rides though to be honest. I've found alot of parts and got some major ones, to me anyway, from another member so at leasst I'm off to a start. Just gotta figure out how to tell her I'm spending more money....... again...
Senior Member
Joined: Apr 2012
Posts: 249
Likes: 1
From: Laredo, Tx
About the 1000rr conversion, keep an eye on the 1k forums so if you decide to get them you might be able to get a deal on stuff you might need.
Thread Starter
|
Welcome Crew
Joined: Feb 2013
Posts: 688
Likes: 1
From: Waycross, Ga
Managed to actually get something accomplished today. Not alot but it is Easter after all.... not alot of pics either cause my phone died. ok... here we go... first was putting on parts I received.
First up was the gas cap.
This, along with the ignition witch with two keys, appropriately sized hex key, and pulse generator cover, I received from Jeff. Thanks again man.
In these two you can see the side by side, and why I was changing it to begin with.


As you can see, apparently the right way to open a locked gas cap without a key is a screwdriver and hammer. I'm STILL trying to get all the pieces out of the tank. Magnet is a no go. Any ideas would be greatly appreciated.

Doesnt look too bad, even with the sticker. And the blue is growing on me, alot.... too bad I only have the tank in blue..... but most importantly, it works!!!!!
First up was the gas cap.
This, along with the ignition witch with two keys, appropriately sized hex key, and pulse generator cover, I received from Jeff. Thanks again man.
In these two you can see the side by side, and why I was changing it to begin with.
As you can see, apparently the right way to open a locked gas cap without a key is a screwdriver and hammer.
Doesnt look too bad, even with the sticker. And the blue is growing on me, alot.... too bad I only have the tank in blue..... but most importantly, it works!!!!!
Last edited by gtcole; Mar 31, 2013 at 06:55 PM.
Thread Starter
|
Welcome Crew
Joined: Feb 2013
Posts: 688
Likes: 1
From: Waycross, Ga
Next today was working on the ignition switch. Took the new switch and the old harness and spliced them together.
The new one and old rigged up crap

Then my repair. forgot to take pics of it but it is soldered, no more wire nuts. Heat shrinked the joints, then taped. I like to be sure, sorry.

moved on to the front. This is this morning
then mounted the mater cyclinder, ignition switch, and levers.
I didn't have the pivot bolts for the brake or clutch lever. Didnt feel like waiting or spending the money for them either. So I figured why not. I took a m6x1.0 bolt, added a sleeve, used some jb weld to hold the sleeve in the appropriate positon. Then greased and installed. Works just like the original. It'll work til I get new levers and grips.


For the clutch lever, I found a bolt for a timing cover at work that just happened to be the right size. Who woulda thought it was a honda too?

the old lever was held on by a tapping screw. way too small to do anything with or properly hold it.

New ignition


While I had the jb weld out I noticed a crack in the airbox plastic

so to work I went fixng it too

not pretty but it does the job.
Changed the plugs, checked valve clearance, drained the oil and flushed and bled the front brakes. other then that just scrubbed more crud off her. Later this week I'm going to attempt to make a pulse generator cover gasket and install that too. I still need to figure out which connector the headlight leads go to. Til next time.
The new one and old rigged up crap
Then my repair. forgot to take pics of it but it is soldered, no more wire nuts. Heat shrinked the joints, then taped. I like to be sure, sorry.
moved on to the front. This is this morning
then mounted the mater cyclinder, ignition switch, and levers.
I didn't have the pivot bolts for the brake or clutch lever. Didnt feel like waiting or spending the money for them either. So I figured why not. I took a m6x1.0 bolt, added a sleeve, used some jb weld to hold the sleeve in the appropriate positon. Then greased and installed. Works just like the original. It'll work til I get new levers and grips.
For the clutch lever, I found a bolt for a timing cover at work that just happened to be the right size. Who woulda thought it was a honda too?
the old lever was held on by a tapping screw. way too small to do anything with or properly hold it.
New ignition
While I had the jb weld out I noticed a crack in the airbox plastic
so to work I went fixng it too
not pretty but it does the job.
Changed the plugs, checked valve clearance, drained the oil and flushed and bled the front brakes. other then that just scrubbed more crud off her. Later this week I'm going to attempt to make a pulse generator cover gasket and install that too. I still need to figure out which connector the headlight leads go to. Til next time.