
View Poll Results: Which Design Should I lean towards
Image 1


0
0%
Image 2


0
0%
Image 3


2
100.00%
I don't care


0
0%
Voters: 2. You may not vote on this poll
98 CBR F3 Project Bike (SSSA, Car Rim, R1 Tail, F4i front)


As it stands now, I need to get the bike on the road.
I am just going to use vinyl like i did last time. While I am waiting for new headlight assembly to come in, i will make paper templates for the reflective chrome vinyl for the areas of the headlights that seem to bleed out. The OEM headlight assembly has these blocked out for obvious reasons.
Then I will make a template for the headlight itself. I will just mask the entire headlight in vinyl and cut out the parts to be removed. That part is simple enough.
Ideally, I will just make a proper eyelid after I decide on if this design is safe enough at night.
Both HID's will be on. I tried a test the other day to see if both HID's would fire if they were wired to one headlight wire (highbeam). I suspect my test wires were too low a gauge to support the amperage draw. but wiring it right to the battery, both HID's ignited properly. Of course, having the engine on was helpful. I have a relay I will use wired up to my dedicated 12v line. I'll wire this up to the highbeam lead as the toggle.
I'll keep it documented though.
So, last night as i was getting ready for the last haul of the bike upgrades, I drained the tank, i could have just left it full, but its easier to handle empty and took apart the airbox to clean the air filter. While there, i wanted to see what all the fuss was about for changing the thermal sensor.
Since i did the f4i gauge swap, my temp readings are wrong, so i got myself a RR thermo, and did the swap. I sprayed some liquid wrench in there as a lot of forum members said that this part could snap pretty easy. So i spend a day or two spraying the sensor.
The next part was a pretty stressing moment, I didnt want to take the carbs off to get a bolt down there, so i bough myself a small 12mm universal knuckle, extension and went to work on removing the sensor.


Here is the sensor, i yanked the wire housing off with some gentle force, but you see that nut that is right above it, damn if it wasnt just in the way.


I didn't want to lose that little nut, so i made a small tray to catch it out of paper, then grabbed it with some needle nose pliers.
No problem. This holds the choke cable onto the carbs. Now, the hard part, removing the sensor.
After some gentle pulls on the wrench, it came loose. Phew! Put the new sensor in, no problem.

Ugh oh. Where did that bolt go that held the choke cable!
That is my holy **** moment this morning. I tried a magnet to pull it back out, sticky tape, nothing, it kept going in further. SO, now i have no choice but to pull the carbs to get the damn thing back on.
SO, lesson, if you need to change the sensor, make sure to keep an eye on that damn bolt!
If anyone has a bright idea on how to get that damn thing out, i would be happy! ive done some reading on pulling the carbs... the question is, do i have to disconnect every tube to get under the carbs to where that bolt goes in?
My new headlight should be here soon, and I would love to get the bike on the road sometime!
Many thanks!
Since i did the f4i gauge swap, my temp readings are wrong, so i got myself a RR thermo, and did the swap. I sprayed some liquid wrench in there as a lot of forum members said that this part could snap pretty easy. So i spend a day or two spraying the sensor.
The next part was a pretty stressing moment, I didnt want to take the carbs off to get a bolt down there, so i bough myself a small 12mm universal knuckle, extension and went to work on removing the sensor.
Here is the sensor, i yanked the wire housing off with some gentle force, but you see that nut that is right above it, damn if it wasnt just in the way.
I didn't want to lose that little nut, so i made a small tray to catch it out of paper, then grabbed it with some needle nose pliers.
No problem. This holds the choke cable onto the carbs. Now, the hard part, removing the sensor.
After some gentle pulls on the wrench, it came loose. Phew! Put the new sensor in, no problem.
Ugh oh. Where did that bolt go that held the choke cable!
That is my holy **** moment this morning. I tried a magnet to pull it back out, sticky tape, nothing, it kept going in further. SO, now i have no choice but to pull the carbs to get the damn thing back on.
SO, lesson, if you need to change the sensor, make sure to keep an eye on that damn bolt!
If anyone has a bright idea on how to get that damn thing out, i would be happy! ive done some reading on pulling the carbs... the question is, do i have to disconnect every tube to get under the carbs to where that bolt goes in?
My new headlight should be here soon, and I would love to get the bike on the road sometime!
Many thanks!
UPDATE, after consulting my maintenance manual, i saw that the "screw" that got pushed in was really the choke bolt, that runs the length of the carbs.
I ran outside to see if the bolt was pushed out on the other side, and low and behold, it was, so i pushed it back in, attached the choke "arm" or whatever you want to call it, and tightened her back up...
WOW, i don't think i've been so excited over something so minuscule in a long time! I even did a full on fist pump.
Not that yanking the carbs wouldnt have been educational. it just wasn't on the menu for today!
Thanks internet service manual! I owe you a big one.

That's the question. I'm currently waiting on the new headlight. It will take me a night to prep it, cover all the silly spots the cheap knock offs don't black out, and slap it in.
Right now, it looks like it will be June 5th when the new light comes in. so, between then and now, I will change the oil and coolant, and get it ready to roll.
Right now, it looks like it will be June 5th when the new light comes in. so, between then and now, I will change the oil and coolant, and get it ready to roll.
Getting close to getting back on the road.
Here are the new liveries being added:


They covered up the damage from last spring perfectly! You can still see the divots in the paint if you look close enough, but, im happy enough with it.
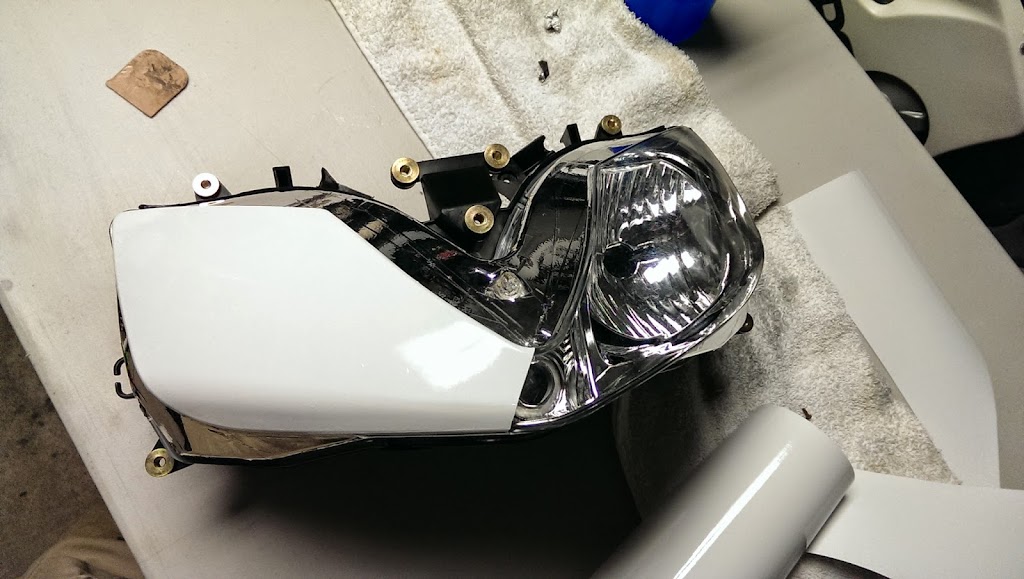
On friday I got a delivery, ahead of schedule, my new headlamp came in. WoOt.
Since it's a cheap knock off, it needed to be covered up pretty well. Chrome vinyl style.

Chrome added, it's in multiple rows that overlap, but you'll never see them so it's not that critical.

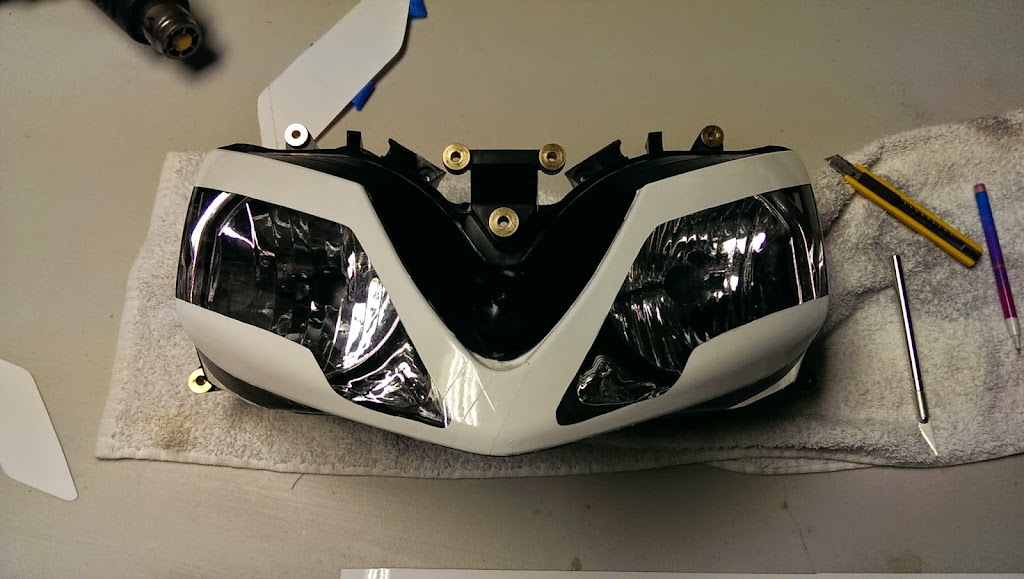
First attempt at a full screened headlamp. I quickly realized that i was not going to be able to do the whole thing in one shot, its just such an akward piece of hardware, using the heatgun to help was almost impossible, but going slow worked out well. I still got some bubbles, but whatever. At this point i just want on the road.
Second side done. You can see the crest of the overlap on the front. It's not as terrible as the pic makes it out to be. In fact, I will continue the stripes done the front to mostly cover it up anyhow.

Second layer. I used black out vinyl, so it's pretty thick, but not thick enough that one layer was good enough. I should have layered the vinyl first, so i wouldn't have had to do two layers. Live and learn.

Test, lest see where the weak spots are. As you can see from this, there is a lot of bleed through on the top and sides.


I ended up electrical taping the edges and the top of the lens to help block out any extra light coming out. That is the new eyelid template. It's a bit bigger than what i envisioned, but i also had to consider that I would be driving at night some times. So, a little bigger was required.


One side cut, that was a real stressing moment, did the knife cut through all the way, thankfully it worked out well.

First test, success.


Tonight is to setup the relay, and get both lights working and secure the headlamp into the front fairing, get the led strips for the DRL taped in place as well. Lets hope it all goes well!
Here are the new liveries being added:
They covered up the damage from last spring perfectly! You can still see the divots in the paint if you look close enough, but, im happy enough with it.
On friday I got a delivery, ahead of schedule, my new headlamp came in. WoOt.
Since it's a cheap knock off, it needed to be covered up pretty well. Chrome vinyl style.
Chrome added, it's in multiple rows that overlap, but you'll never see them so it's not that critical.
First attempt at a full screened headlamp. I quickly realized that i was not going to be able to do the whole thing in one shot, its just such an akward piece of hardware, using the heatgun to help was almost impossible, but going slow worked out well. I still got some bubbles, but whatever. At this point i just want on the road.
Second side done. You can see the crest of the overlap on the front. It's not as terrible as the pic makes it out to be. In fact, I will continue the stripes done the front to mostly cover it up anyhow.
Second layer. I used black out vinyl, so it's pretty thick, but not thick enough that one layer was good enough. I should have layered the vinyl first, so i wouldn't have had to do two layers. Live and learn.
Test, lest see where the weak spots are. As you can see from this, there is a lot of bleed through on the top and sides.
I ended up electrical taping the edges and the top of the lens to help block out any extra light coming out. That is the new eyelid template. It's a bit bigger than what i envisioned, but i also had to consider that I would be driving at night some times. So, a little bigger was required.
One side cut, that was a real stressing moment, did the knife cut through all the way, thankfully it worked out well.
First test, success.
Tonight is to setup the relay, and get both lights working and secure the headlamp into the front fairing, get the led strips for the DRL taped in place as well. Lets hope it all goes well!

it was 50$ or so plus shipping (because i live north of the border).
It does have a bottom end tolerance. Doesn't seem to kick in till the engine hits 100.