
View Poll Results: Which Design Should I lean towards
Image 1


0
0%
Image 2


0
0%
Image 3


2
100.00%
I don't care


0
0%
Voters: 2. You may not vote on this poll
98 CBR F3 Project Bike (SSSA, Car Rim, R1 Tail, F4i front)


Anytime, if it servers even as the slightest inspiration as to what ANYONE can do, i'm happy. I went into this build with 0 experience on bikes, fabricating or whatnot. still lots to do before it's 100% and i can finally just leave it alone!


Junior Member
Joined: Dec 2013
Posts: 7
Likes: 0
i hope i can say the same.. i built a hurricane almost 20 years ago. i biught a f3 Streetfighter.. just got the carbs back from a friend rebuilding and need to spend some time getting it running again. it had been sitting for a long time when I got it. i already snagged a sssa wheel brake shockand all... i hope it comes out ok.. Pretty nervous about getting the sssa on there right.. i read and have all sorts of info on it.. its the fabbing sruff that worries me.. and i need to chop my subframe and start over.. its definitely in need of work from previous owner.
yeah, I've been battling other projects for time. Trying to finish my basement, have an original pac-man arcade cabinet waiting to be restored... got kids, wife, bad weather, freelance... generally... no time... and when i do have time, it's too frikken cold!
On the chopping block right now is a general clean up of the fairings, some new vinyl, and making a new eyelid for the headlight. Gonna make it out of fabric soaked in fiberglass resin. just easier to work with, less fraying.
After that, im putting in some LED strip lighting for DRL. Not sure if im going to mount them in the headlight, or on top of it.
Then, the big job. side covers for the exposed part of the bike. gonna make it first from cardboard soaked with resin, then use that as a mold. the end goal is by end of summer, the bike is done.
I may end up getting a proper paint job next year. gives me time to repair the cover ups.
Just take your time. A couple guys here have done SSSA conversions. There are a couple ways to attack it. You can fab something to use the current F3 shock mount, you can make some adapter that uses the mounting points on the sssa's shock mount, Valkie did that.
Save chopping your frame for last.
I would however bore out your frame to fit the stock swingarm bolt. I know some people have made sleeves so they could re-use the F3 swingarm bolt inside the sssa, since the VFR bolt was thicker than the F3's. But if you don't ever plan on going back to the old swingarm, do the job, it will make things a lot easier in the end.
Ping me if you want to bounce ideas around
On the chopping block right now is a general clean up of the fairings, some new vinyl, and making a new eyelid for the headlight. Gonna make it out of fabric soaked in fiberglass resin. just easier to work with, less fraying.
After that, im putting in some LED strip lighting for DRL. Not sure if im going to mount them in the headlight, or on top of it.
Then, the big job. side covers for the exposed part of the bike. gonna make it first from cardboard soaked with resin, then use that as a mold. the end goal is by end of summer, the bike is done.
I may end up getting a proper paint job next year. gives me time to repair the cover ups.
Originally Posted by Vicwakesurf
Pretty nervous about getting the sssa on there right.. i read and have all sorts of info on it.. its the fabbing sruff that worries me.. and i need to chop my subframe and start over.. its definitely in need of work from previous owner.
Save chopping your frame for last.
I would however bore out your frame to fit the stock swingarm bolt. I know some people have made sleeves so they could re-use the F3 swingarm bolt inside the sssa, since the VFR bolt was thicker than the F3's. But if you don't ever plan on going back to the old swingarm, do the job, it will make things a lot easier in the end.
Ping me if you want to bounce ideas around

They have a lot of awesome stuff. These must be new, because if they had them when i was looking i probably would has used them instead..seems a little more versatile as far as sizing (the led strips can only be cut certain ways in order to still be able to work)
i mounted mine on the lower v fairing behind the front wheel. enough sticks out at the top so oncoming traffic can see, but, they have to be looking..so its not a very practical..but hey, it looks cool! lol
Nice.
I am thinking on these from Custom Dynamics.
Maximum TruFLEX� Daytime Driving Lights
Flexible LED Lighting TruFlex Flexible LED Light Strips
run two of those on either side of the headlight. Not sure, still playing around with baking the headlight and putting something on the inside.
I am thinking on these from Custom Dynamics.
Maximum TruFLEX� Daytime Driving Lights
Flexible LED Lighting TruFlex Flexible LED Light Strips
run two of those on either side of the headlight. Not sure, still playing around with baking the headlight and putting something on the inside.
It's been a while since I last updated this thread. Things have been really slow. Just too many projects.
Right now my goal is to get the bike up, running and on the road.
The first project was cleaning up the nest of wire that was coming up front. I was using yellow electrical tape and crap, awful.

I stripped the main harness back as far as i could, un-wound many of the tangled mess and straightened it up.
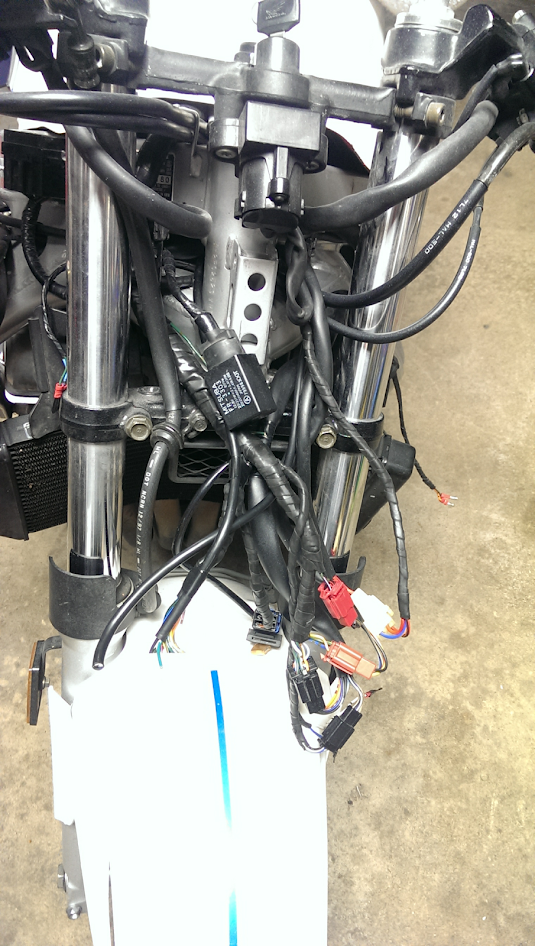
I added in a new set of dedicated 12v wires for accessories. I used a PC power cable, it had a good amount of shielding and at least 16 gauge wiring. I also added the same for grounding wires. I had made a large header connector for the gauge pod, I added two 12v dedicated wires into this, one for the always on clock, the other that will go to a relay.
I also fed a couple wires through the frame, wrapped in high temperature tape.
Second thing, I wanted to add a new windscreen. I liked the double bubble, but i wanted a more sleek line. I picked up a used OEM, and added in some "fun". Some may call it a bit on the ricer side, but, i like it, will be nice at night.

I used 5 6k mcd blue LED's to illuminate the inside of the windscreen.


On the outside of it, I will do what I did before, but this time with white plasti-dip. Kinda got onto the craze I suppose. I had done the last windscreen in vinyl, but wanted to see if this worked as well.
So far i am doing tests on my old screen, to see how the results are.
On the plastidip note, i wanted to have more fun with it, so i did my gauge cover too. It peels off, so im not worried about ruining anything.
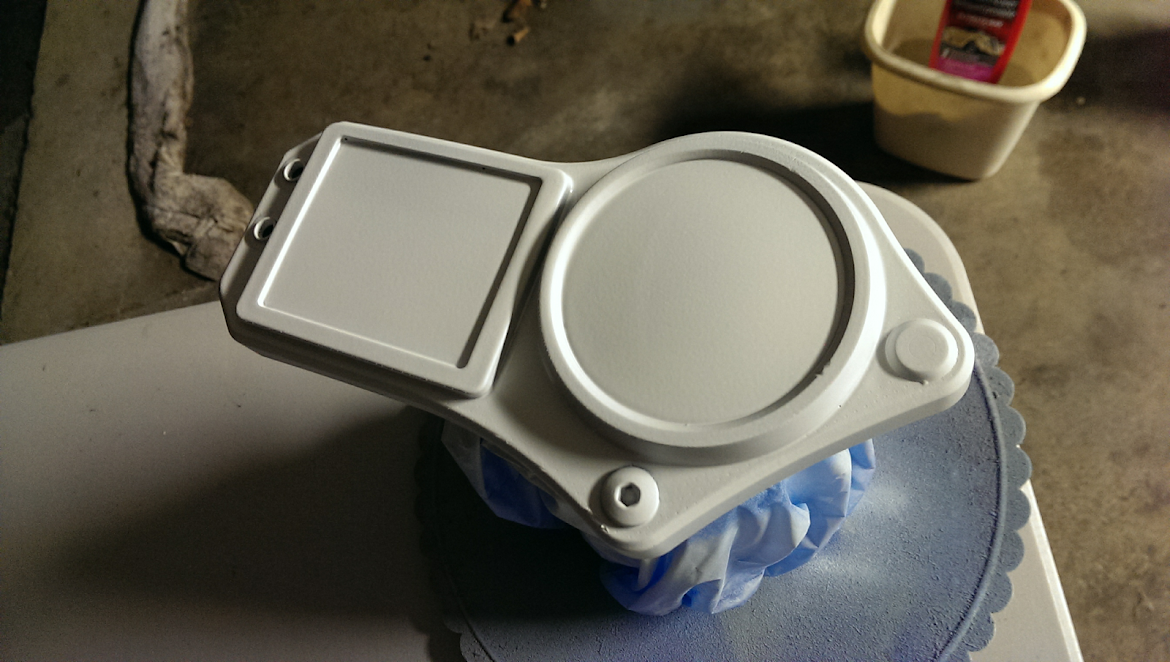
This will be mounted on my newly finished stay bar.

I stripped the paint i had on before, which was a gold, then coated it in an aluminium silver enamel, then the blue metallic finish.
Lastly, I wanted to re-due the eyelid i had on the headlight. I initially was going to make this out of t-shirt material using fiberglass resin. It's easy to work with stretches really well. But upon exploring plastidip, I am going to try that first, as it's simple, and easily removable.
This is what I hope to achieve.

I have to play around with positioning so i don't cut off too much light. I don't drive at night anyhow, so i'm not absolutely concerned about it. But my headlight housing is also chrome, and I will continue a strip of chrome vinyl out the side of the bike to make it look like one complete piece.
I have a couple 6" DRL LED strips on order, those will run during the day and at night, the dual HID's will only be for night. The DRL's will run off the same lead that powers the gauge illumination, so it will only work with a key inserted. I have to do tests to see what kind of amperage draw the LEDs will cause, and weather or not i need a relay.
Anyhow, I hope to have more updated this weekend.
Right now my goal is to get the bike up, running and on the road.
The first project was cleaning up the nest of wire that was coming up front. I was using yellow electrical tape and crap, awful.
I stripped the main harness back as far as i could, un-wound many of the tangled mess and straightened it up.
I added in a new set of dedicated 12v wires for accessories. I used a PC power cable, it had a good amount of shielding and at least 16 gauge wiring. I also added the same for grounding wires. I had made a large header connector for the gauge pod, I added two 12v dedicated wires into this, one for the always on clock, the other that will go to a relay.
I also fed a couple wires through the frame, wrapped in high temperature tape.
Second thing, I wanted to add a new windscreen. I liked the double bubble, but i wanted a more sleek line. I picked up a used OEM, and added in some "fun". Some may call it a bit on the ricer side, but, i like it, will be nice at night.
I used 5 6k mcd blue LED's to illuminate the inside of the windscreen.
On the outside of it, I will do what I did before, but this time with white plasti-dip. Kinda got onto the craze I suppose. I had done the last windscreen in vinyl, but wanted to see if this worked as well.
So far i am doing tests on my old screen, to see how the results are.
On the plastidip note, i wanted to have more fun with it, so i did my gauge cover too. It peels off, so im not worried about ruining anything.
This will be mounted on my newly finished stay bar.
I stripped the paint i had on before, which was a gold, then coated it in an aluminium silver enamel, then the blue metallic finish.
Lastly, I wanted to re-due the eyelid i had on the headlight. I initially was going to make this out of t-shirt material using fiberglass resin. It's easy to work with stretches really well. But upon exploring plastidip, I am going to try that first, as it's simple, and easily removable.
This is what I hope to achieve.
I have to play around with positioning so i don't cut off too much light. I don't drive at night anyhow, so i'm not absolutely concerned about it. But my headlight housing is also chrome, and I will continue a strip of chrome vinyl out the side of the bike to make it look like one complete piece.
I have a couple 6" DRL LED strips on order, those will run during the day and at night, the dual HID's will only be for night. The DRL's will run off the same lead that powers the gauge illumination, so it will only work with a key inserted. I have to do tests to see what kind of amperage draw the LEDs will cause, and weather or not i need a relay.
Anyhow, I hope to have more updated this weekend.
well, the plasti-dip did not go so well.
Firstly, if your going to use the product, know that it needs to have a super clean surface. Secondly, don't use rubbing alcohol on your headlights if they're plastic <- Mine developed severe "crazing" on the surface, to the point where chunks of plastic came off.


Secondly, plastidip is not 100% Opaque, even with multiple coats. The HID's shown through it with remarkable ease. 5x coats with black, 1x coat in white.

So, that's a 250$ replacement for the headlight, my windscreen turned out pretty well, but didn't get photos.
On top of that, one of my mirrors the LED stopped working, so i had to replace that. What a pain.
Firstly, if your going to use the product, know that it needs to have a super clean surface. Secondly, don't use rubbing alcohol on your headlights if they're plastic <- Mine developed severe "crazing" on the surface, to the point where chunks of plastic came off.
Secondly, plastidip is not 100% Opaque, even with multiple coats. The HID's shown through it with remarkable ease. 5x coats with black, 1x coat in white.
So, that's a 250$ replacement for the headlight, my windscreen turned out pretty well, but didn't get photos.
On top of that, one of my mirrors the LED stopped working, so i had to replace that. What a pain.
Last edited by nvanvlymen; May 20, 2014 at 02:34 PM.

Welcome Crew and ROTY 2014
Joined: Dec 2010
Posts: 2,059
Likes: 6
From: Kansas
It's interesting - if you are able to pull this off, the "slimming of the headlights makes it slightly resemble an RSV-4 front end!