
1987 Hurricane to 2003 CBR600RR Conversion

Thread Starter
|
Senior Member
Joined: Dec 2012
Posts: 873
Likes: 8
Progress looks great! This is turning into such a special build you might want to consider starting your own thread. Not that I have a problem with you posting on this one, but it might be good to have your build archived.

Senior Member
Joined: Apr 2014
Posts: 257
Likes: 1
From: Bainbridge Is., WA
Yeah, that may make the most sense. I have some before pics and some other progress shots from last year that may or may not be of use to others. I will be looking into setting up a second blog on my own site to house info on the project's progress. If that comes together I'll post a link.
This is a weekend of setback. I decided the POR15 has got to go. I botched the job too much after all the rest of the work I've put in so far, so I am scrub, scrub, scrubbing the frame with a gallon of acetone, a 3M paint stripping pad and heavy latex gloves. Hopefully the last of the stuff will soda blast out of the crannies and I will attempt to shoot with something else. Leaning towards VHT frame paint. I know, I know, "powder coat, you fool!" But my whole raison d'etre is DIY and thus I am trying to complete the bike without going to a pro for any part of the project if at all possible.
I did score another point in the plus column, acquiring a fox twin clicker shock this week. I didn't get the screaming deal you got for yours, but I didn't pay crazy money either.
Last edited by Doc B.; May 13, 2014 at 01:52 PM.
Thread Starter
|
Senior Member
Joined: Dec 2012
Posts: 873
Likes: 8
I'm not a big fan of powder coating because it's difficult to repair and keep nice. Also requires a ton of prep and masking if you want to get the bolts back in. Frame paint will work if you put a 2 Pak clear over it. They sell rattle can 2 Pak and it has really good fan spray nozzles. A little spendy but worth it. I've used it with good results.
Yeah a Fox clicker...hard to find so worth extra if you found one.
Yeah a Fox clicker...hard to find so worth extra if you found one.
Senior Member
Joined: Apr 2014
Posts: 257
Likes: 1
From: Bainbridge Is., WA
Been working a lot on the bike but not spending much time documenting the process, though I have been grabbing some photos here and there. The VHT satin roll bar paint came out really nice, and so far seems pretty durable.
Wanted to say thanks for the tip Dennis. Tonite I just shot my first rattle can 2K clearcoat and man, it's everything they say it is - easy to shoot and looks great. Here's the rear wheel. Wanted the tires on the rims in advance so I wouldn't screw up my paint job. I put new ones on last week, myself. BT-45s, 110/80-17 front, 150/70-17 rear. That was quite a workout.
Wheel prep was a light soda blast followed by a bit of sanding, then a lot of scotchbrite and lacquer thinner scrubbing before mounting the tires. A wiping down with lacquer thinner before paint was the final prep. Then a coat of adhesion promoter, three coats of Krylon X-metal "metalizer" (silver undercoat) and three coats Krylon X metal red topcoat. Despite of the fancy "anodize look" description of all of these paints they are simply good old candy coat. That sat for several days, though I did do a little touch up on some thin spots with the red last night.
Tonight the temp and humidity were perfect so I hurried home from the office and went right to work spraying the clear. I used the fast cure stuff shot in two coats, and it does seem pretty dry after an hour and a half. I should mention that the orange peel look on the spoke and hub is actually the texture of the casting. The paint laid on really smooth.
One can of 2K was just enough for two wheels, and total cost for all the paint was about $60.
Last edited by Doc B.; Jun 3, 2014 at 11:27 PM.
Senior Member
Joined: Apr 2014
Posts: 257
Likes: 1
From: Bainbridge Is., WA
Thanks! I do have a shot of the clutch cover I refinished. The original cover had crankcase and timing port plugs that had been torqued down with no o-rings and had completely welded to the cover and subsequently had the hex sockets stripped. So I bought a new cover off the bay and new plugs and o-rings from Cheap Cycle Parts.
Same kind of prep, soda blast and lots of scrubbing with scotchbrite and lacquer thinner. Paint is VHT nu-cast iron engine enamel baked at 200 for 30 minutes, and more of the candy coat on the small bits. I learned the hard way that the cool red anodized oil filler caps for later models don't fit the Hurricane. So I used the silver base coat on the stock black plastic oil filler cap before shooting the red, and the last wee bit of 2K clear left from the wheels. the new plugs have clear red shot right over the aluminum. Logo was revealed by taping off the paint and sanding it with 100 grit wrapped around a stick.

I also attempted a fork air equalizer on the newly refurbed forks, which I posted in the mods category:
https://cbrforum.com/forum/600-modif...alizer-152108/
Same kind of prep, soda blast and lots of scrubbing with scotchbrite and lacquer thinner. Paint is VHT nu-cast iron engine enamel baked at 200 for 30 minutes, and more of the candy coat on the small bits. I learned the hard way that the cool red anodized oil filler caps for later models don't fit the Hurricane. So I used the silver base coat on the stock black plastic oil filler cap before shooting the red, and the last wee bit of 2K clear left from the wheels. the new plugs have clear red shot right over the aluminum. Logo was revealed by taping off the paint and sanding it with 100 grit wrapped around a stick.
I also attempted a fork air equalizer on the newly refurbed forks, which I posted in the mods category:
https://cbrforum.com/forum/600-modif...alizer-152108/
Last edited by Doc B.; Jun 4, 2014 at 10:52 AM.
Thread Starter
|
Senior Member
Joined: Dec 2012
Posts: 873
Likes: 8
That cover looks great! I'm doing something similar to mine only the covers will be black with the fins and logos highlighted by sanding...what brand and color of paint did you use for the cover?
Senior Member
Joined: Apr 2014
Posts: 257
Likes: 1
From: Bainbridge Is., WA
I wanted the cover to look a little different than the aluminum colored parts on the bike so I decided to use VHT nucast iron engine enamel. It seems pretty durable as I stupidly splashed some lacquer thinner on it last night and it just slightly dulled the satin sheen where it landed, one of those things that no one will notice but me.
At this point the engine is back in the frame and the forks and swingarm are on. I'm hung up for a bit waiting for some rotors. When those show up I can get the wheels on and free the frame from the straps it's been hanging from. I'll try to remember to get a progress pic at that point.
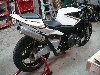
Fairings are pretty much fitted and most of the brackets for them have been fabbed. I am only half way through the vinyl wrap of them, which has turned out to be the really tedious part of the project. The tight compound curves of the small parts are really a challenge to get the vinyl to fit over without puckering. I keep messing it up and I'm now ordering my third batch of vinyl. I thought vinyl wrap was supposed to be an easy way to make something look good, but I will just take the easy way out and shoot paint next time. Another rather involved step left to do is fabbing up a bracket that will mount to where the front fairing bracket attaches and support the oil cooler and an electronic steering damper from a Suzuki.
Bit by bit.
At this point the engine is back in the frame and the forks and swingarm are on. I'm hung up for a bit waiting for some rotors. When those show up I can get the wheels on and free the frame from the straps it's been hanging from. I'll try to remember to get a progress pic at that point.
Fairings are pretty much fitted and most of the brackets for them have been fabbed. I am only half way through the vinyl wrap of them, which has turned out to be the really tedious part of the project. The tight compound curves of the small parts are really a challenge to get the vinyl to fit over without puckering. I keep messing it up and I'm now ordering my third batch of vinyl. I thought vinyl wrap was supposed to be an easy way to make something look good, but I will just take the easy way out and shoot paint next time. Another rather involved step left to do is fabbing up a bracket that will mount to where the front fairing bracket attaches and support the oil cooler and an electronic steering damper from a Suzuki.
Bit by bit.
Senior Member
Joined: Apr 2014
Posts: 257
Likes: 1
From: Bainbridge Is., WA
The case paint seems pretty tough and I like the satin finish, so I think I will leave it as is for now. The silver wheel paint I used on the swingarm and hugger is not holding up well. It is a somewhere between a satin and matte finish too, and I have soda blasted the rearsets and passenger peg brackets to a matte look to match. I think I'm going to try the Eastwood matte 2K clear over all of those parts.