
1987 Hurricane to 2003 CBR600RR Conversion


Senior Member
Joined: Apr 2014
Posts: 257
Likes: 1
From: Bainbridge Is., WA
My apologies guys. For a guy who claims to be a forum admin my posting skills seem pretty lame. Let me know if my third attempt made the images show in my original post.
I took what may be a less well thought out route than you have with the hugger. The existing holes were filled in with plastic weld and drilled new holes lined up with the four existing mounting brackets on top of the swingarm, with 3/8" spacers in the gaps between the hugger and the brackets on the chain side. M6 x 20mm button head screws mount the chain side and M6 x 12mm mount the brake side. If I have figured out how to get my image links to work I will post pics later.
I took what may be a less well thought out route than you have with the hugger. The existing holes were filled in with plastic weld and drilled new holes lined up with the four existing mounting brackets on top of the swingarm, with 3/8" spacers in the gaps between the hugger and the brackets on the chain side. M6 x 20mm button head screws mount the chain side and M6 x 12mm mount the brake side. If I have figured out how to get my image links to work I will post pics later.
Thread Starter
|
Senior Member
Joined: Dec 2012
Posts: 873
Likes: 8
I can see the pics. Looks like a very good job. The fits look very good. No easy task. Interesting way you cut the lower around the engine. That was a trouble spot.
One thing you might consider if you plan on painting the tank is to fill the recess area where the Hurricane seat goes. I did that on mine. I haven't posted pictures of that, but it looks much better because the tank flows into the seat.
What's that crazy pipe in the second picture?
One thing you might consider if you plan on painting the tank is to fill the recess area where the Hurricane seat goes. I did that on mine. I haven't posted pictures of that, but it looks much better because the tank flows into the seat.
What's that crazy pipe in the second picture?
Senior Member
Joined: Apr 2014
Posts: 257
Likes: 1
From: Bainbridge Is., WA
Thanks for the kind words on the fairing. I used a rotary tool with a flex shaft and sanding drums. You can trim a little or a lot off with good control.
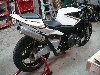
I hear you about the tank. I suspect your skill level at achieving a really close look to an RR exceeds mine by quite a bit. My lazy approach will be to add a half bra to cover the recess. Here is a pic of the tank freshly vinyl wrapped.

That gas cap was a test fit to see if I could update to a later bolt on type. The hole alignment was dicey so for now I will use the stock gas cap.
The pipe is a Danmoto GP extreme for an F4, which was very reasonably priced and seems well made. The Yoshi pipe and the header that were on the bike were both roached.
And here is what I ended up with for the hugger.

I trimmed that tab that hangs down over the swingarm since I was using the original F1 mounting tabs anyway and I thought that tab might interfere with the rubber chain protector that slips over the F1 arm pivot. Finish is Duplicolor silver wheel paint that will eventually get a coat of 2K clear, and more CF look vinyl wrap on the fender portion.
I hear you about the tank. I suspect your skill level at achieving a really close look to an RR exceeds mine by quite a bit. My lazy approach will be to add a half bra to cover the recess. Here is a pic of the tank freshly vinyl wrapped.
That gas cap was a test fit to see if I could update to a later bolt on type. The hole alignment was dicey so for now I will use the stock gas cap.
The pipe is a Danmoto GP extreme for an F4, which was very reasonably priced and seems well made. The Yoshi pipe and the header that were on the bike were both roached.
And here is what I ended up with for the hugger.
I trimmed that tab that hangs down over the swingarm since I was using the original F1 mounting tabs anyway and I thought that tab might interfere with the rubber chain protector that slips over the F1 arm pivot. Finish is Duplicolor silver wheel paint that will eventually get a coat of 2K clear, and more CF look vinyl wrap on the fender portion.
Thread Starter
|
Senior Member
Joined: Dec 2012
Posts: 873
Likes: 8
And here is what I ended up with for the hugger.
I trimmed that tab that hangs down over the swingarm since I was using the original F1 mounting tabs anyway and I thought that tab might interfere with the rubber chain protector that slips over the F1 arm pivot. Finish is Duplicolor silver wheel paint that will eventually get a coat of 2K clear, and more CF look vinyl wrap on the fender portion.
I trimmed that tab that hangs down over the swingarm since I was using the original F1 mounting tabs anyway and I thought that tab might interfere with the rubber chain protector that slips over the F1 arm pivot. Finish is Duplicolor silver wheel paint that will eventually get a coat of 2K clear, and more CF look vinyl wrap on the fender portion.
I like how you did the hugger. I looked at the stainless chain guards too (great minds think alike), but opted for the stock F2 for now.
I'm wondering if you have fitted the tire in there yet. What I found was with the hugger mounted with the plastic lining up at the left axel end, the fender rubbed on the tire. Had to cut mine back more to eliminate that. Likely due to the difference between the F1 and F2 swing arms.
Senior Member
Joined: Apr 2014
Posts: 257
Likes: 1
From: Bainbridge Is., WA
Haven't test fitted the wheel yet, though I should have. Guess I can probably slot the mounting holes, move the thing forward and cover the slots with washers if I set the hugger too far back. Or fill 'em with the plastic welder and go at it again if it's really off. The metal chain guard just happened to be new old stock on ebay and it was cheaper than any of the used plastic ones that were listed. There is what appears to be a real CF one on the bay that I think will fit, but I figured it would just show up my fake CF.
1999 CBR900RR CBR 900RR Chain Guard Gaurd Guide | eBay
If this Pacific Northwet rain will lift for a while I hope to be soda blasting my frame and painting it next.
1999 CBR900RR CBR 900RR Chain Guard Gaurd Guide | eBay
If this Pacific Northwet rain will lift for a while I hope to be soda blasting my frame and painting it next.
Thread Starter
|
Senior Member
Joined: Dec 2012
Posts: 873
Likes: 8
I here you on the frame...I have one of mine out right now and turns out it's junk. Had some bondo below the steering head. Couldn't figure out why and I ground it all out and the stupid PO ground down the welds and filled it...turns out he took all the weld away and there is a hole there...jeez! I will have to use one of the other ones...
You should fit that wheel and tire in there. I cut mine about the same as you the first time...and was surprised when the tire hit.
You should fit that wheel and tire in there. I cut mine about the same as you the first time...and was surprised when the tire hit.
Senior Member
Joined: Apr 2014
Posts: 257
Likes: 1
From: Bainbridge Is., WA
Sounds like he was trying to collect on his life insurance policy. I will take your advice and test fit that wheel tonight. If you hear a smack sound from the west that will be my palm hitting my forehead.
Also, I don't want to hijack your very fine how-to. I looked at several forum threads around before diving into the project and the level of detail you have provided is what convinced me to go for it. I'll be happy to post further progress reports in a new thread if that works best.
Also, I don't want to hijack your very fine how-to. I looked at several forum threads around before diving into the project and the level of detail you have provided is what convinced me to go for it. I'll be happy to post further progress reports in a new thread if that works best.
Thread Starter
|
Senior Member
Joined: Dec 2012
Posts: 873
Likes: 8
No, not a problem, we all love seeing other projects. I want to see it with that carbon fiber tank and the hugger...I think it's going to look awesome. Besides I'm a little stuck right now waiting for better weather so I can finish my paint and start putting mine together...again. Seems like it's taking forever.
Senior Member
Joined: Apr 2014
Posts: 257
Likes: 1
From: Bainbridge Is., WA
I may have lucked out. When I set the back edge of the axle bolt flange at the "new chain" hash mark (made punch marks before blasting off the decal) it looks like I have about 1/8" clearance under the top edge of the fender. This fender has a rub mark under there from previous use, so rubbing was apparently somewhat of an issue on the F2 it came from. The tire is a Metzler ME1 130/80 17 VB. Tires on bike are kind of a bummer - never used, still have the parting seam down the center tread, but at least 10 years old, hard and cracked. Looking at mounting a 150/70V-17 Battlax BT45 on the rear. Supposed to work well on the 3.5" rim and I think it specs to the same circumference. Guess I'll find out if I can get away with this when the new tire goes on.
Senior Member
Joined: Apr 2014
Posts: 257
Likes: 1
From: Bainbridge Is., WA
Trying to keep progressing on this thing. Today was a gorgeous sunny day. Those of you not from the Pacific Northwet may not know that it's tradition here to declare any two sunny days in a row a weekend since the occurrence is so rare. So I stayed home from the office and got going on the frame. Soda blasted, then scrubbed with lacquer thinner and a Scotchbrite pad for paint prep.
I got talked into using POR15 Chassis Black Topcoat, and brushing it on with a foam brush. It gets a lot of good feedback on the web about how tough it is and how it looks like a spray finish, and my coworker just did a crusty old Beemer frame with it. However, the CBR frame has so many nooks, crannies, and tabs that brushing the thick paint on was kind of a nightmare. It took me three hours to get a single coat on, which meant replenishing tiny amounts in my paint cup and changing foam brushes often so the paint wouldn't kick before I applied it. If anyone tries this, it was suggested to me that using POR primer first may have made the topcoat application more easily. I suspect I will need to do a fair amount of sanding to level it out and I may thin the remainder of the paint by 5% and apply the second coat with a detail sprayer.

In the plus column, I got the solo seat cowling vinyl wrapped last night -

I got talked into using POR15 Chassis Black Topcoat, and brushing it on with a foam brush. It gets a lot of good feedback on the web about how tough it is and how it looks like a spray finish, and my coworker just did a crusty old Beemer frame with it. However, the CBR frame has so many nooks, crannies, and tabs that brushing the thick paint on was kind of a nightmare. It took me three hours to get a single coat on, which meant replenishing tiny amounts in my paint cup and changing foam brushes often so the paint wouldn't kick before I applied it. If anyone tries this, it was suggested to me that using POR primer first may have made the topcoat application more easily. I suspect I will need to do a fair amount of sanding to level it out and I may thin the remainder of the paint by 5% and apply the second coat with a detail sprayer.
In the plus column, I got the solo seat cowling vinyl wrapped last night -
Last edited by Doc B.; May 7, 2014 at 09:00 PM.