
1987 Hurricane to 2003 CBR600RR Conversion

Thread Starter
|
Senior Member
Joined: Dec 2012
Posts: 873
Likes: 8
I'm still quite confused as to what your having a problem with. The bulbs and sockets should be part of your RR headlight assembly. I bought mine used and it came with them. If you have the RR sockets then the RR plugs should plug into them. The harness needs to be cut. The wires should be spliced into the Hurricane harness. I think I suggested you get wiring diagrams for both bikes so you can match the color codes for the wires. The only wires you need from the RR harness are the lights...the rest of the wires are not needed.

Ok let me try and reword the situation, I bought my headlamp assesmbly with no bulbs or wires so than I looked for a headlight harness which is the pics I'm showing and than I went to a shop while waiting for the wire to come in I bought the two bulbs now when the wire came in I figured let me try and put the bulbs on the wires yet to my realization they did not fit at all in any of the plugs. On the original plug there's the headlight bulb and the 3 prongs and there's a socket that goes on there to power it< that's where my issue is with the harness and the bulbs my bulbs don't fit in? So either I'm missing sometnin or I got the wrong bulbs or wires, the wire harness in the pics and the two bulbs is all I got am I missing somethin?

Senior Member
Joined: Apr 2014
Posts: 257
Likes: 1
From: Bainbridge Is., WA
Hi Dennis, just want to say thanks for this great thread. I picked up a '90 CBR in rough but running shape last summer and after an abortive attempt to get original plastic from a flaky ebayer I decided to take the RR conversion approach. So far the setup is a stock 90 CBR with 03RR fairings and seat. A few more bits are being added as I figure out what I want to do - 929 front master cylinder, an aftermarket digital speedo/tach, updated mirrors and turn signals, all that stuff that doubles your initial cost estimate.
As you know keeping up the pace on this kind of project is tricky. I did manage to fit the fairings last fall before my garage got too cold to work

A Danmoto exhaust for a CBRF4 was fitted along with a like new old stock header during the winter.

Anyway, great job, and thanks so much for your inspiration.
As you know keeping up the pace on this kind of project is tricky. I did manage to fit the fairings last fall before my garage got too cold to work
A Danmoto exhaust for a CBRF4 was fitted along with a like new old stock header during the winter.
Anyway, great job, and thanks so much for your inspiration.
Last edited by Doc B.; May 4, 2014 at 10:56 AM.

Member
Joined: Mar 2011
Posts: 51
Likes: 0
Hi Dennis, just want to say thanks for this great thread. I picked up a '90 CBR in rough but running shape last summer and after an abortive attempt to get original plastic from a flaky ebayer I decided to take the RR conversion approach. So far the setup is a stock 90 CBR with 03RR fairings and seat. A few more bits are being added as I figure out what I want to do - 929 front master cylinder, an aftermarket digital speedo/tach, updated mirrors and turn signals, all that stuff that doubles your initial cost estimate.
As you know keeping up the pace on this kind of project is tricky. I did manage to fit the fairings last fall before my garage got too cold to work in.

A Danmoto exhaust for a CBRF4 was fitted along with a like new old stock header during the winter.

Anyway, great job, and thanks so much for your inspiration.
As you know keeping up the pace on this kind of project is tricky. I did manage to fit the fairings last fall before my garage got too cold to work in.
A Danmoto exhaust for a CBRF4 was fitted along with a like new old stock header during the winter.
Anyway, great job, and thanks so much for your inspiration.
Senior Member
Joined: Apr 2014
Posts: 257
Likes: 1
From: Bainbridge Is., WA
Duoh! Sorry guys, my image hosting attempt obviously didn't work. Ipads are pretty limited for this kind of stuff so I will get the image links corrected when I get to my workstation at the office. In the meantime, if the mods would be so kind as to grant me permission to edit my posts I will fix the bad links rather than bulking up the thread with another post. If editing permission is post count based just let me know how many times I need to post "good idea, I agree!"

Retired Super Moderator, Tin Star Man & Hurricane Saloon Prospect, ROTM Feb 2015
Joined: Sep 2011
Posts: 2,382
Likes: 5
From: V��ksy, Finland
It`s not, and that is exactly the reason why. Only an Admin can grant full pass so I`m of no help there...
Senior Member
Joined: Apr 2014
Posts: 257
Likes: 1
From: Bainbridge Is., WA
OK, thanks. I've been admin of my own forums for about 15 years and the only thing I know for sure is every forum is set up differently. It's fairly rare to come across a forum that does not allow one to edit their own post. Hopefully the preview function is giving me the true story on my revision of the image links and you can see the images this time. Looks like I also have editing permission now, thank you admin.
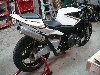
The bike is pretty much in the rough in that first pic, with the fairings fitted. Lots of aluminum bending and drilling underneath the plastic, and lots of trimming with a Dremel sanding drum -
Second shot of the DanMoto F4 exhaust uses a 929 passenger peg bracket. That combo bolts right up with no modification. The seat fairing has a test coat of Plasti Dip on it. The first time I threw my leg over the seat I found out how fragile it is, so the finish plan has been revised to vinyl wrap.
By the way Dennis your idea of using the F2 rear hugger trimmed down is great. I will be appropriating your good idea.
Last edited by Doc B.; Apr 30, 2014 at 07:09 PM.
Thread Starter
|
Senior Member
Joined: Dec 2012
Posts: 873
Likes: 8
Doc,
Still can't see the pics.
The F2 hugger mod takes a bit of mods to the swing arm. There are brackets that I made and one of the original ones is cut off. It's does look good though. When you get to that point I can post more detailed pictures of the mod.
Still can't see the pics.
The F2 hugger mod takes a bit of mods to the swing arm. There are brackets that I made and one of the original ones is cut off. It's does look good though. When you get to that point I can post more detailed pictures of the mod.