
1987 Hurricane to 2003 CBR600RR Conversion


Senior Member
Joined: Apr 2014
Posts: 257
Likes: 1
From: Bainbridge Is., WA
Thanks. Filter is indeed in and the air box is all buttoned up. No leaks at the header. Vacuum leak seems like a possibility since I had to plug several vacuum lines from the missing California emissions stuff. Double checked it, but the manual is a bit sketchy about a couple of the connections. Another possible clue is that when warm the engine tends to race pretty high when the choke is put on a bit. And at least one pop was out the pipe, saw a bit of flame. I'll grab a vacuum line tester and see what I can find. Probably ought to check my diaphragm repair too, to be sure it's holding up. The associated slide seems to work properly, dropping at the same rate as the others when the little port in the throat is blocked and making the same slurping sound as the other slides when returning.
I'm taking a small brain rest from this and have been connecting up some lights. I got a nice little brake flasher circuit from the guy who built my steering damper controller. Works great. However I had forgotten to restore the rear brake switch when I did all the other switches on the front controls. Man was that thing tarnished and filthy! Luckily the switches are pretty well made and can be disassembled, cleaned and lubed, and put back in service. A little fine sandpaper and WD40 and it works like new.
I'm taking a small brain rest from this and have been connecting up some lights. I got a nice little brake flasher circuit from the guy who built my steering damper controller. Works great. However I had forgotten to restore the rear brake switch when I did all the other switches on the front controls. Man was that thing tarnished and filthy! Luckily the switches are pretty well made and can be disassembled, cleaned and lubed, and put back in service. A little fine sandpaper and WD40 and it works like new.
Thread Starter
|
Senior Member
Joined: Dec 2012
Posts: 873
Likes: 8
I understand the brain rest. I am putting together a Yamaha Raptor engine on a machine I bought to get the rear end for my trike project. The PO said the engine was blown. It's a 2004 that I picked up cheap. Plan was to pull it apart and take what I needed and sell the rest on Ebay. I decide to tear the engine down to see what was salvageable. Low and behold it's not blown and all the parts look new. The cross hatching is still on the piston and cylinder. Head is perfect. Has a stage 2 cam, big bore kit. Titanium rod. Clean as a whistle inside.
So the PO had a new clutch in it a very good aftermarket unit. What I figure is he took the drive gears off to put the clutch in because the balance shaft was out of time and hitting the crankshaft. Guy who put the clutch in didn't know what he was doing...so trying to get it all back together and see if it will run. Pretty sure it will fire right up because nothing was wrong except the screwed up timing that I could find.
Now it will just be sold for a profit and will look for another one for my trike project.
I'm taking a break from it because I am now putting together the stuff the PO took off and can't find all the bolts. Was driving me nuts so tomorrow will head to the hardware store and buy some bolts.
Fire in the pipe is unburnt fuel...backfiring. Could be the backpressure in your aftermarket pipe. I don't know much about the pipe you have. You may need to find someone with an O2 sniffer to look at the fuel mixture to figure this out. If you have a different muffler you could put on it you might want to try that just to see what happens.
Senior Member
Joined: Apr 2014
Posts: 257
Likes: 1
From: Bainbridge Is., WA
Take it easy on that back! Sounds like you got a sweet deal.
I've been studying a bit and yeah, it kinda sounds like it could be excess fuel in the pipe after letting off the throttle. Don't have the original pipe, it was a mess. But I did install an optional baffle in the Danmoto for a little extra quiet and I may try to pull it out and see what happens.
I've been studying a bit and yeah, it kinda sounds like it could be excess fuel in the pipe after letting off the throttle. Don't have the original pipe, it was a mess. But I did install an optional baffle in the Danmoto for a little extra quiet and I may try to pull it out and see what happens.
Thread Starter
|
Senior Member
Joined: Dec 2012
Posts: 873
Likes: 8
Yes, I am having surgery on the 22nd of Sept. They gave me a cortisone shot and a nerve drug to get me through until then. I can move some and this ATV was sitting on my trailer and decided to look at it because I was bored just sitting here. I bought it the night before my back went out. Now it's in my driveway so need to get it running so I can move it to my pole barn which is 60 miles away. Had a bunch of things going when back went out. Now am trying to do a bunch of stuff quick because I will be down for a while after the surgery.
Honda's are all at the other place too. That's why not much happening there. Need to move some stuff around so I can prepare for winter, because of being down for most of Oct and part of Nov. Will not be able to do much. I finally got access to where my real shop will be, and it's a heated space, but needs to be fixed up and set up...won't be able to complete that in time to get all the projects in there so sort of bummed. Hopefully can do some prep work in there after a couple of months after the surgery. It will be an awesome space with overhead trolley hoist and my machine shop. Will have room for 3 projects at a time and also have space to bring all my bikes inside. Will have 12' x 12' paint booth, welding area, pretty much everything a guy would need. Was really excited to finally get set up properly and my dang back goes out.
I'm thinking taking the baffle out will make it worse...at least it will tell you what's going on if that happens.
Senior Member
Joined: Apr 2014
Posts: 257
Likes: 1
From: Bainbridge Is., WA
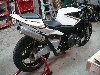
Here's another part of the project I puzzled over for a few months before executing. I was a little too unsure of my welding skills to try the tail raising mod to the subframe, so I needed to try to figure a way to hide the exposed stubs sticking out beneath the RR seat fairing. Figured I could somehow mount the license plate to make use of them. But they would still look crappy from the side. Looking at a picture of an RR yielded and answer. I just repurposed the rear side reflectors, angling them to match the slope of the fairing edge and covering the exposed stubs. The license frame is simply mounted to two vertical pieces of 1" aluminum angle, which are then screwed to the little threaded bosses right at the tip of the subframe ends. There was enough exposed angle to allow drilling them for hanging the turn signals from them too.

The turn signals are kind of cheesy and may get replaced, but I'm pretty happy with the ease and simplicity of the setup.

The turn signals are kind of cheesy and may get replaced, but I'm pretty happy with the ease and simplicity of the setup.
Thread Starter
|
Senior Member
Joined: Dec 2012
Posts: 873
Likes: 8
Interesting. I thought I saw a picture of your subframe and thought that it was welded. What you did looks good. I have a late model Yamaha R6 tail light and license plate assembly. There is a picture of it mounted somewhere in this thread. I also had to swap frames because the first one didn't have a title. The spare frame ended up going to a weld shop because the PO was trying to build a street fighter and ground down some of the exposed welds. Some where almost through the metal so needed to have a professional fix it because my welding is not that good. Guy did a great job and charged me $35.
The second frame is also missing some of the fairing mount points so will be changing them a bit from the original. Most of it will be the same as my how to at the beginning of this thread.
The second frame is also missing some of the fairing mount points so will be changing them a bit from the original. Most of it will be the same as my how to at the beginning of this thread.

 )
)
Senior Member
Joined: Apr 2014
Posts: 257
Likes: 1
From: Bainbridge Is., WA
I hope you realize you are asking for a video of some old fart putt-putting around on a crotch rocket. That ought to be good for a laugh, for sure. Thanks for the vote of confidence though!

Super Moderator
Joined: Mar 2013
Posts: 7,177
Likes: 404
From: Alabama
We need to see the video. It will help the rest of us old farts justify ourselves. :-)
Senior Member
Joined: Apr 2014
Posts: 257
Likes: 1
From: Bainbridge Is., WA
OK, here's another little learned tidbit -
The Hurricane has a two position switch that switches either the lo beam or the hi beam only, since only one or the other is on in the single headlamp at one time.
The RR is designed to have the left hand lo beam on whenever the bike is on, and the right hand hi beam is added with the lo beam by throwing the hi beam switch.
In the Hurricane harness there is a white wire for lo beam, blue for hi beam and green for ground. You will find these at the plug for the stock Hurricane headlamp. I cut off the stock plug and grafted the black/blue of the RR hi beam socket to blue, The Black/white of the RR lo beam socket (plus an extra wire for the hot to the running lamp) to the white wire, and both blacks (plus an extra for the running lamp) to the green ground wire.
If you just put in some lamps you will see only the lo beam on the lo setting of the switch, and only the hi beam on the hi setting, with the lo beam shutting off.
The switch itself is fed 12V from a blue/white wire, which can be found next to the blue wire and the white wire in the harness coming out of the headlamp switch. I simply cut the white wire near the connector at the far end of the harness attached to the headlamp switch. Then I stripped a little insulation off the blue/white wire and soldered the end of the white wire that goes into the harness connector (and on to the headlamp) to the bared blue/white wire. A bit of electrician's tape weatherproofs the connection.
Now the lo beam is always on whenever the key is switched on, and the high beam functions as normal, coming off and on with the hi beam switch.