F4i cosmetic/performance bike makeover (a diary)...(PICS)
#11
 09-06-2007, 11:23 PM


Join Date: Jun 2007
Location: Chicago, IL (downtown)
Posts: 2,360
Likes: 0
Received 0 Likes
on
0 Posts
#12
09-06-2007, 11:46 PM
Join Date: Jun 2007
Location: Chicago, IL (downtown)
Posts: 2,360
Likes: 0
Received 0 Likes
on
0 Posts
Blacked out OEM Windshield AND Sticker RemovalAND Carbon Fiber Bar Ends
Ranking of project 1-10 (10 being worst):
Cost:1 -free to remove stickers, and $5 for paint
Difficulty:1 -c'mon
Functionality:-10 -does nothing, windshield may worsenfunctionality
Visuals:1 -this is just my opinion though
Time:5 -believe it or not, this takes time
Overall:1 - ...so easy, and makes such a huge difference IMO....
I am not going to do a project ranking for the bar ends, simply buy them ($15-50), unscrew the old ones, put the new ones in...some are better for vibration some are not, just test em out and go with it....(you can notice them in some of the pics)
so i am doing these together because it isn't really a writeup so much as an idea for people....first the stickers...
i personally think honda put WAY too many stickers on the f4i....it's amazing, if you stand back and just look at the paint job, it's pretty powerful on it's own...(granted i am repainting soon, but it will be a spin off of the stock scheme)....
the only real thing to know about doing this are a few simple suggestions
1) use a blow dryer to heat up the stickers....they are sort of vinylish so they will stretch as you peel them off, but they will come off A LOT easier....don't even think about reusing them....not unless you have the patience of a saint to not pull hard (not me)....
2) after removing them, the "backing" willl still be on the bike...it will be the black tacky stuff from the sticker....remember this....GOO-GONE IS YOUR FRIEND...buy a big bottle, i found it in a spray bottle like windex, almost 1/4 of the way through it now...(great for grease and other things too)....spray it on the goo spots from the stickers and let is sit for a bit....then start rubbing with something non-abrasive...a shammy or auto rag....just repeat until its all gone...just don't let it dry, and after you do it, clean up the area with a cleaner and polish so the goo-gone doesn't sit (i think eventually it will damage but it will take awhile)
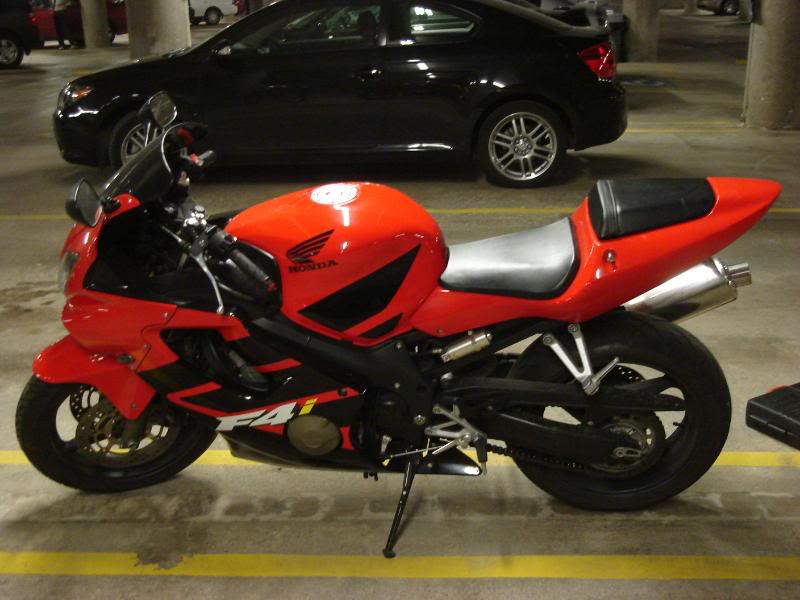
that's it....results...very different...compare these pics with my bike before picture...notice the rear cbr and honda sticker is gone as is the front cbr sticker on the front fairing...looks a lot cleaner IMO

other side, i also took off the stickers on the chainguard and the frame...cleans it up i think too....(sorry for the dirty pics, i was riding in the rain then working on the bike, felt no need to shine her up yet)
-----------------------------------------
The blacked out windshield....
i was too cheap to buy a smoked windshield (for now)...and i wanted to spend that $70 on something else more important, so my buddy turned me on to this idea...essentially just get some black plastic bonding paint....spary the inside of the windshield and VIOLA....blacked out windshield...
1) take off the windshield, be careful to not lose the washers for the screws...you'll see what i am talking about...just don't rush...
2) clean up the windshield good....grab your Goo-gone....then windex it.....maker sure there is nothing on the inside...make sure
Ranking of project 1-10 (10 being worst):
Cost:1 -free to remove stickers, and $5 for paint
Difficulty:1 -c'mon
Functionality:-10 -does nothing, windshield may worsenfunctionality
Visuals:1 -this is just my opinion though
Time:5 -believe it or not, this takes time
Overall:1 - ...so easy, and makes such a huge difference IMO....
I am not going to do a project ranking for the bar ends, simply buy them ($15-50), unscrew the old ones, put the new ones in...some are better for vibration some are not, just test em out and go with it....(you can notice them in some of the pics)
so i am doing these together because it isn't really a writeup so much as an idea for people....first the stickers...
i personally think honda put WAY too many stickers on the f4i....it's amazing, if you stand back and just look at the paint job, it's pretty powerful on it's own...(granted i am repainting soon, but it will be a spin off of the stock scheme)....
the only real thing to know about doing this are a few simple suggestions
1) use a blow dryer to heat up the stickers....they are sort of vinylish so they will stretch as you peel them off, but they will come off A LOT easier....don't even think about reusing them....not unless you have the patience of a saint to not pull hard (not me)....
2) after removing them, the "backing" willl still be on the bike...it will be the black tacky stuff from the sticker....remember this....GOO-GONE IS YOUR FRIEND...buy a big bottle, i found it in a spray bottle like windex, almost 1/4 of the way through it now...(great for grease and other things too)....spray it on the goo spots from the stickers and let is sit for a bit....then start rubbing with something non-abrasive...a shammy or auto rag....just repeat until its all gone...just don't let it dry, and after you do it, clean up the area with a cleaner and polish so the goo-gone doesn't sit (i think eventually it will damage but it will take awhile)
that's it....results...very different...compare these pics with my bike before picture...notice the rear cbr and honda sticker is gone as is the front cbr sticker on the front fairing...looks a lot cleaner IMO
other side, i also took off the stickers on the chainguard and the frame...cleans it up i think too....(sorry for the dirty pics, i was riding in the rain then working on the bike, felt no need to shine her up yet)
-----------------------------------------
The blacked out windshield....
i was too cheap to buy a smoked windshield (for now)...and i wanted to spend that $70 on something else more important, so my buddy turned me on to this idea...essentially just get some black plastic bonding paint....spary the inside of the windshield and VIOLA....blacked out windshield...
1) take off the windshield, be careful to not lose the washers for the screws...you'll see what i am talking about...just don't rush...
2) clean up the windshield good....grab your Goo-gone....then windex it.....maker sure there is nothing on the inside...make sure
#13
09-07-2007, 12:08 AM
Join Date: Jun 2007
Location: Chicago, IL (downtown)
Posts: 2,360
Likes: 0
Received 0 Likes
on
0 Posts
Painted Upper Vent Covers
Ranking of project 1-10 (10 being worst):
Cost:2 -can of black paint
Difficulty:2 -have to remove the vent covers
Functionality:10 -does nothing
Visuals:3 -think it makes a big difference
Time:3 -time to let the paint dry
Overall:3 - ...simple visual mod, once again, sort of just 'pops'....
i should have included this is the last pseudo mod post...but ehhh....that post was getting long....
basically, i was thinking about doing this mod, but was on the fence...it just so happened that while i was thinking about it, someone posted about how they wanted to try it and got a lot of good responses...so i thought 'what the hell'....the only problem with this is once you do it, you can't really 'go back' because to remove the paint would damage the plastic covers...so if you are going to do it, you are going to live with it...be forewarned.....that said....i love this mod....it's so stupid, but it is a great little trick to make your bike pop...
i used black although any color is fine....matte or gloss, or whatever will work....it's nice because it covers that faded look the plastic gets after getting old...before you start telling me that they have the black restore stuff...i know...but that is once again temporary...plus with paint, you can change colors, finishes, etc...if you just want to get the black back, then get the black renew stuff, if you want to do a custom job...read on....
it's real easy....just take off the upper vent covers...for those who don't know what those are...they are the black pieces of plastic to the left and right of the tank between the tank and the windshield....look and you'll know what i am talking about...essentially, they cover the intake ducts from the front of the bike to the airbox.....
once they are off, paint, let dry, reinstall....hard...i know
my only suggestions....prime it....because that area is a 'high traffic' area in that you will be touching it a lot or rubbing on it, it will flake...so prime it with a good plastic primer and then paint...i didn't do that...i already flaked in an area...it's barely noticeable but i notice it...when i get the bike repainted, i am just going to have them paint them and clear them so i don't really care at this point...
it's nice, if you use gloss, it's easier to keep clean than the texturized surface originally there....and like i said, it just makes the bike pop a bit....
hear you can see each vent cover and the way it shines....it looks nice don't ya think...for a cheap mod...it stands out nicely...
and

i'll get another farther shot during theday sometime and post it....
Ranking of project 1-10 (10 being worst):
Cost:2 -can of black paint
Difficulty:2 -have to remove the vent covers
Functionality:10 -does nothing
Visuals:3 -think it makes a big difference
Time:3 -time to let the paint dry
Overall:3 - ...simple visual mod, once again, sort of just 'pops'....
i should have included this is the last pseudo mod post...but ehhh....that post was getting long....
basically, i was thinking about doing this mod, but was on the fence...it just so happened that while i was thinking about it, someone posted about how they wanted to try it and got a lot of good responses...so i thought 'what the hell'....the only problem with this is once you do it, you can't really 'go back' because to remove the paint would damage the plastic covers...so if you are going to do it, you are going to live with it...be forewarned.....that said....i love this mod....it's so stupid, but it is a great little trick to make your bike pop...
i used black although any color is fine....matte or gloss, or whatever will work....it's nice because it covers that faded look the plastic gets after getting old...before you start telling me that they have the black restore stuff...i know...but that is once again temporary...plus with paint, you can change colors, finishes, etc...if you just want to get the black back, then get the black renew stuff, if you want to do a custom job...read on....
it's real easy....just take off the upper vent covers...for those who don't know what those are...they are the black pieces of plastic to the left and right of the tank between the tank and the windshield....look and you'll know what i am talking about...essentially, they cover the intake ducts from the front of the bike to the airbox.....
once they are off, paint, let dry, reinstall....hard...i know
my only suggestions....prime it....because that area is a 'high traffic' area in that you will be touching it a lot or rubbing on it, it will flake...so prime it with a good plastic primer and then paint...i didn't do that...i already flaked in an area...it's barely noticeable but i notice it...when i get the bike repainted, i am just going to have them paint them and clear them so i don't really care at this point...
it's nice, if you use gloss, it's easier to keep clean than the texturized surface originally there....and like i said, it just makes the bike pop a bit....
hear you can see each vent cover and the way it shines....it looks nice don't ya think...for a cheap mod...it stands out nicely...
and
i'll get another farther shot during theday sometime and post it....
#14
09-07-2007, 12:20 AM
Join Date: Jun 2007
Location: Chicago, IL (downtown)
Posts: 2,360
Likes: 0
Received 0 Likes
on
0 Posts
Alright so my next few posts are going to be a part of ONE project...sort of....let me sort of outline it here first...
I got my new Bootleg exhaust, but I am going for a black all over bike and will be attempting to paint or powder or coat anything that is metal colored or not black or red....that being said, i wanted my exhaust midpipe to be black as well as the can (got CF)...i found a place to ceramic coat GLOSS black (i know, cool)....so in doing that....i figure, hell, i have to take off the side fairings to do that, might as well just send in other things to be powdered in one shipment...
me and my bright ideas...so i decided to have my rear pegs, rearsets, rear brake line retaining hooks, stator/clutch cover, new heel guards and new chainguard all done at the same time.....soooooo....yeah....think about what that entails....it's a lot more than you think....
so the next few posts, which i will not start tonight (too late) will detail a little of what it takes to take all that off and some things i noticed....and answer some questions and reservations I had before undertaking all this...specifically, i will talk about...
- putting on a slipon exhaust (crazy easy)
- removing the rear pegs (EASY) - diassembling (daunting, but VERY EASY)
- removing the rearsets (EASY) - disassembling (has some tricks)
- chainguard, heel guards, etc....(too easy, brief run over at best)
- stator and clutch cover (oyyyy......daunting...sort of...then when done...seems easy)
- finally, reassembly, and pictures of the final product...
soooooo, stay tuned...pics to comeand a write up on each thing talked about above...
btw....here was a before pic before i tore her up....

so hear are some after pics from disassembly to send things out for coating and whatnot...
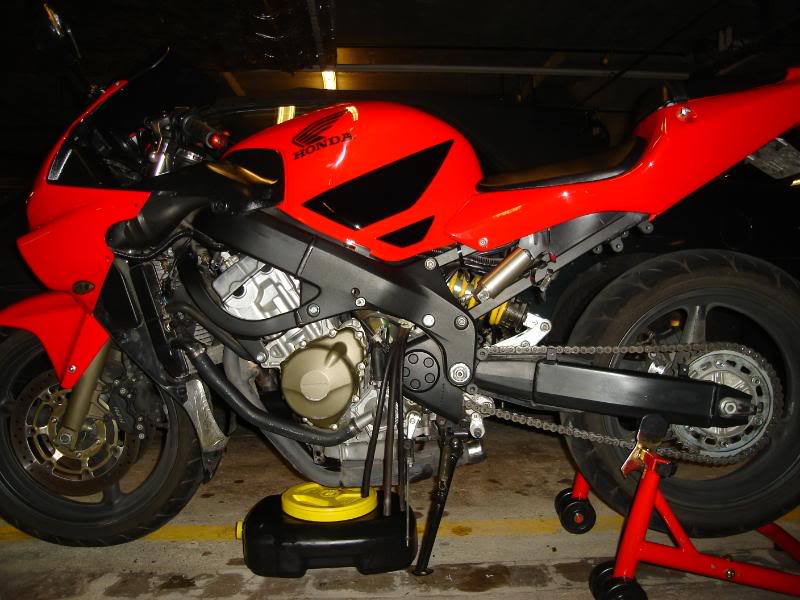
other side...(sorry for the crappy pics, my camera sucks)
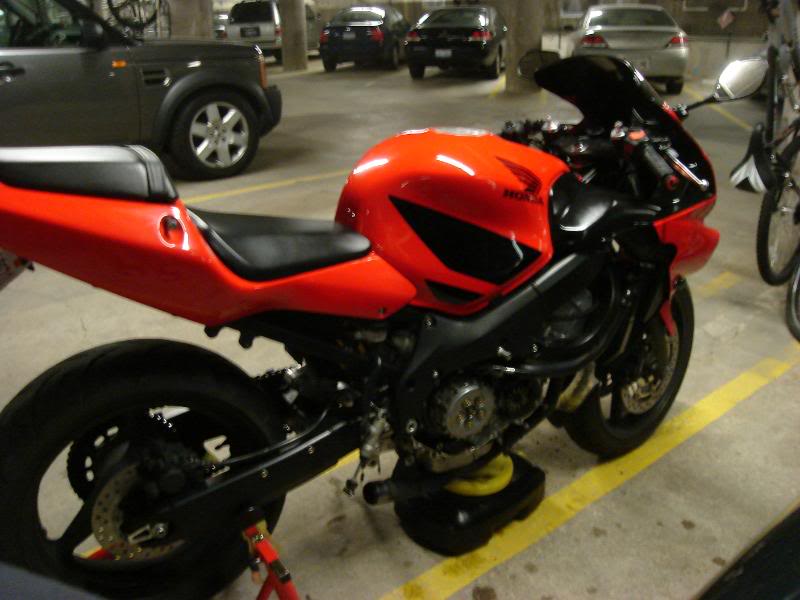
as you can see, no pass. pegs, no rearsets, no muffler....and of course no clutch case cover....(and the wonderful oil bin...lol)
I got my new Bootleg exhaust, but I am going for a black all over bike and will be attempting to paint or powder or coat anything that is metal colored or not black or red....that being said, i wanted my exhaust midpipe to be black as well as the can (got CF)...i found a place to ceramic coat GLOSS black (i know, cool)....so in doing that....i figure, hell, i have to take off the side fairings to do that, might as well just send in other things to be powdered in one shipment...
me and my bright ideas...so i decided to have my rear pegs, rearsets, rear brake line retaining hooks, stator/clutch cover, new heel guards and new chainguard all done at the same time.....soooooo....yeah....think about what that entails....it's a lot more than you think....
so the next few posts, which i will not start tonight (too late) will detail a little of what it takes to take all that off and some things i noticed....and answer some questions and reservations I had before undertaking all this...specifically, i will talk about...
- putting on a slipon exhaust (crazy easy)
- removing the rear pegs (EASY) - diassembling (daunting, but VERY EASY)
- removing the rearsets (EASY) - disassembling (has some tricks)
- chainguard, heel guards, etc....(too easy, brief run over at best)
- stator and clutch cover (oyyyy......daunting...sort of...then when done...seems easy)
- finally, reassembly, and pictures of the final product...
soooooo, stay tuned...pics to comeand a write up on each thing talked about above...
btw....here was a before pic before i tore her up....
so hear are some after pics from disassembly to send things out for coating and whatnot...
other side...(sorry for the crappy pics, my camera sucks)
as you can see, no pass. pegs, no rearsets, no muffler....and of course no clutch case cover....(and the wonderful oil bin...lol)
#15
09-07-2007, 01:50 AM

Bike is looking good so far...can't wait to see the afters with all the black. I've got a bunch of the same mods so far on my '01 Grey/Black(flushmounts w/running mod, Hotbodies undertail, windscreen, bar ends, Bootleg CF Shorty) but you're going crazy on that thing...Thanks for all the ideas!!
#16
09-09-2007, 09:41 PM
Join Date: Jun 2007
Location: Chicago, IL (downtown)
Posts: 2,360
Likes: 0
Received 0 Likes
on
0 Posts
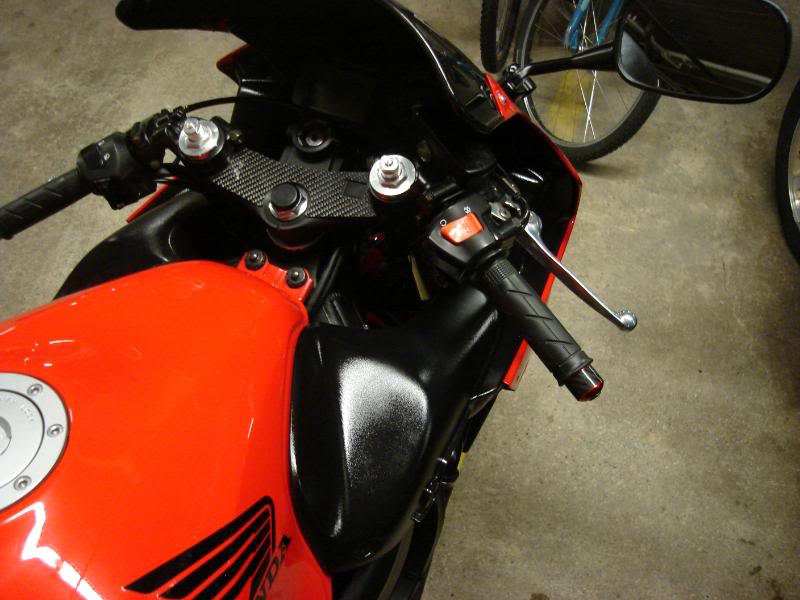
okay so i just updated some pictures if anyone is interested...i updated a picture of the windscreen, a closeup of my bar ends, better pics of the painted upper vent covers, and a few after shots from disassembly....enjoy....update coming soon...
#17
09-09-2007, 10:03 PM
Join Date: Jun 2007
Location: Chicago, IL (downtown)
Posts: 2,360
Likes: 0
Received 0 Likes
on
0 Posts
Passenger Pegs
Alright, i am not going to give a project rating on this stuff well, because i did the whole thing at once and it's a lot to take off....but none of it was hard...pretty much just unscrew things...so rather, i am going to talk about the pass. pegs here and the rearsets in another post....essentially...those things are sort of neat to look at up close so i took some pics...sooo...here we go...
first taking them off is easy...just unscrew the muffler from the right side, and unscrew both from the subframe...SUPER easy....but when you send things out to powder...you either have to disassemble them yourselves or pay the coaters...to have the coaters disassemble my rearsets and pegs, they would have charged $70 to take them apart and $70 to put back...a $140 TOO DO THAT??? yeah...but you have to think it's time they don't want to spend...
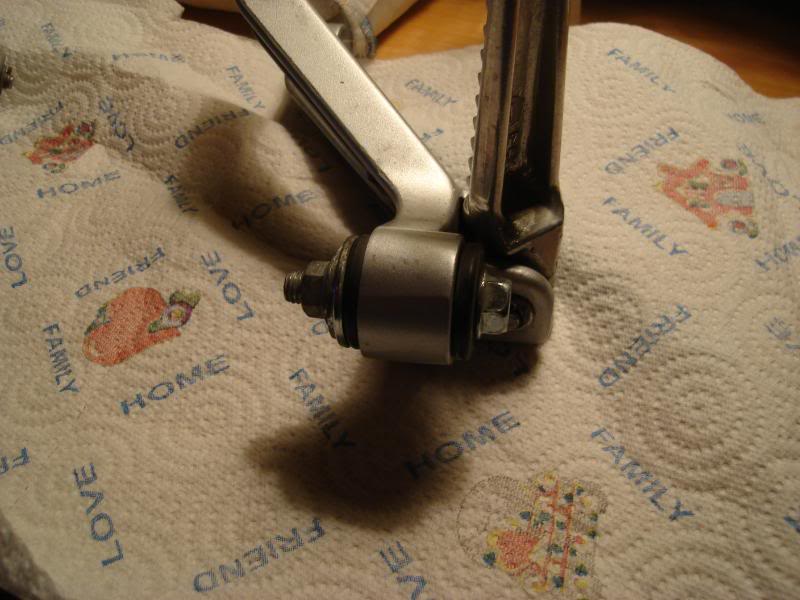
so i thought, crap...this is going to be a pain...turned out it wasn't, but you have to remember how things go and being that i would be taking them apart then waiting a week....i don't trust my memory...haha...so i took pictures....here's the pass. peg...
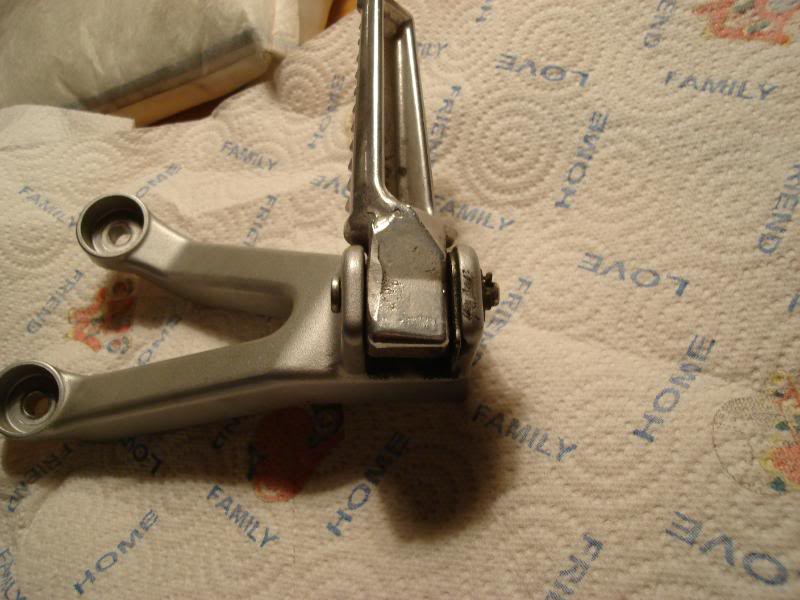
as you can see (hopefully)...the "hinge" is hitch pin (i think that's what they're called)...you just pull out the retaining "wire" (it's just a soft piece of bendable metal) and the pin slips right out...
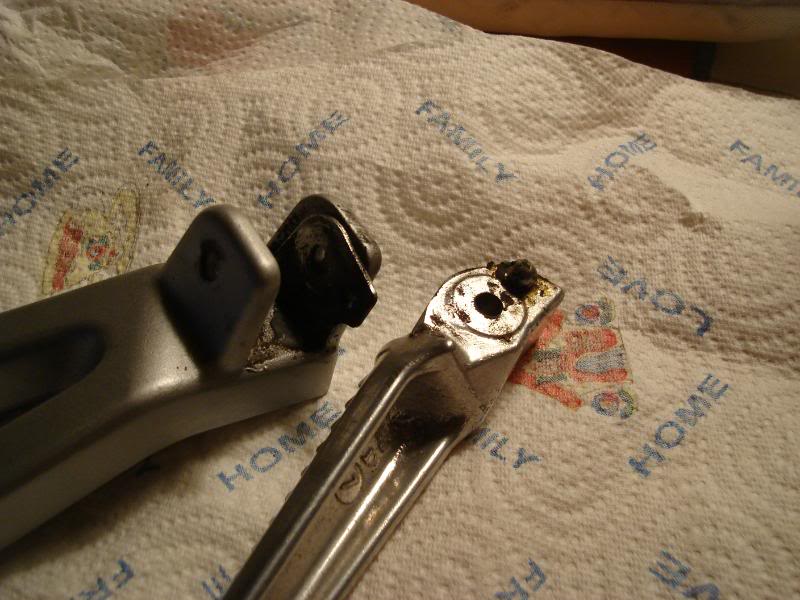
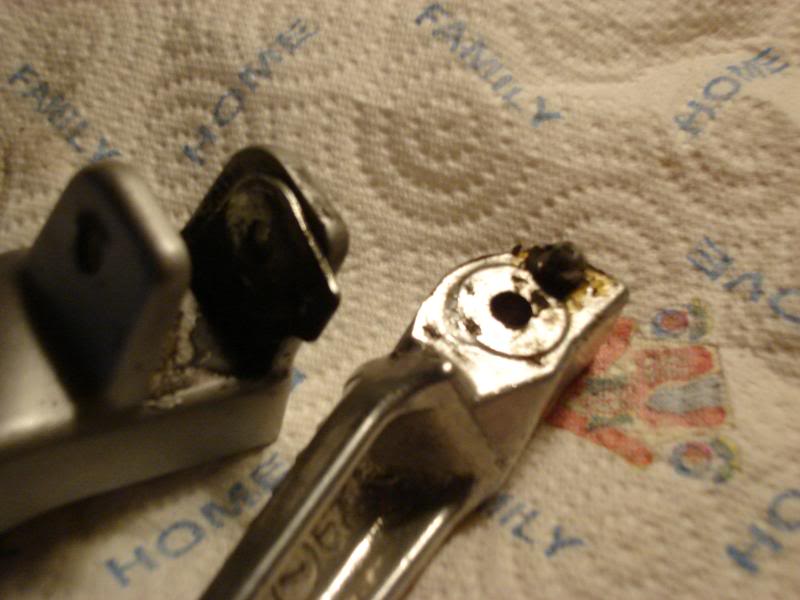
now you can see a plate on the right side...that is nestled between the peg and the holder....i didn't take a clos eup of it...but essentially it has two recesses in it....and a little guide area....looking at the peg...you can see the ball that is used to lock into those recesses...the ball is sitting on top of another hole....in there is a spring so that the ball can compress into the hole....so the way the pegs work is when you move them...the ball is pushed into the hole on the peg....rides along the ridge on the plate until it gets to the other recess in the plate where it springs up a little bit (the click you hear) and it's locked in place....
so to send out for coating...take the plate, the ball, and the spring...put them in a baggie (as i did with everything and marked so i knew which goes with what)....and clean up the pieces....
here's a couple more pics...
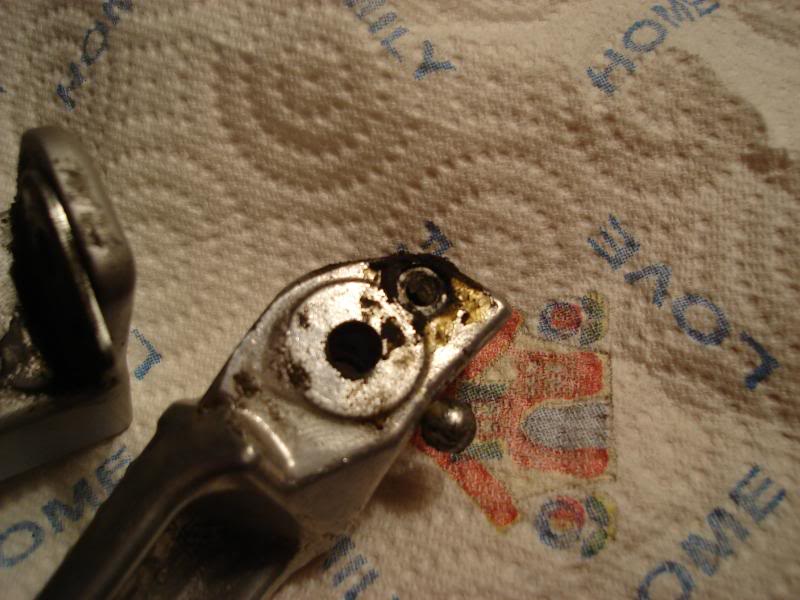
and just a special note....on the right side peg...that black "washer" as it looks from the outside actually runs THROUGH the peg holder...so it takes a little bit to fold up the lip on one side and push it through to get it out...also...remember the way the washers are (if you're **** like i am)....
Alright, i am not going to give a project rating on this stuff well, because i did the whole thing at once and it's a lot to take off....but none of it was hard...pretty much just unscrew things...so rather, i am going to talk about the pass. pegs here and the rearsets in another post....essentially...those things are sort of neat to look at up close so i took some pics...sooo...here we go...
first taking them off is easy...just unscrew the muffler from the right side, and unscrew both from the subframe...SUPER easy....but when you send things out to powder...you either have to disassemble them yourselves or pay the coaters...to have the coaters disassemble my rearsets and pegs, they would have charged $70 to take them apart and $70 to put back...a $140 TOO DO THAT??? yeah...but you have to think it's time they don't want to spend...
so i thought, crap...this is going to be a pain...turned out it wasn't, but you have to remember how things go and being that i would be taking them apart then waiting a week....i don't trust my memory...haha...so i took pictures....here's the pass. peg...
as you can see (hopefully)...the "hinge" is hitch pin (i think that's what they're called)...you just pull out the retaining "wire" (it's just a soft piece of bendable metal) and the pin slips right out...
now you can see a plate on the right side...that is nestled between the peg and the holder....i didn't take a clos eup of it...but essentially it has two recesses in it....and a little guide area....looking at the peg...you can see the ball that is used to lock into those recesses...the ball is sitting on top of another hole....in there is a spring so that the ball can compress into the hole....so the way the pegs work is when you move them...the ball is pushed into the hole on the peg....rides along the ridge on the plate until it gets to the other recess in the plate where it springs up a little bit (the click you hear) and it's locked in place....
so to send out for coating...take the plate, the ball, and the spring...put them in a baggie (as i did with everything and marked so i knew which goes with what)....and clean up the pieces....
here's a couple more pics...
and just a special note....on the right side peg...that black "washer" as it looks from the outside actually runs THROUGH the peg holder...so it takes a little bit to fold up the lip on one side and push it through to get it out...also...remember the way the washers are (if you're **** like i am)....
#18
09-09-2007, 11:28 PM

#19
09-10-2007, 03:23 AM

www.hotbodiesracing.com go to the undertail section then to f4i they have instructions on there.
#20
09-10-2007, 09:22 AM
Join Date: Jun 2007
Location: Chicago, IL (downtown)
Posts: 2,360
Likes: 0
Received 0 Likes
on
0 Posts
yeah the exact instructions they give you, are the ones you can download from the site...although i found them to be marginally helpful....(very helpful for wiring though....)
if you do a search (i will try to get it later)...someone documented how they did it...it wasn't great, but it helped...
EDIT: here is the site http://gallery.devnulled.com/v/autos...F4i-undertail/
it will at least give you an IDEA of where to cut
briefly, you pretty much cut the plastic glove box along the bottom of the subframe so if you were looking at it...NOTHING would be below the subframe bar line....then you cut the glove box at the end near the tail up to where there is an actual box.....can't explain it really...looking down on it....it will look like a box....then further towards the tail...just some more plastic...pretty much cut to keep the box....i'll see if i can find the pics online...