F4i cosmetic/performance bike makeover (a diary)...(PICS)
#1
 09-06-2007, 12:06 PM


Join Date: Jun 2007
Location: Chicago, IL (downtown)
Posts: 2,360
Likes: 0
Received 0 Likes
on
0 Posts
Well I figured I would start this thread up for anyone dumb enough to undertake something like this (not really dumb, but it is for those of us who like to "visually mod" as well as "performance mod")...
I have an '01 Red/black F4i....I am going to be doing a lot of cosmetic work on the bike as well as performance mods...but I know since i have gotten into working on my bike, i am searching all over for different things to do, different ways to do it....wondering the in between steps, etc....so i figured i would make this a pseudo diary of what i have done, am doing, and will do...
i currently don't have my camera pictures with me as i post this, but i will post pictures of the bike before so everyone can have a reference for how i got it.....and post pictures as i go along for everything i do to it...
i will try and keep this main post as an index for all the things i have done so you can jump to things from here...
if you think this is a dumb idea, let me know, i won't bother doing it seeing as it will be some work to keep it updated and whatnot...but i know i have looked at the ROTM bikes and wondered how they started, or how much it took to get them to where they are...yeah you hear the "i did x,y, and z" but how....what order, how long it take, etc....and how many cheap mods did a lot, whereas how many expensive mods (i.e. full systems, PCIII tuned, etc.) were done.....i just thought it would be cool for one, to give ideas to those out there, and two to encourage people to mess with their bikes and make them their own....i think it will help out the newbs out there trying to figure out what's out there while at the same time being interesting for the experience guys who have done this....
so i guess without further ado....
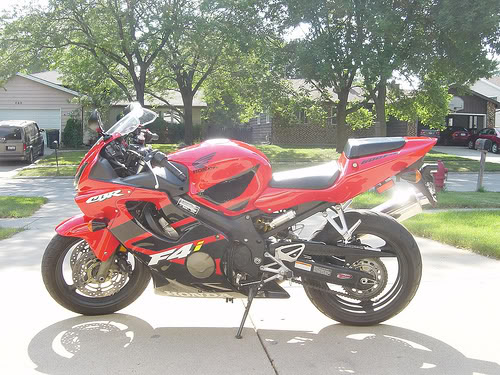
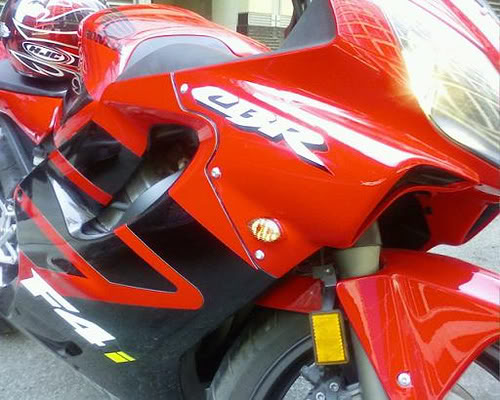
here she is when i got her....(i'll work on a bigger pic)
Stuff i have done so far that i will post pics of....(in the order I did them)....
** Stealth garage door opener (next post)
** Hotbodies Flushmounts (with running lights mod)
** Blacked out OEM windshield
** Removed stickers
** Hotbodies Undertail
** Carbon fiber bar ends (anno red) - given to me for free
** Painted upper vent covers
** ALL DONE
** New stator cover (to replace rashed one) - powdered mirror black
** Clutch cover powdered mirror black
** Rearsets powdered mirror black
** Passenger Pegs powdered mirror black
** CNC metal chainguard powdered mirror black
** CNC metal heel guards powdered mirror black
** Bootleg Shorty CF exhaust ceramic coated gloss black
** New Grips
** Spiegler SS lines
** Powdercoated Calipers
** Painted rear master cylinder & reservoir
Stuff i have the parts for, haven't put on quite yet or are waiting on things
** APE manual CCT
** Streetglow LED lighting kit (not ghettor just in the engine bay)
** Vortex Frame Sliders
** 520 Conversion and Red EK MVXz chain
** Speedohealer
ummm...that's all i can think of for the moment....so check back on the thread and i'll be updating it as things move along
I have an '01 Red/black F4i....I am going to be doing a lot of cosmetic work on the bike as well as performance mods...but I know since i have gotten into working on my bike, i am searching all over for different things to do, different ways to do it....wondering the in between steps, etc....so i figured i would make this a pseudo diary of what i have done, am doing, and will do...
i currently don't have my camera pictures with me as i post this, but i will post pictures of the bike before so everyone can have a reference for how i got it.....and post pictures as i go along for everything i do to it...
i will try and keep this main post as an index for all the things i have done so you can jump to things from here...
if you think this is a dumb idea, let me know, i won't bother doing it seeing as it will be some work to keep it updated and whatnot...but i know i have looked at the ROTM bikes and wondered how they started, or how much it took to get them to where they are...yeah you hear the "i did x,y, and z" but how....what order, how long it take, etc....and how many cheap mods did a lot, whereas how many expensive mods (i.e. full systems, PCIII tuned, etc.) were done.....i just thought it would be cool for one, to give ideas to those out there, and two to encourage people to mess with their bikes and make them their own....i think it will help out the newbs out there trying to figure out what's out there while at the same time being interesting for the experience guys who have done this....
so i guess without further ado....
here she is when i got her....(i'll work on a bigger pic)
Stuff i have done so far that i will post pics of....(in the order I did them)....
** Stealth garage door opener (next post)
** Hotbodies Flushmounts (with running lights mod)
** Blacked out OEM windshield
** Removed stickers
** Hotbodies Undertail
** Carbon fiber bar ends (anno red) - given to me for free
** Painted upper vent covers
** ALL DONE
** New stator cover (to replace rashed one) - powdered mirror black
** Clutch cover powdered mirror black
** Rearsets powdered mirror black
** Passenger Pegs powdered mirror black
** CNC metal chainguard powdered mirror black
** CNC metal heel guards powdered mirror black
** Bootleg Shorty CF exhaust ceramic coated gloss black
** New Grips
** Spiegler SS lines
** Powdercoated Calipers
** Painted rear master cylinder & reservoir
Stuff i have the parts for, haven't put on quite yet or are waiting on things
** APE manual CCT
** Streetglow LED lighting kit (not ghettor just in the engine bay)
** Vortex Frame Sliders
** 520 Conversion and Red EK MVXz chain
** Speedohealer
ummm...that's all i can think of for the moment....so check back on the thread and i'll be updating it as things move along
#2
09-06-2007, 12:17 PM
Join Date: Jun 2007
Location: Chicago, IL (downtown)
Posts: 2,360
Likes: 0
Received 0 Likes
on
0 Posts
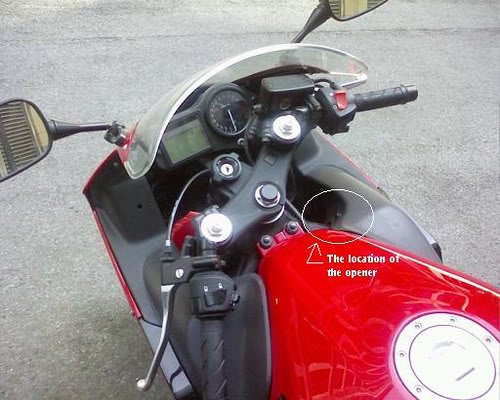
Stealth Garage Door Opener
Ranking of project 1-10 (10 being worst):
Cost: 2 - very cheap
Difficulty: 4 - not very hard, should know SOME wiring, requires removing upper vent (easy)
Functionality: 1 - easily the best bang for the buck mod i have done yet
Visuals: 4 - sort of cool that it can't be seen...overall, not really a visual element at all
Time: 5 - if you know wiring, quick, if not longer...about 45 min.
Overall: 4 - ...REALLY cheap mod...and is extremely functional....
the first mod i did was integrate my garage door opener into the upper vent cover....i hated carrying around my opener and i had lost one already while riding (yeah i know, i'm stupid)....so i spent about $10 in parts and put this on my bike...it's stealthy so most people don't even notice it and it works like a charm...not a single issue since i put it in....i also didn't wire it to the battery so when i remove the upper vent cover, the whole thing comes off, making it easy to work on if i need to and without the extra hassle of running a ton of wires....
here are some pics.....sorry for the crappy pics there were on my cell at the time, i will work on putting up nicer ones
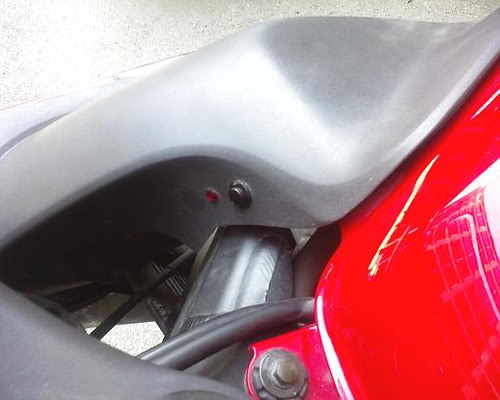
here's an "outside" view
Ranking of project 1-10 (10 being worst):
Cost: 2 - very cheap
Difficulty: 4 - not very hard, should know SOME wiring, requires removing upper vent (easy)
Functionality: 1 - easily the best bang for the buck mod i have done yet
Visuals: 4 - sort of cool that it can't be seen...overall, not really a visual element at all
Time: 5 - if you know wiring, quick, if not longer...about 45 min.
Overall: 4 - ...REALLY cheap mod...and is extremely functional....
the first mod i did was integrate my garage door opener into the upper vent cover....i hated carrying around my opener and i had lost one already while riding (yeah i know, i'm stupid)....so i spent about $10 in parts and put this on my bike...it's stealthy so most people don't even notice it and it works like a charm...not a single issue since i put it in....i also didn't wire it to the battery so when i remove the upper vent cover, the whole thing comes off, making it easy to work on if i need to and without the extra hassle of running a ton of wires....
here are some pics.....sorry for the crappy pics there were on my cell at the time, i will work on putting up nicer ones
here's an "outside" view
#3
09-06-2007, 02:08 PM

Senior Member
Join Date: Mar 2007
Location: Central Wisconsin
Posts: 624
Likes: 0
Received 0 Likes
on
0 Posts
#4
09-06-2007, 02:20 PM
Join Date: Jun 2007
Location: Chicago, IL (downtown)
Posts: 2,360
Likes: 0
Received 0 Likes
on
0 Posts
oh thanks....yeah i am gonna keep adding more tonight hopefully....
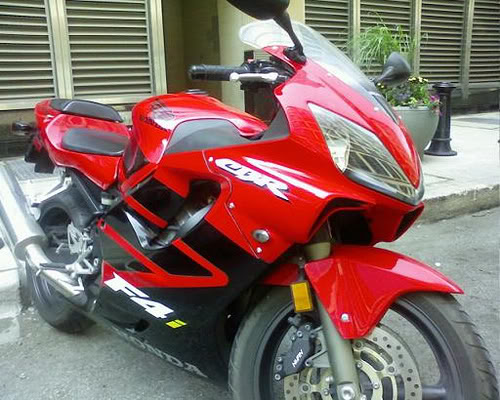
seriously...it doesn't look like that anymore though...with the stickers off, the blacked out windshield and the undertail...she has a slightly different look...now she is torn apart in my garage sitting with no fairings, no rearsets, no pegs, no enginge covers, and no exhaust...i have pics...i will post them tonight...
seriously...it doesn't look like that anymore though...with the stickers off, the blacked out windshield and the undertail...she has a slightly different look...now she is torn apart in my garage sitting with no fairings, no rearsets, no pegs, no enginge covers, and no exhaust...i have pics...i will post them tonight...

#6
09-06-2007, 02:40 PM
Join Date: Jun 2007
Location: Chicago, IL (downtown)
Posts: 2,360
Likes: 0
Received 0 Likes
on
0 Posts
Hotbodies Flushmounts (front)
Ranking of project 1-10 (10 being worst):
Cost: 4 - about $50 (with wiring elements)
Difficulty: 6 - only because i did the running light mod
Functionality: 6 - unfortunately, they are not as visible, but are brighter
Visuals: 3 - look WAY better than the stalks IMO
Time: 6 - if you know wiring, quicker, if not longer...about 1.5 hrs
Overall: 4 - ...moderately priced, MUCH better look over stock....
I bought my flushmounts on ebay for about $40 i think....the only problem with most aftermarket LED flushmounts is that they will have only two wires running from them, a positive and ground....this is where most people get confused....
1) take off the front fairing...really, it's not that hard just a few screws and unclip the master harness and it pops right off....i took mine off, and took it inside to work on
2) the bitch part was trying to get the damn stalks off....the bolt is on the inside of the fairing and for some reason BOTH of mine were like they were seized and wouldn't turn...it took me 45 minutes to get those SOBs off...i ended up trashing both as i ripped the plastic coating around them, arghhh...i hated those things...
3) i clipped the wires close to the end of the stalk so as to retain the plug that goes from the stock signals to the wiring harness...i did this just for ease...and much easier to deal with
4) here is where it gets interesting, i am not going to go into the details as you can find it in the "How-to" sections....using two transistors per side (the extra 'wiring cost')....the two running and blinking wires from the bike go to the ONE positive lead of the LEDs and the grounds are hooked together....
5) do this to both sides, bring down your fairing...HOOK UP THE PLUGS...DO NOT INSTALL THE FAIRING.....and turn on your bike and make sure everything works....blinkers and running lights....good chance a lead may come loose so check before you take the time to reinstall the front fairing...
Note: i didn't install a resistor because i like the increased blink rate, but that's just me (if you have no idea what i am talking about and need explanation, just ask)
without further ado...some pics (once again...sorry about the crappy cel pics, i will update these)
Off
On
once again...any questions, please ask...
#7
09-06-2007, 03:03 PM
Join Date: Jun 2007
Location: Chicago, IL (downtown)
Posts: 2,360
Likes: 0
Received 0 Likes
on
0 Posts
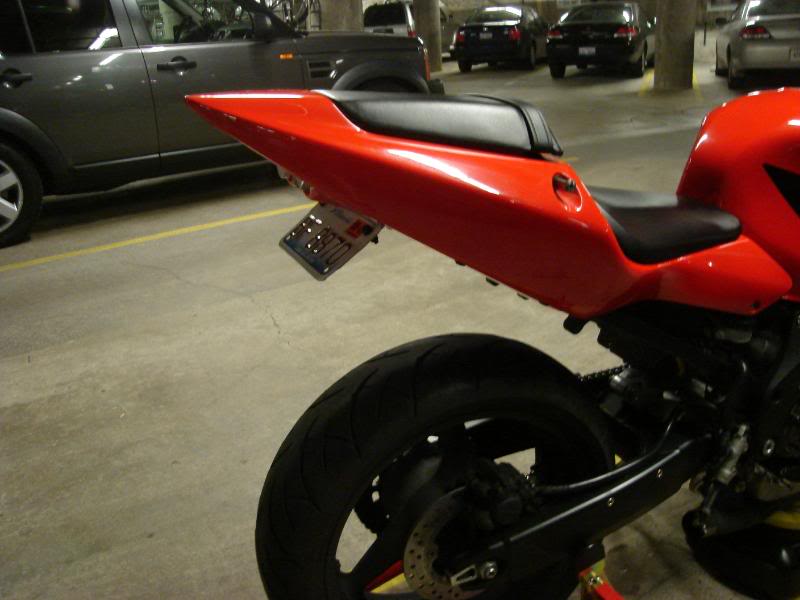
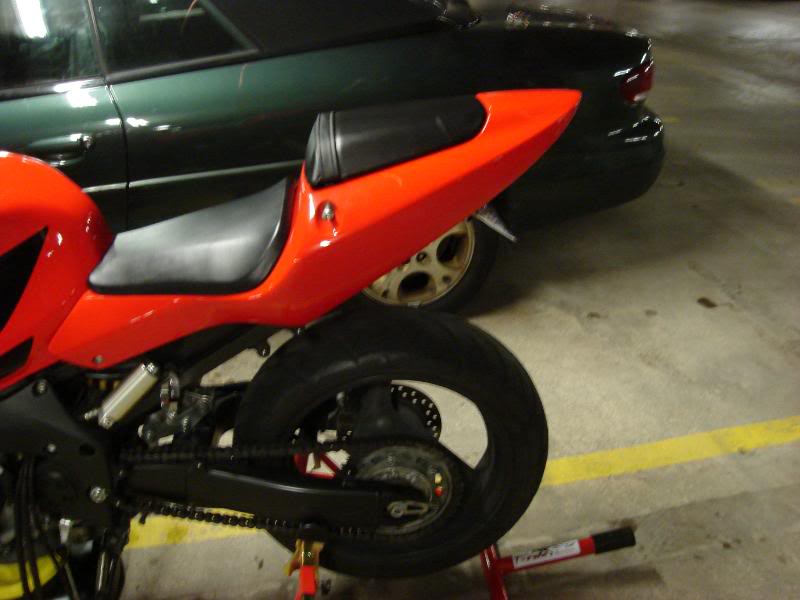
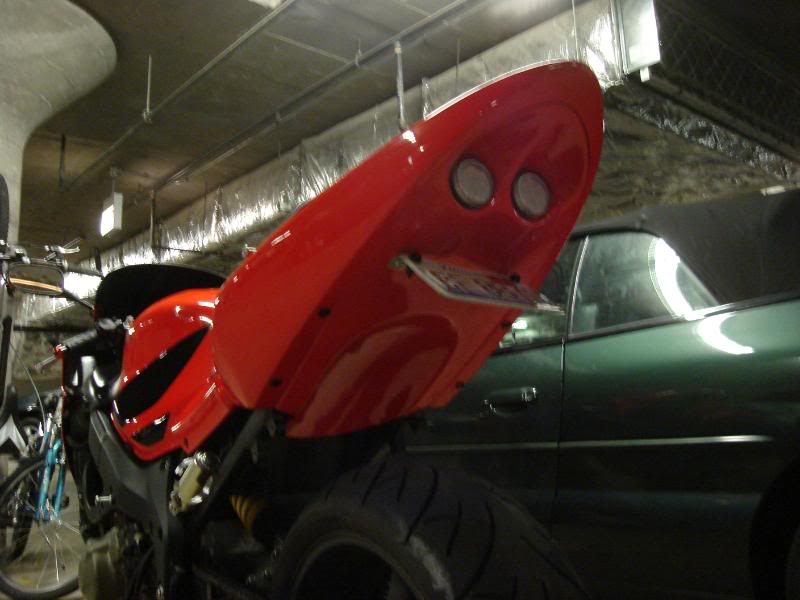
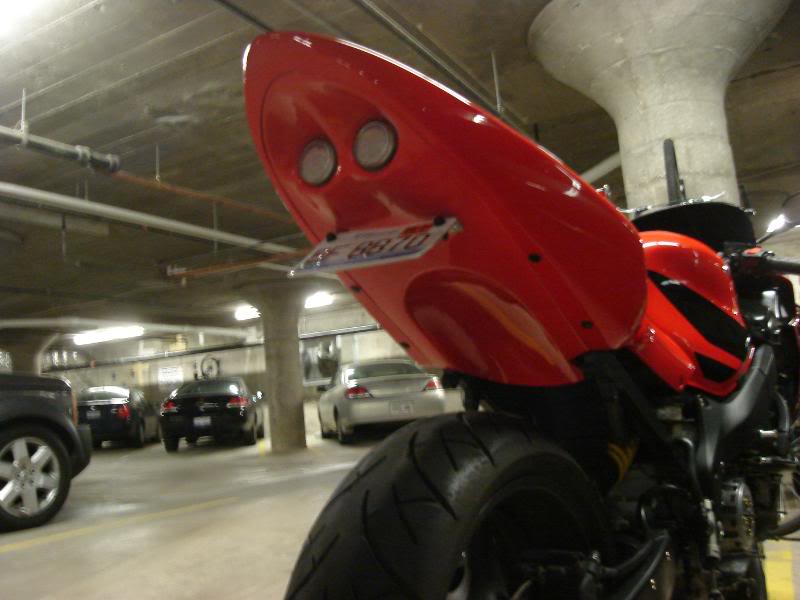
Hotbodies Undertail
Ranking of project 1-10 (10 being worst):
Cost: 7 - about $190
Difficulty: 6 - have to take off rear fairing (sort of sucks)
Functionality: 7 - doesn't really do anything functionally
Visuals: 2 - looks WAY better than the fender, starts to look 'faster'
Time: 7 - not very hard, but time consuming...about 2 hrs
Overall: 5 - ...you can do it cheaper but an fender elminator or undertail generally is the best way to go....
sooo...undertails....you can read a TON about undertails here and everywhere else...there are fender eliminators, undertails (hotbodies, euro, pimpbikes, etc.)....really just search around and find something you like...they most all entail the same things although an FE might work slightly differently (no cutting i believe in most cases)....you can read about how to install them, but generally, it's pretty easy although time consuming...
1) take off your rear cowl....SUCKS....you might feel like you are going to break it removing it, but just be careful and you'll be fine...
2) cut down the bottom of the stock rear compartment (it is replaced by the undertail)...do it nice, but doesn't have to be "that" nice because the undertail will cover it up
3) relocate the lock (this sucks, just follow the instructions the best you can)...you will understand when you actually do it....
4) install the rear cowl again, install the undertail...
5) following the wiring instructions if your tail came with integrated lights...once again, if you want to keep your stock flash rate, you will need to install resistors or a new relay....i didn't bother, i like the increased rate and i have LED fronts and backs....
that's basically it...i mean really basic overview...it is obviously much more involved, but it isn't complicated
it adds a great look to the bike in my opinion getting rid of the ugly fender....now a fender eliminator does the same but doesn't actually give you a full undertail but it is a lot cheaper....(to tell you the truth, some FE are AWESOME looking, check the board)
here is how mine turned out....(crappy pics, i know, cel, will fix... ) NOTE: UPDATED PICS NOW...still crappy, but better
Ranking of project 1-10 (10 being worst):
Cost: 7 - about $190
Difficulty: 6 - have to take off rear fairing (sort of sucks)
Functionality: 7 - doesn't really do anything functionally
Visuals: 2 - looks WAY better than the fender, starts to look 'faster'
Time: 7 - not very hard, but time consuming...about 2 hrs
Overall: 5 - ...you can do it cheaper but an fender elminator or undertail generally is the best way to go....
sooo...undertails....you can read a TON about undertails here and everywhere else...there are fender eliminators, undertails (hotbodies, euro, pimpbikes, etc.)....really just search around and find something you like...they most all entail the same things although an FE might work slightly differently (no cutting i believe in most cases)....you can read about how to install them, but generally, it's pretty easy although time consuming...
1) take off your rear cowl....SUCKS....you might feel like you are going to break it removing it, but just be careful and you'll be fine...
2) cut down the bottom of the stock rear compartment (it is replaced by the undertail)...do it nice, but doesn't have to be "that" nice because the undertail will cover it up
3) relocate the lock (this sucks, just follow the instructions the best you can)...you will understand when you actually do it....
4) install the rear cowl again, install the undertail...
5) following the wiring instructions if your tail came with integrated lights...once again, if you want to keep your stock flash rate, you will need to install resistors or a new relay....i didn't bother, i like the increased rate and i have LED fronts and backs....
that's basically it...i mean really basic overview...it is obviously much more involved, but it isn't complicated
it adds a great look to the bike in my opinion getting rid of the ugly fender....now a fender eliminator does the same but doesn't actually give you a full undertail but it is a lot cheaper....(to tell you the truth, some FE are AWESOME looking, check the board)
here is how mine turned out....(crappy pics, i know, cel, will fix...
) NOTE: UPDATED PICS NOW...still crappy, but better
#9
09-06-2007, 07:57 PM

