
F2 Project from spring 2013
#31
 11-27-2012, 02:41 PM


Join Date: Oct 2012
Location: Sunny Devon
Posts: 93
Likes: 0
Received 0 Likes
on
0 Posts
#32
11-27-2012, 02:45 PM
Join Date: Oct 2012
Location: Sunny Devon
Posts: 93
Likes: 0
Received 0 Likes
on
0 Posts
#33
01-17-2013, 04:41 PM
Join Date: Oct 2012
Location: Sunny Devon
Posts: 93
Likes: 0
Received 0 Likes
on
0 Posts
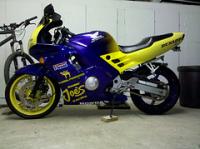
Some shots of the engine, all cleaned up and sprayed to match the fairings!
I have spent some time and money to get this far.
Frame has been blasted and sprayed black. No rust
Stearing bearings have been changed
new clutch kit been fitted (EBC Friction plates and steel plates, springs, new washers....oh and a new base plate at snapped a bolt that turned out to be weak.... but still, its new!)
Wheels are being blasted and sprayed right now, should have them here at the end of the month. will post more when done.
#36
01-18-2013, 12:27 AM

Senior Member
Join Date: Mar 2011
Location: Vancouver, Canada
Posts: 249
Likes: 0
Received 0 Likes
on
0 Posts
The engine looks great, nicely done.
It doesn't sound like you did but I'm curious if looked inside while you had it out of the frame and easily accessible? I know it means buying a new head gasket but since you made it look so darn nice I thought it would be worth the effort to make sure the pistons and valves are ok. I had so much carbon build up in my cylinders it was holding one of the valves open.
It doesn't sound like you did but I'm curious if looked inside while you had it out of the frame and easily accessible? I know it means buying a new head gasket but since you made it look so darn nice I thought it would be worth the effort to make sure the pistons and valves are ok. I had so much carbon build up in my cylinders it was holding one of the valves open.
#37
01-18-2013, 12:57 AM

#38
01-18-2013, 04:51 AM

#39
01-18-2013, 10:44 AM
Join Date: Oct 2012
Location: Sunny Devon
Posts: 93
Likes: 0
Received 0 Likes
on
0 Posts