
'93 F2 Mods - Phase 2


Retired Super Moderator, Tin Star Man & Hurricane Saloon Prospect, ROTM Feb 2015
Joined: Sep 2011
Posts: 2,382
Likes: 5
From: V��ksy, Finland
Those things happen, I just recently did some work on my Volvo's engine, got everything back together, went for a test ride, floored the throttle, the gearbox shifted down and the revs went up but virtually no acceleration and the whole dash lit up like new years eve! Almost ruined my pants as it went to the limp home mode, got back, popped the hood and saw one of the pipes to the intercooler had popped off. Probably would have been a good idea to screw the clamp back tight... Now I have to go get that lambda light signed before it passes MOT...

Senior Member
Joined: Mar 2011
Posts: 249
Likes: 1
From: Vancouver, Canada
I wasn't in a rush to get my forks done so the info was indeed useful. There's lots of info out there and it doesn't always match up so I wanted to ask a trusted source so I knew which numbers to use. I had to wait for the Motorex fork oil to arrive anyway so I couldn't do much in the mean time.

Member
Joined: Mar 2010
Posts: 73
Likes: 3
Just read through your phase 1 thread and I'm mighty impressed with the work you have done! The bike has completely transformed - I love the race colours.
Sorry to hear about your little mishap but at least you found the problem without too much agony.
Sorry to hear about your little mishap but at least you found the problem without too much agony.

Thread Starter
|
Welcome Crew and ROTY 2014
Joined: Dec 2010
Posts: 2,059
Likes: 6
From: Kansas
Yes, but now you can give me grief, since I poked at you for snapping off bolts!!
And indeed, I had identified the issues correctly!! Though re-doing work is always agony for me, to some degree!
So I picked up some plugs from O'Reilly auto parts yesterday, and didn't bother to check the boxes, as I've purchased NGKs from them before, for a good price, and even cheaper Autolite plugs, that I've just used as "throw aways", for reading plugs after fueling changes... we'll, they sold me the wrong plugs!

Fortunately, I happened to have a set of NGKs still around, that I had forgotten about, that had only been run a little bit, and were in real good shape - I just needed to verify the gaps. The plugs I pulled from the bike were well "fouled-out", so I knew this change would yield a significant benefit.
And though I wasn't at first happy about having to do so, it was worth it to pull the tank, airbox, and carbs off again, as my other suspicion was correct, regarding the carb-side clamps for the boots - I already learned that one of them was loose, but with the carbs mounted, it was the only clamp I could get to. Two of the remaining three clamps were also loose - I said two of the remaining three, because the clamp at carb 2 did not even HAVE the screw and square-nut present!!!
A quick trip to the hardware store, and then it was back together with everything.
With the new plugs in, and the carb-side boot clamp issue resolved, it fired up immediately, and after I got the idle re-adjusted, it purred like a kitten!!
 No more fluctuation in idle, and no more "hanging" of the revs, after throttle application!
 I mounted the frame sliders, and began to install the bodywork, where I learned that the upper portion of the fairing stay was indeed straight and true, but the smaller brackets below, containing the grommets for holding the plastic pins on the headlight assembly, were somewhat askew. Re-positioning these is very simple, but it took some trial and error to get things right. I will probably work on tweaking these brackets just a smidge, the next time I have occasion to take the fairings off, since all the upper and lower front fairings mounted fine, but they are just a little, tiny bit off - nothing that you would see, if you weren't removing/installing them.
The R1 passenger peg bracket/exhaust hanger units that came on the bike, put the pegs up higher than they should be, which would be a cramped postion for a passenger, and also requires the exhaust to mount a little higher. I was forced to use these for now, as someone in the past literally bent the mid-pipe, so that the muffler would mount on these brackets!
It will work for now, but hopefully, this weekend, I can get the can cut down, to remove the damaged part, lighten things up a little, and of course, make it sound even meaner! (this can really does sound great, as it is right now). While I'm at it, I'll heat the mid-pipe, and attempt to bend it back to where it should be, so that I can mount the black OEM brackets, that I previously modified, and have the billet pegs mounted on.
I worked pretty late last night, and was too busy to get any pics, but I'll try to get one during lunch.
Last edited by JNSRacing; Mar 8, 2013 at 01:46 PM.
Thread Starter
|
Welcome Crew and ROTY 2014
Joined: Dec 2010
Posts: 2,059
Likes: 6
From: Kansas
There is much yet to do, but it runs and rides - it was 31�F this morning, and it started with only the tiniest bit of choke, and immediately, at that.

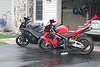
I mentioned in a previous post, that the exhaust sits at a funny angle, due to the R1 peg brackets - it could look worse, but after this weekend, it will look a lot better!
The red rims are growing on me just a touch, but the red fender makes it look like Ronald McDonald's bike or something! I'll be painting that black as soon as it's warm enough, as well as the red tank that came with the new bike, so I can put it on the race bike.
I have two black rear rims, my original F2 rim, and the wider F3 rim, and but I've only got one black front rim - my plan is to pick up another black front rim, and then I'll just use the red rims for rain tires, for wet races.
I had given it a little shake-down ride in my neighborhood last night, at around midnight, after installing the fairings, adjusting and lubing the chain, and getting the tires at the right pressure - man, did it feel weird, which is no surprise - different shock, levers, rearsets, tires, brake setup, gearing, and the fact that it is roughly 25 lb. or so heavier in street form, than the other one was while in street form.
I had to make an adjustment of the shift lever this morning, before heading to work, since it needed to be moved just one spline down on the shaft.
When changing to GP shift on an F2, depending on the angle you like the lever at, it often causes the shift rod to rub on the kickstand mounting bolt heads, which was the case again with this bike, so I had to use a little more pressure to make shifts, and it was a kind of hard to get neutral, though that got easier after some miles of riding - I'm going to grind the heads of those bolts down just a smidge, so the shift rod won't touch anymore.
Lastly, the bike starts easily and quickly, and idles very nice, all of which I might have mentioned before - on the road, though, the bottom end and mid-range are great, but I'll need to work with the mains to get my top end dialed in, which of course, could mean I'll have to make changes to the needle jets and pilot screws. I'm not going to pursue this until I've shortened the can and re-aligned the mid-pipe.
Those red rims with your fairings look great in my opinion.  Agree with you though, the red fender is pretty terrible. Lol. I think it'll look better once you get the muffler cut down as well. Looking good man.
Agree with you though, the red fender is pretty terrible. Lol. I think it'll look better once you get the muffler cut down as well. Looking good man.
Thread Starter
|
Welcome Crew and ROTY 2014
Joined: Dec 2010
Posts: 2,059
Likes: 6
From: Kansas
The rims don't look too bad, but honestly, it looks better in this picture, then when you're standing right next to it... I might end up changing my mind, and leaving the red ones on, but more than likely, I'll use those for rains, and stick with the black - another thing you can't see in the picture, is that these rims are far more scratched up then the black ones, which look almost perfect.
Thread Starter
|
Welcome Crew and ROTY 2014
Joined: Dec 2010
Posts: 2,059
Likes: 6
From: Kansas
The F2 rim is 4.5 inches wide, whereas the F3 rims is 5 inches wide, other than that, not a whole lot is different.
The cush drive/sprocket carrier is interchangeable, you use the same axle, and the chain-side wheel spacer is the same, but you have to use the brake-side wheel spacer from an F3, and the bearings are different, which doesn't affect the mounting of the wheel, it just means when you replace the bearings/seals, you've gotta remember to order for an F3.
This wheel allows you to mount a 170 rear, rather than 160, for the street, and it allows you to better employ 165 size racing slicks.
Some people mount 180s on the F3 rim, which is better than mounting a 180 on an F2 rim, but in my opinion, a 170 is the best fit for the 5 inch rim.

