


'87 1000F top end assembly write up.



Thread Starter
|
Senior Member
Joined: Oct 2008
Posts: 303
Likes: 0
From: Cambridge, Ontario, Canada

Not there yet, but maybe by the end of the long weekend (this weekend will be a 4 dayer for us).
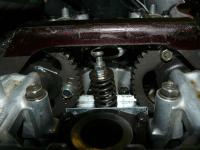
Only worked an hour on the bike tonight (was busy with the car). Intalled the top timing chain hoop but since the original 4 bolts were removed by a chisle and a hammer (the allan key was stripped), had to find replacements but the only ones I had were too long and had to be cut down to size. But after a bit, it was all in the engine.
Before installing the cam cover, I must remember to check the valve clearances and adjust as needed. I'll feel more relaxed once the engine finally is sealed up.
Only worked an hour on the bike tonight (was busy with the car). Intalled the top timing chain hoop but since the original 4 bolts were removed by a chisle and a hammer (the allan key was stripped), had to find replacements but the only ones I had were too long and had to be cut down to size. But after a bit, it was all in the engine.
Before installing the cam cover, I must remember to check the valve clearances and adjust as needed. I'll feel more relaxed once the engine finally is sealed up.
Thread Starter
|
Senior Member
Joined: Oct 2008
Posts: 303
Likes: 0
From: Cambridge, Ontario, Canada
Had a little more time to work on the bike and it's coming along nicely.
Took a couple hours to properly indext the cams as they were 180 degrees out. It's too bad that Honda didn't machine the sprocket to only go together one way. It would have saved time for me and I'm sure many others too. The good think is that even when the cams are 180 aout,they do not interfere with the pistons, so the worst it can happen is that the engine would not start. It's important that untill you are 100% sure that the timings are right ( check it by hand after it's set too) to ONLY turn the engine over by hand, at the crank, or else you can damage the valves.
Pic # 29 is right after the engine was finally sealed up (valve cover was installed) with a new valve cover gasket.
Pic # 30: The carburatos and the air box are in. What a PITA was to install the carbs. Took two ratcheting straps a rubber hammer, a heat gun, liquid wrench and some choice words to get them in.
Pic # 31: Another angle after the carbs were installed, it's starting to look complicated. The radiator and exhaust headers are going on tomorrow.
Pic # 33: Side shot of the bike, a it is now. The old battery is is totally shot so I'll need to buy one before firingit up.
Took a couple hours to properly indext the cams as they were 180 degrees out. It's too bad that Honda didn't machine the sprocket to only go together one way. It would have saved time for me and I'm sure many others too. The good think is that even when the cams are 180 aout,they do not interfere with the pistons, so the worst it can happen is that the engine would not start. It's important that untill you are 100% sure that the timings are right ( check it by hand after it's set too) to ONLY turn the engine over by hand, at the crank, or else you can damage the valves.
Pic # 29 is right after the engine was finally sealed up (valve cover was installed) with a new valve cover gasket.
Pic # 30: The carburatos and the air box are in. What a PITA was to install the carbs. Took two ratcheting straps a rubber hammer, a heat gun, liquid wrench and some choice words to get them in.
Pic # 31: Another angle after the carbs were installed, it's starting to look complicated.
The radiator and exhaust headers are going on tomorrow.Pic # 33: Side shot of the bike, a it is now. The old battery is is totally shot so I'll need to buy one before firingit up.
Thread Starter
|
Senior Member
Joined: Oct 2008
Posts: 303
Likes: 0
From: Cambridge, Ontario, Canada
It's ALIVE!!!!! Got it running today. The radiator still needs to be installed but at least it's running. The #4 wire was bad and it took a little time to figure out what the heck was going on. I started thinking that it was a compression related issue but luckily it wasn't. If it was, that would have suked a big one!!! Tomorrow the radiator is going in and then time for a quick test drive around the block.
Didn't notice till last night that someone pulled the fuel pump and I never got it with the bike. So since many here have bypassed it in the past, figured might as well try it and it worked.
Didn't notice till last night that someone pulled the fuel pump and I never got it with the bike. So since many here have bypassed it in the past, figured might as well try it and it worked.

 Great storyline
I just found this post by chance and am thinking about doing the same to mine at some point soon.
Can anyone remember why Imo had to do this work in the first place? It'd be interesting to know what had happened to the motor to make him have to rip the top end off in the first place. He didn't say..... in this post at least.
Nice to know you can the top end with the engine still in the frame too.
Look forward to recollections from anyone with a long memory or perhaps even the man himself, even though it appears Imo hasn't posted here since 09.
Can anyone remember why Imo had to do this work in the first place? It'd be interesting to know what had happened to the motor to make him have to rip the top end off in the first place. He didn't say..... in this post at least.
Nice to know you can the top end with the engine still in the frame too.
Look forward to recollections from anyone with a long memory or perhaps even the man himself, even though it appears Imo hasn't posted here since 09.


Must've been a nasty moment. Dropping valves.... yikes!


Thread
Thread Starter
Forum
Replies
Last Post
