
**NEW** HID INSTALLATION WRITE-UP (for newer style kits) 09-05-07
#1
 09-04-2007, 11:20 PM


NEWER Style HID Installation Guide:
Alright guys, it's been a long time coming, so here it is. An updated HID Installation guide with the newer style HID kits.
INSTALLATION GUIDE IS FOR 2005-2006 MODEL YEAR CBR600RR MOTORCYCLES! You can take this information and adapt it to any other bike, but this guide is tailored for the 05-06 bikes.
My old HID installation write-up went through how to install the older style kits with the separate ballasts and igniters, and extension of harnesses. Then the newer, smaller, more efficient style ballasts came out with built-in igniters, so here's the installation guide (which is SO much easier than the older kits.)
You will NOT need to remove any fairings for this project, and should take less than an hour when you are taking your time.
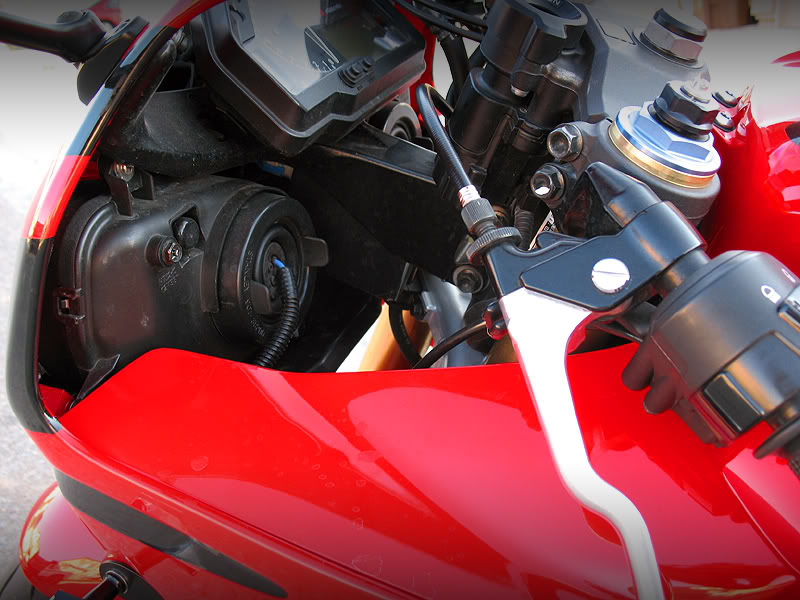
First off, the ballasts will be mounted up front because you can't (and not supposed to) extend the harnesses on these newer style kits due to the high-voltage silicone wiring.
Can you see both my ballasts???? They're in plain view in the picture below...............
Here's how to install them, it's simple...........We'll start with the high beam (right side)............
INSTALL THE BULBS FIRST! This prevents them from possibly sustaining damage during installation. You just put them in like regular bulbs, DO NOT TOUCH THE BULBS!
On the newer HID kits, you have a wiring harness that plugs from your stock headlight socket into the ballast. There are two leads (paddle connectors) that you plug into the socket of your headlight. One is black (negative) and one is red (positive). Plug the positive paddle connector into the positive on the socket. (I believe that the wire with the white markings on it is the positive on the stock socket.) Push them in with some force. They fit a little loosely, and can possibly vibrate out. So I would recommend either electrical taping them down onto the socket, or soldering them in (which would be the best way for all you solderers out there.)
Now, tuck the socket underneath the intake tube cover on the right side (you can easily un-screw the one screw, and tuck it in there easily.)
You now have power for the ballast, next, you need to mount your ballast. But where? There is so little room up front, how are we going to mount two ballasts out of sight? Easy.
Take the one of the ballasts and either wrap it in electrical tape or paint it black, your preference. (this step is SOLELY for cosmetic purposes). I personally wrapped them neatly in electrical tape. This allows me to send the ballast in for warranty if for some reason it ever fails, and since it's black, it blends into the bike so they don't become an eye sore.
The high beam ballast is to be mounted underneath the front fairing bracket (not sure what it's really called) as in the picture below........

The ballast is mounted vertically with 3M Automotive Adhesive double-stick tape (it usually comes with your HID kits.) Put the tape on top of the ballast, and shove the ballast up into the bracket. It is VERY snug, and could easily hold without the tape, but the tape just serves as extra piece of mind. Make sure the wires on the ballast are facing toward the front of the bike (like in the picture).
Connect the power to the ballast, and run the other wire (the other wire connects to the connectors on the bulb wires). Run the wires however you feel necessary to make the cleanest looking installation.
Once you connect the bulb to the ballast, you should be able to turn on the kit to get your first glimpse of what they look like.
--------------------------------------------------------------------------------------------------------------------------------
NEXT is the low beam. You do it the same way as the
Alright guys, it's been a long time coming, so here it is. An updated HID Installation guide with the newer style HID kits.
INSTALLATION GUIDE IS FOR 2005-2006 MODEL YEAR CBR600RR MOTORCYCLES! You can take this information and adapt it to any other bike, but this guide is tailored for the 05-06 bikes.
My old HID installation write-up went through how to install the older style kits with the separate ballasts and igniters, and extension of harnesses. Then the newer, smaller, more efficient style ballasts came out with built-in igniters, so here's the installation guide (which is SO much easier than the older kits.)
You will NOT need to remove any fairings for this project, and should take less than an hour when you are taking your time.
First off, the ballasts will be mounted up front because you can't (and not supposed to) extend the harnesses on these newer style kits due to the high-voltage silicone wiring.
Can you see both my ballasts???? They're in plain view in the picture below...............
Here's how to install them, it's simple...........We'll start with the high beam (right side)............
INSTALL THE BULBS FIRST! This prevents them from possibly sustaining damage during installation. You just put them in like regular bulbs, DO NOT TOUCH THE BULBS!
On the newer HID kits, you have a wiring harness that plugs from your stock headlight socket into the ballast. There are two leads (paddle connectors) that you plug into the socket of your headlight. One is black (negative) and one is red (positive). Plug the positive paddle connector into the positive on the socket. (I believe that the wire with the white markings on it is the positive on the stock socket.) Push them in with some force. They fit a little loosely, and can possibly vibrate out. So I would recommend either electrical taping them down onto the socket, or soldering them in (which would be the best way for all you solderers out there.)
Now, tuck the socket underneath the intake tube cover on the right side (you can easily un-screw the one screw, and tuck it in there easily.)
You now have power for the ballast, next, you need to mount your ballast. But where? There is so little room up front, how are we going to mount two ballasts out of sight? Easy.
Take the one of the ballasts and either wrap it in electrical tape or paint it black, your preference. (this step is SOLELY for cosmetic purposes). I personally wrapped them neatly in electrical tape. This allows me to send the ballast in for warranty if for some reason it ever fails, and since it's black, it blends into the bike so they don't become an eye sore.
The high beam ballast is to be mounted underneath the front fairing bracket (not sure what it's really called) as in the picture below........
The ballast is mounted vertically with 3M Automotive Adhesive double-stick tape (it usually comes with your HID kits.) Put the tape on top of the ballast, and shove the ballast up into the bracket. It is VERY snug, and could easily hold without the tape, but the tape just serves as extra piece of mind. Make sure the wires on the ballast are facing toward the front of the bike (like in the picture).
Connect the power to the ballast, and run the other wire (the other wire connects to the connectors on the bulb wires). Run the wires however you feel necessary to make the cleanest looking installation.
Once you connect the bulb to the ballast, you should be able to turn on the kit to get your first glimpse of what they look like.
--------------------------------------------------------------------------------------------------------------------------------
NEXT is the low beam. You do it the same way as the
#2
09-05-2007, 12:21 AM
Oh, and the bulbs size is H7. (for both high beam and low beam). If you do end up buying the kit from the same eBay store as I did, buy the automotive kit. That comes with 2 bulbs, 2 ballasts, and 2 harnesses. If you get the motorcycle kit, you'll only get 1 of each.
#3
09-05-2007, 10:58 AM

#4
09-05-2007, 08:56 PM
Nope, never had that problem. If someone is having that problem with blowing fuses, the kit wasn't installed right, or something else is going on.
These are plug-and-play kits. Plug them in and go, that's what makes them awesome.
These are plug-and-play kits. Plug them in and go, that's what makes them awesome.
#5
09-11-2007, 10:29 AM

Thanks Fox, I really value the info you have provided all of us, I have never done work on motorcycles, this will be my first time, there is hardly anyspace to mount that ballstand, wish there was more space to it, I want to install 2 of them, for high and low beams, cuz i hate how only one works, when im on it, people are like Hey buddy change your bulb!!! infact when i got mine from the showroom, I thought something was wrong.. looks weird with one eye only... some retards out there should have a good reasoning behind this one sided High and the other sided Low.. fools!!
anyway thanks for your support fox... hope you come with something soon, I already bought the HIDs and waiting for a idea where and how to install it.. take care..
Ace.
anyway thanks for your support fox... hope you come with something soon, I already bought the HIDs and waiting for a idea where and how to install it.. take care..
Ace.
#6
09-11-2007, 05:26 PM

another great write up Blue Fox! im gonna add this to my list of parts to buy when tax returns come next year. oh, and just so you know, the piece that you mounted the high beam ballast to is called the front lower fairing stay
________
Yamaha Ttr230
________
Yamaha Ttr230
Last edited by axsys; 05-04-2011 at 11:00 PM.
#7
09-11-2007, 11:12 PM
ORIGINAL: axsys
oh, and just so you know, the piece that you mounted the high beam ballast to is called the front lower fairing stay
oh, and just so you know, the piece that you mounted the high beam ballast to is called the front lower fairing stay

#8
09-12-2007, 09:57 PM

Join Date: Aug 2007
Location: Oklahoma City
Posts: 1,362
Likes: 0
Received 0 Likes
on
0 Posts
#9
09-15-2007, 01:27 AM
ORIGINAL: Lrn2Go
Nice write-up! The only question I have, and it's nothing to do with the install, but your pictures are real real clear... I've got to ask, what kind of camara are you using?
Nice write-up! The only question I have, and it's nothing to do with the install, but your pictures are real real clear... I've got to ask, what kind of camara are you using?
All the pictures I take are from my trusty, little point-and-shoot, Canon A630 8-megapixel digital camera. Cost me a whopping $160 on eBay for a brand new one. It's about a year old, but I believe these are the best little cameras money can buy. They take striking pictures.........and I always get the "You took those with a digital SLR, right?" comments all the time.
Thanks for the compliment.
#10
09-16-2007, 01:25 AM
ORIGINAL: Blue Fox
.........and I always get the "You took those with a digital SLR, right?"
.........and I always get the "You took those with a digital SLR, right?"

________
LovelyWendie99
Last edited by axsys; 05-04-2011 at 11:02 PM.