
how to wrap your tank in Carbon Fiber

Thread Starter
|
July 2011 ROTM
Joined: May 2010
Posts: 223
Likes: 8
From: Hampton Roads, VA
Okay... so i wanted to try this an thought it came out pretty good so far and wanted to share. I have done composite work before, but not on a tank. (i will be adding more pictures tonight)
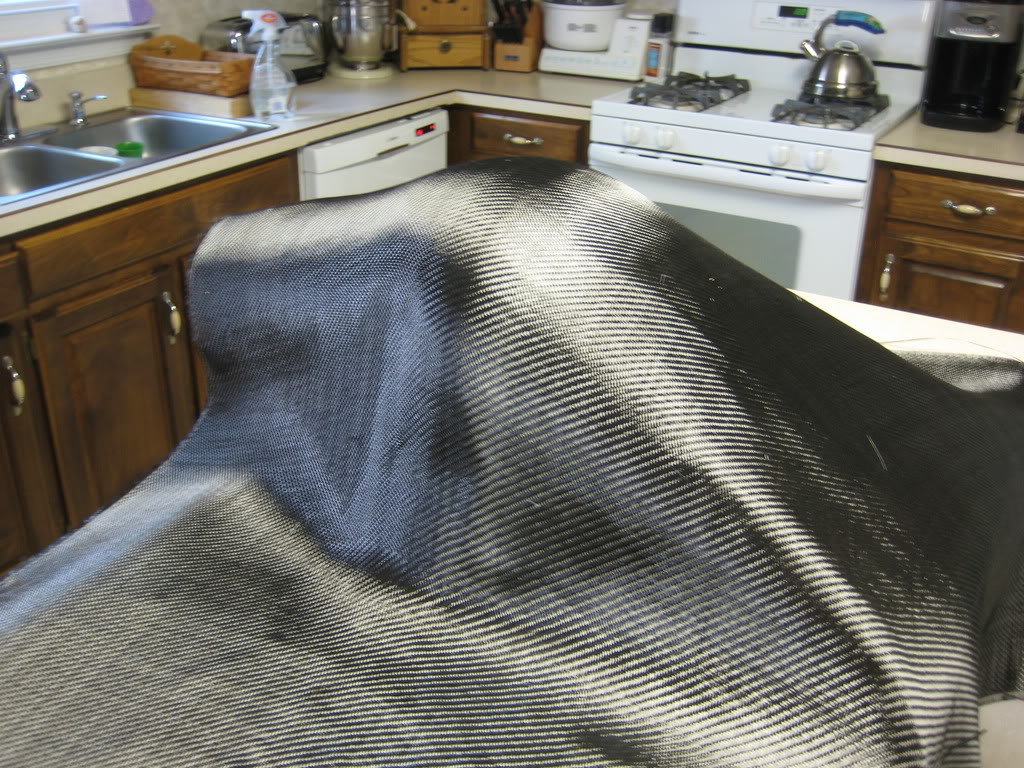
I am working with a damaged CBR600 tank. the beauty of this is that the Carbon fiber will not only blend minor imperfections, it will also protect the bondo. Plus, because there is metal underneath you dont have to worry about making sure it is gas-proof and crash proof.
I got the tank dents all worked out and the sprayed it with primer. Some wet-sanding to get it smooth and then a gentle cleaning with soap and water. as with painting, in order to get a good end product you have to do your prep well.
So... #1 clean the surface you are going to bond to.
then.. #2 you cut your overlay material to size. this keeps you from wasting valuable time and material while your resin is mixed.
in this case i am using carbon
then, #3 you make sure that alllll your stuff is in order. that means brushes, gloves, solvent,
or anything else you spread that resin. (no pic.. sorry)
#4 Coat the entire surface FIRST. this allow you to get better adhesion as well as giving the cloth something to "stick" to. (keeps the pattern pretty too)
my hands were messy, so no pic of this stage. imagine a primer colored tank covered in resin
#5 lay the cloth down and smooth it evenly (symmetrically too if possibly) so that it stick to the surface. the resin i was using had a pot life of 12 minutes so i got my sister to help lay the resin. (this is why preparation is key)
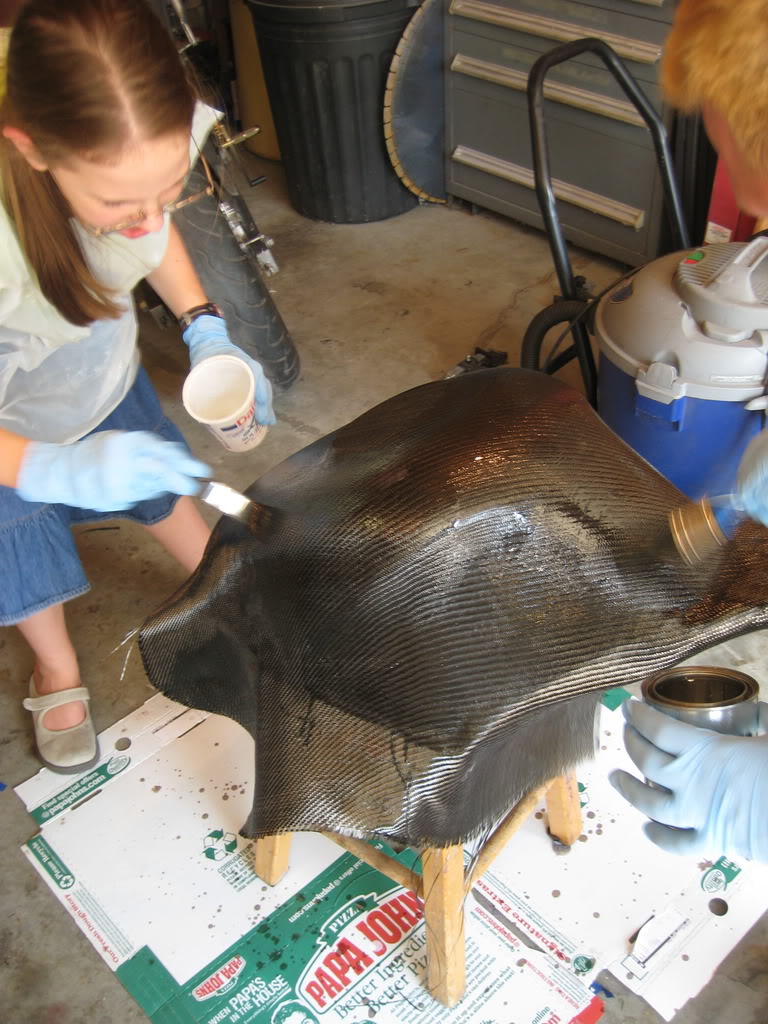
#6 brush the rest of the resin on the smoothed cloth and continue to monitor how well it is adhering to the curves of the part. certain areas will want to pull away or bubble... just just brush it back down. the resin in the fabric will take longer to set up that in the mixing cup (due to the volume)
so here you go...
you are done.... sorta
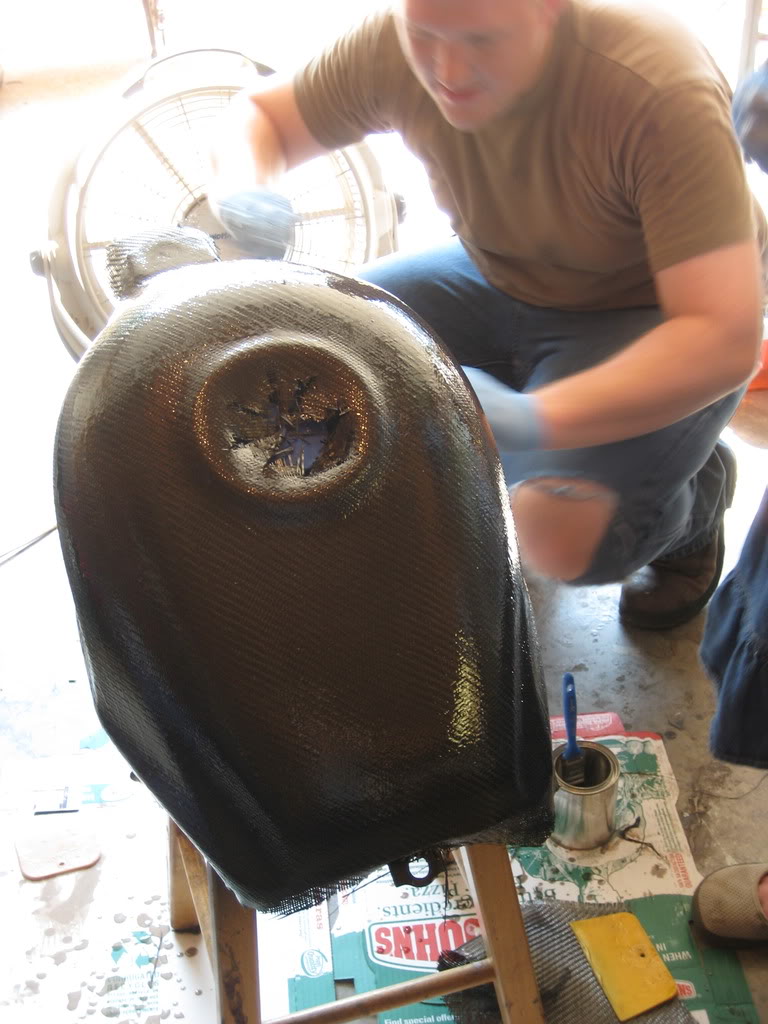
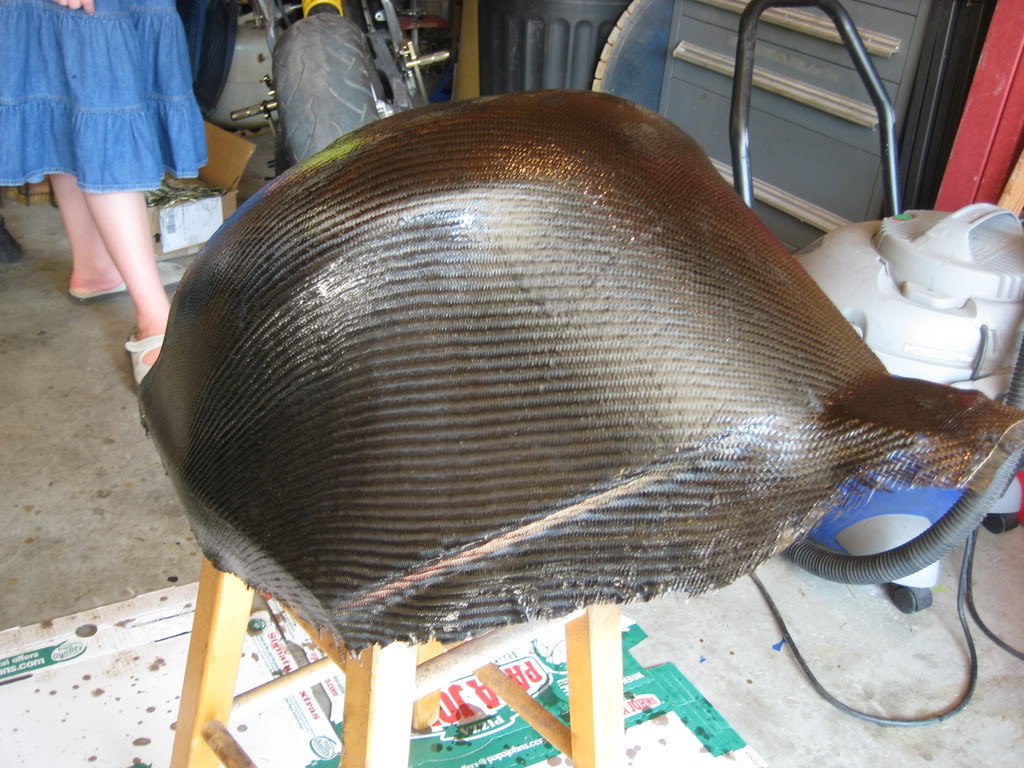
you will want to trim the excess off before it cures too long. You can cut it off with scissors with a low layer count and semi-hardened resin (prolly your best bet) then... put another layer of resin on. and it looks like this:
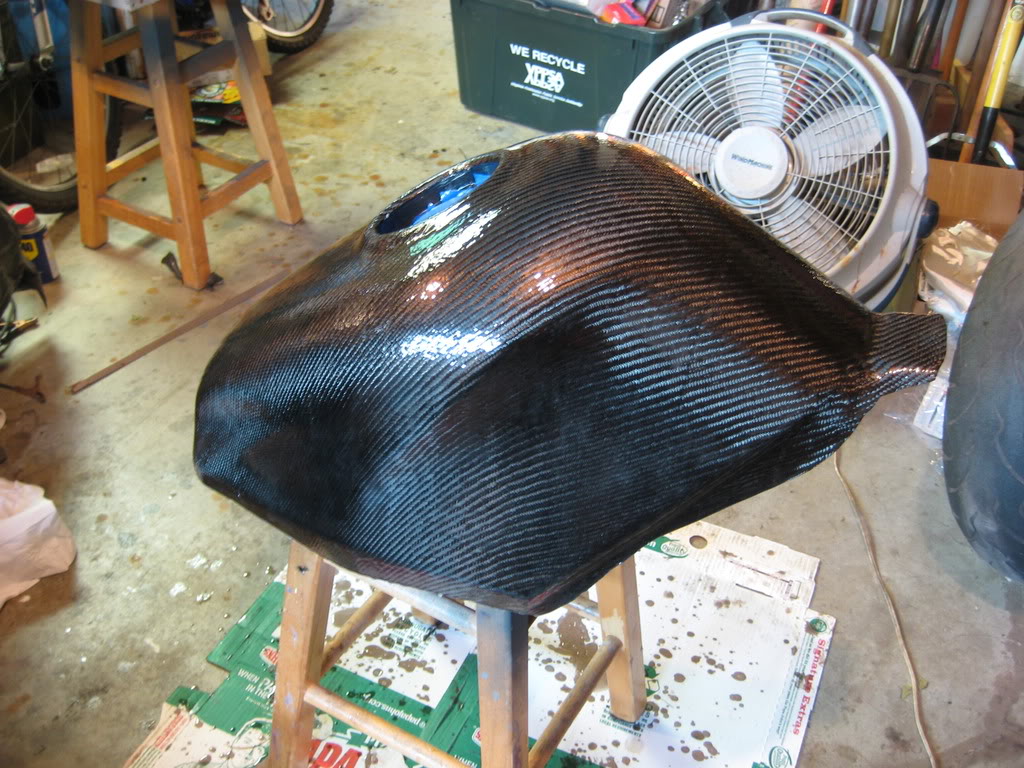
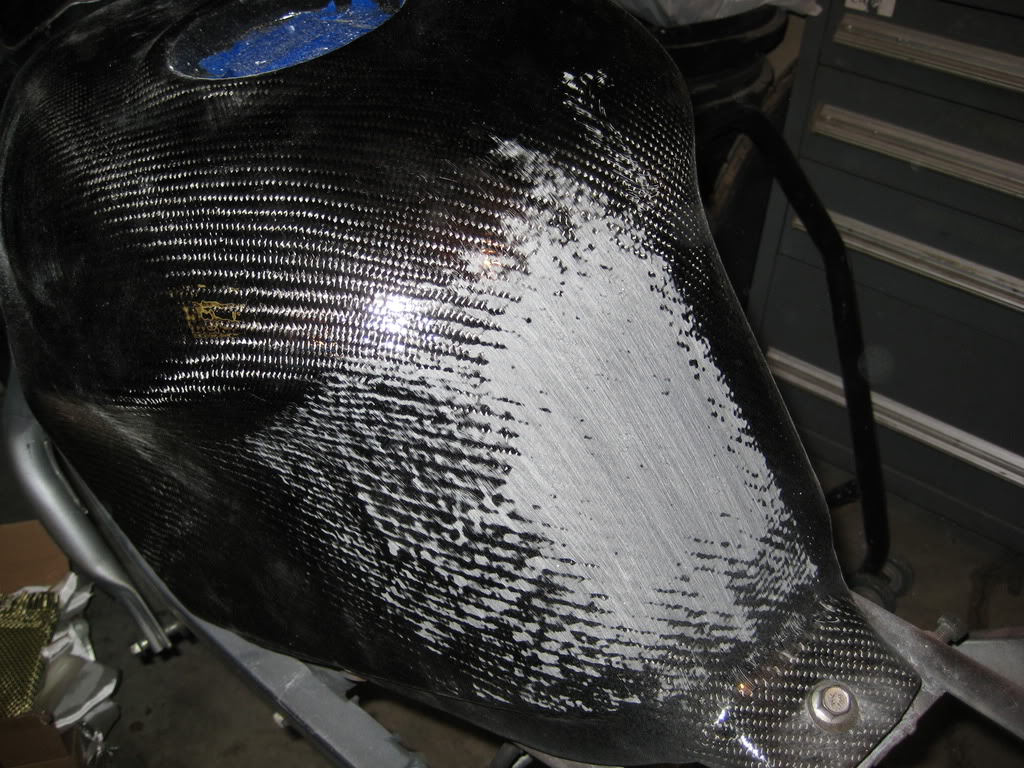
Now, you do not want to leave the tank like this.. (or maybe you do) but it will need block sanding just like other body work, and prolly another layer of resin, but that is really all there is to wrapping a tank. not so hard.
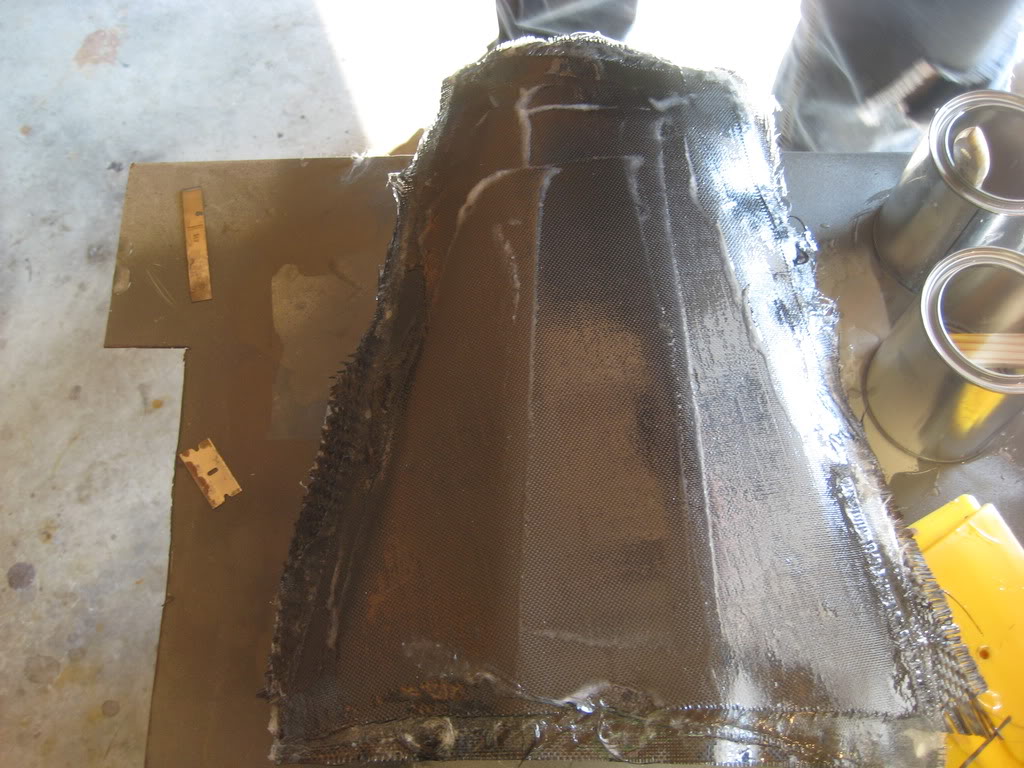
Now... if you want to make something not stick, you would do what i did for the under-tail panel
#1 prep/clean... just make sure it is smooth and clean.. ( i have also added material extending past the edges to make sure i get all of the part that i want, no ragged edges.)
#2 Wax. i use car wax first, then after buffing that out, i use some bowling ally wax. works great. technically at this pint you could put resin on it and it would most likely not stick, but use some PVA (poly vinyl Alcohol) and that will make sure it doesn't stick.
#3 Cut you material.. this time you have to cut your layers. depending on how thick/heavy/flexible you want it.. cut out your layers. I used i thin layer of carbon one very heavy layer, three heavy fiberglass (for thickness and expense) and one more thin carbon fiber.
#4 Get ready.. materials layers "mold"
#5 Now, you want to mix the resin and again, apply the resin first to the "mold" then lay your first layer of glass or carbon. this is the most important as it is the one that you will see (usually.. ) then, smooth the cloth down spreading the resin through it evenly. repeat for each layer.
i didnt leave those globs of resin on there.. i promise.
again, i apologize for lack of pictures. messy hands. i have more stuff to do, more pictures to come.
#6 let it cure before attempting to remove it. i really wanted to try and take the part off as soon as it looked cure. DONT DO IT! until the resin has fully cure (overnight is usually good) even if you manage to remove the part successfully without destroying it, your part can warp or deform after removal.
save yourself some heartache go drink a beer find someone better looking than yourself to hit on, and come back later... (much later if you are lucky *wink*)
anyway, till next time yall!
thanks for reading.
~Chris
I am working with a damaged CBR600 tank. the beauty of this is that the Carbon fiber will not only blend minor imperfections, it will also protect the bondo. Plus, because there is metal underneath you dont have to worry about making sure it is gas-proof and crash proof.
I got the tank dents all worked out and the sprayed it with primer. Some wet-sanding to get it smooth and then a gentle cleaning with soap and water. as with painting, in order to get a good end product you have to do your prep well.
So... #1 clean the surface you are going to bond to.
then.. #2 you cut your overlay material to size. this keeps you from wasting valuable time and material while your resin is mixed.
in this case i am using carbon
then, #3 you make sure that alllll your stuff is in order. that means brushes, gloves, solvent,
or anything else you spread that resin. (no pic.. sorry)
#4 Coat the entire surface FIRST. this allow you to get better adhesion as well as giving the cloth something to "stick" to. (keeps the pattern pretty too)
my hands were messy, so no pic of this stage. imagine a primer colored tank covered in resin
#5 lay the cloth down and smooth it evenly (symmetrically too if possibly) so that it stick to the surface. the resin i was using had a pot life of 12 minutes so i got my sister to help lay the resin. (this is why preparation is key)
#6 brush the rest of the resin on the smoothed cloth and continue to monitor how well it is adhering to the curves of the part. certain areas will want to pull away or bubble... just just brush it back down. the resin in the fabric will take longer to set up that in the mixing cup (due to the volume)
so here you go...
you are done.... sorta
you will want to trim the excess off before it cures too long. You can cut it off with scissors with a low layer count and semi-hardened resin (prolly your best bet) then... put another layer of resin on. and it looks like this:
Now, you do not want to leave the tank like this.. (or maybe you do) but it will need block sanding just like other body work, and prolly another layer of resin, but that is really all there is to wrapping a tank. not so hard.
Now... if you want to make something not stick, you would do what i did for the under-tail panel
#1 prep/clean... just make sure it is smooth and clean.. ( i have also added material extending past the edges to make sure i get all of the part that i want, no ragged edges.)
#2 Wax. i use car wax first, then after buffing that out, i use some bowling ally wax. works great. technically at this pint you could put resin on it and it would most likely not stick, but use some PVA (poly vinyl Alcohol) and that will make sure it doesn't stick.
#3 Cut you material.. this time you have to cut your layers. depending on how thick/heavy/flexible you want it.. cut out your layers. I used i thin layer of carbon one very heavy layer, three heavy fiberglass (for thickness and expense) and one more thin carbon fiber.
#4 Get ready.. materials layers "mold"
#5 Now, you want to mix the resin and again, apply the resin first to the "mold" then lay your first layer of glass or carbon. this is the most important as it is the one that you will see (usually.. ) then, smooth the cloth down spreading the resin through it evenly. repeat for each layer.
i didnt leave those globs of resin on there.. i promise.
again, i apologize for lack of pictures. messy hands. i have more stuff to do, more pictures to come.
#6 let it cure before attempting to remove it. i really wanted to try and take the part off as soon as it looked cure. DONT DO IT! until the resin has fully cure (overnight is usually good) even if you manage to remove the part successfully without destroying it, your part can warp or deform after removal.
save yourself some heartache go drink a beer find someone better looking than yourself to hit on, and come back later... (much later if you are lucky *wink*)
anyway, till next time yall!
thanks for reading.
~Chris


Banned
Joined: Sep 2010
Posts: 568
Likes: 2
From: Omaha,Ne.
What u need to do is the "not stick" deal with the tank covers and sell them badboyz and make some money with your handy work. Its pretty badazz lookin! I have an 1999 F4, make me one?? Id give you $150 for one. Let me know if you could tackle this or even want to??
Thread Starter
|
July 2011 ROTM
Joined: May 2010
Posts: 223
Likes: 8
From: Hampton Roads, VA
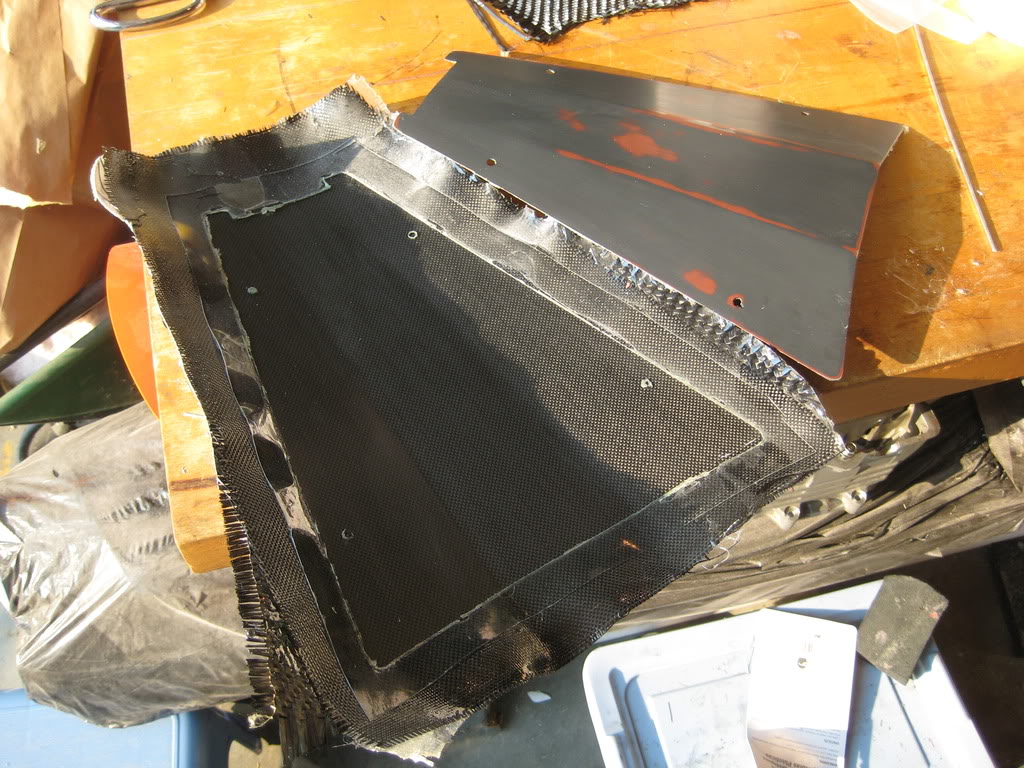
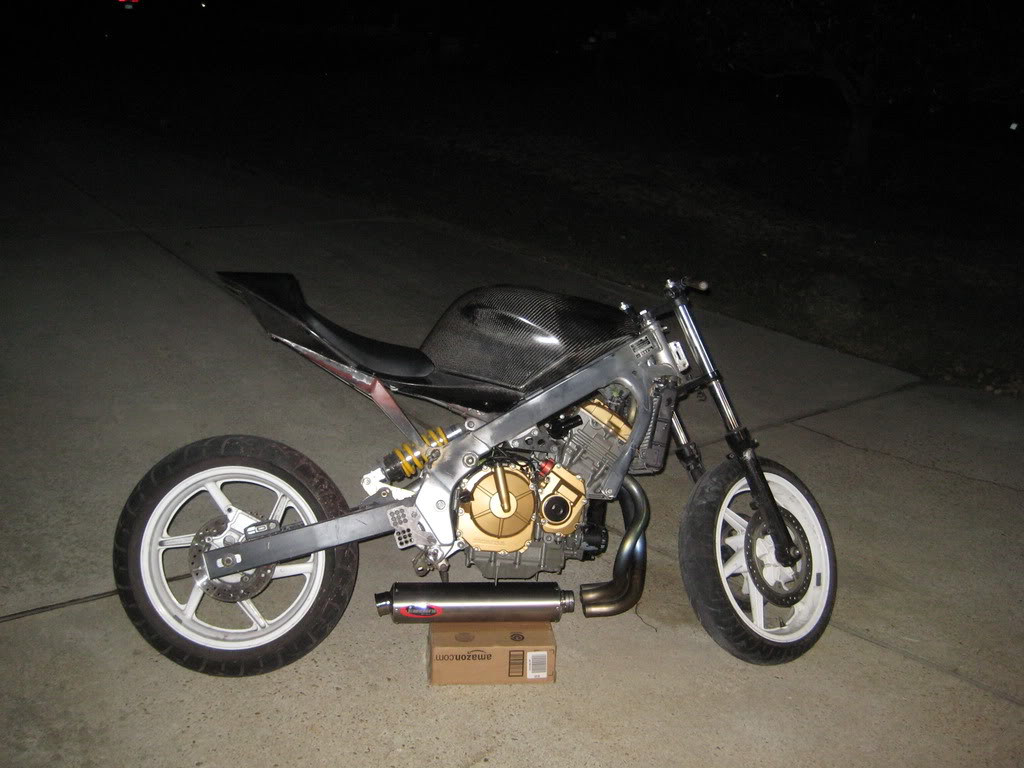
and... I also have more pictures!
the undertail is cured:
It came right off the waxed mold:
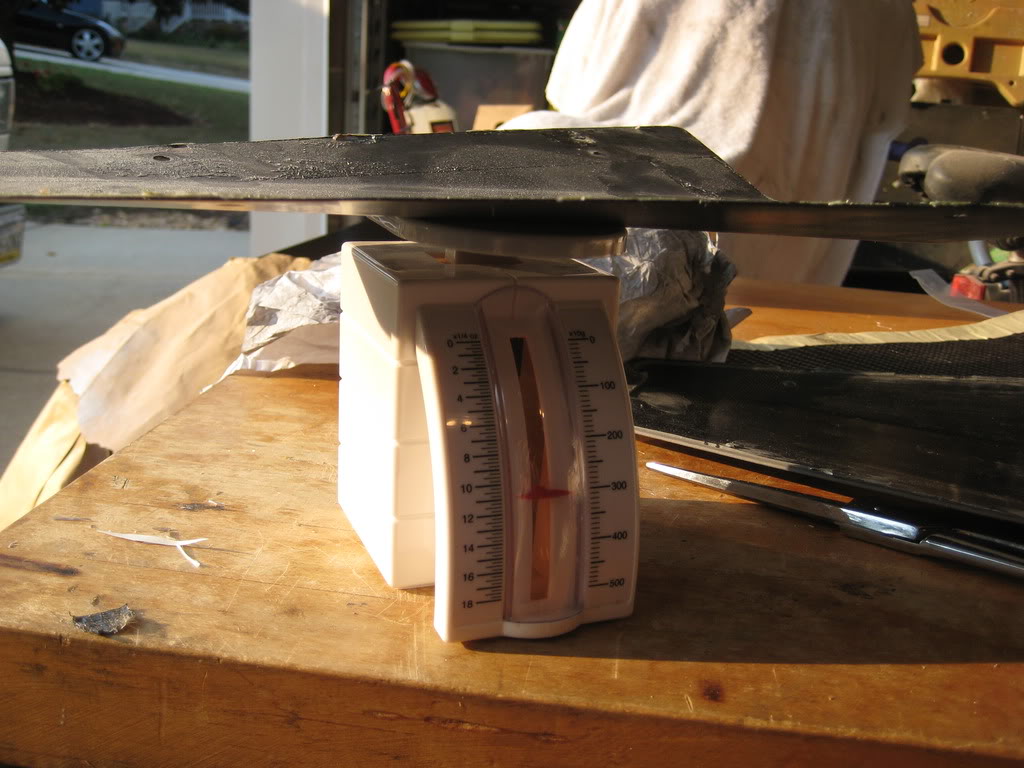
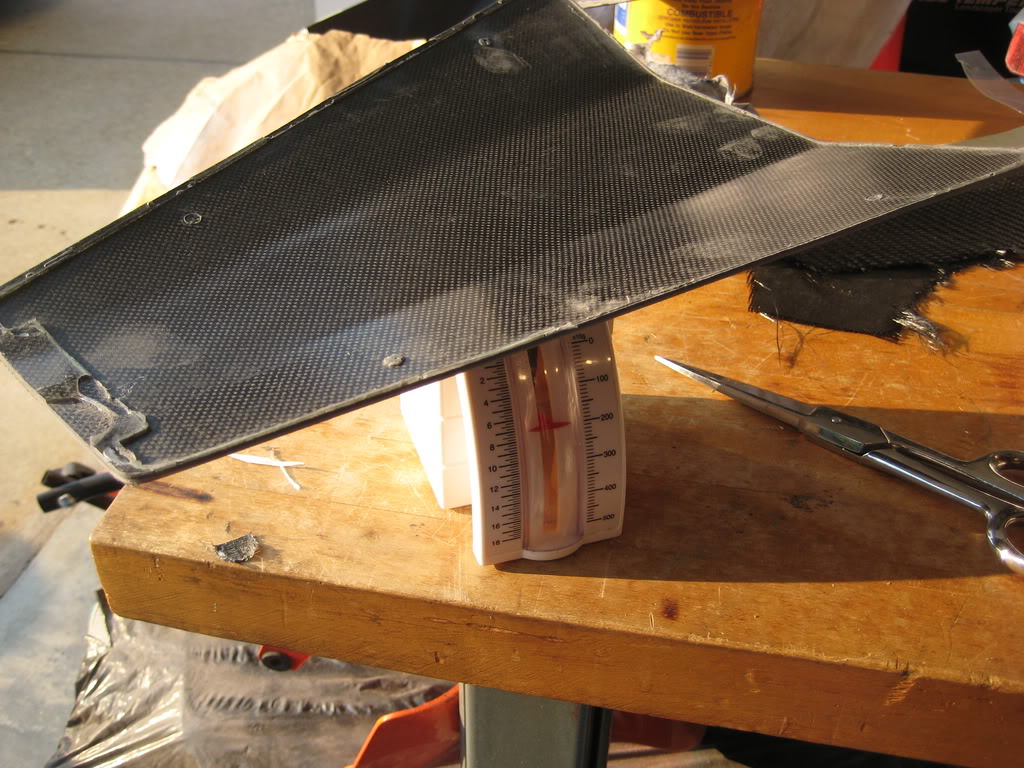
Weight comparison:
Steel 22 gauge
Carbon fiber 3 layers of carbon 3 of fiberglass
I still have some trimming and fitting to do
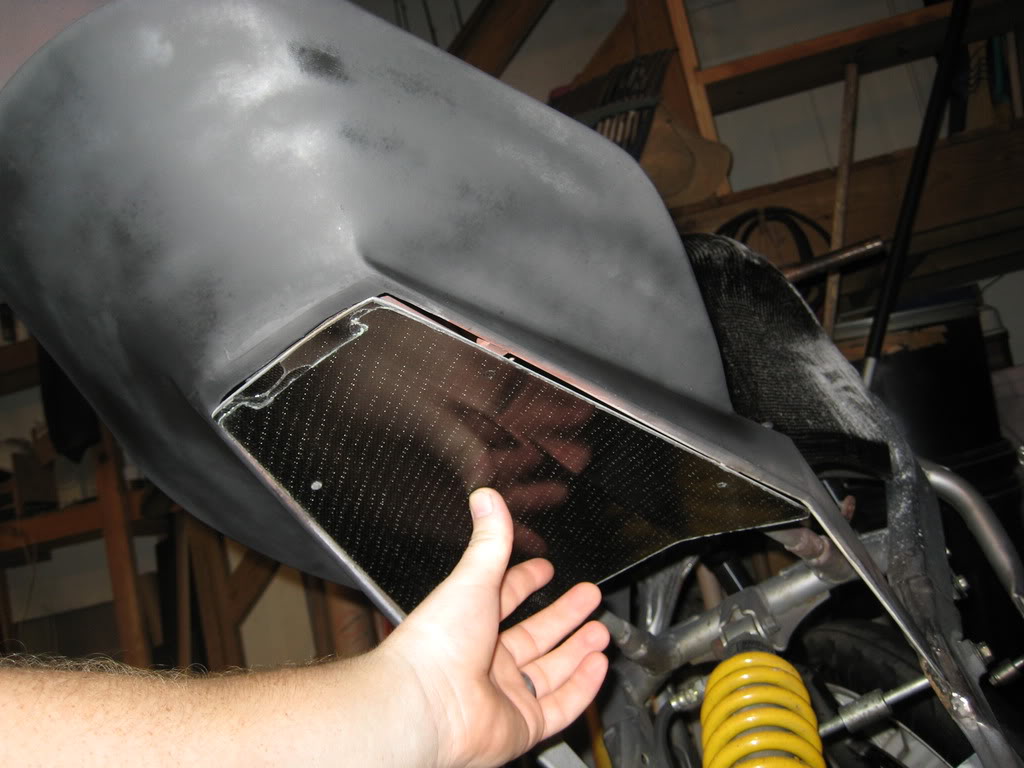
I also got started sanding the tank
more pictures soon!
thanks for reading guys!
~Chris


Thread Starter
|
July 2011 ROTM
Joined: May 2010
Posts: 223
Likes: 8
From: Hampton Roads, VA
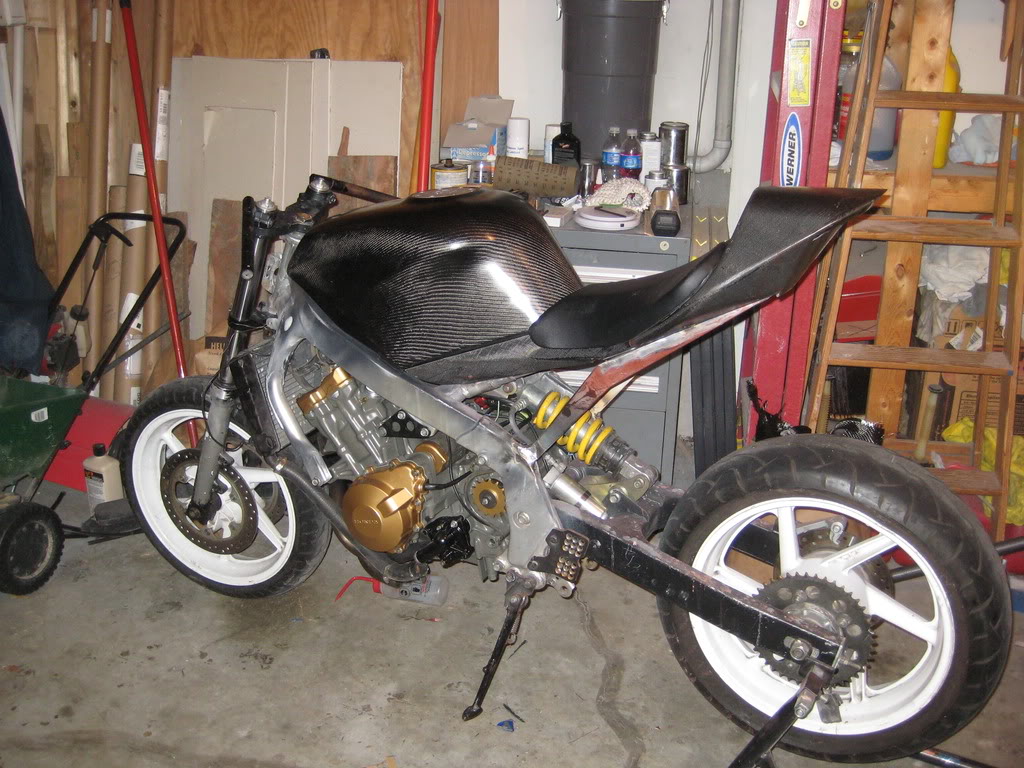
sorry for the long time between updates.. been super busy, however i have done some work to the bike. i dont have any daylight pictures of the body work on and the engine in yet.. but i have these:
as for what i used.. i used a 2k twill cloth (about $30 per yard (56 inches wide)) and i uesed west systems epoxy. 105 resin and 206 hardener. about $50 shipped for a quart of resin and a pint of hardener
you can find the the sheet easily anywhere on the net, but ebay has it and is a good source. you can also get colored fiberglass for those without dark bikes...