
How To: Swap an Engine by Yourself


Thread Starter
|
Junior Member
Joined: Feb 2013
Posts: 16
Likes: 0
From: MD
So I did this recently to my F3 and thought I would write up a post about it. The process is specific to an F3 but in theory will work for any CBR. Try it at your own risk!
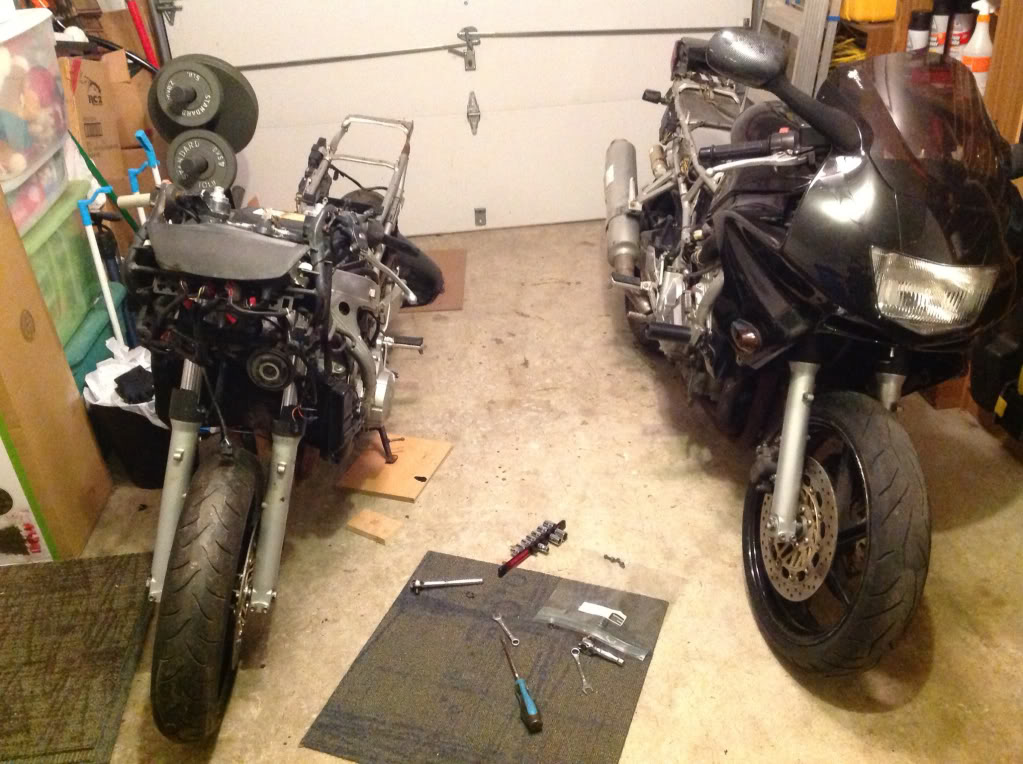
First, you need a new engine. Really I recommend just buying a whole bike. In this photo, the organ donor is on the left. I picked it up for $700, which is marginally more than you will pay for just an engine, and with it I got brand new tires, a K&N air filter and a speedohealer, which makes up the difference by itself. It also had the stock jet needles in it, which was awesome, because the dynojet needles have a much flatter tip that wasn't working out well for my bike.
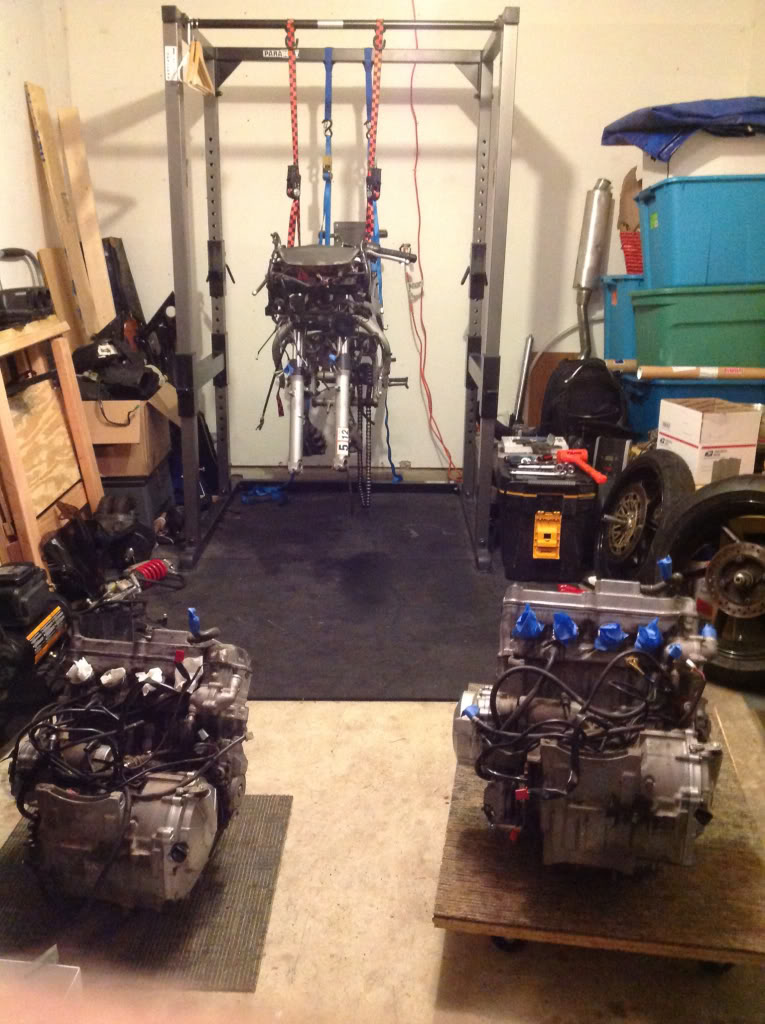
Now, the engine is very heavy. The Clymer's manual states that you should not attempt to remove the engine without a hydraulic jack and "at least 2 and preferably 3 helpers." I didn't have either of those, so I came up with a different solution. Rather than drop the engine out of the bike, I decided to lift the bike off of the engine. To do this, you will need a moving dolly (mine is outfitted with a plywood top and some carpet), 4 ratchet straps (which you will already have if you own a bike), and a secure mounting point somewhere up high (I used my power rack, but you could screw some hooks into your ceiling joists, theoretically). If you have all that, you essentially follow the process below. Note that you will have to lift and carry an engine 2-3 times to transfer the engines to and from the dolly, and they're about 150# - to avoid this, get 2 dollies.
1. Strip the bike down to just the frame, the engine and the wheels/suspension.
2. Hang the ratchet straps to your ceiling mounting points and place at some logical locations on the frame. Tighten to tension but no further.
3. Loosen both wheels, then start to raise the bike off the ground by tightening the ratchet straps, preferably symmetrically. Once the bike is off the ground, remove the wheels. (Brakes should already be off)
4. Position the moving dolly underneath of the bike, making sure it's large enough for the entire engine.
5. Begin to lower the bike. There are 4 aluminum fins sticking down on the bottom of the engine- these are designed to keep it upright when it's not attached to anything. Continue lowering the bike symmetrically until all 4 fins rest on the dolly evenly.
6. Remove the engine bolts, preferably from front to back and top to bottom. The upper engine mounting bolt goes through another bolt on the right side of the frame that tightens against the engine, remember to loosen this. Check to make sure the engine is actually loose, you may have to play with it a bit.
7. At this point you need to lift the frame up off of the engine evenly, however due to some oddly placed tabs on the engine it will not lift straight up. I had to cant the front end up and tip the engine forward a bit, but I'm sure there are other ways to do it. Anyway, lift the frame up high enough to roll out the dolly, and voila.
8. Transfer the engine to wherever you're storing it, and transfer the new engine to the dolly, or just grab another dolly. When you set the old engine down, place a support block underneath the oil cooler so it doesn't tip forward (but at no point should you lift the engine up by the oil cooler).
9. Repeat in reverse to install the new engine. I strongly recommend installing the bottom-most engine bolt first. This is the one that goes through the frame on the left side and a tab on the right.
This whole process took me about 8-10 hours, including getting the bike about 60% put back together, but I had to pull my donor engine first. Pics of the process below. Enjoy!


First, you need a new engine. Really I recommend just buying a whole bike. In this photo, the organ donor is on the left. I picked it up for $700, which is marginally more than you will pay for just an engine, and with it I got brand new tires, a K&N air filter and a speedohealer, which makes up the difference by itself. It also had the stock jet needles in it, which was awesome, because the dynojet needles have a much flatter tip that wasn't working out well for my bike.
Now, the engine is very heavy. The Clymer's manual states that you should not attempt to remove the engine without a hydraulic jack and "at least 2 and preferably 3 helpers." I didn't have either of those, so I came up with a different solution. Rather than drop the engine out of the bike, I decided to lift the bike off of the engine. To do this, you will need a moving dolly (mine is outfitted with a plywood top and some carpet), 4 ratchet straps (which you will already have if you own a bike), and a secure mounting point somewhere up high (I used my power rack, but you could screw some hooks into your ceiling joists, theoretically). If you have all that, you essentially follow the process below. Note that you will have to lift and carry an engine 2-3 times to transfer the engines to and from the dolly, and they're about 150# - to avoid this, get 2 dollies.
1. Strip the bike down to just the frame, the engine and the wheels/suspension.
2. Hang the ratchet straps to your ceiling mounting points and place at some logical locations on the frame. Tighten to tension but no further.
3. Loosen both wheels, then start to raise the bike off the ground by tightening the ratchet straps, preferably symmetrically. Once the bike is off the ground, remove the wheels. (Brakes should already be off)
4. Position the moving dolly underneath of the bike, making sure it's large enough for the entire engine.
5. Begin to lower the bike. There are 4 aluminum fins sticking down on the bottom of the engine- these are designed to keep it upright when it's not attached to anything. Continue lowering the bike symmetrically until all 4 fins rest on the dolly evenly.
6. Remove the engine bolts, preferably from front to back and top to bottom. The upper engine mounting bolt goes through another bolt on the right side of the frame that tightens against the engine, remember to loosen this. Check to make sure the engine is actually loose, you may have to play with it a bit.
7. At this point you need to lift the frame up off of the engine evenly, however due to some oddly placed tabs on the engine it will not lift straight up. I had to cant the front end up and tip the engine forward a bit, but I'm sure there are other ways to do it. Anyway, lift the frame up high enough to roll out the dolly, and voila.
8. Transfer the engine to wherever you're storing it, and transfer the new engine to the dolly, or just grab another dolly. When you set the old engine down, place a support block underneath the oil cooler so it doesn't tip forward (but at no point should you lift the engine up by the oil cooler).
9. Repeat in reverse to install the new engine. I strongly recommend installing the bottom-most engine bolt first. This is the one that goes through the frame on the left side and a tab on the right.
This whole process took me about 8-10 hours, including getting the bike about 60% put back together, but I had to pull my donor engine first. Pics of the process below. Enjoy!

Junior Member
Joined: Jul 2014
Posts: 2
Likes: 0
HEy everyone, I tried to search the forum for some cbr600f4 and hornet engine swap but I didn't found anything. I have F4 but I want to have fuel injection because it runs smoother, I had one before. F4i sport build for stunt riding was awesome!!! now I live in Denmark and here is very expensive to have f4i so I bought f4 and have plans to make it into f4i 
Soooo my question. does honda hornet engine is the same as cbr engine I mean the bolting to the frame? I want to have fuel injection plus reverse front forks so I was thinking to buy Hornet with reverts front forks and just put everything in to my F4
Soooo my question. does honda hornet engine is the same as cbr engine I mean the bolting to the frame? I want to have fuel injection plus reverse front forks so I was thinking to buy Hornet with reverts front forks and just put everything in to my F4


Thread
Thread Starter
Forum
Replies
Last Post