
My F4 mod log.


Thread Starter
|
Track junkie & modaholic
Joined: Aug 2011
Posts: 1,847
Likes: 2
From: USA
phew sorry for the delay! stupid holidays 
the seats didn't quit turn out how I wanted them to, but I happy. I still have to add the passenger strap to the back but I'm going to go to a tailor for that and than bolt the strap to the seat.


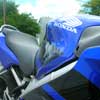
but I'm really happy with the clip-ons and Im gonna get some renthol grips (just need to survive the holidays)

the seats didn't quit turn out how I wanted them to, but I happy. I still have to add the passenger strap to the back but I'm going to go to a tailor for that and than bolt the strap to the seat.


but I'm really happy with the clip-ons and Im gonna get some renthol grips (just need to survive the holidays)

Last edited by CJardine; May 19, 2013 at 05:05 AM.

Senior Member
Joined: Apr 2009
Posts: 6,494
Likes: 5
After I recovered my pillion seat, I left the strap off.
They look good. Although, I'm concerned that you didn't seat them below the *stopper-rings*. This could be a safety issue. What did the instructions w/ the clip-ons say about this? Personally, I'd put them below those stopper-rings. If you're going to keep 'em as is, please make sure you have those bar pinch bolts on there extremely solid & torqued!
Good to see your update. Keep up your mods.
Thread Starter
|
Track junkie & modaholic
Joined: Aug 2011
Posts: 1,847
Likes: 2
From: USA
they arn't seated yet, Im waiting to do that when I adjust my suspension. the driven clip-ons are wider than the OEM ones so I have to lower the forks ~ 1 cm. will I need to do something to the rear shock to counter the front end?
edit: I still have the Stopper Rings and the instructions never mentioned anything about them, the bolts are torqued to the right specs and loc-tited.
Does anyone know anything about this? Hyperpro Fork and Shock Springs - Honda CBR600F4 1999 to 2000 - KneeDraggers.com My rear shock is more than toast I started to adjust it to accept my weight (PO was 115 lbs) and the shock is unresponsive, called up my mech friend and he checked it out, told me I needed a new one. So I was thinking of getting a used one on ebay and this.
To prep the seats I left the seats and the vinyl sheet out in the sun while I was at work, when I came home I used heavy duty adhesive on both the seat and vinyl let them sit for about 2 mins and than started to stretch the fabric over the seat. The seats feel great but Im thinking about getting new foam and shaping it to the same shape; I wanted to get a race tail but the mrs. nixed that. :S
So my fairing never showed up it really sucks but I called CBRFairings.com and they are willing to ship a new set for free through a different shipper. But now Im torn between the Playboy fairing with no decals /logos and flat black with gloss wings; like Aurora_F4i has. I love both and now that I have another chance to choose I'm torn again.
edit: I still have the Stopper Rings and the instructions never mentioned anything about them, the bolts are torqued to the right specs and loc-tited.
Does anyone know anything about this? Hyperpro Fork and Shock Springs - Honda CBR600F4 1999 to 2000 - KneeDraggers.com My rear shock is more than toast I started to adjust it to accept my weight (PO was 115 lbs) and the shock is unresponsive, called up my mech friend and he checked it out, told me I needed a new one. So I was thinking of getting a used one on ebay and this.
To prep the seats I left the seats and the vinyl sheet out in the sun while I was at work, when I came home I used heavy duty adhesive on both the seat and vinyl let them sit for about 2 mins and than started to stretch the fabric over the seat. The seats feel great but Im thinking about getting new foam and shaping it to the same shape; I wanted to get a race tail but the mrs. nixed that. :S
So my fairing never showed up
it really sucks but I called CBRFairings.com and they are willing to ship a new set for free through a different shipper. But now Im torn between the Playboy fairing with no decals /logos and flat black with gloss wings; like Aurora_F4i has. I love both and now that I have another chance to choose I'm torn again.
Last edited by CJardine; Dec 24, 2011 at 03:22 PM. Reason: Content
Senior Member
Joined: Apr 2009
Posts: 6,494
Likes: 5
Does anyone know anything about this? Hyperpro Fork and Shock Springs - Honda CBR600F4 1999 to 2000 - KneeDraggers.com My rear shock is more than toast I started to adjust it to accept my weight (PO was 115 lbs) and the shock is unresponsive, called up my mech friend and he checked it out, told me I needed a new one. So I was thinking of getting a used one on ebay and this.
Nothing wrong w/ using a used shock as long as its still good.
So my fairing never showed up it really sucks but I called CBRFairings.com and they are willing to ship a new set for free through a different shipper. But now Im torn between the Playboy fairing with no decals /logos and flat black with gloss wings; like Aurora_F4i has. I love both and now that I have another chance to choose I'm torn again.
it really sucks but I called CBRFairings.com and they are willing to ship a new set for free through a different shipper. But now Im torn between the Playboy fairing with no decals /logos and flat black with gloss wings; like Aurora_F4i has. I love both and now that I have another chance to choose I'm torn again.
Official Welcome Crew
Joined: Nov 2009
Posts: 1,641
Likes: 2
From: Long Island, New York
you have to pull the crap out of them! hehe
I also used spray adhesive on the foam. Can you give some details on what you did to put the LEDs inside the ram air scoops?
That looks pretty good and if my assumption is correct the wiring is right there and it should be relatively easy to do...
Thanks
I also used spray adhesive on the foam. Can you give some details on what you did to put the LEDs inside the ram air scoops?
That looks pretty good and if my assumption is correct the wiring is right there and it should be relatively easy to do...
Thanks
Thread Starter
|
Track junkie & modaholic
Joined: Aug 2011
Posts: 1,847
Likes: 2
From: USA
Yea sure, unfortunately I didn't take any pics wile in the process. My plan was to rewire the flush mounts as running lights but the previous owner lopped of the original connectors and twist /taped the flush mounts, so I needed to repair the bike-side wiring harness. I undid all of the twist /taped wiring, soldered two wires to the ground and put a bullet connector on one. I found OEM connectors as well so I attached the other ground to the female connector.
I soldered two wires to the turn signal wire and attached one wire to a bullet connector and left the other wire alone (for now). At this point the Ram air duct wiring was done bike-side but the turn signals still needed a bit of work.
I soldered a diode to the running light wire and a fresh wire to the other end of the diode. Attached the running light wire and the turn signal wire together than to the other end of the female connector. Now the the turn signals were done and wired for running /turn signals!
For the ram air vents I cut off the LEDs original connector, soldered wires to the now exposed leads and attached bullet connectors to each wire. At that point it was plug and play with the LEDs and turn signals
About the LED strips you can buy the 60 inch strip and cut it, there are points to solder new wires to the strip every three LEDs. Also the LEDs have a weather proof sleeve around them.
As always I heat shrink everything I solder! Don't quote me on any of this til I can get home and double check everything but I can also solder something up and take pics if you want.
OEM Connectors
050 Connectors
bullet Connectors
Bullet Connectors
LED Strip
SWFLS series Flexible Light Strip
Last edited by CJardine; Dec 25, 2011 at 02:49 PM. Reason: Grammar
Senior Member
Joined: Apr 2009
Posts: 6,494
Likes: 5
Patience. ;-) The trick is getting the creases/folds on the backside of the seat b/f stapling.