
Need help, can't get motorcycle started or to stay running


Thread Starter
|
Banned
Joined: May 2024
Posts: 1
Likes: 0
Hi, I am new to the forum but have used it in the past for help when people had similar problems but this time I am at a loss and can't find anything. I have a 1998 Honda CBR600F3 and I got it out of storage around the end of April for the season. However, when I tried to start the bike after charging the battery I started to experience issues with it not starting it would sound like it was trying to start, then after a little bit gas started leaking out towards the front of the bike and it looked like it was coming out of the air duct. I eventually got the bike running but it didn't sound like it was running right and it wouldn't go over 4,000 rpm and the bike slowly died, after it shut off the bike wouldn't start again. My dad and I both checked the carburetor and it all seemed fine, I replaced the spark plugs in it, checked the ignition coils and there is a spark, and the first cylinder was flooded, and found gas mixed with the oil. When trying to test the spark plugs more with it all torn apart there is a very faint spark between the end of it and the plug itself, these are from a brand I don't usually use, but I am planning to get new spark plugs again next week of the brand I usually use. I am starting to feel at a loss for what it could be, any ideas or other things to check would be appreciated. Thank you
Senior Member
Joined: Apr 2015
Posts: 708
Likes: 187
From: Connecticut / Florida
"the carburetor"? - there are four of them. Most likely the idle jets are blocked.
Test with the correct plugs, change the oil, either clean the carbs properly or run a can of seafoam through the bike.
Test with the correct plugs, change the oil, either clean the carbs properly or run a can of seafoam through the bike.

Senior Member
Joined: May 2011
Posts: 1,988
Likes: 439
From: Mesa, AZ
That will never work. Carbs don’t need “cleaning”, they need “restoration”. Meaning complete disassembly to every last nut, bolt & individual component. Many expert mechanics have had to pull carbs 4-5x for ever deeper cleaning before they were restored back to factory-fresh clean OEM condition.
1. completely disassemble carbs to every last nut, bolt and individual component. If it can be further taken apart, do it. Take lots of photos and videos so you can put it back together properly. Compare to factory service-manual, just in case previous owners modified anything. Needle jets upside down is common mistake. For differentmodel, but yours should be similar with double number of carbs & parts that needs to be completely disassembled.

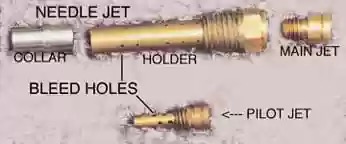
2. Completely disassemble emulsion-tube and pilot jet.
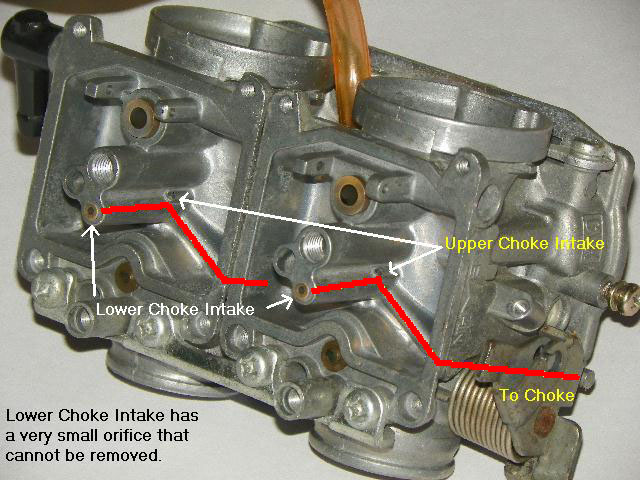
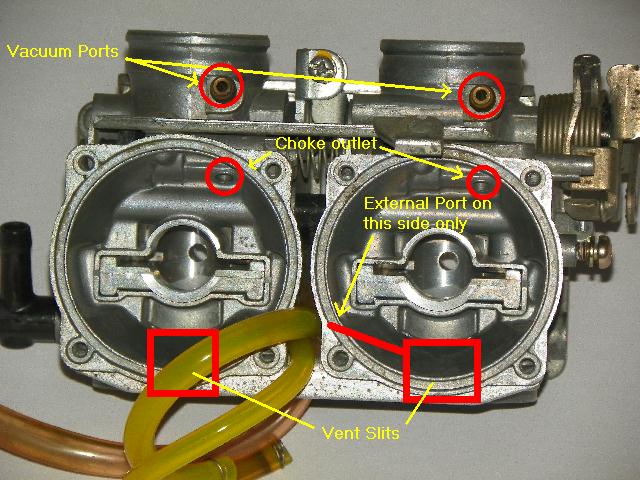
3. clean out all secret hidden passages in carb-body with PEA-based fuel-system cleaner and . Note: spray “carb-cleaners” no longer work due to removal of chlorinated compounds. Thanks a lot crunchy-granola, tree-hugging, bark-eating smelly hippies! For different model, but yours will be similar:
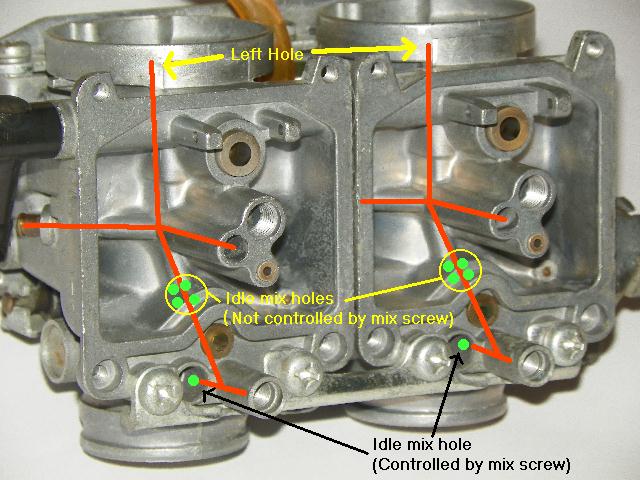

4. Poke out all lateral bleed holes with soft copper wire. Dried petrol turns to plastic and cannot be dissolved again. Must be mechanically scrubbed away. Also poke out all bleed-holes in carb-venturi towards float-bowl.
5. Ultrasonic soak everything for days. Micro soda-blast everything before reassembly.
6. Replace all rubbers: float-valves, pilot-screw O-rings, fuel-rail O-rings, float-bowl seals, slide-diaphragms if needed.
7. Set float-levels to stock. Verify with external wet-test when back on bike. 8. Do rough bench-sync. Then fine-tune with manometers
If you skipped any if these steps, that’s why bike isn’t running right. When carbs are restored back to factory-fresh clean, it’ll run like brand-new off showroom floor. That kind of restoration requires lots of specialised equipment and decades of experience on hundreds of sets of carbs and even destroying some in process of learning. Best to send to pros for expert restoration, reasonable fees and quick turnaround.
https://customcarbservices.com
1. completely disassemble carbs to every last nut, bolt and individual component. If it can be further taken apart, do it. Take lots of photos and videos so you can put it back together properly. Compare to factory service-manual, just in case previous owners modified anything. Needle jets upside down is common mistake. For differentmodel, but yours should be similar with double number of carbs & parts that needs to be completely disassembled.
2. Completely disassemble emulsion-tube and pilot jet.
3. clean out all secret hidden passages in carb-body with PEA-based fuel-system cleaner and . Note: spray “carb-cleaners” no longer work due to removal of chlorinated compounds. Thanks a lot crunchy-granola, tree-hugging, bark-eating smelly hippies! For different model, but yours will be similar:
4. Poke out all lateral bleed holes with soft copper wire. Dried petrol turns to plastic and cannot be dissolved again. Must be mechanically scrubbed away. Also poke out all bleed-holes in carb-venturi towards float-bowl.
5. Ultrasonic soak everything for days. Micro soda-blast everything before reassembly.
6. Replace all rubbers: float-valves, pilot-screw O-rings, fuel-rail O-rings, float-bowl seals, slide-diaphragms if needed.
7. Set float-levels to stock. Verify with external wet-test when back on bike. 8. Do rough bench-sync. Then fine-tune with manometers
If you skipped any if these steps, that’s why bike isn’t running right. When carbs are restored back to factory-fresh clean, it’ll run like brand-new off showroom floor. That kind of restoration requires lots of specialised equipment and decades of experience on hundreds of sets of carbs and even destroying some in process of learning. Best to send to pros for expert restoration, reasonable fees and quick turnaround.
https://customcarbservices.com
Last edited by dannoxyz; May 21, 2024 at 01:51 PM.
Senior Member
Joined: Apr 2015
Posts: 708
Likes: 187
From: Connecticut / Florida
I will check the idle jets next, the plugs I used are correct, just a different brand but I plan to get the brand I typically use next week, as for an oil change, I plan to once I get the bike running, and I tried a bit of B12 first with no luck and then tried seafoam but no luck too, or should I use the whole can of seafoam in the bike? Thank you


Senior Member
Joined: Jul 2022
Posts: 127
Likes: 8
From: Spring Valley, NV

Senior Member
Joined: May 2011
Posts: 1,988
Likes: 439
From: Mesa, AZ
nah, any bare metal will rust. Rust-removers actually just make it worse by removing rust coating and exposing bare metal below.
Phosphoric-acid works best because it leaves mildly protective phosphate coating. Can find at Home Depot as concrete stain/rust remover. Read label carefully to make sure it's 100% phosphoric acid. Best to completely fill tank with petrol immediately after rust removal.
Phosphoric-acid works best because it leaves mildly protective phosphate coating. Can find at Home Depot as concrete stain/rust remover. Read label carefully to make sure it's 100% phosphoric acid. Best to completely fill tank with petrol immediately after rust removal.


Thread
Thread Starter
Forum
Replies
Last Post

