
build time! P=


Thread Starter
|
Senior Member
Joined: Dec 2013
Posts: 247
Likes: 11
From: Scotland
you know how when you're reading someone's build thread and theres huge gaps between posts as they've 'been busy' and you have to wait for ages. well damn i've been busy! haha still haven't gotten round to even test fitting the front end. this weekend wether i get a test fit in or not i'm just going to assume i need to swap stems, get it done and get this project moving forward.
its been raining/nasty here for the best part of a month now, which makes painting impossible when you can only do it outdoors but thats the front wheel now sanded to a 1200 grit, painted, smoothed, painted, smoothed, painted, polished, lacquered and currently curing so that i can polish it back once again =D it's looking pretty clean it's fair to say, need to repair the tab on the mudguard before i get round to painting that though.
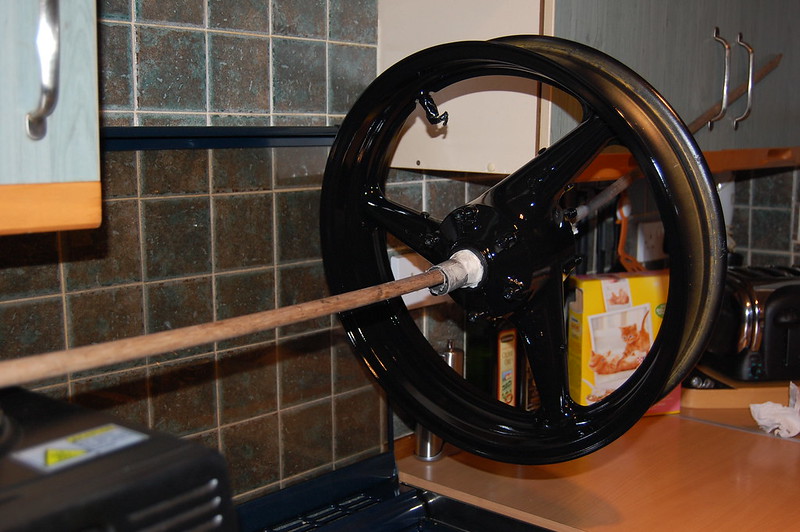

snaffled myself a pilot road 4 whilst i was at it (�94 is pretty decent) , i opted for the 120/70 which the 929 uses rather than the 120/60 that the f3 typically uses just to compensate a little for the lost height as the forks are going to be a tad shorter.

just for kicks, a 120 sitting beside a 2.25 :P
//
I've just replaced the back pads and went +2t on the rear sprocket to match the -1 i have on the front (definitely worthwhile for anyone reading and not too ridiculous for cruising at 60 either, much better roll on speed)
Gearing Commander: Motorcycle Speed, RPM, Chain & Sprockets Calculator
^ excellent resource for anyone looking at playing about with gearing
got a pile of a2 stainless bolts to start replacing some of the old stuff, some Keihin type: 99101-393 jets, 142s and 145s so i can mess about and tweak it a bit only cost me �11 which is significantly cheaper than going down the factorypro or dynojet route, not looking forward to pulling the carbs a hundred times but it'll be worth it, also got a hong kong special R1 5PW (02/03) brake light on the way with a pillion seat as well although admittedly I'm going through some second thoughts with the tail swap. I'm such an indecisive person.
its been raining/nasty here for the best part of a month now, which makes painting impossible when you can only do it outdoors but thats the front wheel now sanded to a 1200 grit, painted, smoothed, painted, smoothed, painted, polished, lacquered and currently curing so that i can polish it back once again =D it's looking pretty clean it's fair to say, need to repair the tab on the mudguard before i get round to painting that though.
snaffled myself a pilot road 4 whilst i was at it (�94 is pretty decent) , i opted for the 120/70 which the 929 uses rather than the 120/60 that the f3 typically uses just to compensate a little for the lost height as the forks are going to be a tad shorter.
just for kicks, a 120 sitting beside a 2.25 :P
//
I've just replaced the back pads and went +2t on the rear sprocket to match the -1 i have on the front (definitely worthwhile for anyone reading and not too ridiculous for cruising at 60 either, much better roll on speed)
Gearing Commander: Motorcycle Speed, RPM, Chain & Sprockets Calculator
^ excellent resource for anyone looking at playing about with gearing
got a pile of a2 stainless bolts to start replacing some of the old stuff, some Keihin type: 99101-393 jets, 142s and 145s so i can mess about and tweak it a bit only cost me �11 which is significantly cheaper than going down the factorypro or dynojet route, not looking forward to pulling the carbs a hundred times but it'll be worth it, also got a hong kong special R1 5PW (02/03) brake light on the way with a pillion seat as well although admittedly I'm going through some second thoughts with the tail swap. I'm such an indecisive person.
Thread Starter
|
Senior Member
Joined: Dec 2013
Posts: 247
Likes: 11
From: Scotland
well disaster struck today, nah haha not that bad but still a huge setback.
took all the fairings off, clocks off, started to take the clipons off and it dawned on me that i should check that the brake lever was going to fit even though i had cross referenced the part numbers and they checked out.
f3 lever is a oem: 53170-MW0-006
929 lever oem: 53170-MCF-006
at a glance i thought they were the same, rookie mistake and having to put a bike back together in minus temperatures and in the dark with a insignificant led torch is always a nightmare.
pazzo/pazzo style levers // cbr600 1991-2007 (F-18/H-626)
pazzo/pazzo style levers // cbr 929 2000-2001 (F-29/H-626)
^ for anyone interested, F-brake H-clutch.
theres lots of parts fiche sites about for cross referencing or finding parts but this seems to be one of the easier ones to use, its a very handy tool. - Honda Motorcycle OEM Parts, Babbitts Honda Parts House
now for a moment i considered just using the f3's master cylinder but the f3 uses a 1/2 and the 929 uses a 3/4. i then read this write up on custom fighters and decided against it, it would only be a short term solution that could be amended when i get round to the braided lines but i can't say that the sound of lesser braking power/feel is something i could live with - Matching a Front Master Cylinder to your Caliper(s) - Custom Fighters - Custom Streetfighter Motorcycle Forum
to be fair it wouldn't of taken much work to make the f3 lever work, but i couldn't risk not having a bike on the road if it went wrong but more to the point it would be a bit of a farce in these temperatures with only hand tools. going to have to order some new levers, coming up to christmas and having to order internationally is far from ideal with regards to shipping times, going to be a few weeks of sitting looking at that new pilot road 4 just sitting there with 330mm disks, 4pots and usd's looking all sexy and whatnot haha its killing me.
something i noticed when looking at the 929 bottom yoke is that the stem sits about half an inch higher than the bottom of the yoke, so if it happens to be a tad too long i might be able to just press it further into the bottom yoke, don't think id be comfortable pushing it further out to gain height though. I've yet to get the other one off the f3 and measure it up for a comparison but i will post the numbers up when i have it off but it'd be nice not having to swap stems.
i'm going to post the rest of my r1 5pw tail swap findings when I've got time to put it all into something comprehendible but for the time being I've definitely went off of the idea =/ i do like that f3's big *** so saving it for another project down the line.
had a wee race with an evo8 earlier, that was a laugh P=
what an unproductive day though but I'm glad i double checked before going any further!

Retired Super Moderator and Fighterer
Joined: Nov 2006
Posts: 6,146
Likes: 37
As far as the stems go - measure the distance from where the bottom bearing sits to where the top bearing sits. Those should be the same, iirc. Different lengths in stems could be explained by different thickness in the tree (top and bottom).
It's definitely best to wait on the m/c until you get the lever sorted out.
It's definitely best to wait on the m/c until you get the lever sorted out.
Thread Starter
|
Senior Member
Joined: Dec 2013
Posts: 247
Likes: 11
From: Scotland
As far as the stems go - measure the distance from where the bottom bearing sits to where the top bearing sits. Those should be the same, iirc. Different lengths in stems could be explained by different thickness in the tree (top and bottom).
It's definitely best to wait on the m/c until you get the lever sorted out.
It's definitely best to wait on the m/c until you get the lever sorted out.
Dimensions
top of stem to bottom of yoke/tree:
929 - 26cm
f3 - 24.75cm
worth noting that the 929 stem doesn't sit flush with the bottom of the yoke, it sits up 5mm so the length of the stem itself is about 25.5mm for anyone interested. also worth noting that that the f3 stem doesn't look like it pushes out, may just have been the light i was working in though.
Fork length:
top of cap (not the preload adjuster, the lowest flat section) to the very bottom of the fork.
929 - 75.3cm
f3 - 81.5
thats a 6.2cm drop! much bigger drop than i had thought it was going to be, taking into consideration that I'm running a 120/70 rather than the 120/60 it raises it 5mm so i'm looking at an overall drop of 57mm. turn in speed is going to be sharp to say the least but i do have concerns as to negative effects its probably going to have, just going to have to wait and see then take it from there. a 15mm drop is enough to sharpen things up quite drastically after all.
it's looking mean though.
now for the main issue with the swap, clearance on the subframe/cage/bracket for the headlight and clocks, its something i hadn't actually considered but the bottom yoke/tree doesn't make it all the way to the steering stops on the frame, its about 10mm off as the bottom yoke fowls on the headlight bracket. so the bikes going to be off the road over the next couple of days over christmas till i can deal with that, should be able to grind the problem areas and get a brace welded in. obviously can't risk distorting the bracket or the headlight fairing will likely never line up right again. obviously wouldn't be a problem if i were to fighter it.
may still need to grind down the steering stops on the bottom yoke dependant on how far its going to let the forks turn.
worth noting that the ram air inlet needs removed so that you can drop the yoke out, and that the radiator needs to be dropped off its brackets to do that. who would have thought that it would be a tank off and airbox off job to remove the yoke.
the weight difference between the f3 and 929 bottom yokes is almost unbelievable, i don't have a set of scales but i wouldn't be surprised if 10 x 929 alloy yokes held the same weight as a singular f3 steel one.
the guy who threw my tire on has put it on the wrong way haha atleast it'll get sorted for free.
it seems that i either didn't receive or i have misplaced one of the spacers for the front wheel... *facepalm* for the record you can't use the f3's as it's front wheel uses a 6004rs (20mm ID) bearing rather than the 929's 6005rs (25mm ID) ... bit of a nightmare to find one of these and all garages are going to be shut around here till like the 5th of January. found an entire front axle with the spacers on eBay going for a lot more than I'm happy to pay though, should have a spacer by the end of the year haha
//
i'll hopefully have enough light to get some pictures when I'm next at it =]
UPDATED 14th aug 2015
i'm coming to you from the future, ps: i'm an idiot
ANYWAY.
// aspect ratio
been doing a spot of reading and i realised something i wrote about tyre height when talking about the change in front end height due to the usds appearing to be shorter that was the right train of thought but a misunderstanding on my part thusly completely the wrong scale for measuring the changes.
so the tyre numbers 120/70/
120 is width and refers to section width, measured in mm's so 120mm wide right.
70 refers to height, I've always thought it followed suit and meant 70mm, however its actually a measurement of aspect ratio. in the case of the 120/70 it won't be all that far off of 70mm to be fair.
aspect ratio is a percentage of the nominal width, so the 70 represents 70% of 120 which = 84mm. not too far off to make visual assumptions to it meaning 70mm i reckon.
60% of 120 = 72mm
so the 120/70 is 12mm larger in sidewall than the 120/60.
this benefits me for sure.
i cant say why but another thought i had previously is that the height measurement referred to the tyre as a whole. what i mean by this is that i had thought that the 10mm+ i was gaining from the 70 would be distributed 2 ways, so 5mm contact with 5mm at the top opposing side which is really strange. I'm not sure what led me to think that as the height measurement reflects the rim to the top of the tyre singularly which has the opposite effect entirely doubling rather than halting. now whats funnier is that if it were to be distributed evenly the way i had it in my head, it would go four ways leaving a mere 2.5mm height gain haha
so instead of gaining the 5mm i had thought in height... I'm gaining 12mm height. still its 7mm in my favour.
going to go back and drop this additionally into that previous post, just to keep information correct. hey i was wrong, i'll put my hands up rather than hide it.
Last edited by iamhiding; Aug 13, 2015 at 09:41 PM.

Senior Member
Joined: May 2010
Posts: 417
Likes: 1
From: Saratoga, California
Don't forget that the F3 tubes are longer to go through the top triple clamp to mount the clipons above the clamp. The distance from the axle centerline to the top of the triple clamps on both forks is within 5 mm according to my measurements. I'm also putting a 929 front end on my F2.
Thread Starter
|
Senior Member
Joined: Dec 2013
Posts: 247
Likes: 11
From: Scotland
Don't forget that the F3 tubes are longer to go through the top triple clamp to mount the clipons above the clamp. The distance from the axle centerline to the top of the triple clamps on both forks is within 5 mm according to my measurements. I'm also putting a 929 front end on my F2.
just for the record have you got those measurements to post up? just to keep it from being mis-informative for anyone glancing over. it wasn't till after i had measured them that i had realised i should've taken it from the centre of the axle as well, the joys of working on the bike at silly hours.
I've got a couple of photos coming up in a bit of my modified headlight frame, just wondering are you planning on keeping the full fairing? i had initially but it turns out that clearance is a fairly big issue with the controls on the clocks/fairing. had it out for a run without the fairing on, the slighter than i had calculated drop in ride height is of no concern, in fact its probably almost been canceled out by using the 120/70 tyre if you're saying theres about a 5mm difference and the brakes are absolute overkill, love it.
have you started the swap yet? would love to see a couple of pics

Thread Starter
|
Senior Member
Joined: Dec 2013
Posts: 247
Likes: 11
From: Scotland
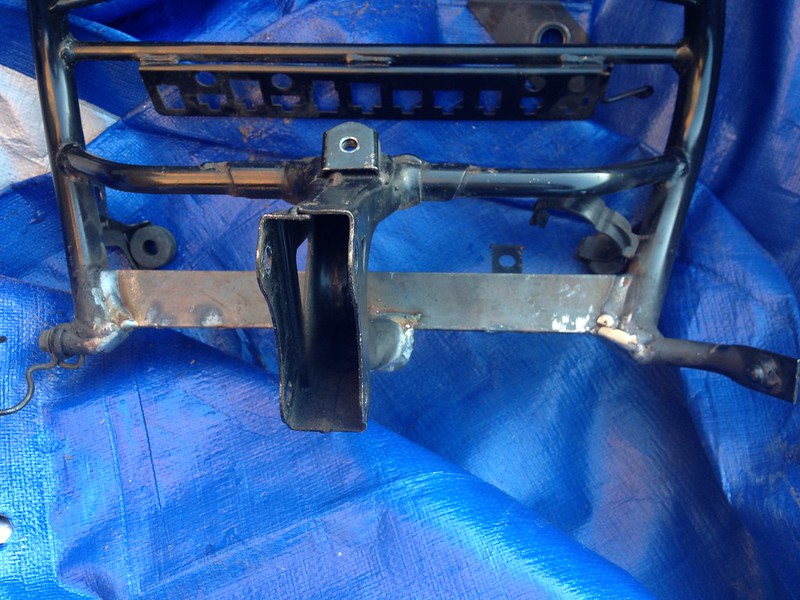
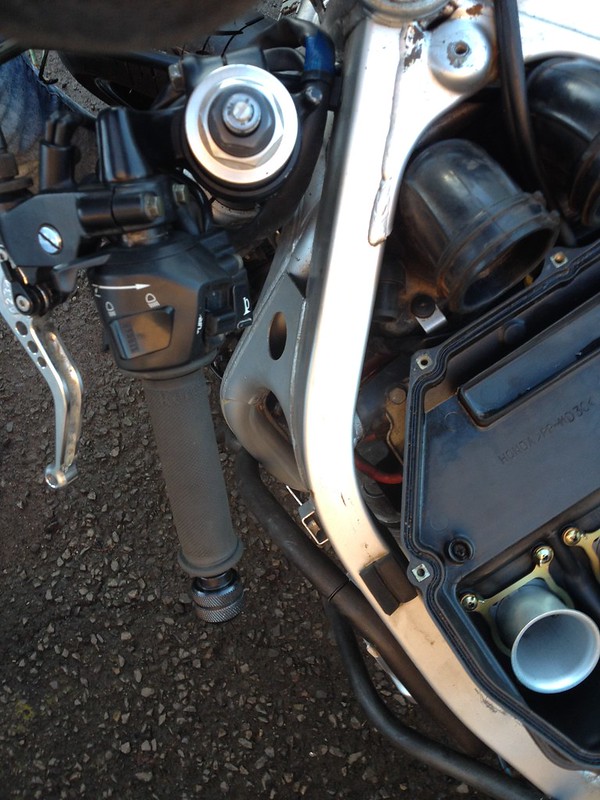
rear shot of the modified headlight bracket, the lowest spar has been cut out and a flat bar put higher up in its place to allow for bottom yoke clearance.
frontal shot, tabs for horn and relay replaced on flat section.
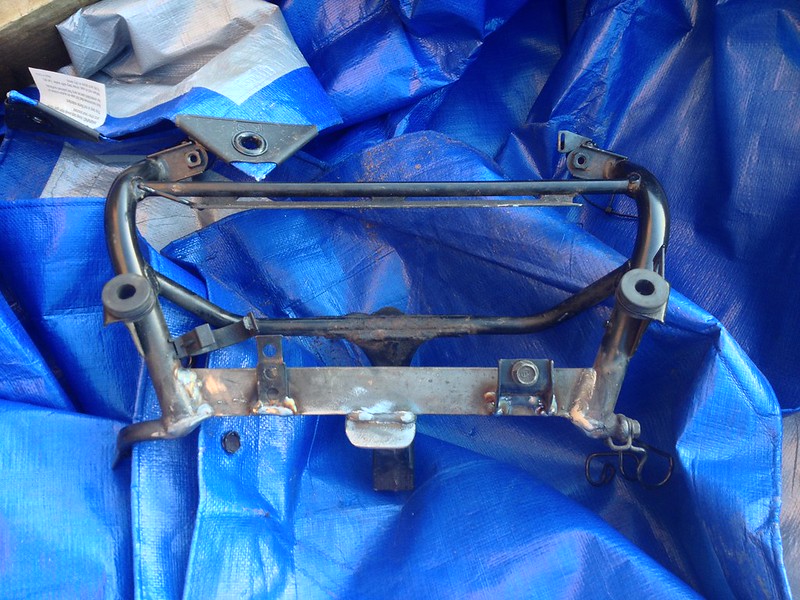
full lock left, yeah it doesn't look like any modifications are needed to be made to the steering stops themselves.
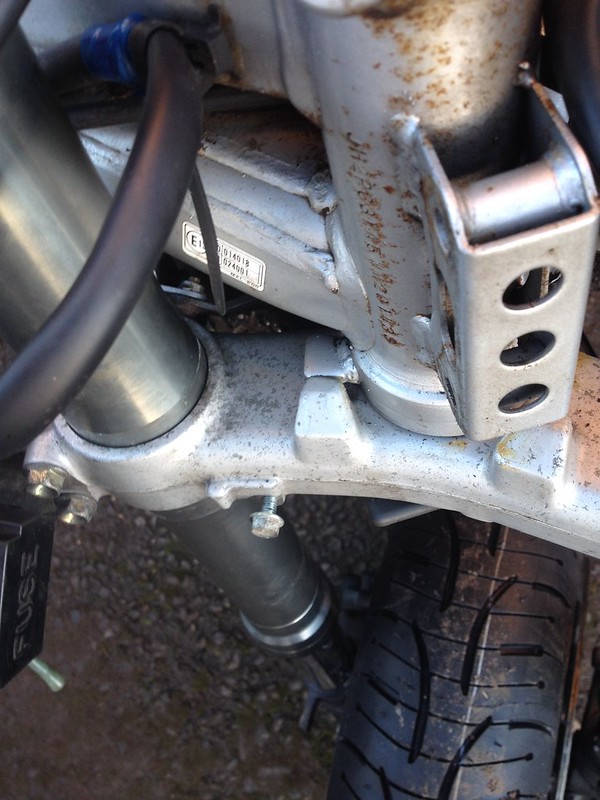
full lock right, i did have to remove the plastic covers that sit on the radiator brackets to get full lock but thats not really an issue.
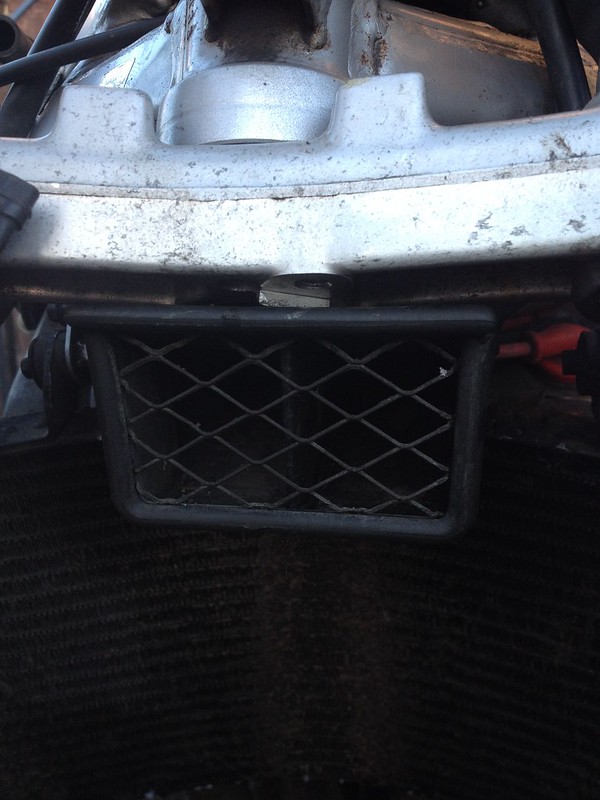
ram air intake, you'll the mounting poing for the 929's horn is under the bottom yoke, the tab just clear the intake. tab could be ground down if need be
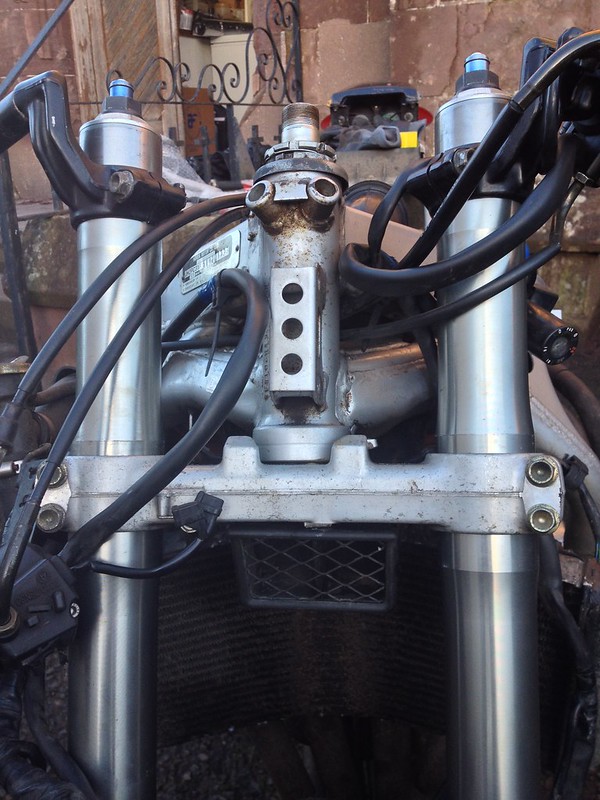
wider shot, the steering lock on the frame and on the lock itself needed to be ground down to clear, yet to play with getting the lock at the right height to allow it to lock.
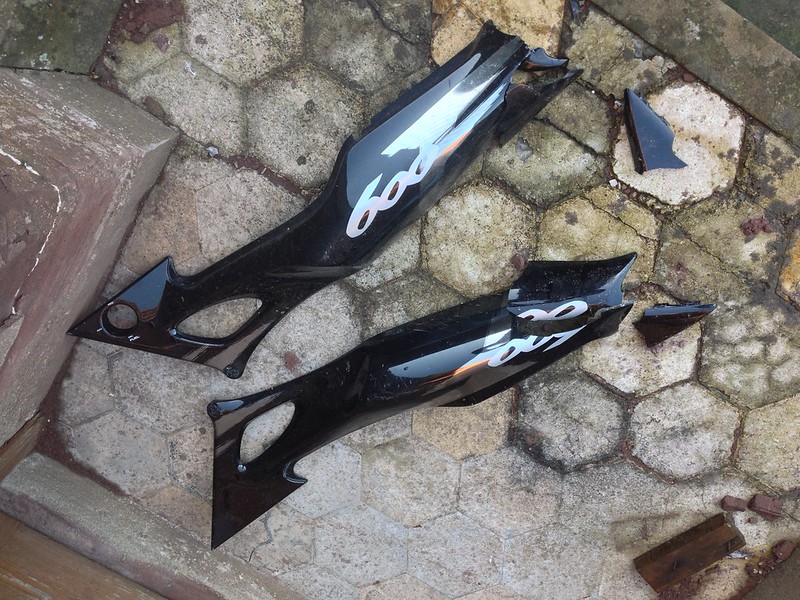
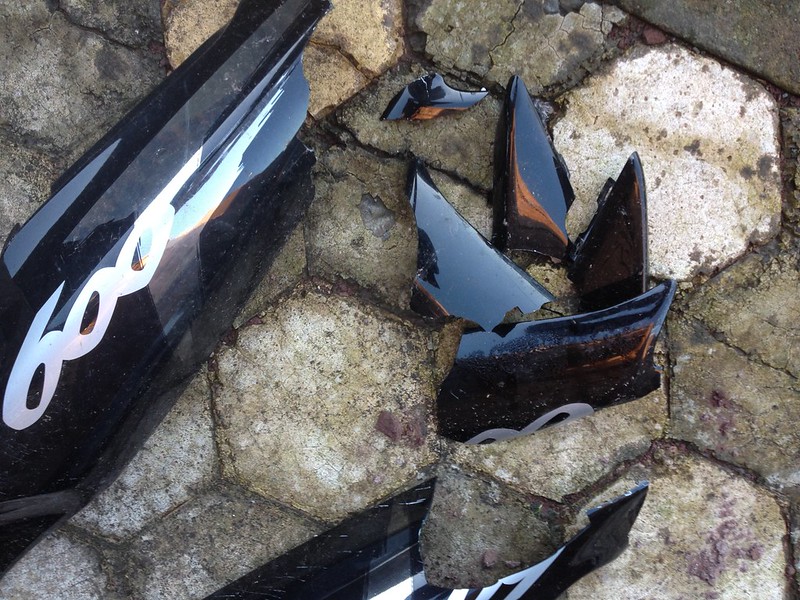
this is what happens when you leave fairings outside and off the bike when winds pick up... absolutely devastated by that one. my plastics were oem & borderline immaculate. rookie mistake right there, i'll never do that again anyway...
on the plus side i do have that r1 tail sitting still, due to the clearance issues I'm having with the fairing the bike is likely to go naked now and end up tastefully fightered.
it was also pointed out by gpfan that i hadn't taken top yoke and the clippers being mounted underneath into consideration with my calculations, going to get the measuring tape back out when I'm next at it and get some more pictures up.
bearing in mind the wet winter roads & a new front tyre, the bike was feeling pretty sweet when i took it out for a very timid blast. the bike is currently off the road. lots of work getting done in the next couple of weeks hopefully.
Thread Starter
|
Senior Member
Joined: Dec 2013
Posts: 247
Likes: 11
From: Scotland
might have picked myself up a winter bargain last week as well, I'm not running it until summer though, too much polished crap to keep clean on these salty roads.
not sure how keen i am on the paintwork but it's really quite tidy in person, oh yeah & 10 points if you can guess what it is anyone
sellers photos, just for the record.


not sure how keen i am on the paintwork but it's really quite tidy in person, oh yeah & 10 points if you can guess what it is anyone
sellers photos, just for the record.