
build time! P=


Thread Starter
|
Senior Member
Joined: Dec 2013
Posts: 247
Likes: 11
From: Scotland
this forum has been a total godsend for finding out little bits and pieces over the last year, so i thought its about time i made a decent contribution.
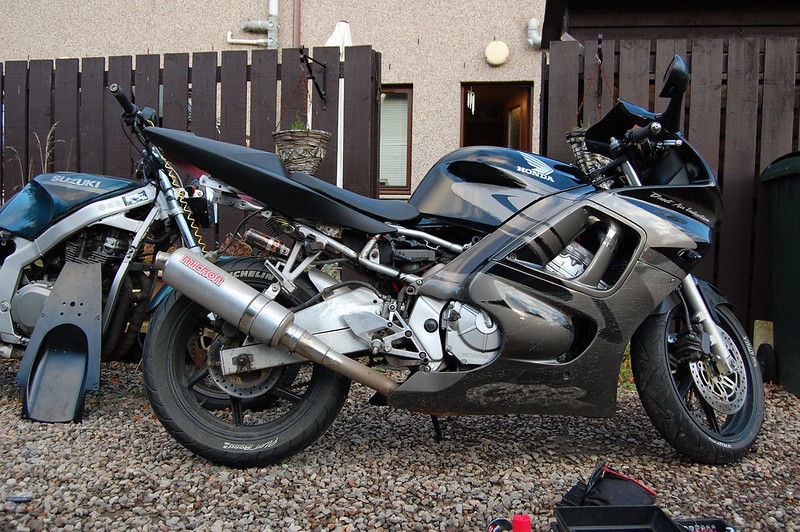
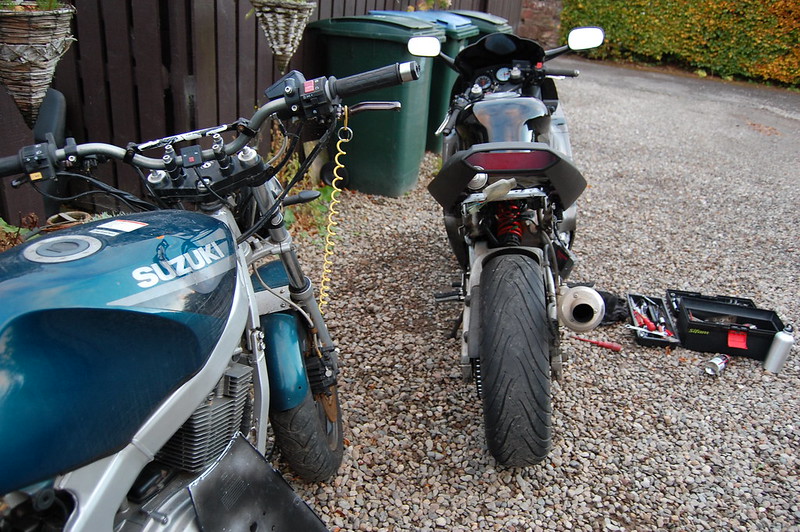
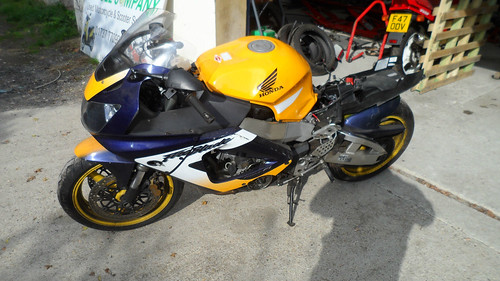
Bike: cbr600 98' F3 daily
Timescale: hopefully over the winter months. + I'm a all season rider btw.
Plans: fireblade 929 USD front end + R1 tail.
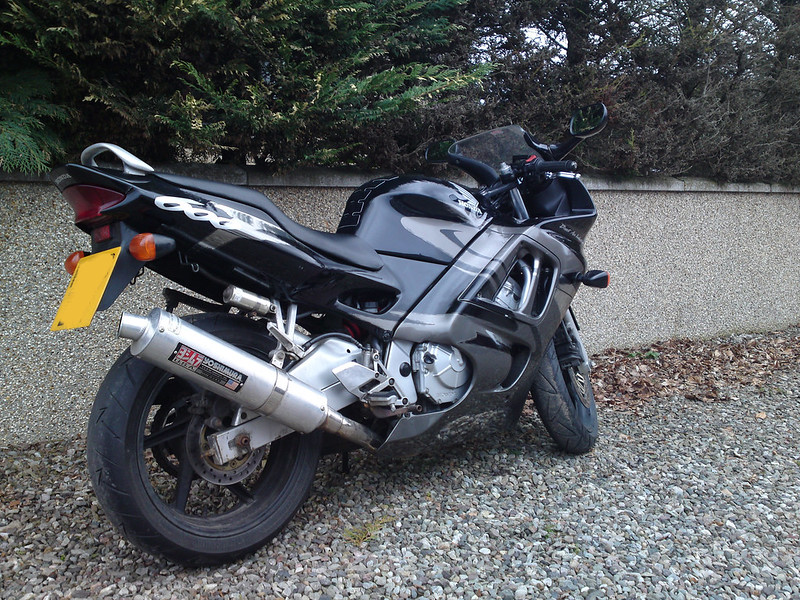
^^ the bike as i got her, well minus the shorty levers.
Story thus far:
so coming up a year now i put my old gs500 down the road and myself in a field, for the record i wouldn't recommend doing it haha and a couple of months later i got the f3, leaving the gs parked up with a dented tank, no clocks, suspected bent forks, torn steering stops and likely a misshapen headstock alongside all the usual odds and sods you would associate with putting a bike down the road (aggressive parking) haha
the whole reason I'm going through this is to resurrect that old gs and prep it for the sister sitting her test next year, anyway the plans for that are to use the f3 front end on the gs P= and seeing as its going to cost �100-300 either way, why not make the most of the situation and upgrade the cbr =P
there will be a sister-build-thread if you will haha on the gstwins forum which i'll link up here in due time.
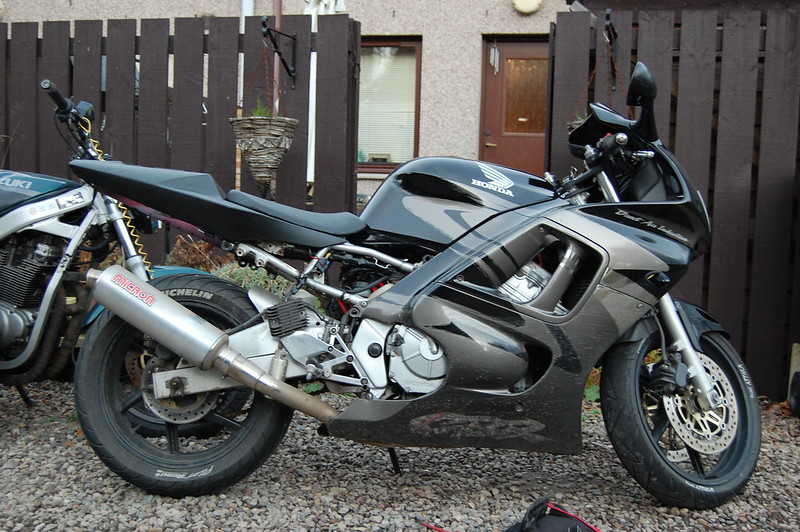
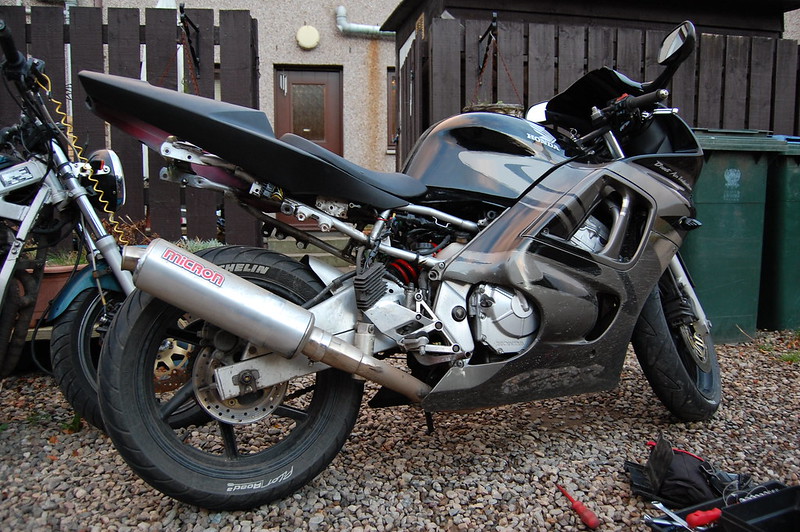
cosmetically the only thing i can fault the cbr for is its bulbous back end and i think that the r1 tail swap is way too common on most bikes and would never have considered it however i picked up the tail plastics, undertail & seat for �25 which isn't very much at all.
i plan on modifying the cbr subframe to take the r1 tail and still retain the ability to ride two-up.
and for anyone looking at front end swaps this chart is really handy: Fork conversion All ***** Racing
it shows you everything using the same bearings, which means they using the same diameter of stem. making the only two concerns to be stem length which is easily overcome by pressing your old stem / by using spacers and the obvious part, fork length effecting geometry.
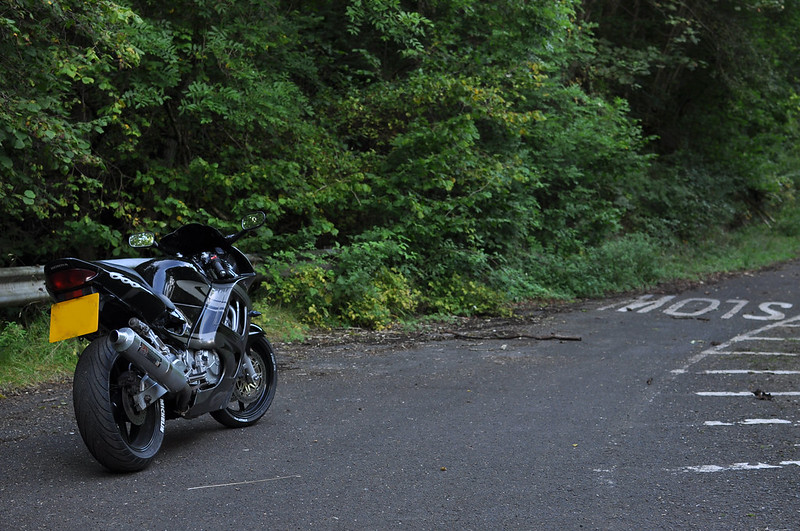
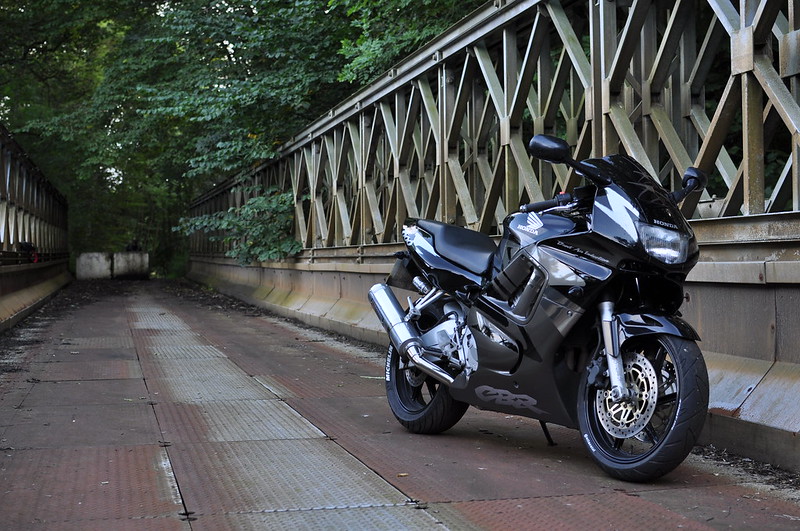
pre-autumnal pics ^^
mods at the time = black double bubble screen, mini faux-carbon black lensed indicators, cut down mudguard, -1th on the front sprocket with renthals front/back, shorty levers, adjustable ignition advancer set to about +4, GSXR1000 k3 R/R and some white tyre lettering which I've had the **** taken out of me a few times for haha but i like it so hey
also those pilot road 3's are wild come wet or dry!
//
the bike now has a micron can after a stubby yoshi mishap P= yeah it turned out that the yoshi had a proper road baffle with a stainless sleeve to make it look like a race can. we managed to ghetto it together but the bike was running like ****e and it was just a smidgen too noisy haha who knew there was such a thing! so long story short make sure you know what you're cutting into!
//
next post will have me up to date with some test fitting pics of this 2002 r1 tail!
& the blade front end should hopefully be with me either this week or next =D
Bike: cbr600 98' F3 daily
Timescale: hopefully over the winter months. + I'm a all season rider btw.
Plans: fireblade 929 USD front end + R1 tail.
^^ the bike as i got her, well minus the shorty levers.
Story thus far:
so coming up a year now i put my old gs500 down the road and myself in a field, for the record i wouldn't recommend doing it haha and a couple of months later i got the f3, leaving the gs parked up with a dented tank, no clocks, suspected bent forks, torn steering stops and likely a misshapen headstock alongside all the usual odds and sods you would associate with putting a bike down the road (aggressive parking) haha
the whole reason I'm going through this is to resurrect that old gs and prep it for the sister sitting her test next year, anyway the plans for that are to use the f3 front end on the gs P= and seeing as its going to cost �100-300 either way, why not make the most of the situation and upgrade the cbr =P
there will be a sister-build-thread if you will haha on the gstwins forum which i'll link up here in due time.
cosmetically the only thing i can fault the cbr for is its bulbous back end and i think that the r1 tail swap is way too common on most bikes and would never have considered it however i picked up the tail plastics, undertail & seat for �25 which isn't very much at all.
i plan on modifying the cbr subframe to take the r1 tail and still retain the ability to ride two-up.
and for anyone looking at front end swaps this chart is really handy: Fork conversion All ***** Racing
it shows you everything using the same bearings, which means they using the same diameter of stem. making the only two concerns to be stem length which is easily overcome by pressing your old stem / by using spacers and the obvious part, fork length effecting geometry.
pre-autumnal pics ^^
mods at the time = black double bubble screen, mini faux-carbon black lensed indicators, cut down mudguard, -1th on the front sprocket with renthals front/back, shorty levers, adjustable ignition advancer set to about +4, GSXR1000 k3 R/R and some white tyre lettering which I've had the **** taken out of me a few times for haha but i like it so hey
also those pilot road 3's are wild come wet or dry!
//
the bike now has a micron can after a stubby yoshi mishap P= yeah it turned out that the yoshi had a proper road baffle with a stainless sleeve to make it look like a race can. we managed to ghetto it together but the bike was running like ****e and it was just a smidgen too noisy haha who knew there was such a thing! so long story short make sure you know what you're cutting into!
//
next post will have me up to date with some test fitting pics of this 2002 r1 tail!
& the blade front end should hopefully be with me either this week or next =D
Last edited by iamhiding; Oct 20, 2014 at 02:37 PM.

Thread Starter
|
Senior Member
Joined: Dec 2013
Posts: 247
Likes: 11
From: Scotland
i found a few other users from various forums who've done similar that i'll link up when i get round to editing this, just for the sake of drawing comparisons.
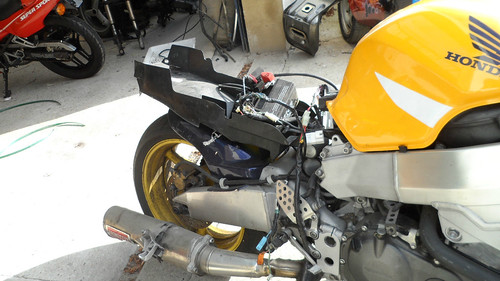
^ just pulled everything off and sat it on to see how it flows with the subframe and tank as it is. its worthwhile noting that despite the drastically different styling, both tails are a very similar width and length. too low an angle and it looks like its sagging a bit which doesn't flow with the bike.
^ much more appropriate angle, with a seat or cowl it should be close to following the line of the tank, still needs tweaking though. undertail leaning on the gs.

^ used the first thing to hand to prop it up a bit to get the angle above haha thought that was worthwhile throwing up here
^ different angle of bike and some more tweaking of tail height

^ different angle of bike
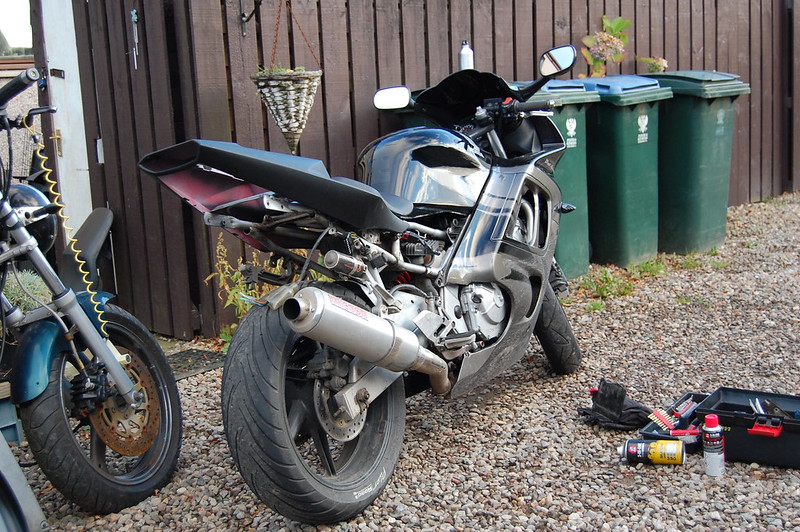
^ further round the back
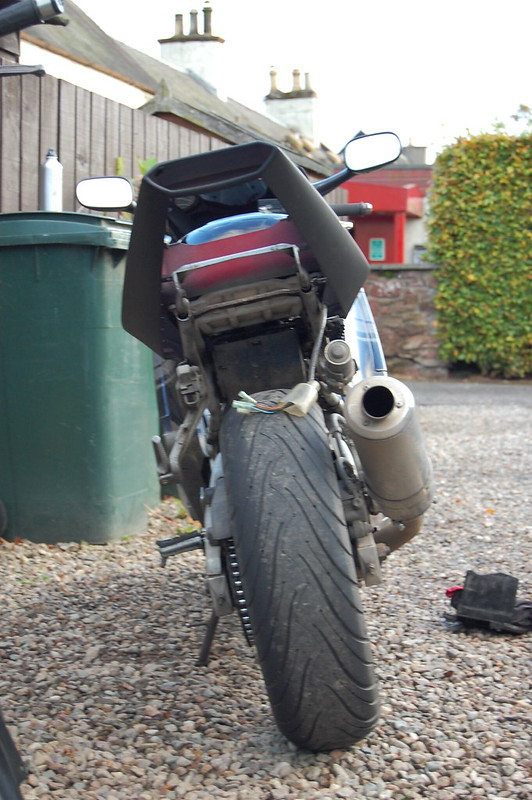
^ tail shot
^ tail shot / not your average GS even if its a bit mangled here and there.
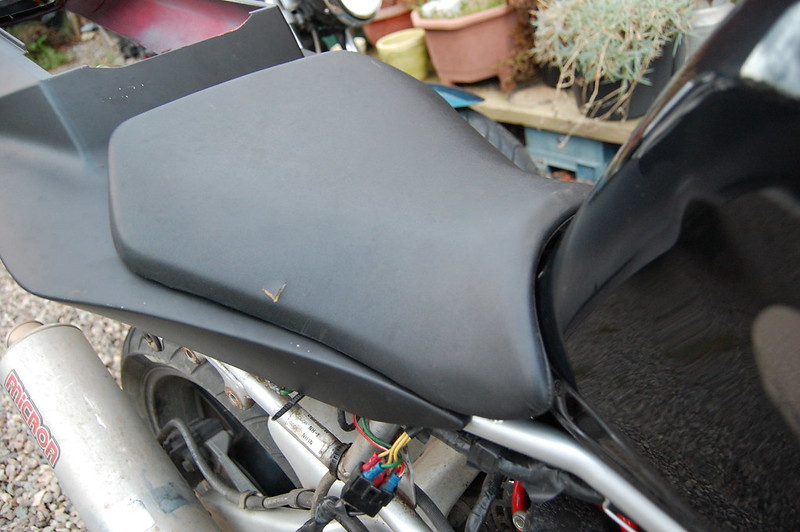
^ seat fitment against tank, almost like its supposed to be there. going to have to take a notch out the brace holing the tank so that the seat will clip in under.
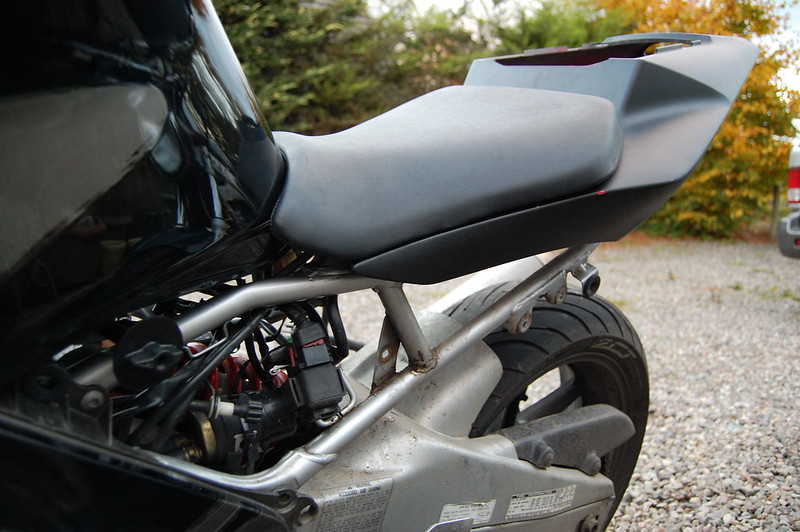
^ seat fitment and part exposed subframe, i think its a really good looking subframe.
//
so at the moment i'm gathering parts more than anything else.
waiting on this front end to arrive which is probably going to get done before the tail if i'm honest.
i'd like to have it setup as a solo seat with exhaust hanger for when I'm not carrying extra weight on the back.
to get:
- 02/03 r1 brake light, (struggling to find an oem one)
- gel battery that i can squeeze under the seat << apparently not the way to go! sticking with the 'current' agm, current getit? =P
- r1 seat/cowl,
- exhaust hanger,
- tail tidy,
- a slightly smaller but still legal number plate.
to do:
- measure f3 stem against fireblade stem, press and make a spacer accordingly, so i can get it fitted up.
- cut, bend, raise, brace and extent the subframe to accommodate the r1 tail and undertail whilst retaining the ability to ride two-up.
- fabricate a tray to relocate all the electrics up under the seat.
- decide wether I'm keeping the tail matte black or spray it gloss to match.
- paint engine casings black.
- couple of bits to sandblast and powder coat as well, frame maybe.
- remember to update the thread and take pics haha
- couple of general maintenance things as well.
//
i'm going to take some pics of the plastics themselves and compare the f3 subframe to the r1's to show where its going to need modded.
//
its a bit annoying but i need to be able to put the bike back together after every time i work on it as its my only means of transport which is going to make the timing of things a tad frustrating at times. with it coming towards winter i find myself starting things in the daylight and it being dark by the time I'm finished.
//
next update should be the arrival of parts! P=
^ just pulled everything off and sat it on to see how it flows with the subframe and tank as it is. its worthwhile noting that despite the drastically different styling, both tails are a very similar width and length. too low an angle and it looks like its sagging a bit which doesn't flow with the bike.
^ much more appropriate angle, with a seat or cowl it should be close to following the line of the tank, still needs tweaking though. undertail leaning on the gs.
^ used the first thing to hand to prop it up a bit to get the angle above haha thought that was worthwhile throwing up here
^ different angle of bike and some more tweaking of tail height
^ different angle of bike
^ further round the back
^ tail shot
^ tail shot / not your average GS even if its a bit mangled here and there.
^ seat fitment against tank, almost like its supposed to be there. going to have to take a notch out the brace holing the tank so that the seat will clip in under.
^ seat fitment and part exposed subframe, i think its a really good looking subframe.
//
so at the moment i'm gathering parts more than anything else.
waiting on this front end to arrive which is probably going to get done before the tail if i'm honest.
i'd like to have it setup as a solo seat with exhaust hanger for when I'm not carrying extra weight on the back.
to get:
- 02/03 r1 brake light, (struggling to find an oem one)
- gel battery that i can squeeze under the seat << apparently not the way to go! sticking with the 'current' agm, current getit? =P
- r1 seat/cowl,
- exhaust hanger,
- tail tidy,
- a slightly smaller but still legal number plate.
to do:
- measure f3 stem against fireblade stem, press and make a spacer accordingly, so i can get it fitted up.
- cut, bend, raise, brace and extent the subframe to accommodate the r1 tail and undertail whilst retaining the ability to ride two-up.
- fabricate a tray to relocate all the electrics up under the seat.
- decide wether I'm keeping the tail matte black or spray it gloss to match.
- paint engine casings black.
- couple of bits to sandblast and powder coat as well, frame maybe.
- remember to update the thread and take pics haha
- couple of general maintenance things as well.
//
i'm going to take some pics of the plastics themselves and compare the f3 subframe to the r1's to show where its going to need modded.
//
its a bit annoying but i need to be able to put the bike back together after every time i work on it as its my only means of transport which is going to make the timing of things a tad frustrating at times. with it coming towards winter i find myself starting things in the daylight and it being dark by the time I'm finished.
//
next update should be the arrival of parts! P=
Last edited by iamhiding; Oct 20, 2014 at 04:09 PM.
Thread Starter
|
Senior Member
Joined: Dec 2013
Posts: 247
Likes: 11
From: Scotland
Well that's finally the 929 blade front end in my possession, not time to fit yet but pictures to follow =D
Thread Starter
|
Senior Member
Joined: Dec 2013
Posts: 247
Likes: 11
From: Scotland
update.
what a nightmare simply getting a hold of the front end was, clutch perch and top yoke ended up being left out and the left set of switches has a gouge out of one of the switches. not a big deal but their communications been terrible and i reckon they've been pretty dishonest with me. (pending eBay case for a part refund) ughh people!
so yeah I've got most of a front end, just waiting on my top yolk turning up next week so i can get a test fit done and see if I'm going to need to make a spacer up or press the old stem in.
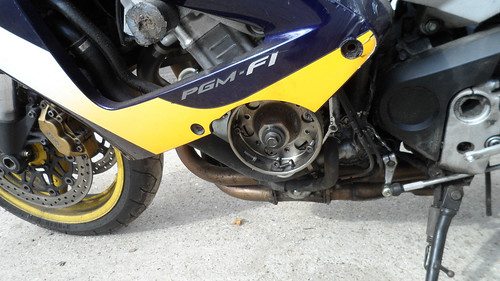
started looking at a 929 swingarm swap and a possible rebore or 918 swap as well but i should probably stick to one thing at a time haha probably not going to bother with any engine work though but i'll post up my swingers swap findings wether i go with it or not.
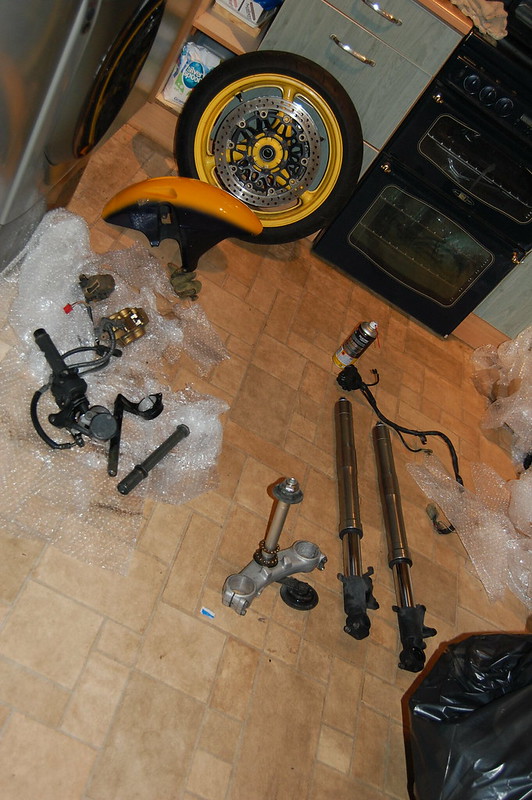
some pics of the mooshed blade i got the front end from:

the brunt of the damage has obviously been to the left side, bit mooshed on the right hand side as well though, no frontal impact by the looks of things though =D
what a nightmare simply getting a hold of the front end was, clutch perch and top yoke ended up being left out and the left set of switches has a gouge out of one of the switches. not a big deal but their communications been terrible and i reckon they've been pretty dishonest with me. (pending eBay case for a part refund) ughh people!
so yeah I've got most of a front end, just waiting on my top yolk turning up next week so i can get a test fit done and see if I'm going to need to make a spacer up or press the old stem in.
started looking at a 929 swingarm swap and a possible rebore or 918 swap as well but i should probably stick to one thing at a time haha probably not going to bother with any engine work though but i'll post up my swingers swap findings wether i go with it or not.
some pics of the mooshed blade i got the front end from:
the brunt of the damage has obviously been to the left side, bit mooshed on the right hand side as well though, no frontal impact by the looks of things though =D
Thread Starter
|
Senior Member
Joined: Dec 2013
Posts: 247
Likes: 11
From: Scotland
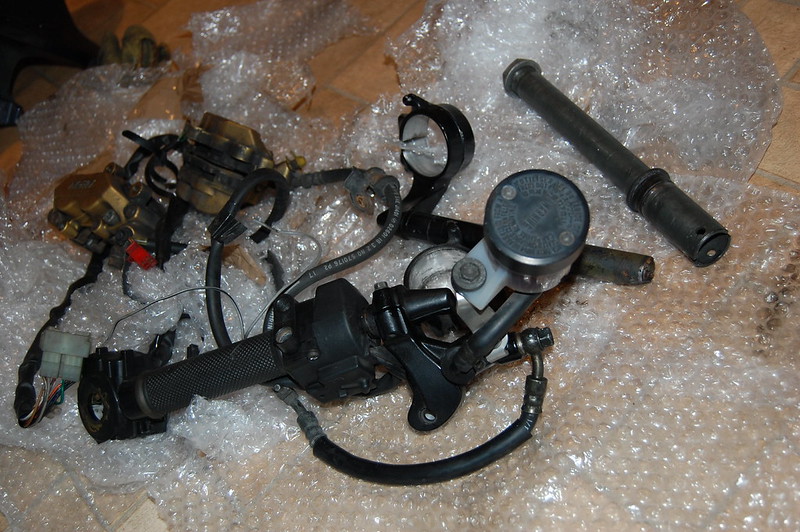
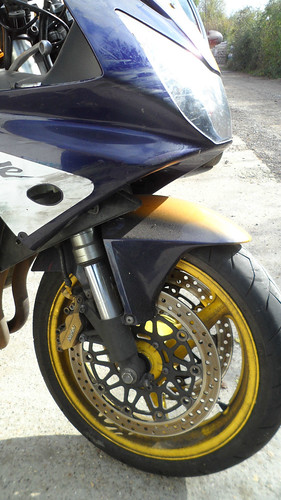
going to delete that chunky white reservoir with appropriate tubing.
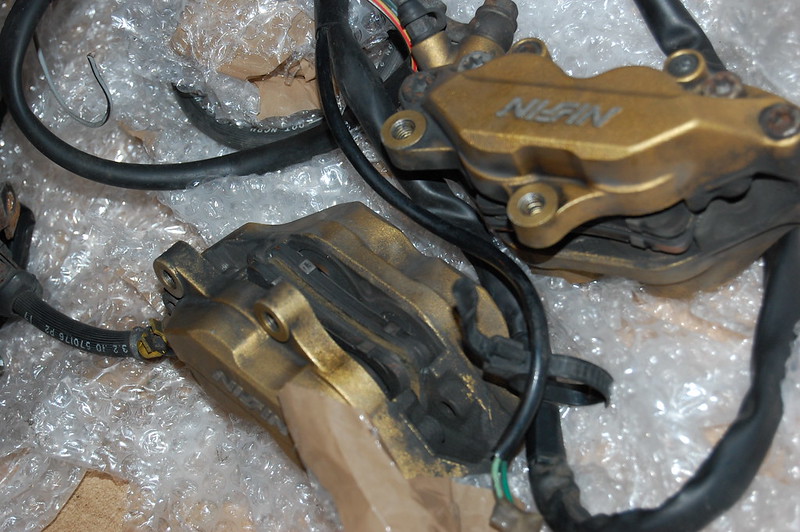
gave the brakes a quick clean up, pads will likely need replaced, haven't had them fully apart yet but the pistons seem pit free and i'll get round to doing the seals once its getting put on the road.
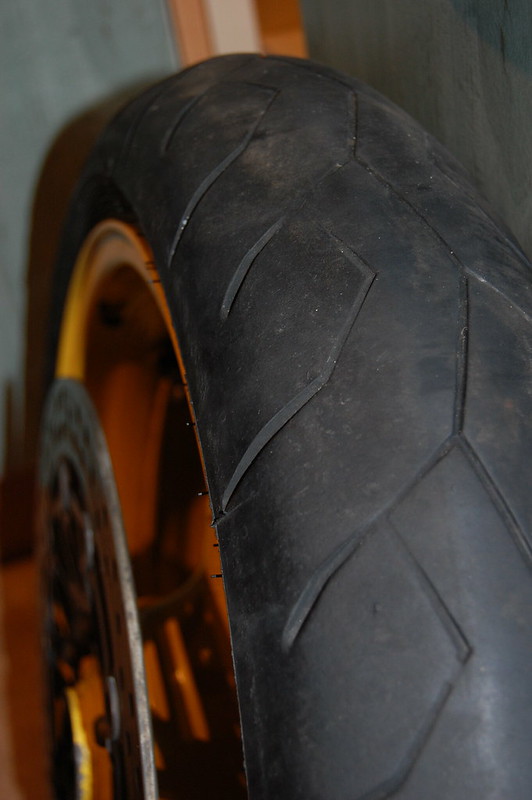
one cooked supercorsa III, was hoping it was going to be usable but i suspected that it wouldn't be any use, no worries just ordered a pilot road 4 to match up with the 3 on the back... matching tyres haha well thats been a while!
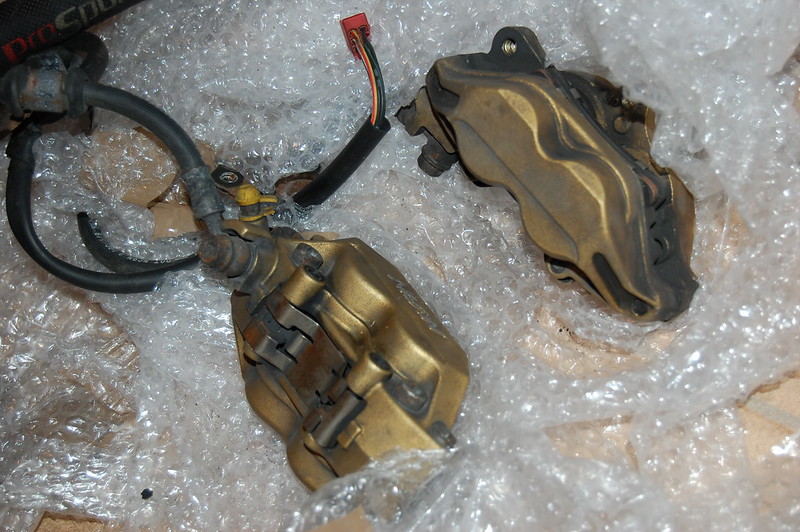


left clip-on is a bit scraped but thats not a big deal and its still straight

torn up passing light switch ^^ particularly annoyed about that. long story short i ended up paying �50 extra to get the set of switches i wasn't after in the first place and when they turn up its like that. thats bad crack!
no top yoke yet but look i even got a horn haha
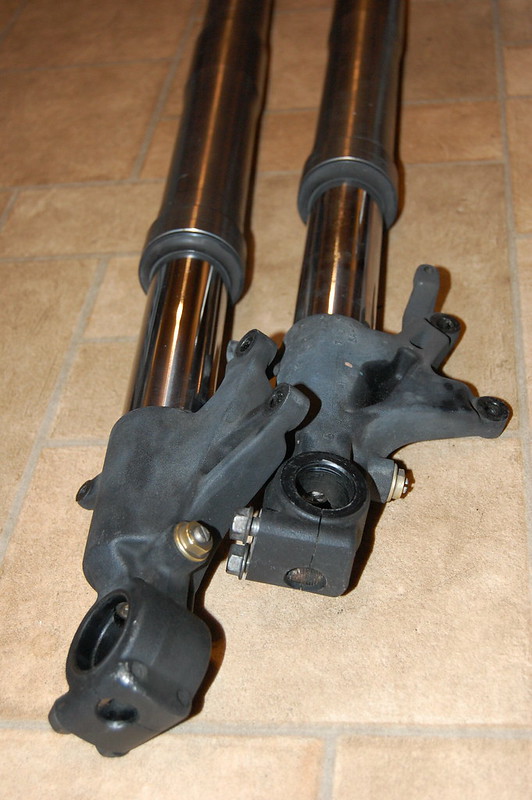
dust seals look a little perished but i'll just get round to that when it comes.
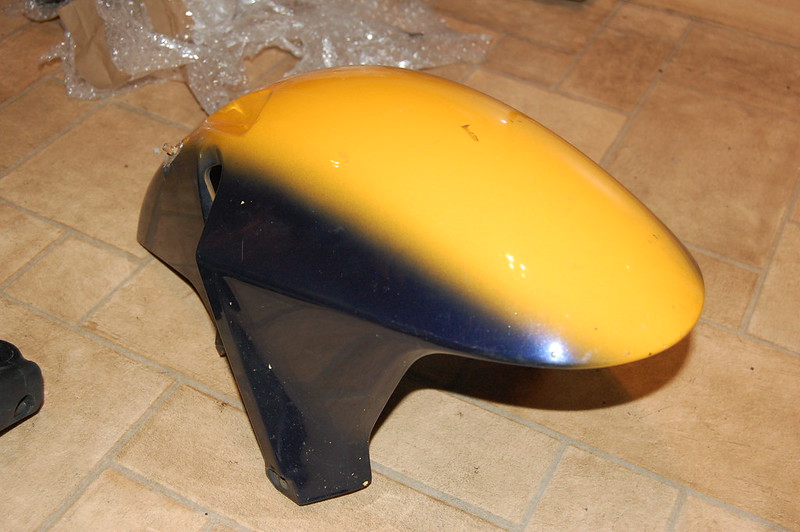
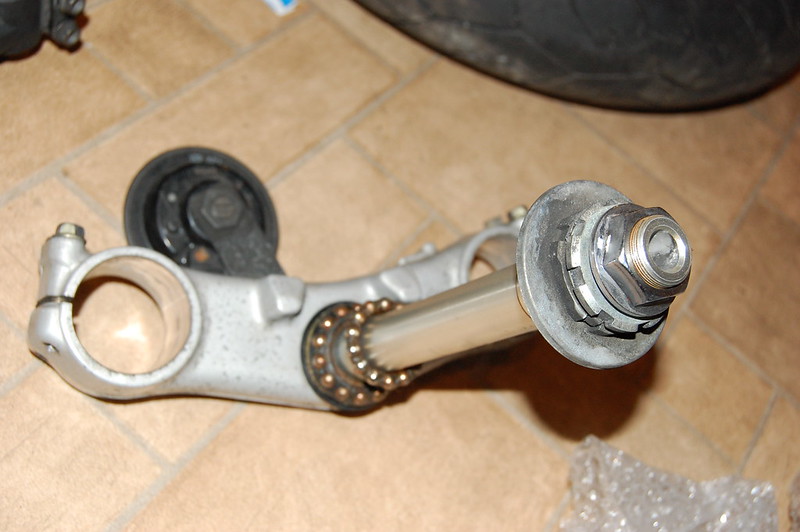
one of the mounting points is missing, going to need to repair that.
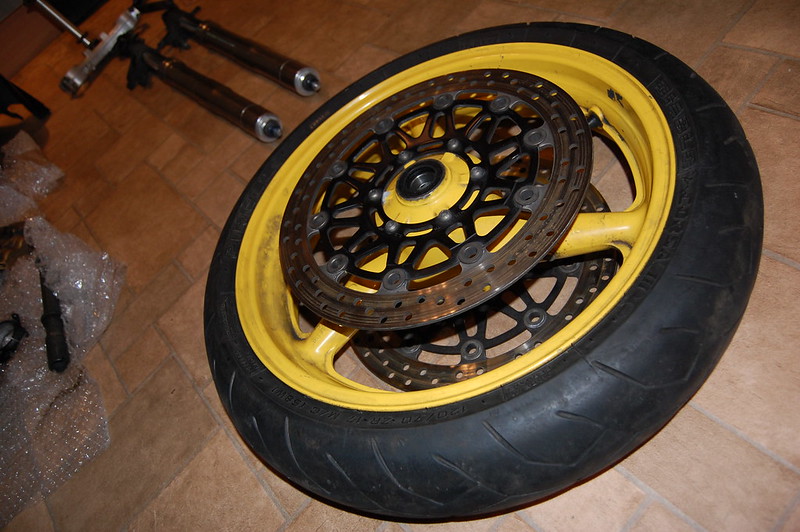
the disks are like new P=

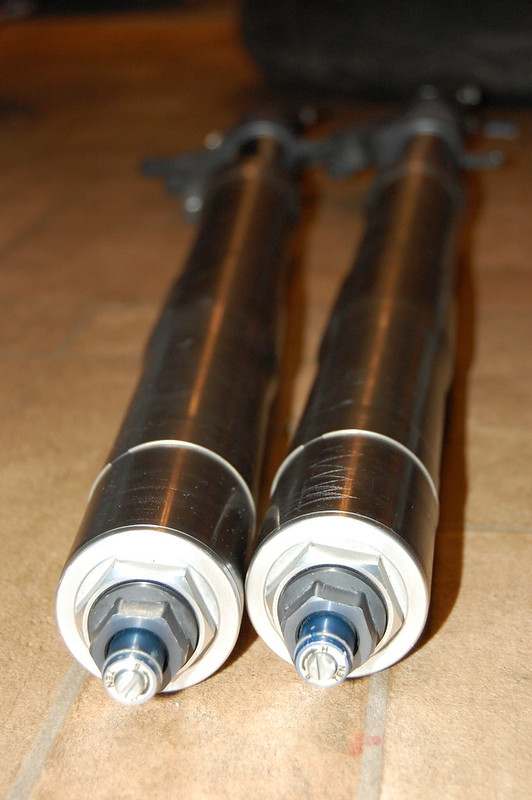
seriously though look at my forks ahhhh can't wait to get them on =D
something i hadn't thought about is that if i were to use the left hand switches there is no choke lever as the 929 is FI, would need to rig something up as i kinda need a choke in the cold weather, looking forward to riding about in snow though
if i had the money to throw about i'd chuck some enduro tyres on the cbr over winter hahaha that would look pretty badass.haven't been able to cross anything off the checklist as of yet, still gathering parts =]

Retired Super Moderator and Fighterer
Joined: Nov 2006
Posts: 6,146
Likes: 37
Any reason you want to use your 929 switch? Surely, it can't look too much different, and the plug must be different. But you could always rig up a bar that you can operate from the outside of the fairings. I operate my bandit carbs manually without the switch on the bars.
That front end is going to be sweet, btw. Lookin' good!
That front end is going to be sweet, btw. Lookin' good!
Thread Starter
|
Senior Member
Joined: Dec 2013
Posts: 247
Likes: 11
From: Scotland
Any reason you want to use your 929 switch? Surely, it can't look too much different, and the plug must be different. But you could always rig up a bar that you can operate from the outside of the fairings. I operate my bandit carbs manually without the switch on the bars.
That front end is going to be sweet, btw. Lookin' good!
That front end is going to be sweet, btw. Lookin' good!
rewiring the plug is easy enough and manually operating the choke is always an option. probably won't bother to be fair but i do quite like the look of the right switches just having the starter and the cutoff. ideally i'd love to have no switches on the bars at all but thats no use for the road is it lol