
'93 F2 Mods - Phase 2


Thread Starter
|
Welcome Crew and ROTY 2014
Joined: Dec 2010
Posts: 2,059
Likes: 6
From: Kansas
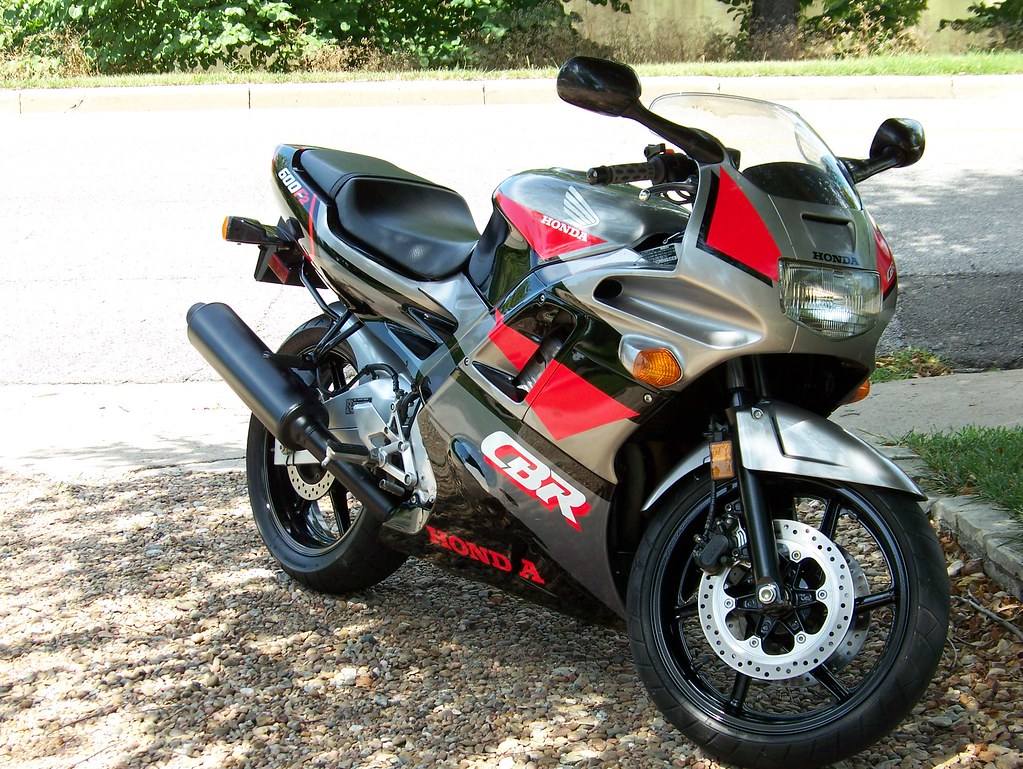
Phase 1 was basically about getting a few mods done to better prepare the bike for decent performance on the track, with little work required to go from a street-legal setup, to track-day duty. Clearly, plenty of those changes are the base for Phase 2, which in a nutshell is the bike's continued evolution toward full-time race setup, with another bike secured for street riding.
Unfortunately, I have not yet acquired a second bike, but this will hopefully happen soon. I'm basically looking for another F2 that runs and drives well, with no mechanical problems, or fluid leaks, that I can get for a very good price - fairings, mirrors, seat, etc., are not even necessary, as I can just use my current street stuff on the new F2. That is still my goal, but I am open to other models also, and have been also searching for good deals for an F4i, 900RR, 919, 929, 954, 600RR, 100RR, etc.
So, for now, I am still in the position of having to swap back and forth from street to track, and some "Phase 2" mods CANNOT take place until the bike is officially no longer needed for street riding - hopefully this will be addressed before the 2013 racing season begins.
If you are not familiar with what has been done to the bike, you can check my last thread, if interested, to see what's transpired.
'93 F2 Mods - Phase 1
I'm gonna make a few posts early in this thread, to give a brief synopsis of where things are now, mainly focusing on those things that are race/performance oriented.
Last edited by JNSRacing; Dec 19, 2012 at 09:30 AM.
Thread Starter
|
Welcome Crew and ROTY 2014
Joined: Dec 2010
Posts: 2,059
Likes: 6
From: Kansas
First off, this is the VERY beginning.
Since there was damage to the stator cover, and I already knew that I would be racing the bike, I replaced it with a heavy duty "race approved" piece, which is required by most race organizations.

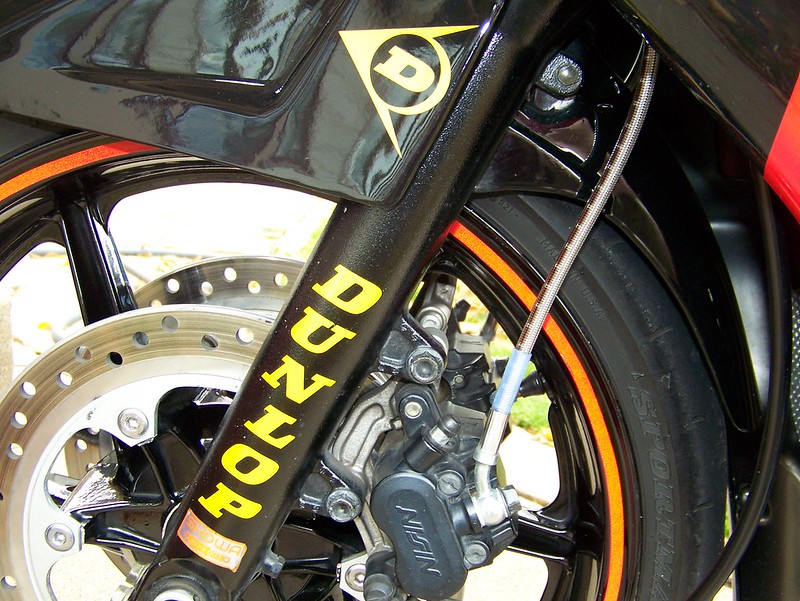
Stainless steel brake lines in the front and rear.
Frame sliders.

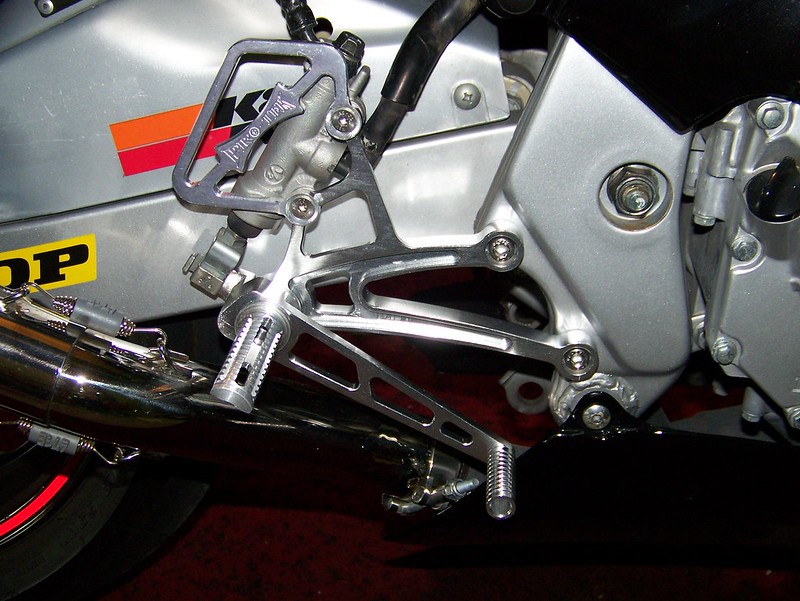
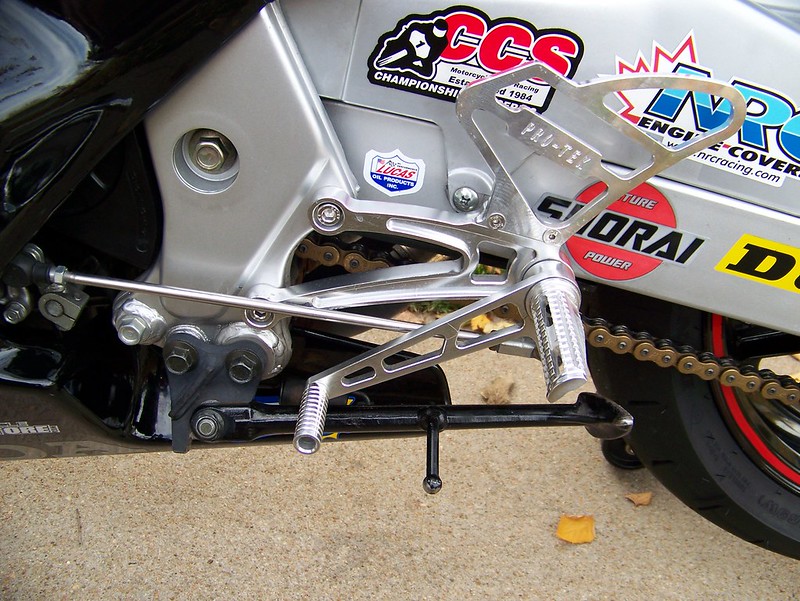
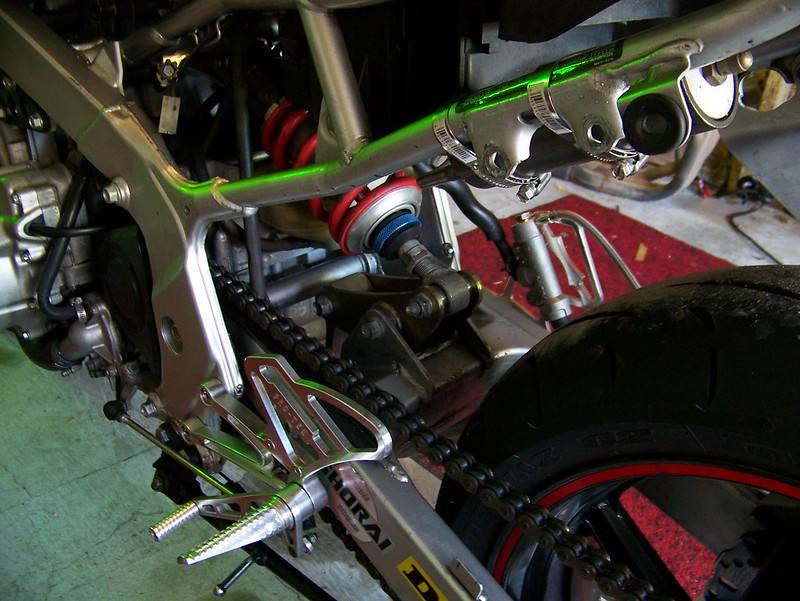
Pro-Tek rearsets.
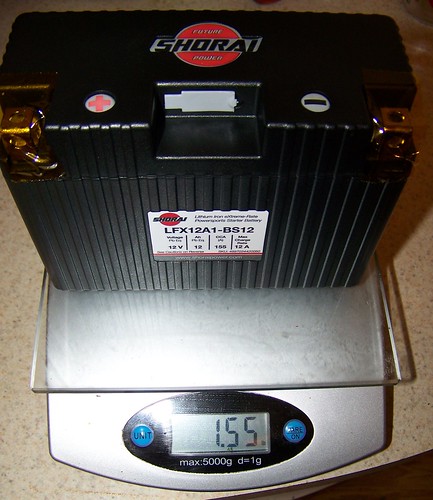
Shorai lithium iron battery (5.5 lb. lighter than OEM).
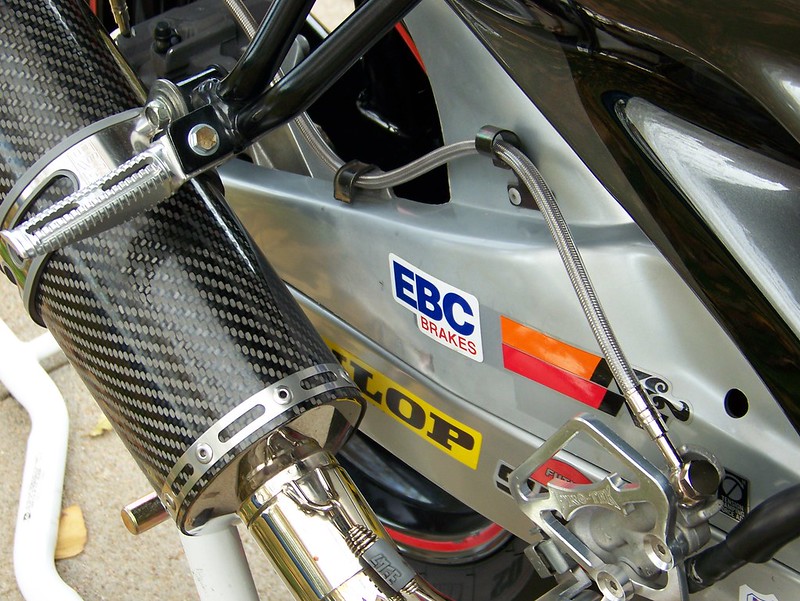
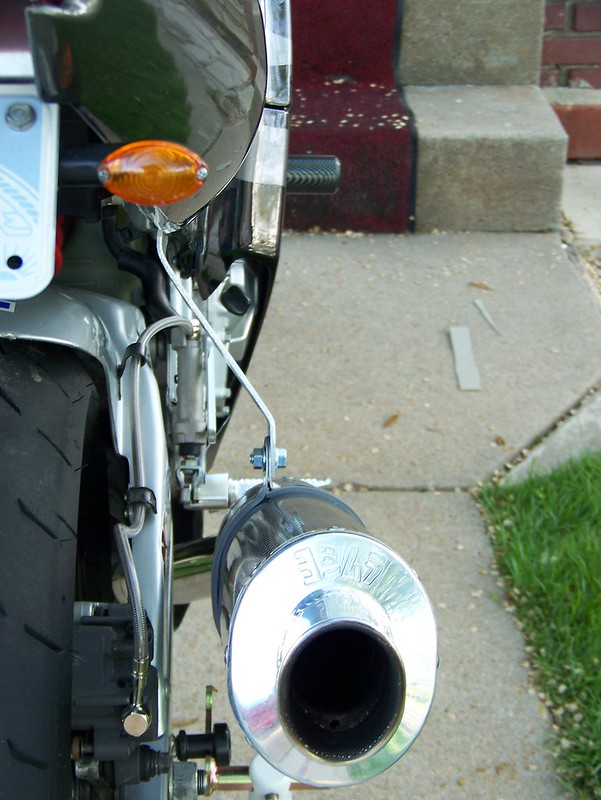
Yoshimura RS-3 slip-on.
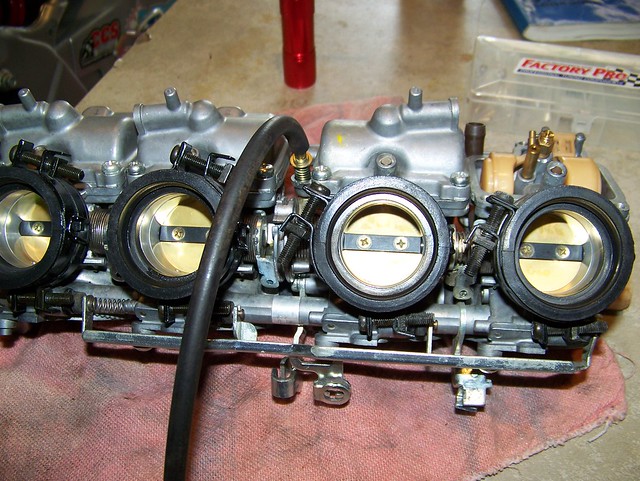
Went through carbs, cleaning them and replacing the jet needles with Factory Pro agressively tapered units, and tuned all fuel circuits for running a K&N filter and the new slip-on.


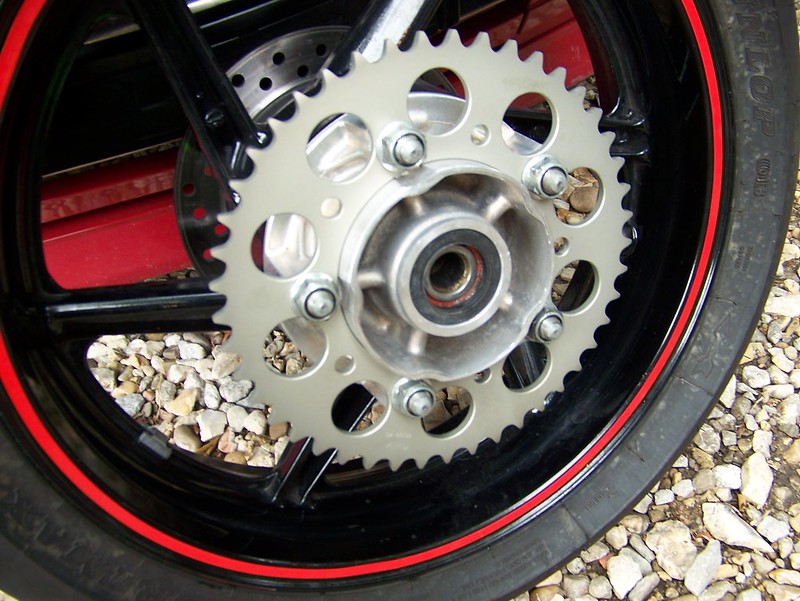
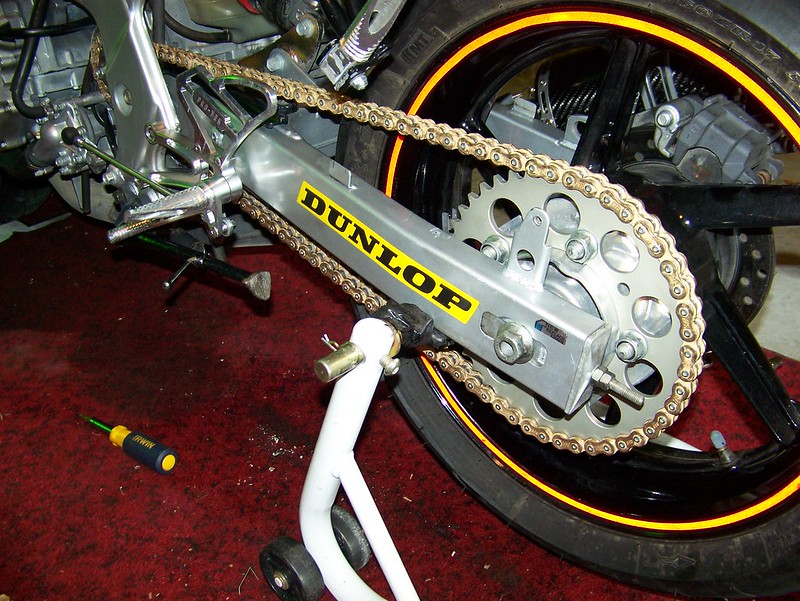
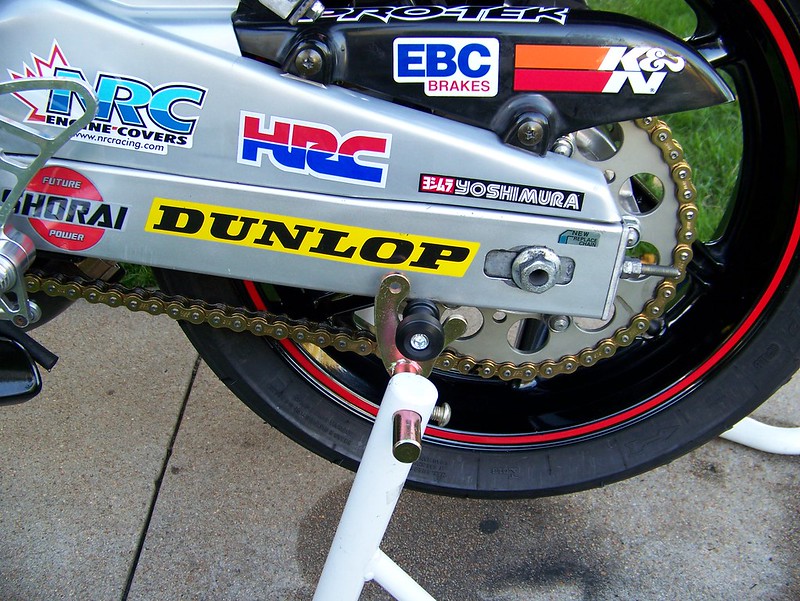
520 AFAM sprockets with D.I.D. ERV3 X-ring chain.

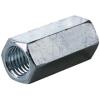
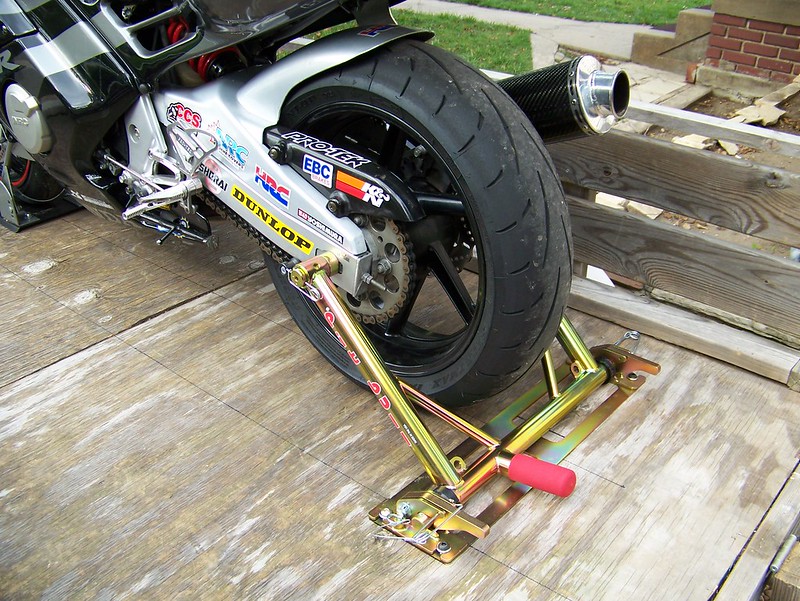
Welded a couple of 8mm X 1.25 pitch X 22mm long coupling nuts to the swing arm, so I could mount spools for a rear stand.
Since there was damage to the stator cover, and I already knew that I would be racing the bike, I replaced it with a heavy duty "race approved" piece, which is required by most race organizations.
Stainless steel brake lines in the front and rear.
Frame sliders.
Pro-Tek rearsets.
Shorai lithium iron battery (5.5 lb. lighter than OEM).
Yoshimura RS-3 slip-on.
Went through carbs, cleaning them and replacing the jet needles with Factory Pro agressively tapered units, and tuned all fuel circuits for running a K&N filter and the new slip-on.
520 AFAM sprockets with D.I.D. ERV3 X-ring chain.
Welded a couple of 8mm X 1.25 pitch X 22mm long coupling nuts to the swing arm, so I could mount spools for a rear stand.
Thread Starter
|
Welcome Crew and ROTY 2014
Joined: Dec 2010
Posts: 2,059
Likes: 6
From: Kansas
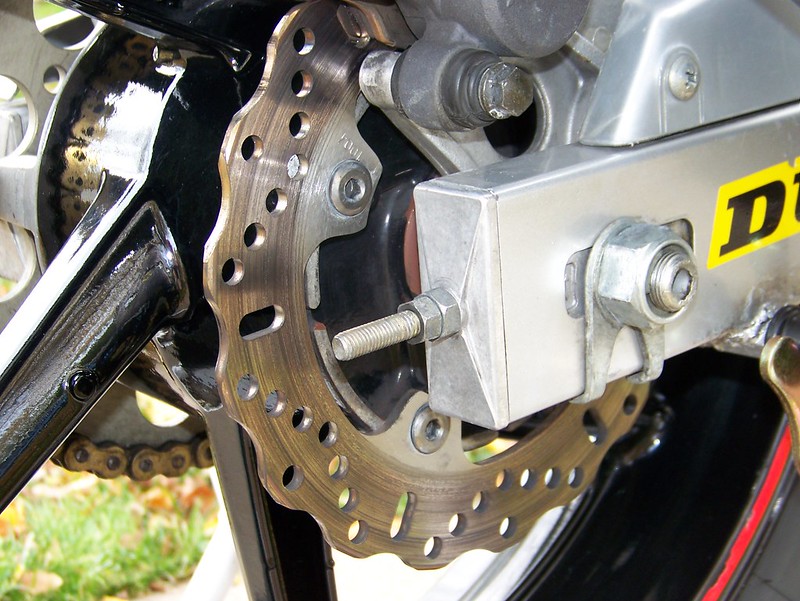
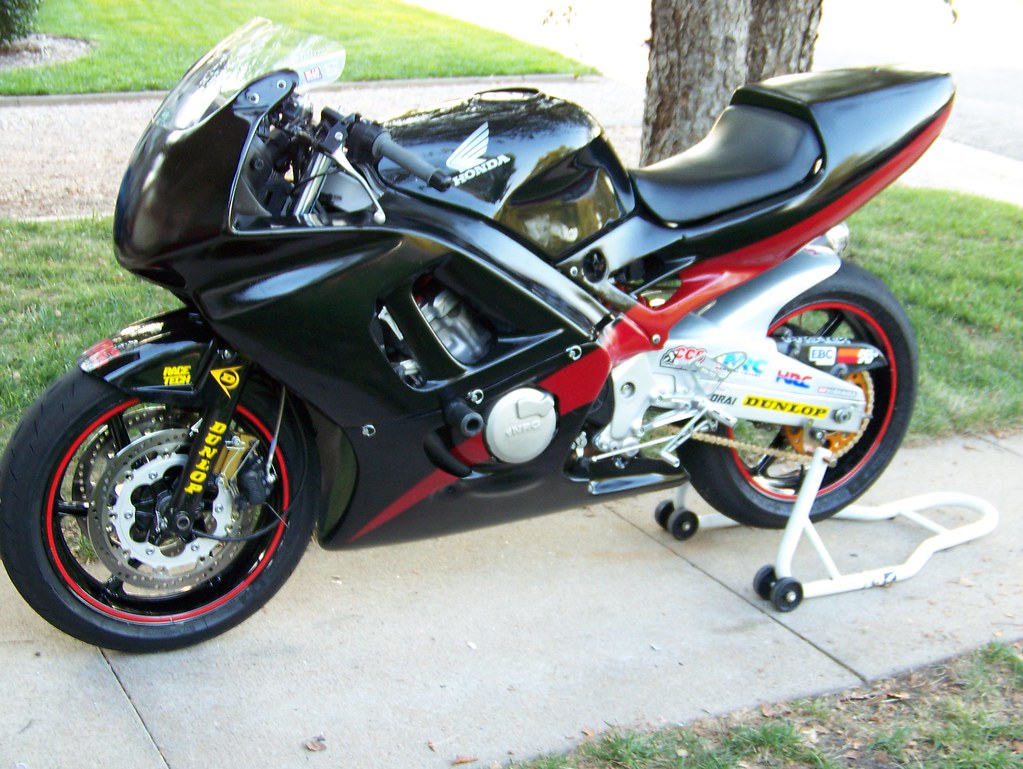
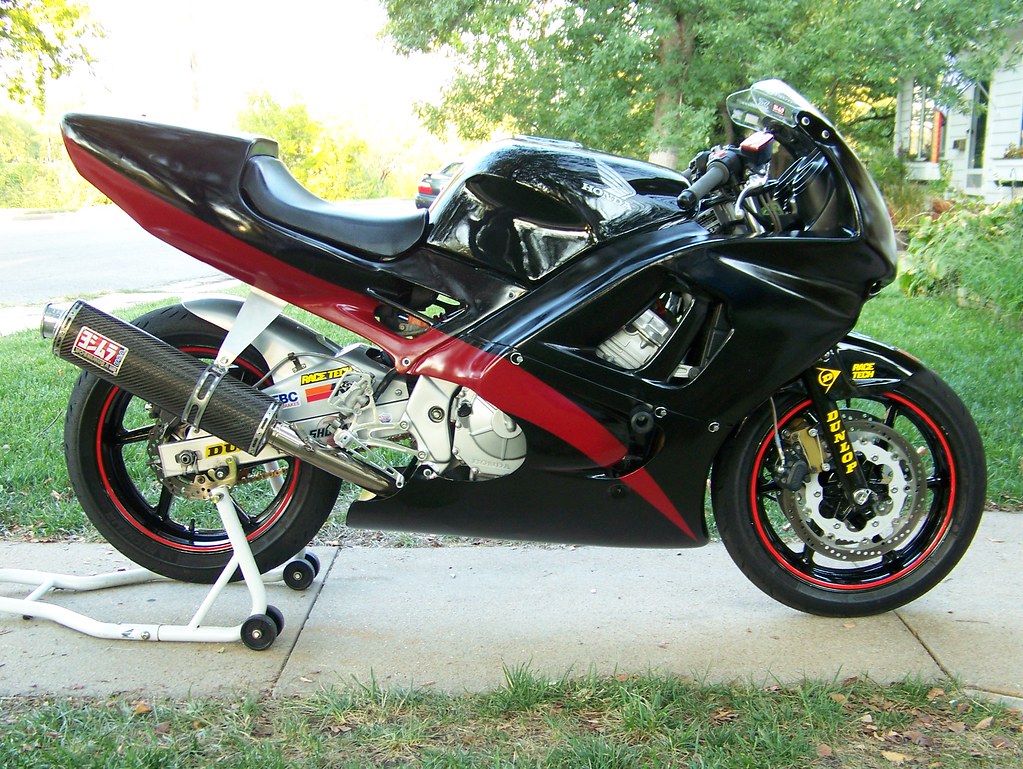
EBC Pro-Lite contour rotor in the rear.
New fork seals and .95KG/mm RaceTech springs, dialed in for my weight and correct sag.

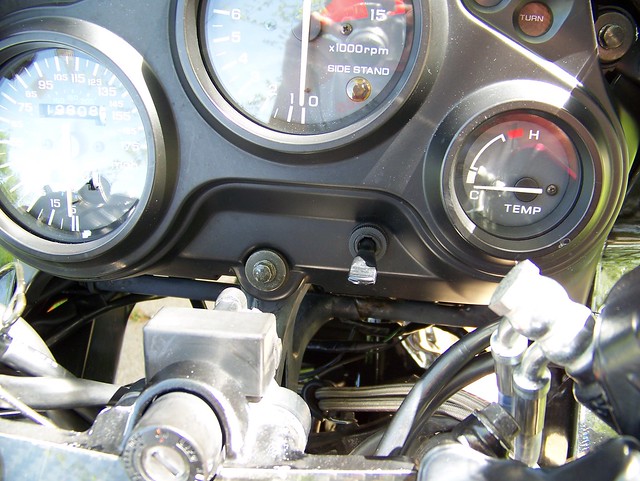
At this point, I installed a switch for turning off the headlight, when taping up for track-days... in the future, this switch will be employed for turning on the ignition, when I eliminate the heavy OEM ignition switch.
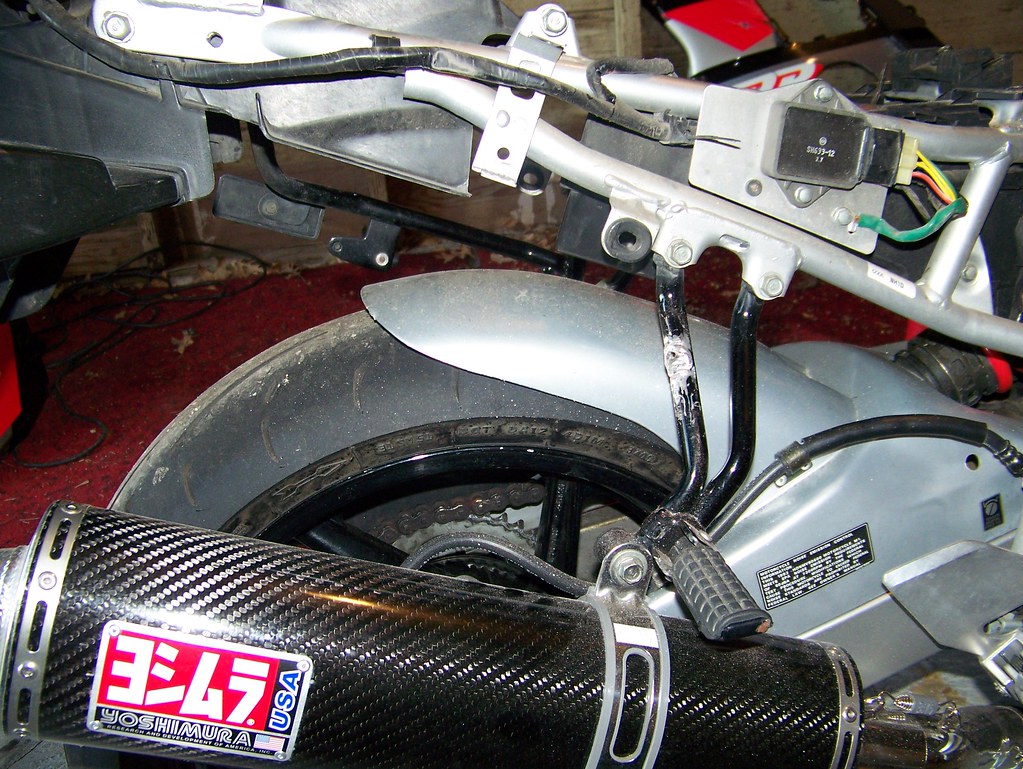
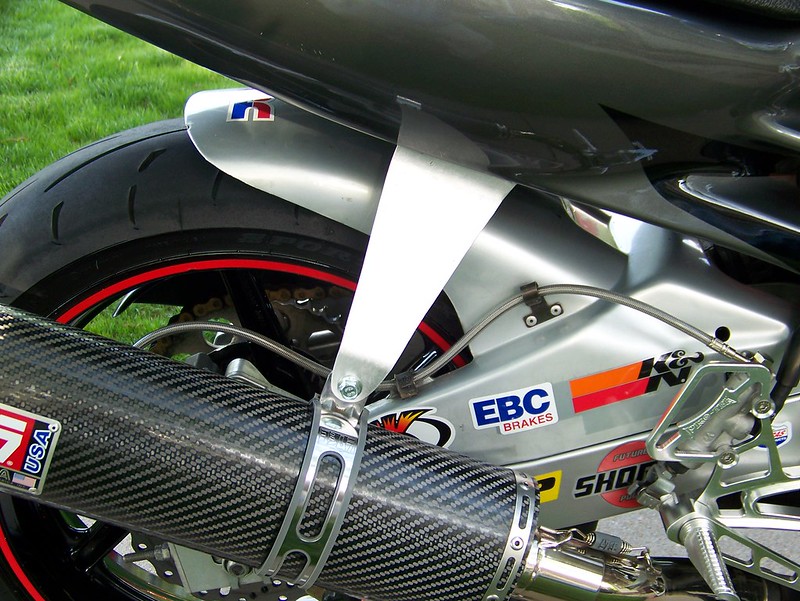
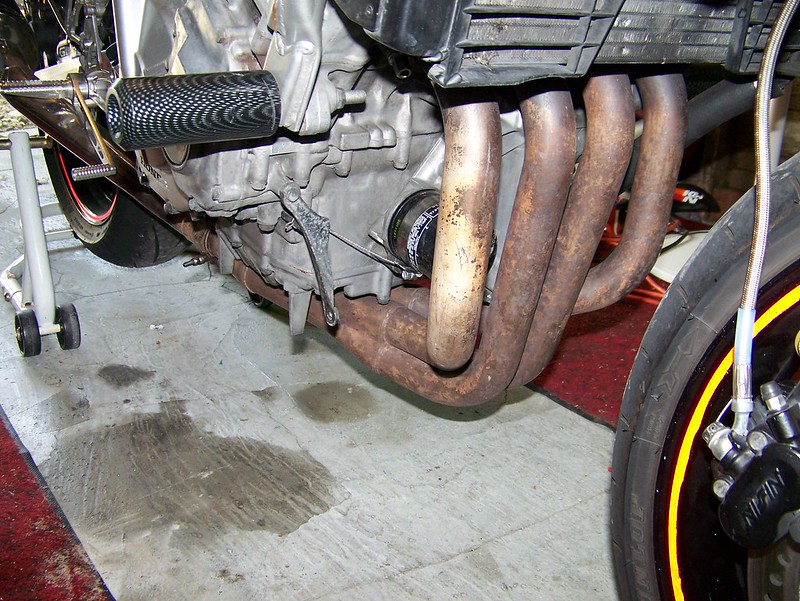
I completely eliminated the passenger peg brackets, and fabricated an aluminum exhaust hanger.
Upgraded the front brakes from OEM 276mm rotors to EBC Pro-lite 310mm units.


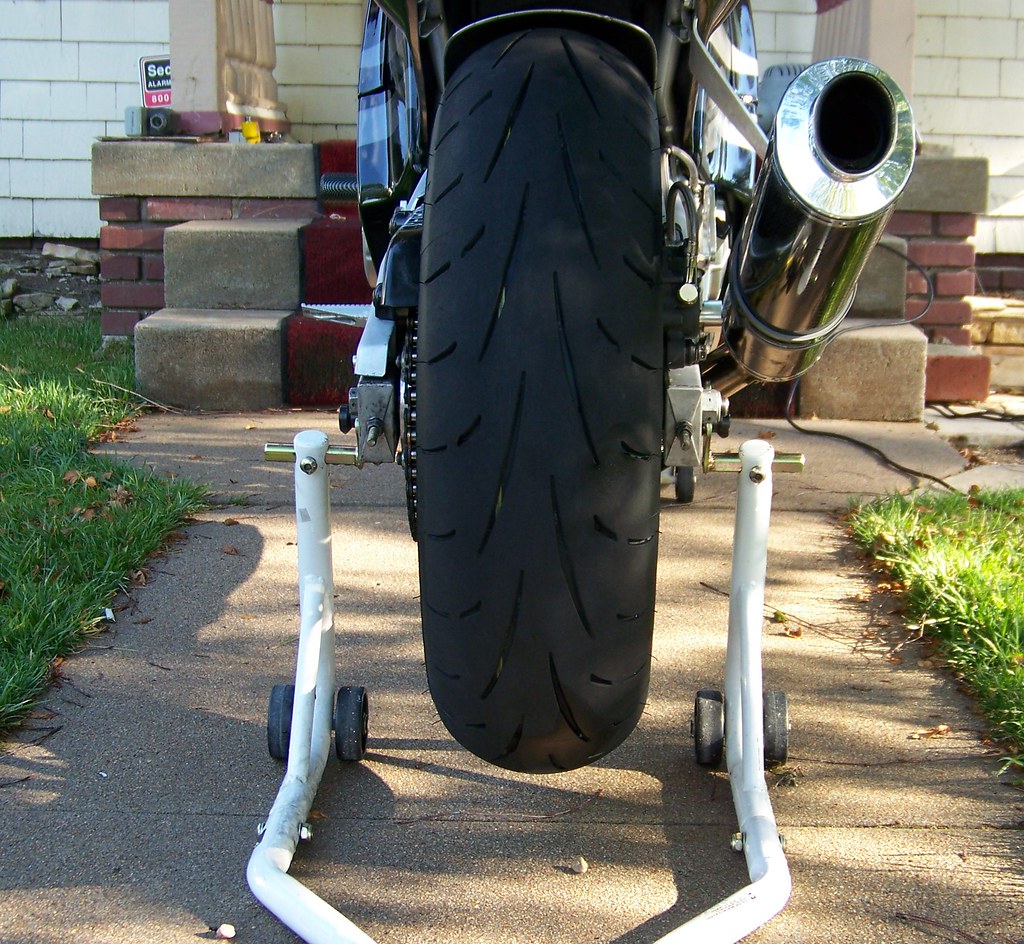
Upgraded to an F3 rear rim, and went up from 160 to 170 in the rear.

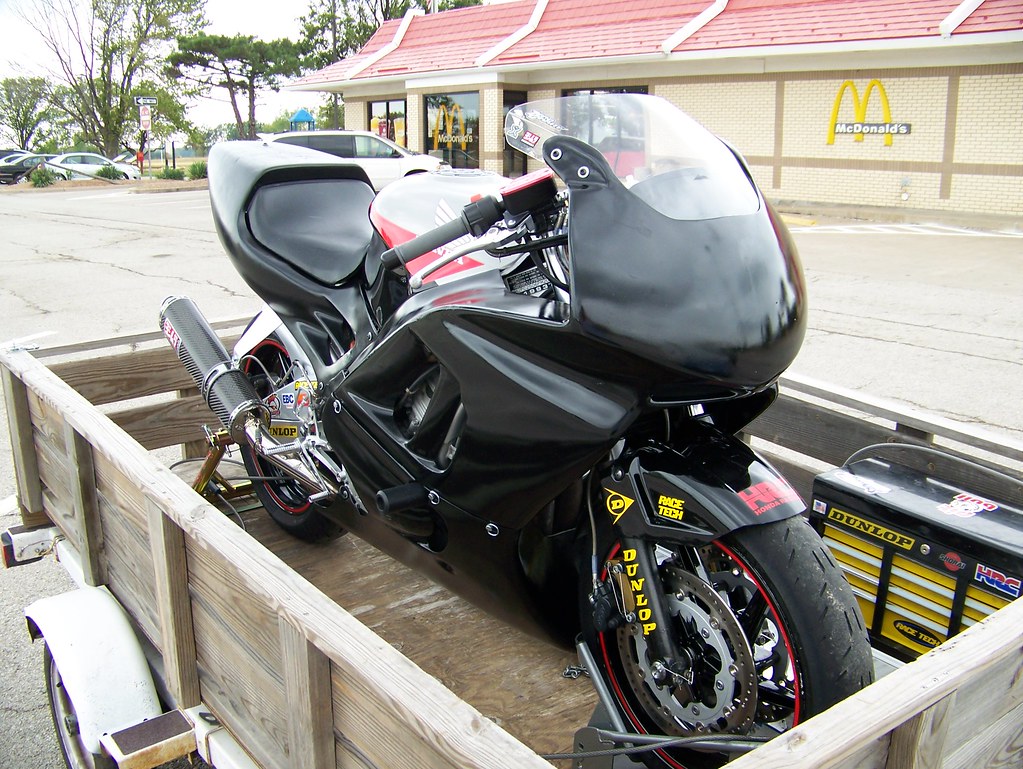
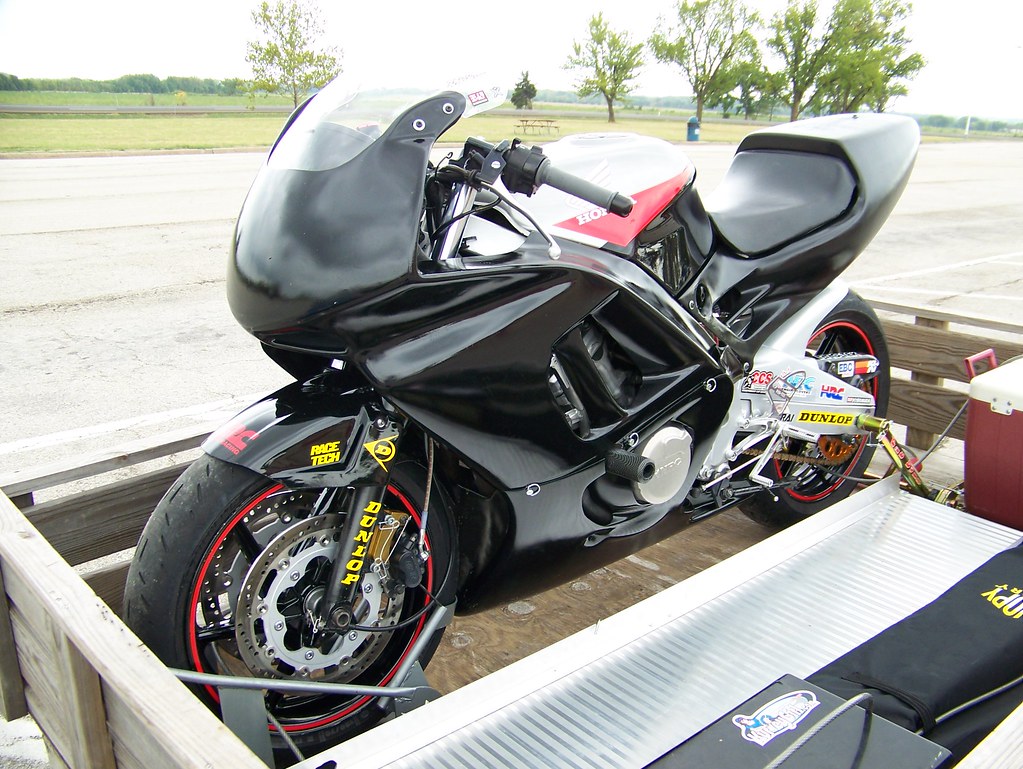
I had already acquired an excellent trailor for the money ($250), and installed the front wheel chock, and later picked up the Pit-Bull trailer restraint system... I can't say enough about how great this setup is.
Picked up a used Two Brothers header, and made some mild carb setting changes to dial it in - definitely got a noticable increase in mid-range oomph, and a tiny bit on the top end as well.
Fox Twin-Clicker shock, sprung for my weight, and dialed in with a good baseline setting all around.
New fork seals and .95KG/mm RaceTech springs, dialed in for my weight and correct sag.
At this point, I installed a switch for turning off the headlight, when taping up for track-days... in the future, this switch will be employed for turning on the ignition, when I eliminate the heavy OEM ignition switch.
I completely eliminated the passenger peg brackets, and fabricated an aluminum exhaust hanger.
Upgraded the front brakes from OEM 276mm rotors to EBC Pro-lite 310mm units.
Upgraded to an F3 rear rim, and went up from 160 to 170 in the rear.
I had already acquired an excellent trailor for the money ($250), and installed the front wheel chock, and later picked up the Pit-Bull trailer restraint system... I can't say enough about how great this setup is.
Picked up a used Two Brothers header, and made some mild carb setting changes to dial it in - definitely got a noticable increase in mid-range oomph, and a tiny bit on the top end as well.
Fox Twin-Clicker shock, sprung for my weight, and dialed in with a good baseline setting all around.
Last edited by JNSRacing; Dec 19, 2012 at 04:23 PM.
Thread Starter
|
Welcome Crew and ROTY 2014
Joined: Dec 2010
Posts: 2,059
Likes: 6
From: Kansas
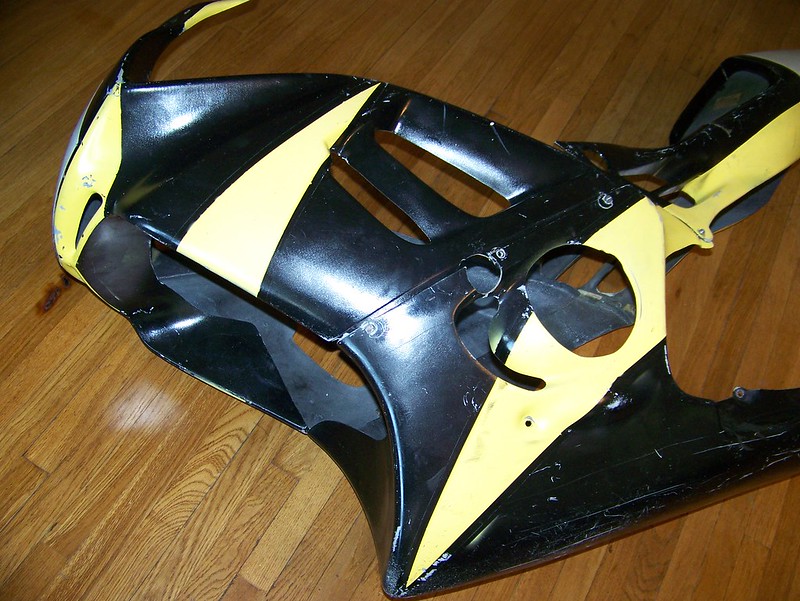
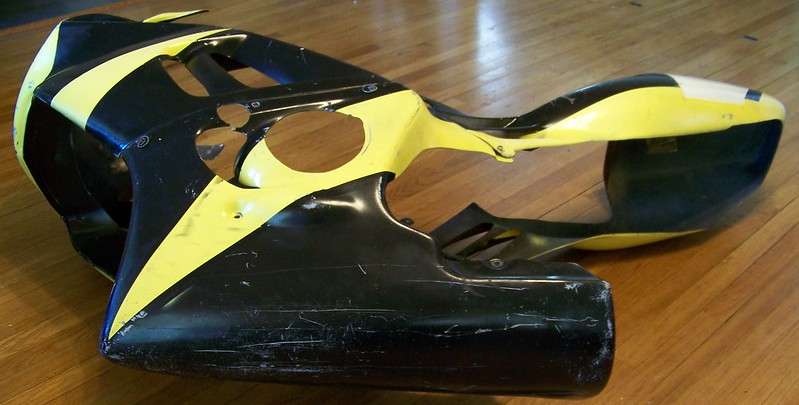
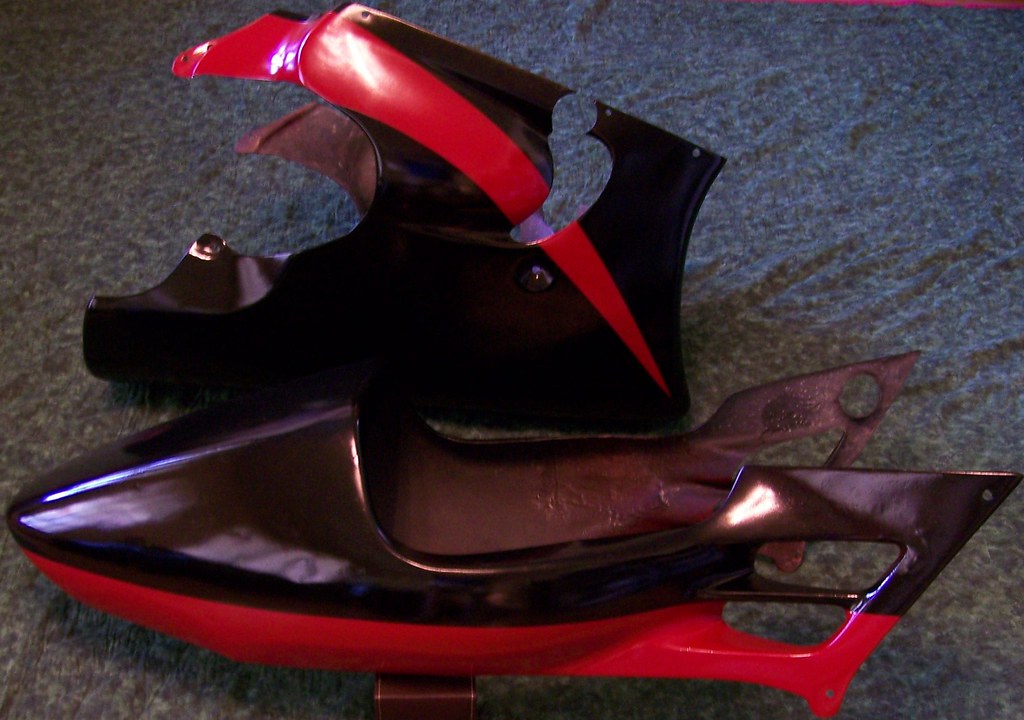
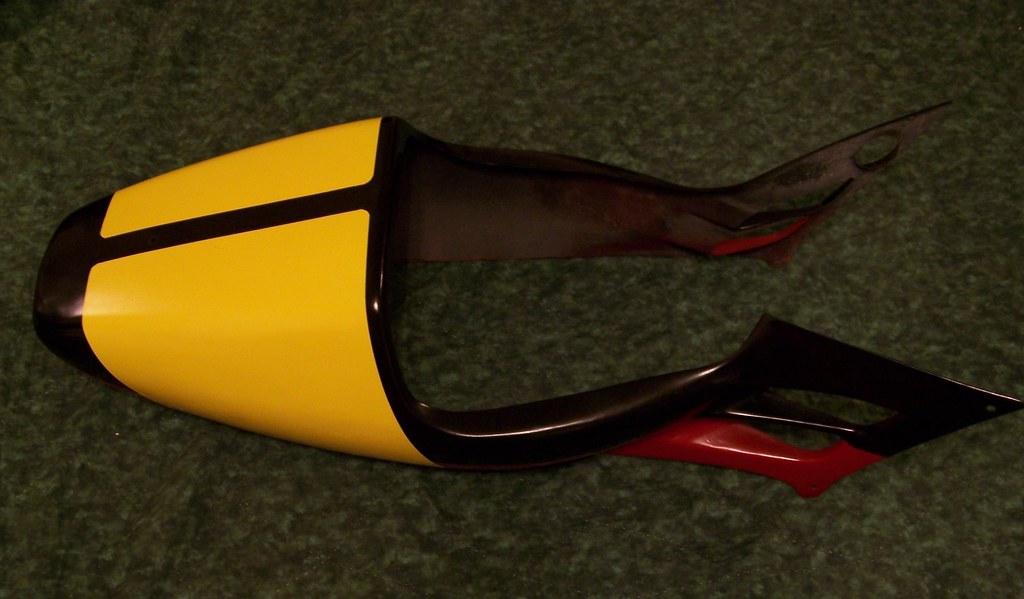
I installed a quick-turn throttle tube around this time, and began working on the used, and somewhat damaged Cheetah race glass.
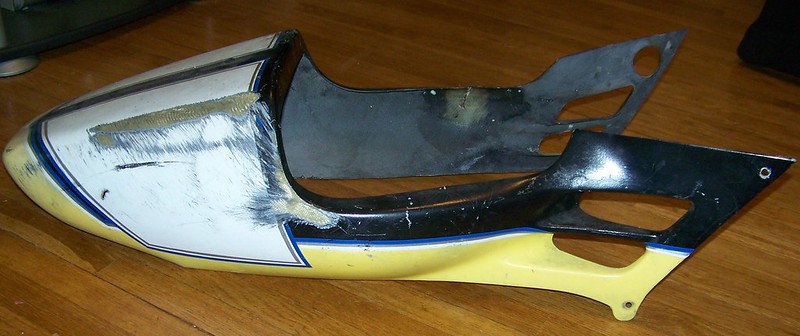
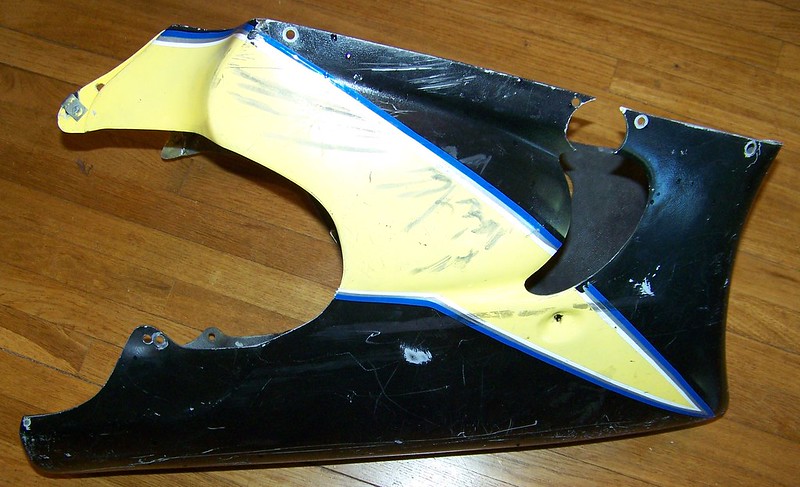
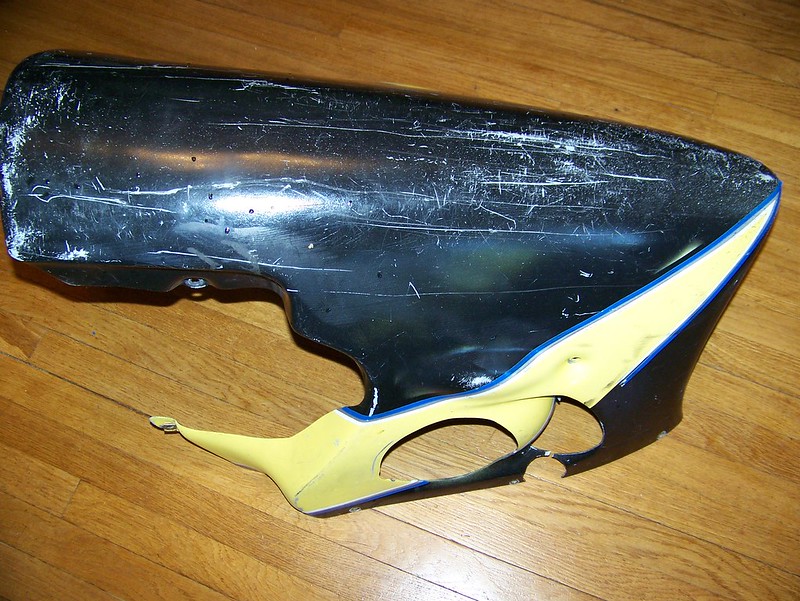
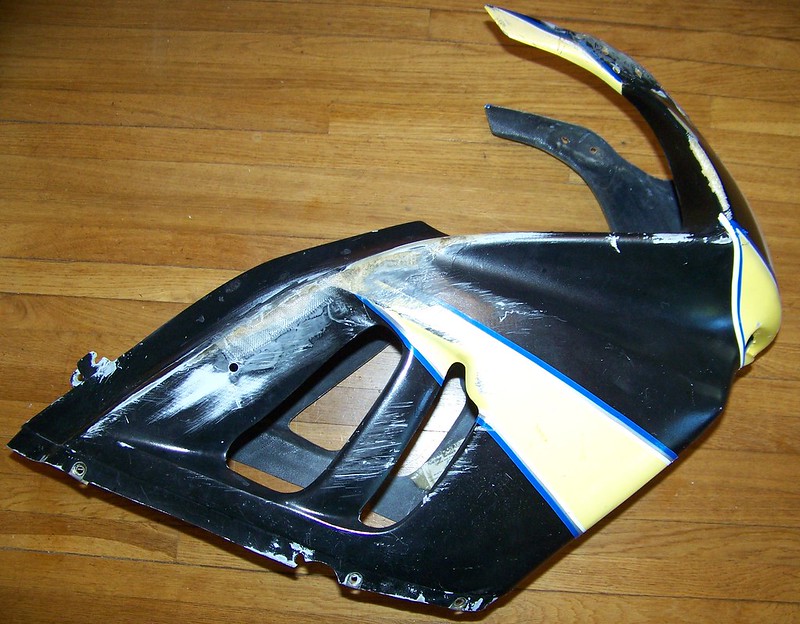
The pin striping removed, and the pieces mocked up.
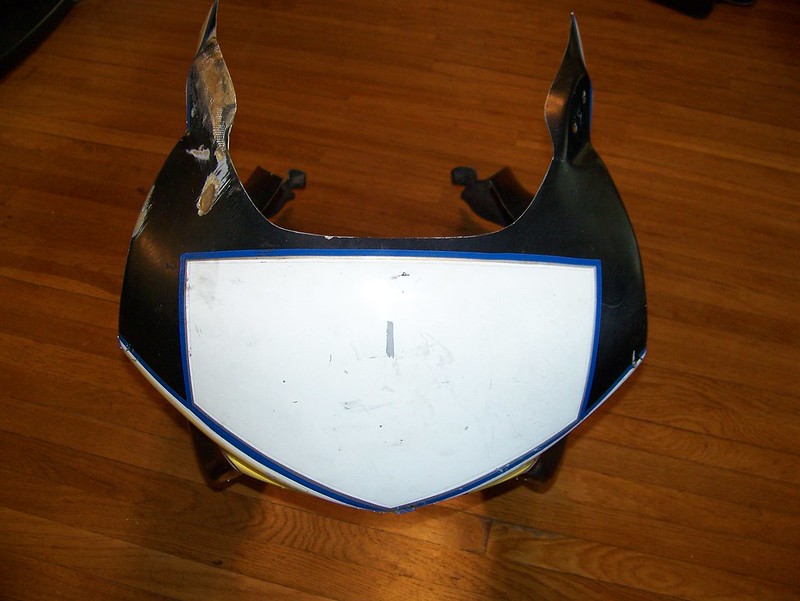
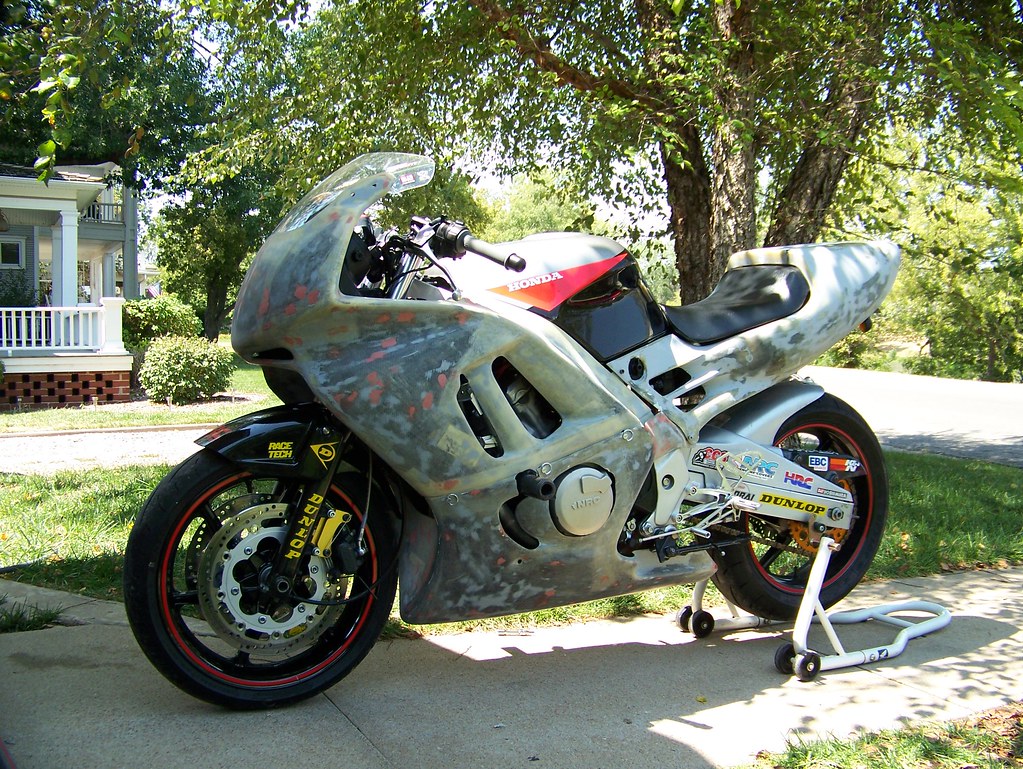
After fiberglass repair work, sanding, and application of spot & glazing putty.
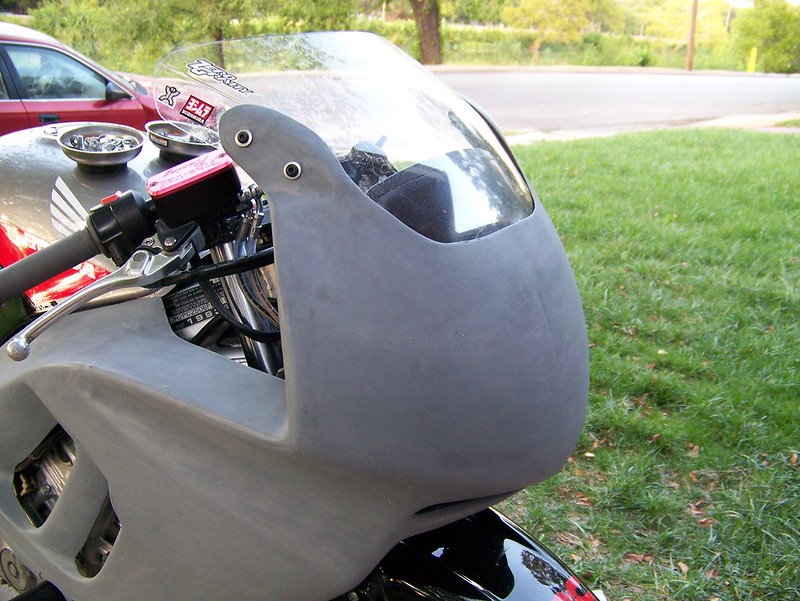
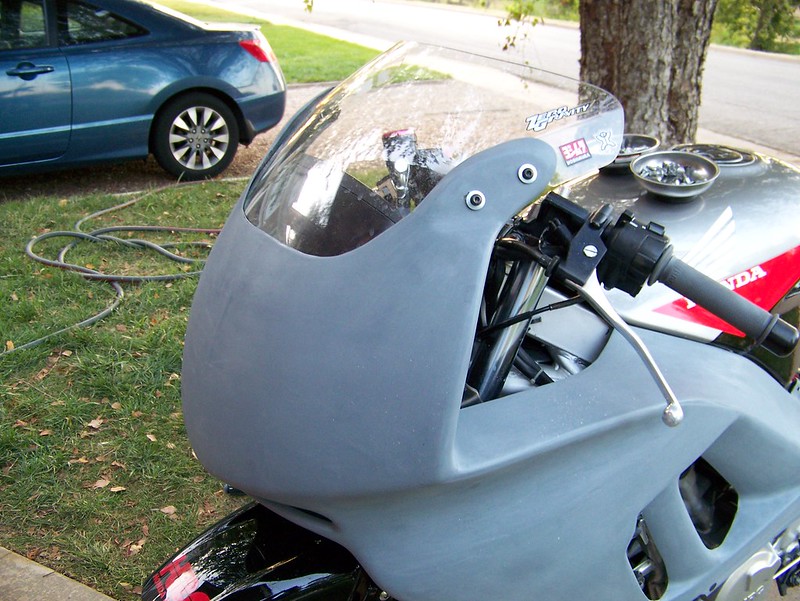
I neglected to mention that somewhere along the way, I replaced my hazy OEM windscreen with a Zero Gravity screen - when I first bought it, I didn't see a picture of what it would look exactly like, and failed to realize that they have a lower profile replacement, which is closer to the OEM screen, and more of a double-bubble type - I thought what I was getting was a double bubble screen... live and learn.
Primed, and correctly positioned mounting holes drilled on the upper.
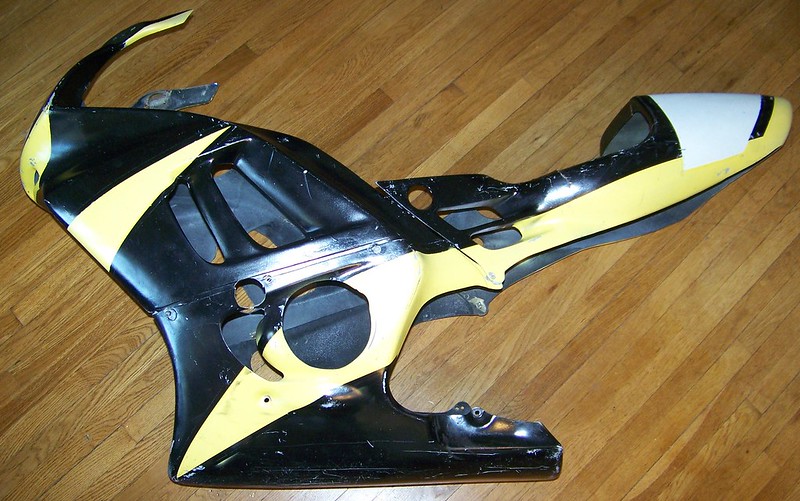
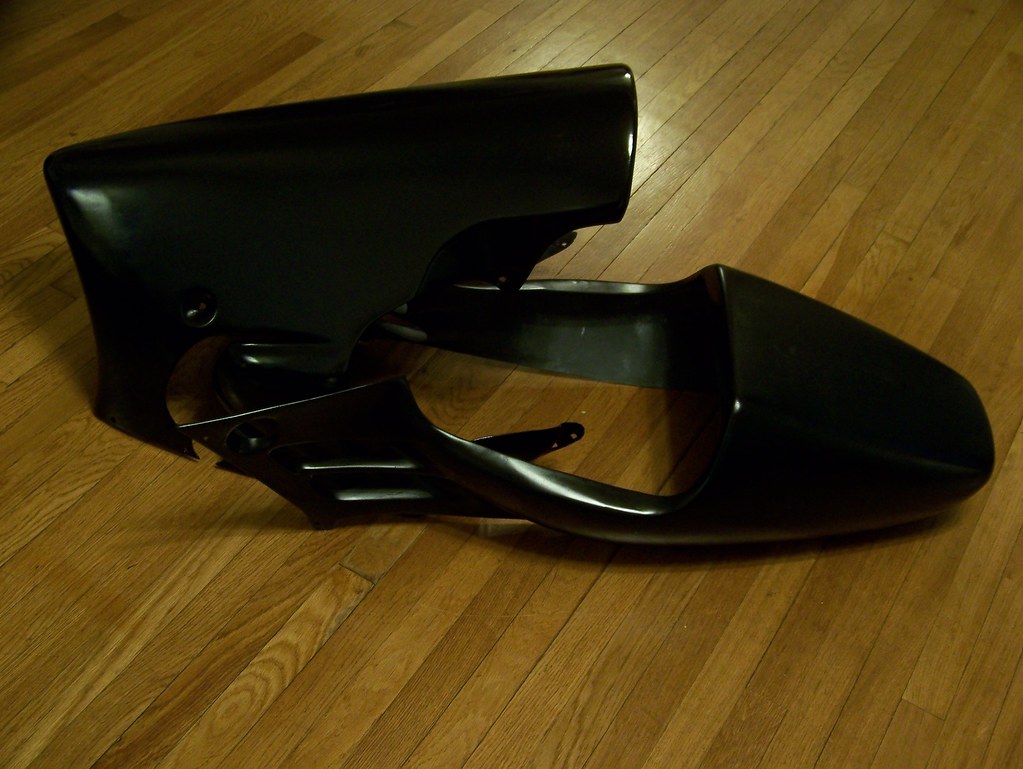
First base-coat of gloss black.
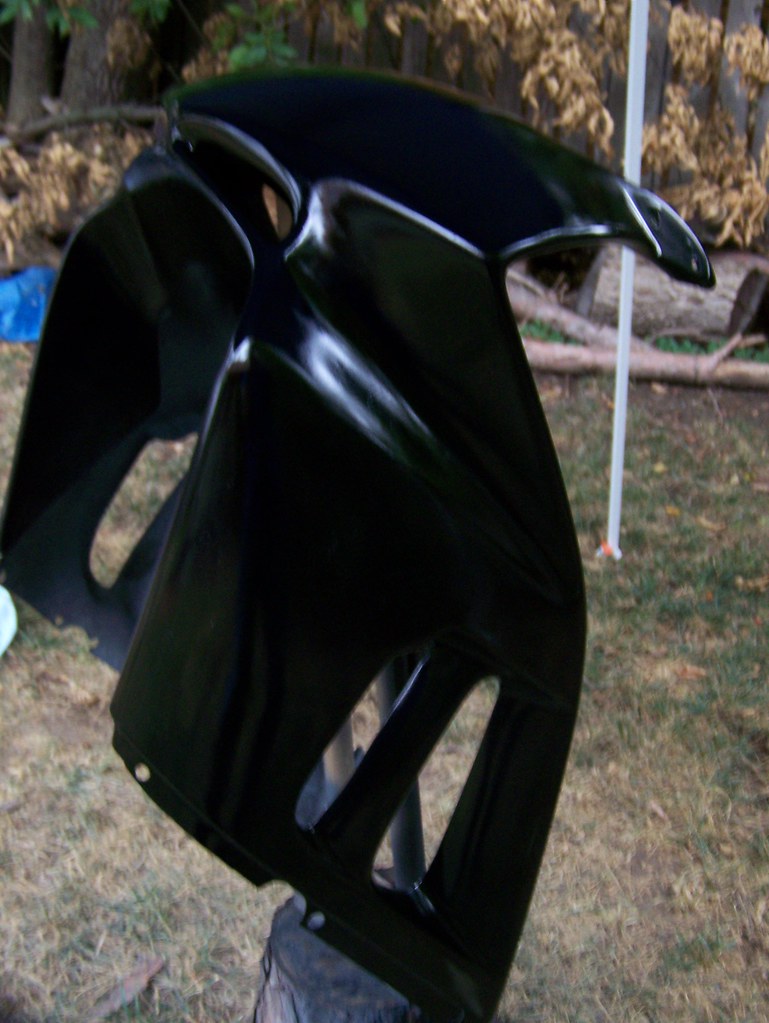

The pin striping removed, and the pieces mocked up.
After fiberglass repair work, sanding, and application of spot & glazing putty.
I neglected to mention that somewhere along the way, I replaced my hazy OEM windscreen with a Zero Gravity screen - when I first bought it, I didn't see a picture of what it would look exactly like, and failed to realize that they have a lower profile replacement, which is closer to the OEM screen, and more of a double-bubble type - I thought what I was getting was a double bubble screen... live and learn.
Primed, and correctly positioned mounting holes drilled on the upper.
First base-coat of gloss black.
Last edited by JNSRacing; Dec 17, 2012 at 10:14 PM.

Senior Member
Joined: Apr 2009
Posts: 6,494
Likes: 5
I never get tired of seeing what you're doing to your bike. :-)
Get yourself a Baxley sport chock for the paddock...Baxley Trailer Sport Chock.
Get yourself a Baxley sport chock for the paddock...Baxley Trailer Sport Chock.


 .
.
Quick question: Which is your preferred method of repairing fairings? Epoxy and fiberglass cloth or the old Lego trick (dissolve Lego in acetone to get a putty)? How far down can you actually sand the fairings without risking the structural integrity of the them?
Thread Starter
|
Welcome Crew and ROTY 2014
Joined: Dec 2010
Posts: 2,059
Likes: 6
From: Kansas
Thank you sir! At some point soon today, I'll start posting up things you actually haven't seen yet... new things done to my bike, that is.
I'm pretty good at dismounting and putting the rear stand under, in the event my "pit crew" is unavailable, but I like the portability of that piece, and that I could just roll into it, and have an easier time getting the rear stand under. It's a tad pricey, though... if I decided to spare the bucks, I might look at some of the "knock offs" that are out there.
Thanks. I totally dig watching other guys process on builds - that's pretty much the reason I started posting this stuff to begin with... it's like engineering ****.
hmmmmmmmmm... I'll have to think about that one. 
With that, it's going to be "situational". Depending on the break/crack/rash... whatever.
For plastic, I might use some fiberglass from the back side, and some resin or plastic epoxy repair goop on the outside - most of the time with plastic, I simply use a specific plastic repair epoxy stuff, or even JB weld, depending on what it is.
For fiberglass, all repairs are fiberglass and resin from the back side (if it's a big enough issue to require it), and spot & glazing putty on the outside, though I have repaired some small "divets" in the outside fiberglass surface with a drop of resin that I sand down later.
Sanding depends on the surface. OEM plastics are the thickets, and best quality, so you can sand a little more, safely, but you've gotta just use your judgement on whether or not you're going to deep. With cheap ABS aftermarket stuff, you're usually starting with thinner pieces to begin with, and of course, with fiberglass, you want to avoid sanding definitely before you get to the core fabric, if possible... if you're getting to that point, then the fiberlass has probably been re-painted/repaired quite a bit, and is getting pretty thin. This was the case with this old stuff I got, so I did a lot of reinforcement from the inside, even at places where there were no cracks, yet the area was starting to get "flimsy".
I'm pretty good at dismounting and putting the rear stand under, in the event my "pit crew" is unavailable, but I like the portability of that piece, and that I could just roll into it, and have an easier time getting the rear stand under. It's a tad pricey, though... if I decided to spare the bucks, I might look at some of the "knock offs" that are out there.
For plastic, I might use some fiberglass from the back side, and some resin or plastic epoxy repair goop on the outside - most of the time with plastic, I simply use a specific plastic repair epoxy stuff, or even JB weld, depending on what it is.
For fiberglass, all repairs are fiberglass and resin from the back side (if it's a big enough issue to require it), and spot & glazing putty on the outside, though I have repaired some small "divets" in the outside fiberglass surface with a drop of resin that I sand down later.
Sanding depends on the surface. OEM plastics are the thickets, and best quality, so you can sand a little more, safely, but you've gotta just use your judgement on whether or not you're going to deep. With cheap ABS aftermarket stuff, you're usually starting with thinner pieces to begin with, and of course, with fiberglass, you want to avoid sanding definitely before you get to the core fabric, if possible... if you're getting to that point, then the fiberlass has probably been re-painted/repaired quite a bit, and is getting pretty thin. This was the case with this old stuff I got, so I did a lot of reinforcement from the inside, even at places where there were no cracks, yet the area was starting to get "flimsy".
Thread Starter
|
Welcome Crew and ROTY 2014
Joined: Dec 2010
Posts: 2,059
Likes: 6
From: Kansas
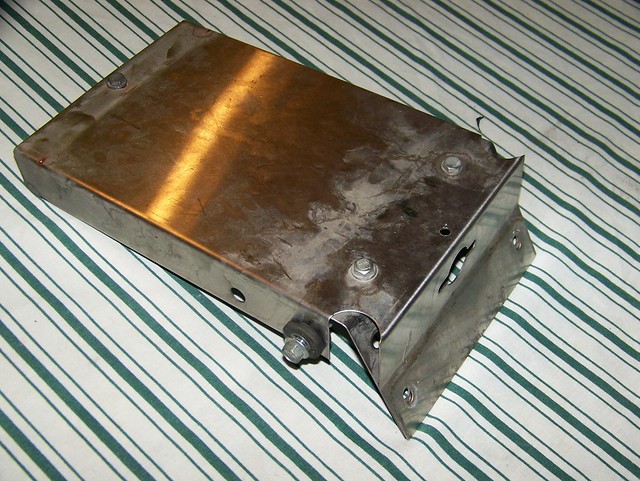
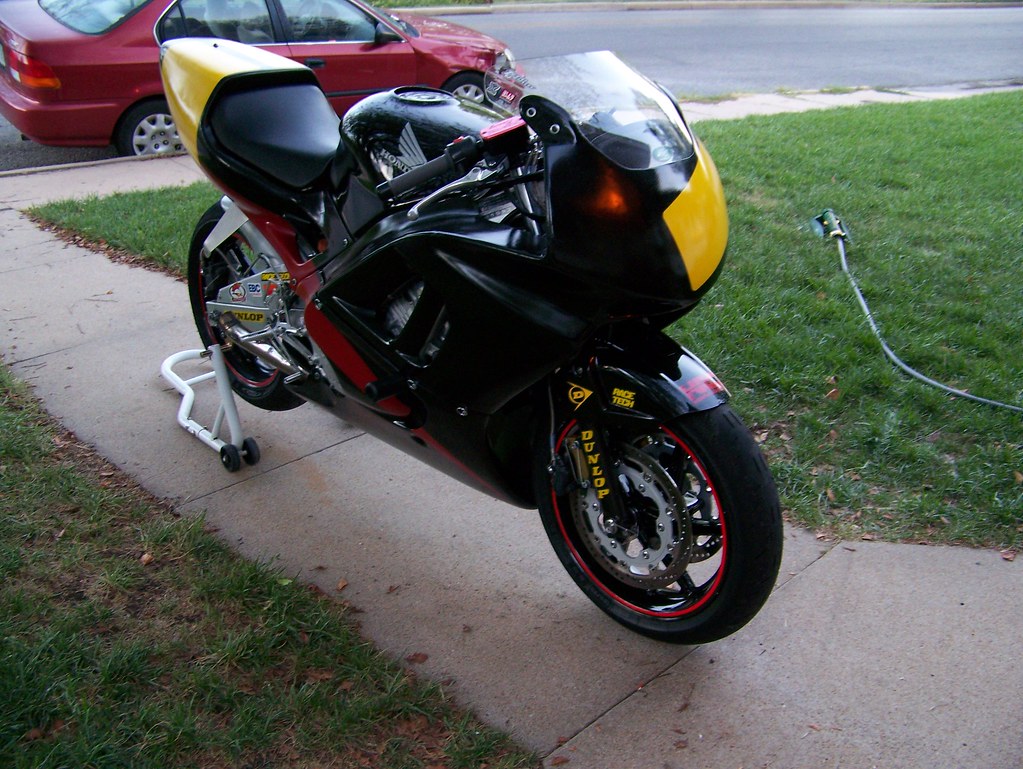
I removed the heavy, steel base for the fender eliminator kit, along with the signals and lights, of course, and fabricated a new rear mount for the race tail, using a cut down version of one of my early exhaust hanger attempts.
It went from this:
...to this:
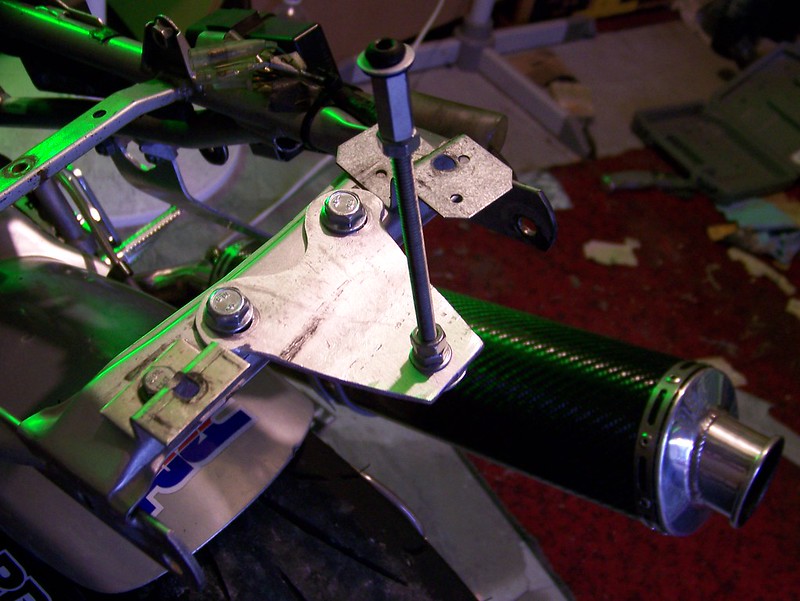
That aluminum plate, that acts as a base for the mount, has since been trimmed down, and the sharp corners rounded off.
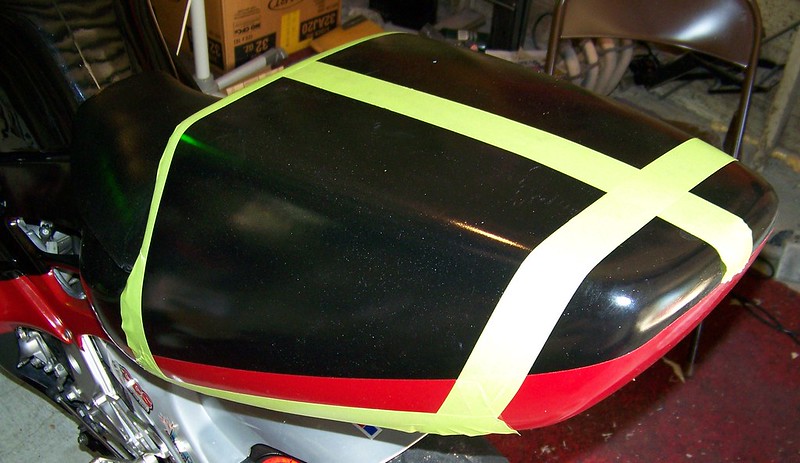
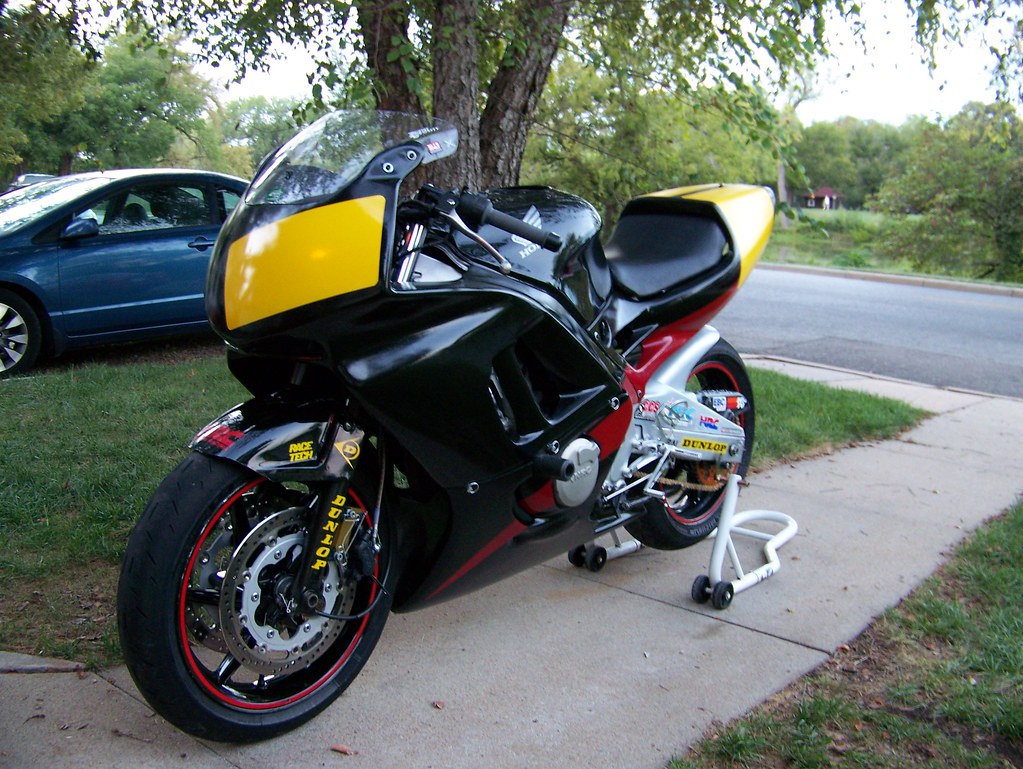
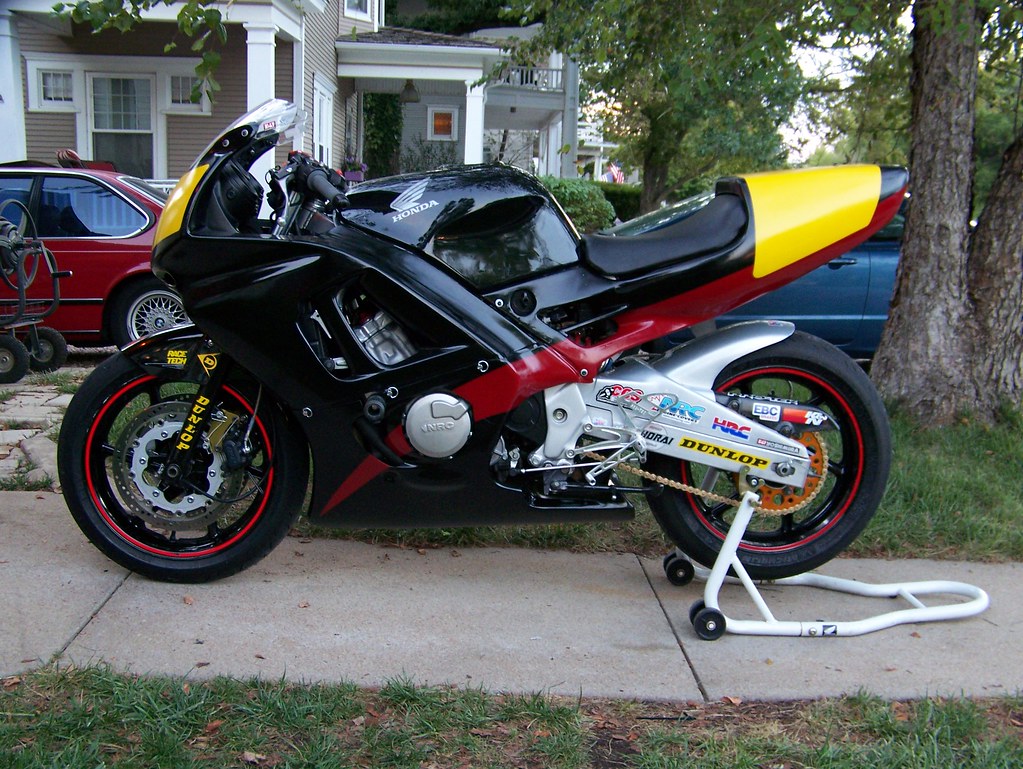
This is how it looked for my second, or maybe third, event of the season.
Taped things up for some red accents.
Got 'em mounted up, using the tank cover that came with the street fairing kit, so I could see how it looked with a black tank - finalized the remaining mounting hardware and got new Dzus fasteners for the lower.
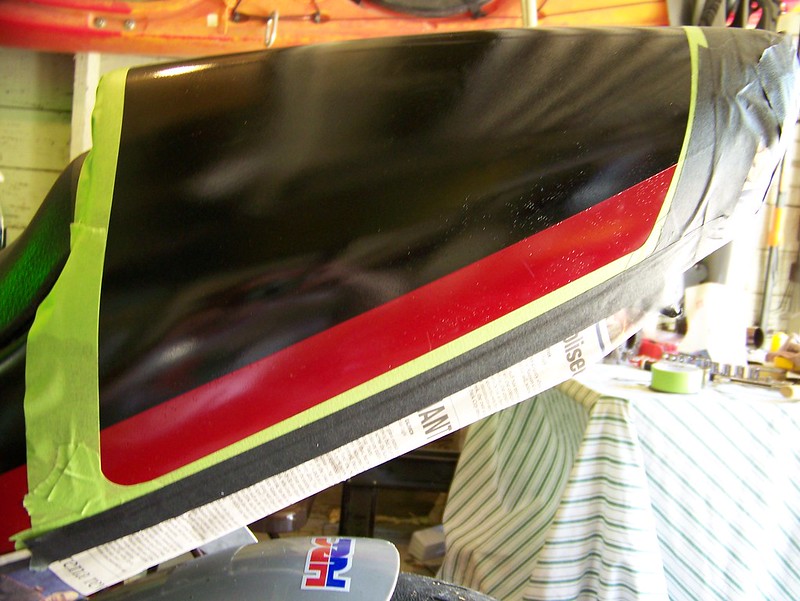
Taped off the tail for the number plates, and got those painted on.
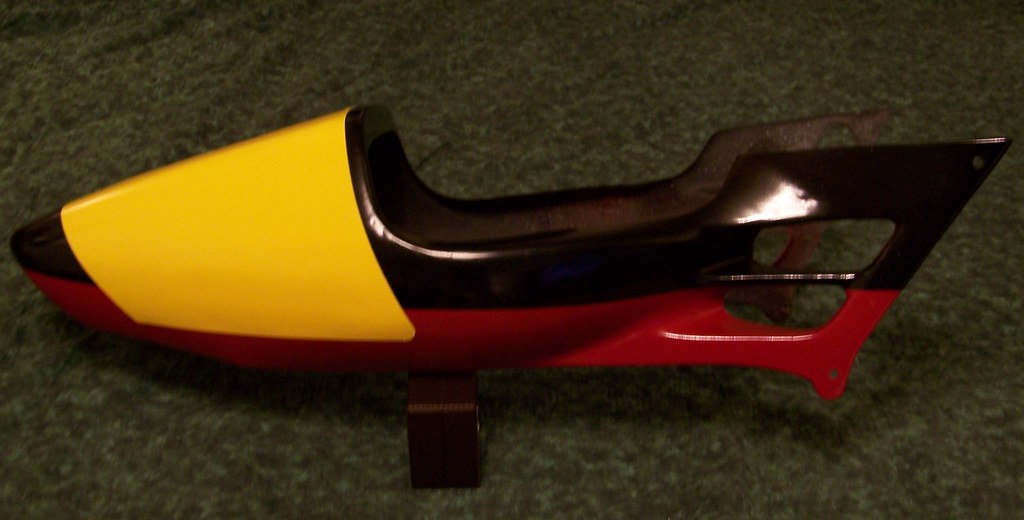
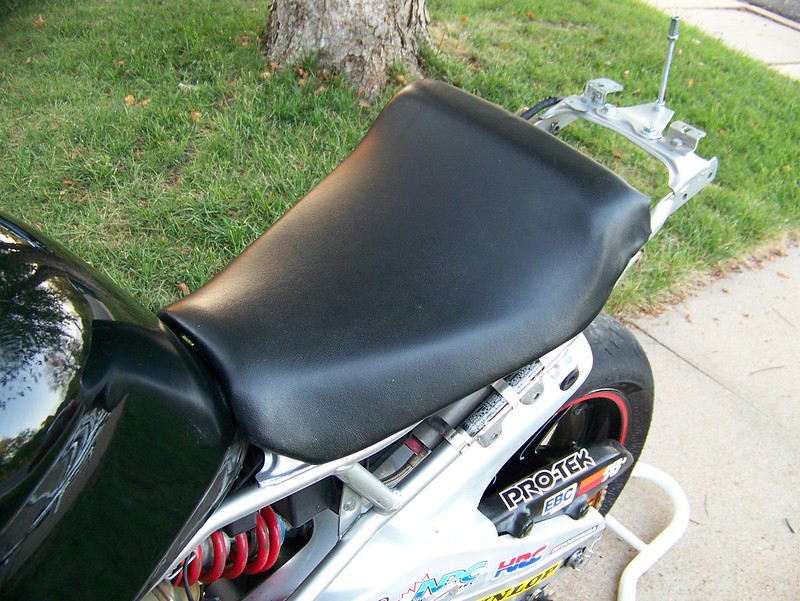
I got a very cheap seat, that had damage to the pillion section, cut it down and re-covered it, for a lighter weight solo seat - saved about 1 1/2 pound.
I finished the front number plate, and did another mounting, to see how things looked - I don't like the boring, right smack in the center number plates on the F2, so I went with something a touch different - it has been approved by my race organization.
It went from this:
...to this:
That aluminum plate, that acts as a base for the mount, has since been trimmed down, and the sharp corners rounded off.
This is how it looked for my second, or maybe third, event of the season.
Taped things up for some red accents.
Got 'em mounted up, using the tank cover that came with the street fairing kit, so I could see how it looked with a black tank - finalized the remaining mounting hardware and got new Dzus fasteners for the lower.
Taped off the tail for the number plates, and got those painted on.
I got a very cheap seat, that had damage to the pillion section, cut it down and re-covered it, for a lighter weight solo seat - saved about 1 1/2 pound.
I finished the front number plate, and did another mounting, to see how things looked - I don't like the boring, right smack in the center number plates on the F2, so I went with something a touch different - it has been approved by my race organization.