'93 F2 Mods - Phase 1
#151
 07-13-2012, 11:20 AM


Yup, got that big washer at the local Ace Hardware store...I did mention, in those steps I outlined before, that I used the old seal, as a buffer between my rig and the new seal, right?
On the subject of the shock, and other items I received in that one shipment - I would be HATED, I mean purely HATED, if I reveald what I paid for the shock, race bodywork, header, quick-turn throttle, spare sprocket carrier, cush drive, spacers, and 46 tooth 520 rear sprocket.... HATED, I tell you!!! I will NEVER forget what that guy did for me, EVER!!
On the subject of the shock, and other items I received in that one shipment - I would be HATED, I mean purely HATED, if I reveald what I paid for the shock, race bodywork, header, quick-turn throttle, spare sprocket carrier, cush drive, spacers, and 46 tooth 520 rear sprocket.... HATED, I tell you!!! I will NEVER forget what that guy did for me, EVER!!
#152
07-13-2012, 02:24 PM

Senior Member
Just so every one knows, it was $12 and some pocket lint  lol jk
On a serious note though...with aftermarket headers...you can't really run stock jets can you? To be honest, I am fine fabbing parts for my bike and making things fit that shouldn't...but messing with the carbs gives me the creeps. All my vehicles have always been injected so not much carb experience. On other words, I'm scared...carbs are my kryptonite
lol jkOn a serious note though...with aftermarket headers...you can't really run stock jets can you? To be honest, I am fine fabbing parts for my bike and making things fit that shouldn't...but messing with the carbs gives me the creeps. All my vehicles have always been injected so not much carb experience. On other words, I'm scared...carbs are my kryptonite
Last edited by goatxxmastr; 07-13-2012 at 02:28 PM.
#153
07-13-2012, 03:54 PM

#154
07-13-2012, 04:11 PM

That's awesome you scored a good deal man! Gotta take what you can get these days.
Goatmaster, dont be afraid of the carbs. They're actually a pretty simple decide, particularly these kehin carbs, they have a fixed float height so you don't even have to mess with that.
All it takes is time so you can dial in your jets and clip positions and such. Unless you can afford a dyno. Then it's a bit quicker.
#155
07-13-2012, 05:25 PM
Senior Member
So I've never synced my carbs either, which seems like it may be a good idea. Either of you have a link to a guide on how to sync them? Also I need a jet kit  so any links are awesome.
Sorry if I sorta thread hijacked you there jns, I just constantly watch over your thread and you have soooo much information .
so any links are awesome. Sorry if I sorta thread hijacked you there jns, I just constantly watch over your thread and you have soooo much information .
#156
07-13-2012, 07:35 PM
So I've never synced my carbs either, which seems like it may be a good idea. Either of you have a link to a guide on how to sync them? Also I need a jet kit so any links are awesome.
Sorry if I sorta thread hijacked you there jns, I just constantly watch over your thread and you have soooo much information .
so any links are awesome. Sorry if I sorta thread hijacked you there jns, I just constantly watch over your thread and you have soooo much information .
As far as synching the carbs, I don't know of a guide, but I'm sure there are plenty, but I just know how to do it - the tool is the key, and it's pretty intuitive, really. Now, not that synching the carbs is not important, but it is highly overrated - the only times I've done it, it wasn't even really necessary - the time it is for sure very important that you do so, is when the carbs have been separated, and potentially jacked with, or if you can visually see (or measure with feeler guages) a significant difference in the gap between the butterfly valves and venturi, when they're closed.
#157
07-13-2012, 09:16 PM
+1 on factory pro. That's who I use too. Although my current jets are keihin cause wouldn't you know it the one size I wound up needing didn't come in the kit I bought but the needles and everything else is factory pro. They have good customer service too. If you can't figure something out you can call them and they'll try to give you advice.
As far as scynching I have the gauge set cause a guy gave it to me with this old maxim I've got but I've never needed to use it. Some brands of carb are worse than others about synching. I've heard hitachi's need it done every few years but these keihin we have on the CBR are pretty bulletproof.
As far as scynching I have the gauge set cause a guy gave it to me with this old maxim I've got but I've never needed to use it. Some brands of carb are worse than others about synching. I've heard hitachi's need it done every few years but these keihin we have on the CBR are pretty bulletproof.
#158
07-14-2012, 02:17 AM

Senior Member
Join Date: Mar 2011
Location: Vancouver, Canada
Posts: 249
Likes: 0
Received 0 Likes
on
0 Posts
Just a couple of questions...
I noticed that your old throttle grip looks like it had a little cut off the end compared to the left grip. Your new ones look the same as each other though. Is that just due to sizing differences between brands or just how they were put on? I partly ask because my throttle grip was trimmed down to by the PO.
What is different about a quick turn throttle that makes it need to turn less? Just a wider cable grip?
I've thought about putting red trim tape on my wheels for a while and noticed you have gone that route. I'm curious what thickness you have on there? I think they come in different mm sizes.
Cheers for any info.
#159
07-14-2012, 05:01 PM
Just a couple of questions...
I noticed that your old throttle grip looks like it had a little cut off the end compared to the left grip. Your new ones look the same as each other though. Is that just due to sizing differences between brands or just how they were put on? I partly ask because my throttle grip was trimmed down to by the PO....
I noticed that your old throttle grip looks like it had a little cut off the end compared to the left grip. Your new ones look the same as each other though. Is that just due to sizing differences between brands or just how they were put on? I partly ask because my throttle grip was trimmed down to by the PO....
I've used the Pro Grip "rim detailing" tape on all my wheels, and I've never specified a size - I order mine from MotorcycleSuperstore.com, and they do require you put in a bike model, but I'm not sure if it makes any difference what you put in - I usually just choose the closest model to mine, that they list, which is an F4 or F4i, I think. For what it's worth, the strip is 6.5mm wide, and there's enough in each kit to cover both sides of two wheels, with just a little to spare (that is, if you've got a steady hand, and don't screw up and waste any length of it!!)
#160
07-16-2012, 10:11 AM
Here's some pics of the new/old Cheetah race bodywork - I'm very much looking forward to the challenge of reparing the "battle wounds" and getting them all "prettied up". I'll definitely be looking for advice on this process, as I haven't worked with fiberglass since I was about 10, and helped my father mold a new lid for one of the hard panniers on his old CB750. And, I'm definitely not a paint man - I have very little experience with painting.
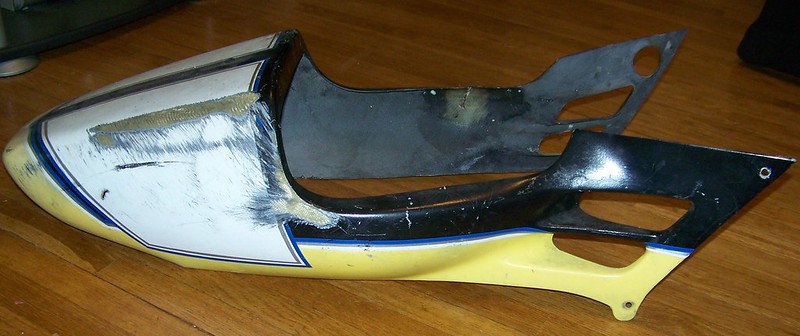
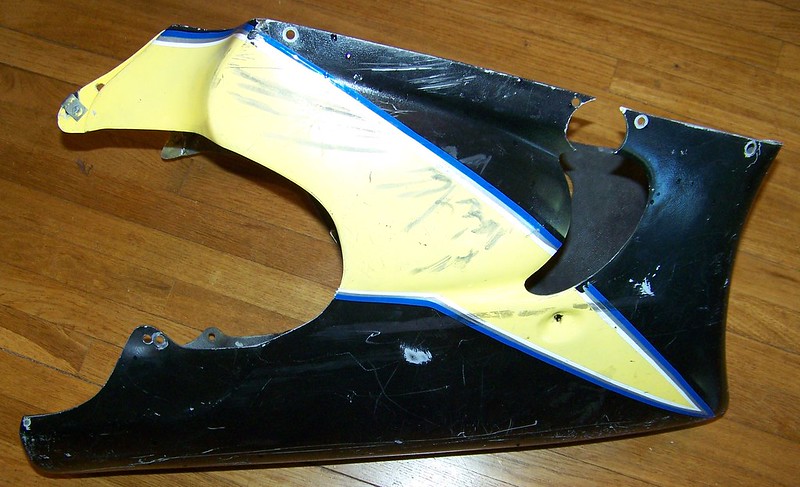
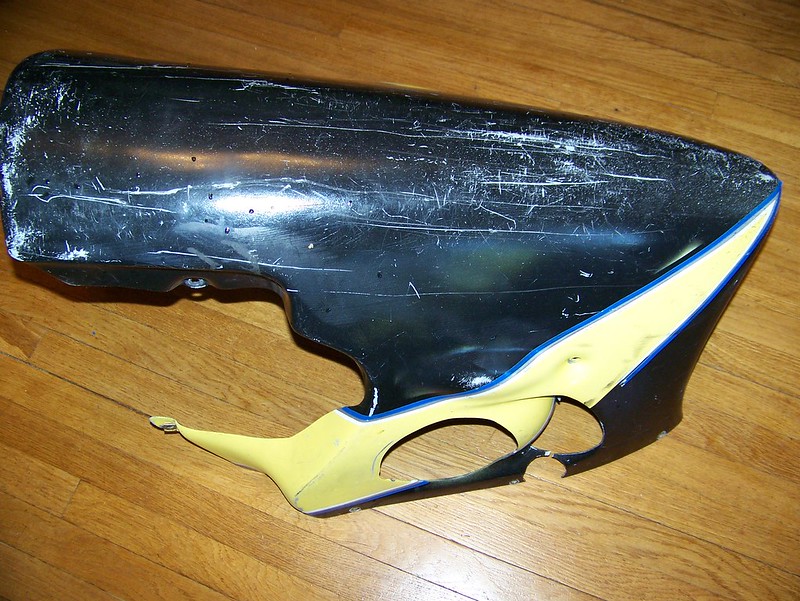
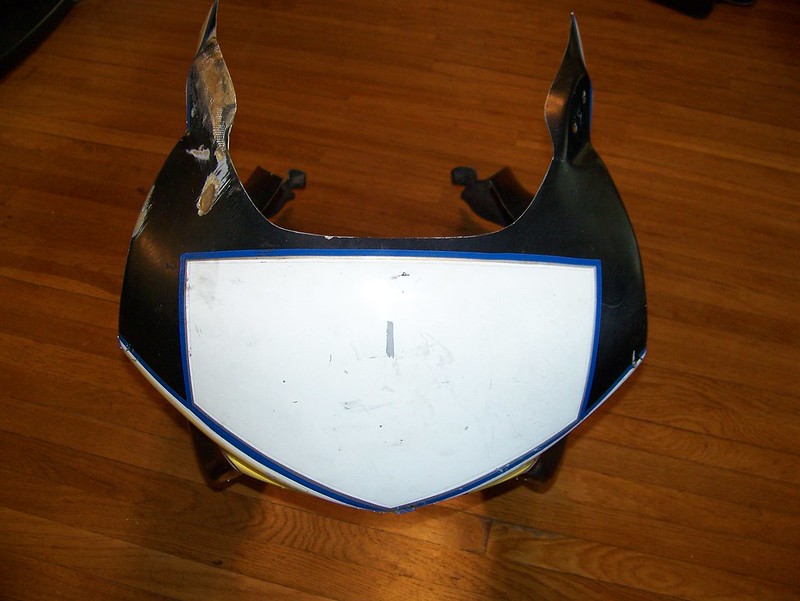
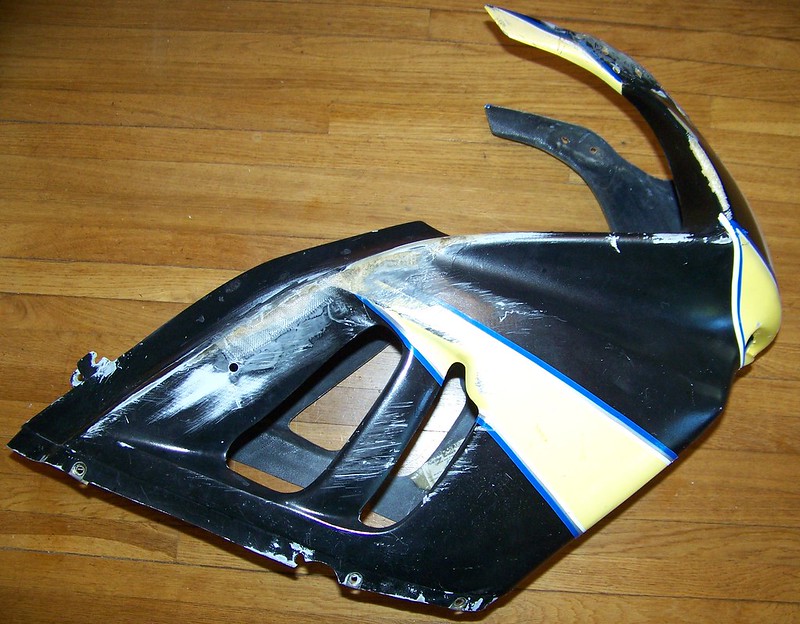
The first question I have, is what kind of stripping agent would be recommended, for getting the paint off, without potentially damaging the fiberglass surface?
The first question I have, is what kind of stripping agent would be recommended, for getting the paint off, without potentially damaging the fiberglass surface?