Cam Chain Tensioner - again
#131
 03-26-2007, 10:57 PM


Ferlev, from your pics it looks as though you have installed it correctly. I would assemble the camshaft holders, this will make sure the cams do not move in the journals (no free play). That is where I suspect you may be getting the little bit of a misalignment. Looks like the cam chain in not fully seated on the cam sprockets. MAKE SURE you use an assembly lube or vaseline on the cam journals as you don't want to dry start these. The liquid sealant is for just around the cam notches on the cylinder head, you only need a little bit. I would mount the gasket on the cover first then put the cover on the engine.
By the way take the chain off of the cam sprockets before you install the camshaft holders. Pay close attention to the tightening sequence and the torqe spec for the camshaft holders too. good luck, cycleslim
By the way take the chain off of the cam sprockets before you install the camshaft holders. Pay close attention to the tightening sequence and the torqe spec for the camshaft holders too. good luck, cycleslim
#132
03-27-2007, 07:15 AM

Senior Member
Join Date: Mar 2005
Location: Perth (Western Australia)
Posts: 865
Likes: 0
Received 0 Likes
on
0 Posts
#133
03-27-2007, 04:36 PM

Hi all,
Thanks for the replies.
Motor_Fan, I know what you mean when you say the CC looks a little weird. Not sure how to say in English, but the chain isn’t symmetric like the drive chain, if you look at the pictures you can see the “tooth” side is different. I guess you need to see it to understand. I will check the chain to see if it’s worn.
Cycleslim, The install was acutaly easier than I expected. Without the camshaft holdes and the exhaust cam in place first and pressing the CCT it all “snaps” or “smacks” in place. You don’t want you’re fingers in the way! I believe this is right. I used Vaseline and think it’s all right.
Trips, Do you know what happens IF I’m one tooth wrong?
I will go to my garage now and disassemble the whole thing again and move it one tooth. Then check the marks again and see if it’s any better. I will keep you updated J
Thanks for you’re input..!
#134
03-27-2007, 06:00 PM
Hehe.. That was easy 
I moved it one tooth. Looks like a perfect fit now! I'm happy with it! I only removed the inlet camshaft holders and it worked fine.. I also filled the new CCT with new clean oil and installed the sparkplugs)
Now I only need some of this liquid seal and new exhaust gaskets, them I'm ready!!

(The picture is taken from a slight angle, but comparing to the exhaust cam picture above, it looks nice...

I moved it one tooth. Looks like a perfect fit now! I'm happy with it! I only removed the inlet camshaft holders and it worked fine.. I also filled the new CCT with new clean oil and installed the sparkplugs
) Now I only need some of this liquid seal and new exhaust gaskets, them I'm ready!!
(The picture is taken from a slight angle, but comparing to the exhaust cam picture above, it looks nice...
#135
03-27-2007, 06:41 PM

Senior Member
Join Date: Sep 2006
Location: Maassen nl
Posts: 472
Likes: 0
Received 0 Likes
on
0 Posts
Nice job ferlev. Glad to see that you got it sussed. Its not easy to interpret what someone is trying to put across and you've done a great job. Good luck when you go to fire it up, just remember, keep the cutoff swicth on to give the oil a chance to get up to the head before you fire her up for real. Let us know how it goes..
[sm=bounceybounce.gif]
[sm=bounceybounce.gif]
#136
03-27-2007, 06:48 PM
#137
03-28-2007, 02:06 AM

Join Date: Jun 2006
Location: Denmark, Europe
Posts: 52
Likes: 0
Received 0 Likes
on
0 Posts
ORIGINAL: Ferlev
Yea, that’s exactly my thought too..! Let her spin for one or two times, then turn the run switch on..
I will keep you updated with my progress. Hehe Maybe I should start a business in this..
Yea, that’s exactly my thought too..! Let her spin for one or two times, then turn the run switch on..
I will keep you updated with my progress. Hehe Maybe I should start a business in this..
#138
03-28-2007, 02:46 AM

The noise was gone after a oil service, the local honda dealer sold me a high performance syntetich oil. and my cam just vant bananas. after a change, filter and oil, mineral 10/40 the noise was almost gone when bikegot hot.
Cbr1000F cam chain is working under OIL preasure! if the oil is to thin, the noise be there.
Cbr1000F cam chain is working under OIL preasure! if the oil is to thin, the noise be there.
#139
03-29-2007, 01:52 PM

Hi,
as I will be doing most of the internals soon (starter clutch, primary chain and tensioner) I thought I would sort the camchain tensioner once and for all. I had designed another method but this one is even simpler.
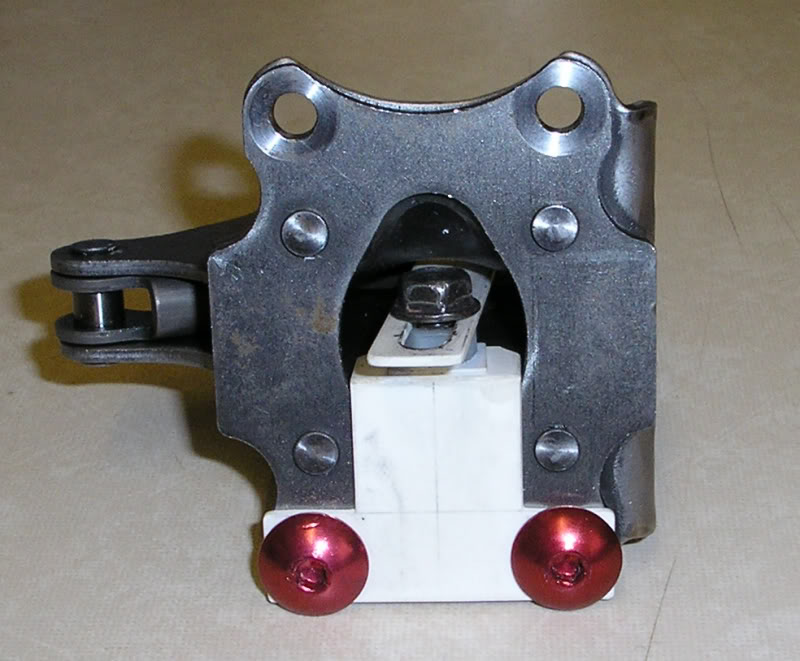
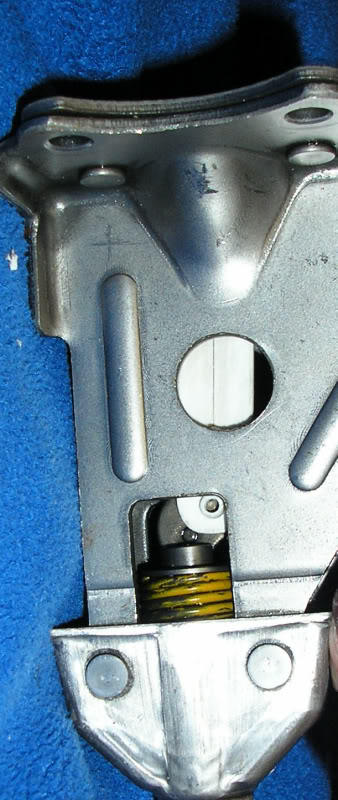
The fault with the tensioners is that the method of locking DOES NOT WORK. I do not consider something that works when it feels like it or only when warm to be satisfactory. Honda's attempts to add a guide plate to direct more oil down to the tensioner are again only partially effective. Its not like there is not enough room available. The tensioner works by pooling oil under a piston under the tesioner spring in order to create a hydraulic lock. It is totally inconsistent in its performance, one day fine the next a bag of nails. Having to change oil grades etc is again proof of its bad design. It should work as sold. Thanks to the photos posted earlier I was able to simplify the design without having to take my own cam cover off. The prototype is made from plastic at the moment just to prove the design.
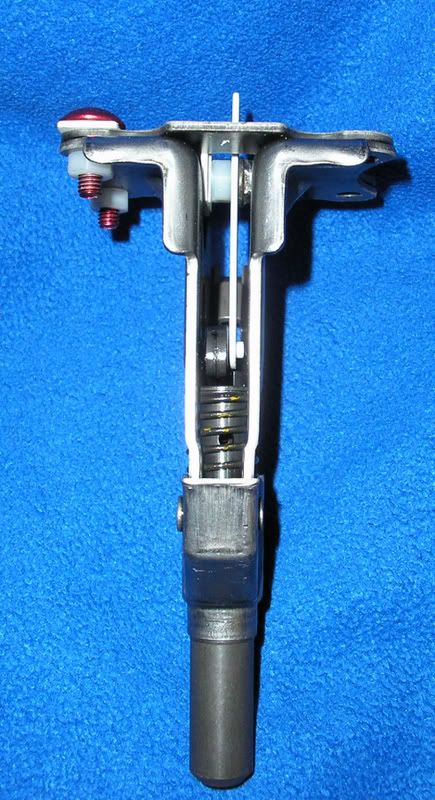
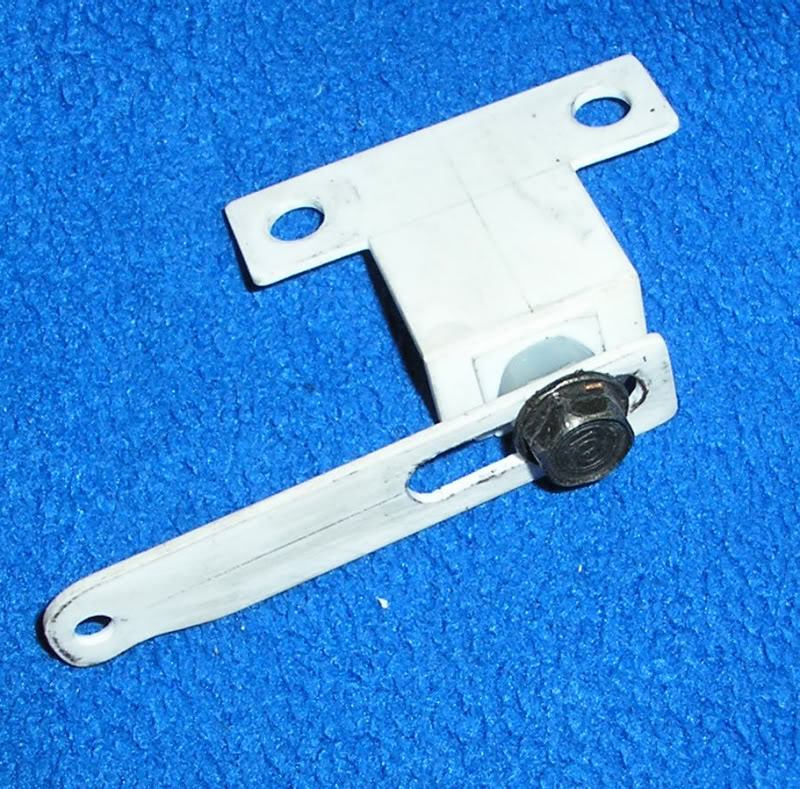
All we are trying to do is to lock the tensioner arm mechanically by the method shown in the photos. This requires one 4mmm hole to be drilled through the tensioner arm when the spring is fully compressed. A 4mm steel pin is then inserted and a spot weld to secure. The locking plate slips over this pin and is secured to the bracket fixed to the top. The bolt cannot fall out when in the engine as it meets the tensioner side before it is fully unscrewed. The locking plate sticks up about 15mm but there is ample room between the cam sprockets and the underside of the chain. Once all the timing marks are lined up simply undo the locking bolt and then re tighten. I would say that this would need doing once every 5-6000 miles.
Pics that explain (hopefully) follow below.
Cheers
Phil
http://i4.photobucket.com/albums/y14.../stuff/cc3.jpg
http://i4.photobucket.com/albums/y14...l/stuff/c4.jpg
http://i4.photobucket.com/albums/y14.../stuff/cc5.jpg
Lastly an old pic of a former ride
http://i4.photobucket.com/albums/y14...l/stuff/a4.jpg
as I will be doing most of the internals soon (starter clutch, primary chain and tensioner) I thought I would sort the camchain tensioner once and for all. I had designed another method but this one is even simpler.
The fault with the tensioners is that the method of locking DOES NOT WORK. I do not consider something that works when it feels like it or only when warm to be satisfactory. Honda's attempts to add a guide plate to direct more oil down to the tensioner are again only partially effective. Its not like there is not enough room available. The tensioner works by pooling oil under a piston under the tesioner spring in order to create a hydraulic lock. It is totally inconsistent in its performance, one day fine the next a bag of nails. Having to change oil grades etc is again proof of its bad design. It should work as sold. Thanks to the photos posted earlier I was able to simplify the design without having to take my own cam cover off. The prototype is made from plastic at the moment just to prove the design.
All we are trying to do is to lock the tensioner arm mechanically by the method shown in the photos. This requires one 4mmm hole to be drilled through the tensioner arm when the spring is fully compressed. A 4mm steel pin is then inserted and a spot weld to secure. The locking plate slips over this pin and is secured to the bracket fixed to the top. The bolt cannot fall out when in the engine as it meets the tensioner side before it is fully unscrewed. The locking plate sticks up about 15mm but there is ample room between the cam sprockets and the underside of the chain. Once all the timing marks are lined up simply undo the locking bolt and then re tighten. I would say that this would need doing once every 5-6000 miles.
Pics that explain (hopefully) follow below.
Cheers
Phil
http://i4.photobucket.com/albums/y14.../stuff/cc3.jpg
http://i4.photobucket.com/albums/y14...l/stuff/c4.jpg
http://i4.photobucket.com/albums/y14.../stuff/cc5.jpg
Lastly an old pic of a former ride
http://i4.photobucket.com/albums/y14...l/stuff/a4.jpg
Last edited by CBRclassic; 05-06-2009 at 06:54 PM.
