When you click on links to various merchants on this site and make a purchase, this can result in this site earning a commission. Affiliate programs and affiliations include, but are not limited to, the eBay Partner Network.
How To - Make Hand-trimmed Vinyl Decals. Basic tools only
Hey All,
I'll say at the start that if I knew how easy it was to work with automotive vinyl, I would have done this a long time ago. I got pretty nice results on my first try. By the second try I had it figured out. It's easy, requires no special tools except a heat gun (blow dryer) and razor blades, and is also completely reversible.
The next time I hear someone asking for advice on how to black-out an OEM paintjob for their streetfighter, or customize their paint scheme without spending a ton of hours or money on bodywork, I hope they'll consider this DIY friendly and inexpensive alternative. Plus it can be easily hand-trimmed to reproduce OEM decals, which is how I stumbled into it in the first place. Now I've got a ton of projects that I'm planning on using it for. If you don't have $1000's to spend on professional bodywork, this stuff is your friend. Highly recommend giving it a try
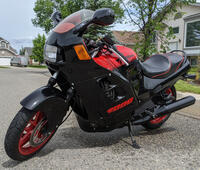
For this how-to, I made some '1000' decals for my '87 Hurricane side fairings. (yes, I know the panel is a little dirty and dusty in this pic)
Availability of older decals can be dicey, especially model-specific patterns. After a lot of fruitless searches, I decided to learn how to make my own decal out of vinyl. It's a very simple design that lends itself well to this method. If you have access to one of those vinyl cutting machines this'll be a breeze. Cutting them out by hand is easy enough though. Here's how I did it
Step 1. Download the template (attached). Note the 'Letter' versions are sized to print on a North American Letter sized sheet. Otherwise you'd want to start with one of the other pdf's and just make sure to print it without scaling (100%)
Step 2. Get some automotive vinyl. I used 3M Scotchprint 1080 film in Hot Rod Red. You'll need less than a sq foot to do both sides. Obviously try and pick a base color that matches your bike, or go try something different. It'd probably look cool cut out of a sticker-bomb pattern or waifu print. No judgement
Step 3. Print the template and cut a workpiece off the vinyl roll. Tape the template to the front of the vinyl. Grab a hobby knife or razor blade. Starting with the long horizontal lines, cut through the template to the vinyl below. You don't need to go through the backing - in fact it's easier if you don't. Use a straightedge and don't worry if you mess up. It's cheap stuff. After a couple tries I got something looking decent
Step 4. Once the long horizontal lines are cut, do the vertical lines. Don't attempt any of the curves yet. That'll come later
Step 5. Your piece of vinyl should now have all the straight lines cut in it. Using the tip of a knife, gently remove the wasted vinyl from the backing. Leave the parts you want to keep. If the backing is shredded, you can hold it together with some masking tape
Step 6. Go get some nail clippers and use them to trim the curves. Scissors work but it's really tough to get it right. Dragging a knife across the corners is nearly impossible. This is how mine turned out
Step 7. If you're not gonna clearcoat over it, application is very simple. Clean the panel and let it dry. Use masking tape to tape over the front of the vinyl. This'll keep the smaller pieces in alignment while you remove the backing. Carefully remove the backing, leaving the vinyl attached to the masking tape. Place the vinyl on the panel and apply pressure. Carefully remove masking tape. Press down to secure the vinyl. Give it a gentle blast with a heatgun if desired. This is what I did because I'd like the option to respray the panels without having to sand the decal off in the future
If you are planning to clearcoat it, scuff the panel (using white scotchbrite, blending paste, or P1200-1500 sandpaper) before cleaning and decal application. Apply the decal as above. Wipe with a tack rag before spraying. Mist the first coat of clear or else it can ruin the vinyl. Then clear 2 more coats. Polish if required
Total cost was less than $30, and I've got plenty of nice red vinyl leftover for other projects