
Novice changes to steel lines.


Thread Starter
|
Senior Member
Joined: Feb 2012
Posts: 118
Likes: 0
From: Beachwood, New Jersey
I am not a mechanic; but I did successfully change my stock brake lines (front only) from the oem to steel lines from Galfer. My bike is a 1997 600f. I will try to explain with text and pictures, what I did and the problems that I had. I do not suggest that this is the best way to do the job; but I ended up with a nice firm lever and strong front brakes. It was def. worth the upgrade imho.
Tools you will need
1. 14mm socket or open ended wrench
2. 12 mm socket or wrench if you also change pads.
3. lots of paper towels and rags.
4. plastic pan to collect old fluid.
5. 8 oz. sqeeze bottles. (not essential, but very useful)
6. bleeder vacuum pump. (got mine from Harbor Freight)
Here is what I did:
cover every painted surface with rags or towels. Fluid will ruing your paint. It will drip during the job.
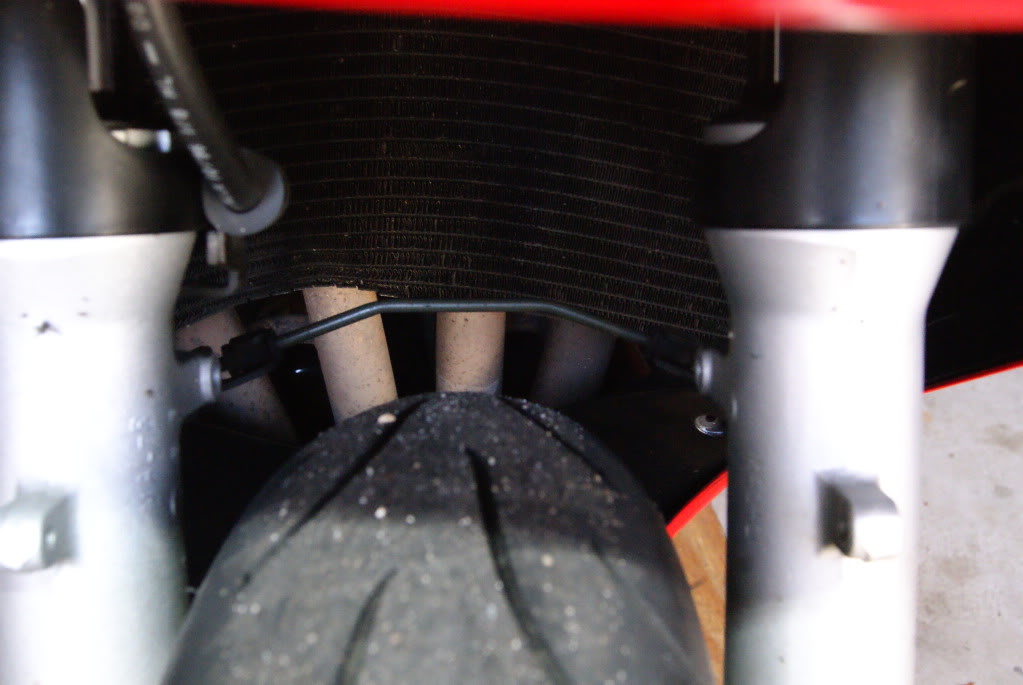
remove fender (forgot to mention 5mm allen is used for this) This will make removing the old lines easier and will give you a view of what you need to remove. Cover your tire with a towel. You will need to remove bolts from oem bracket (on fork and above radiator) and the lines, once removed from the caliper will drip. If you are replacing the pads, you could remove the calipers and move everything over to one side of the bike before you remove banjo bolts and let fluid run out of old lines.

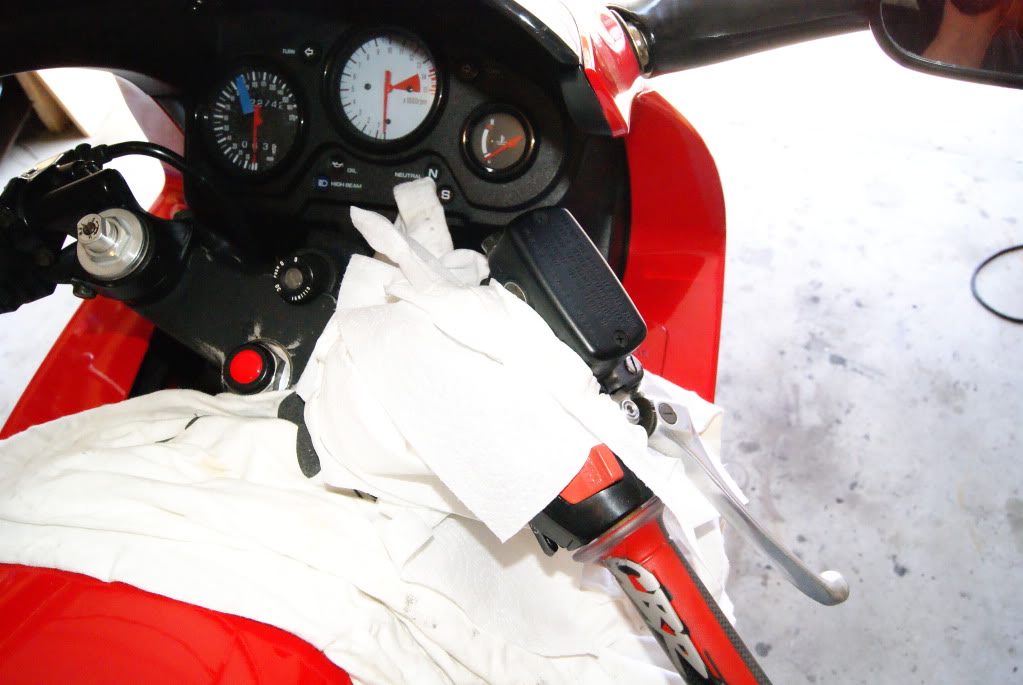
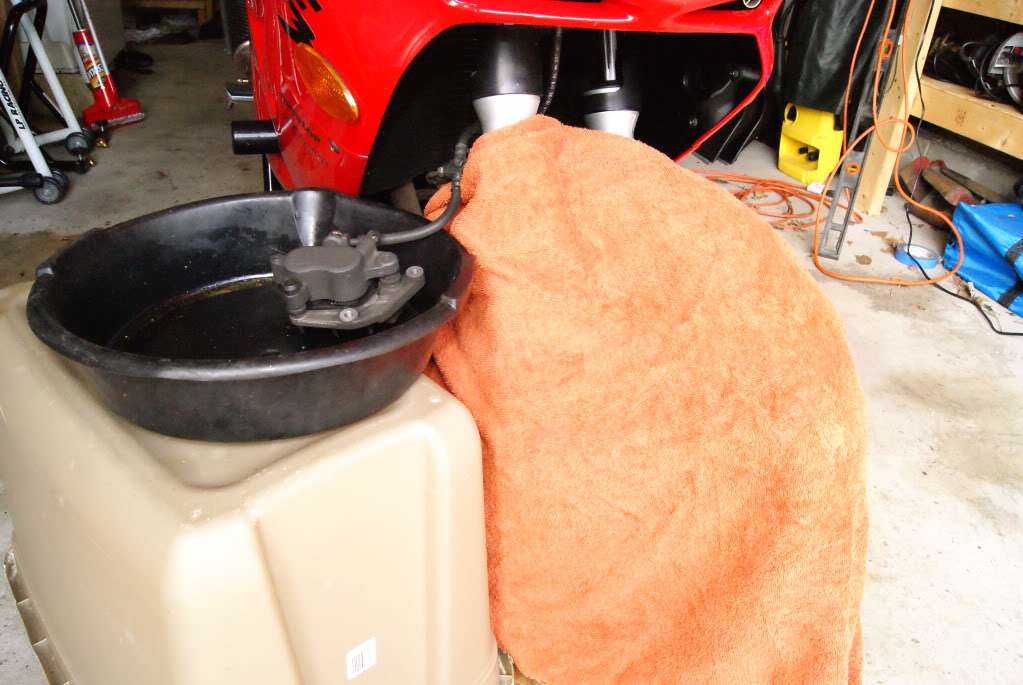
loosen the banjo bolts at the master cylinder (MC) and the fluid will run out of the lines.
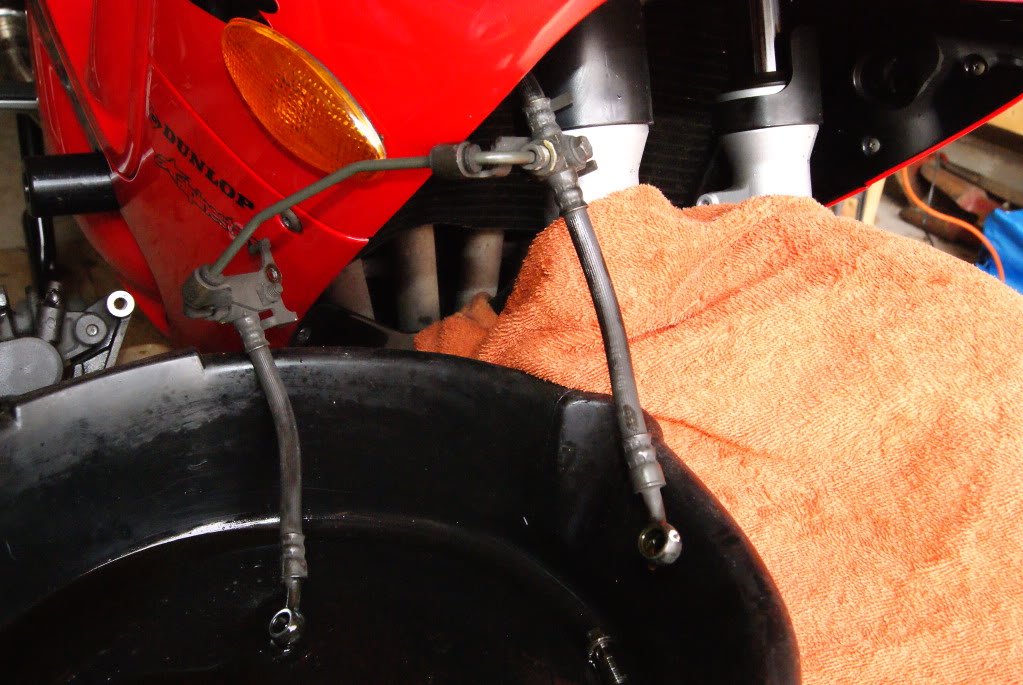
lines draining into a pan.
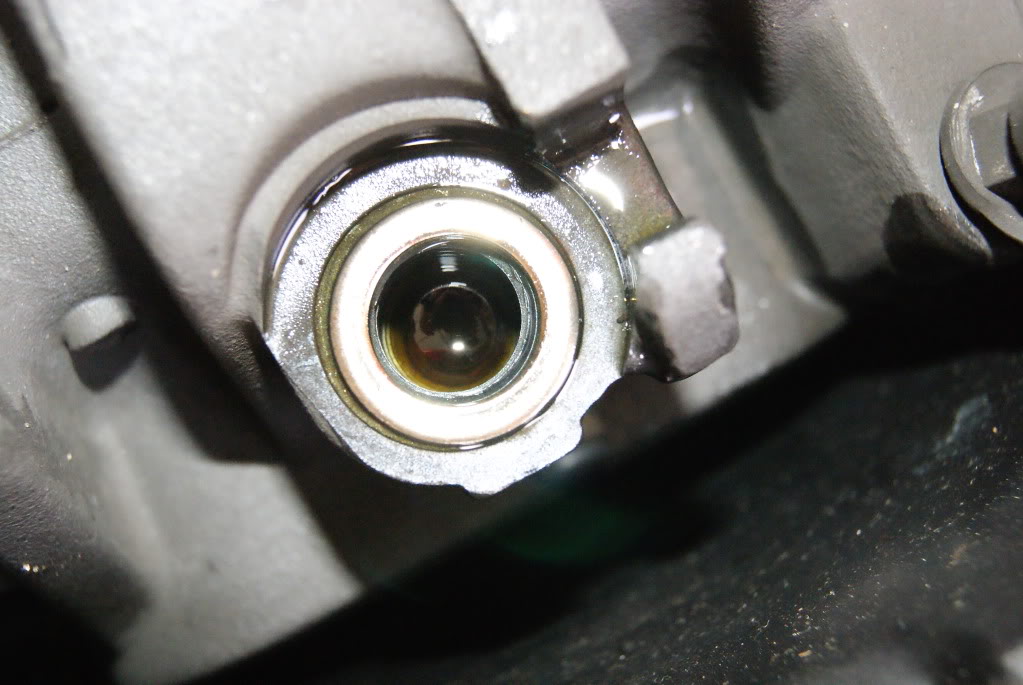
calipers with banjo bolt removed. Note nasty fluid and crush washer. (You will need 7 of these. (They come with the kit) Do not torque the new banjo bolts until you are certain that all the lines are routed neatly. They can only be torqued ONCE and are toast if you try to torque them and then re-torque them because you moved the lines. Found this out the hard way. Dealer charges $2.40 per washer....ouch!
If you are replacing the pads, you can do this now. If you don't change pads, you don't really need to remove calipers from bike.
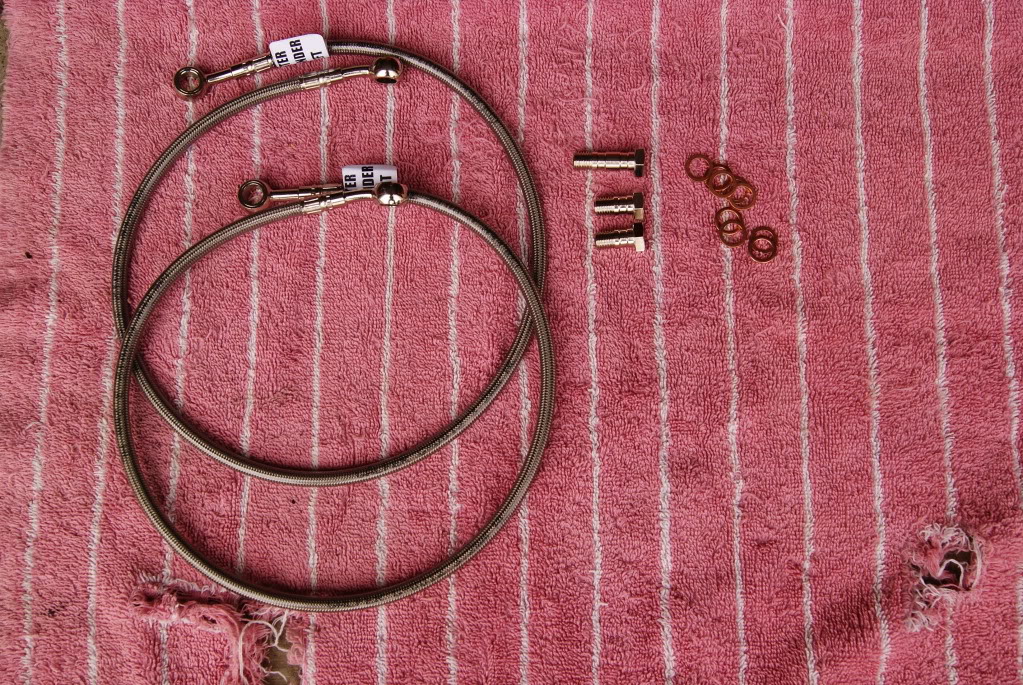
This is the kit as supplied by Galfer. Longer banjo bolt is a double bolt and holds both lines secure at the MC. Shorter banjo bolts go on the calipers with one line running directly from the MC to each caliper.

Galfer recommend this order of components (from left to right in picture)
Banjo bolt, washer, right line, washer, left line, washer, MC. (I thought it made more sense to have the left line (the longer of the two) on the left; but I installed my lines as per Galfer's instructions. (video on website). Make sure that the longer of the two lines goes to the left caliper or they won't fit.

Once your lines are routed the way you want, you can torque the banjo bolts to 17ft./lb (Galfer's number...the Honda manual sais 20 ft./lb. I went with 17 and did not have any leaks. ). Then you can begin to bleed the air out of the lines. I suggest you use a vacuum pump to get fluid into the lines. If you try it with just the lever, it will take forever. I actually could not get fluid into the lines without using the pump.
I pumped fluid until I had about 3 ounces in the holding tank on the pump. Make sure that you fill fluid into the MC as you are doing this or you will pull air into the system. This is where the squirt bottles came in very handy since it is easer to fill the MC with a small bottle of fluid and not have to pour from a big bottle of fluid. I might add that you should position your handlebars so that you MC is as level as possible. For me, this did not leave much room between open top of MC and the windscreen. One more reason little bottles came in handy.
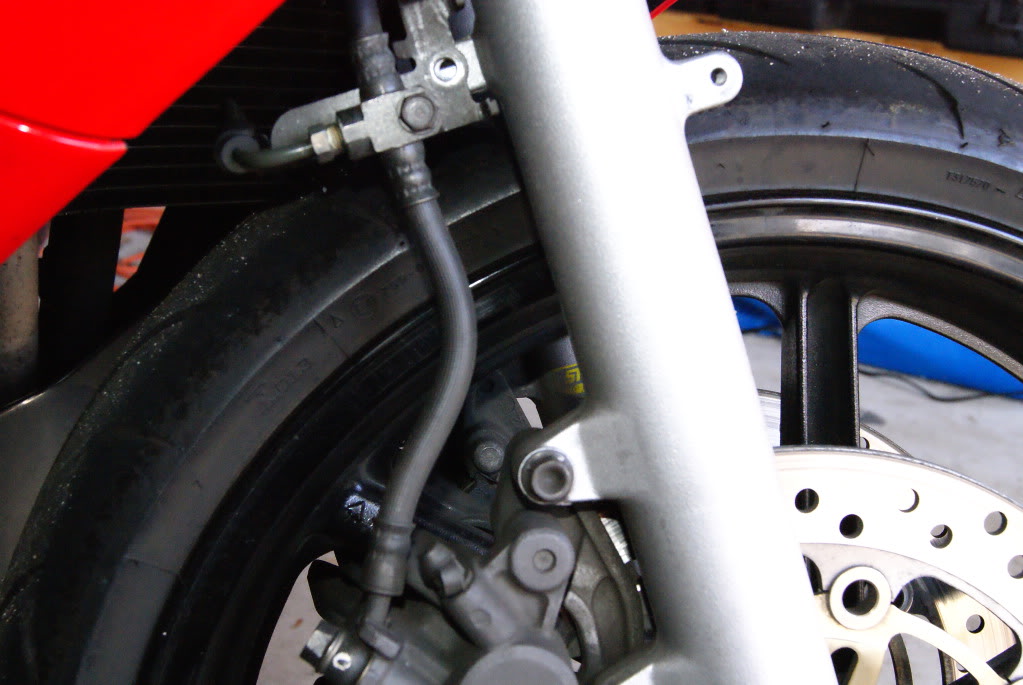
THis picture shows the caliper on the bike with old lines still attached. The bleed valve is where you attach the pump. It will pull fluid from MC down the lines and through the caliper. Then, when there is fluid in the lines, you can switch to clear tubing (so you can see bubbles) and bleed the lines until there is resistance in the lever and no bubbles in the tube. This might take a while; but it is important to get all the air out of the lines. Clos valve, pump brake lever, hold brake lever tight while opening bleed valve (8mm open end wrench), close bleed valve, release lever. This will have to be repeated in that sequence several times. I did it about 5 times until I got some pressure in the lever. Then I reapeated it about 12-15 times before the lever felt the way I wanted it to and all the bubbles were gone. Oh, and you will need to switch from one side caliper to the other. Work slowly and methodically and everything should work out fine.
I made several mistakes along the way, so there was much swearing and several pittiful please for help from the real experts on this forum before I got it all working. (For their help and patience, I will be forever grateful). If I were to do this again, I would do it as I described above.
If I left anything out, or did something wrong, I would welcome any suggestions you might have. I hope this might be of some value to someone out there. PM me if you need further clarification or if anything I said is confusing.
Erich
Tools you will need
1. 14mm socket or open ended wrench
2. 12 mm socket or wrench if you also change pads.
3. lots of paper towels and rags.
4. plastic pan to collect old fluid.
5. 8 oz. sqeeze bottles. (not essential, but very useful)
6. bleeder vacuum pump. (got mine from Harbor Freight)
Here is what I did:
cover every painted surface with rags or towels. Fluid will ruing your paint. It will drip during the job.
remove fender (forgot to mention 5mm allen is used for this) This will make removing the old lines easier and will give you a view of what you need to remove. Cover your tire with a towel. You will need to remove bolts from oem bracket (on fork and above radiator) and the lines, once removed from the caliper will drip. If you are replacing the pads, you could remove the calipers and move everything over to one side of the bike before you remove banjo bolts and let fluid run out of old lines.
loosen the banjo bolts at the master cylinder (MC) and the fluid will run out of the lines.
lines draining into a pan.
calipers with banjo bolt removed. Note nasty fluid and crush washer. (You will need 7 of these. (They come with the kit) Do not torque the new banjo bolts until you are certain that all the lines are routed neatly. They can only be torqued ONCE and are toast if you try to torque them and then re-torque them because you moved the lines. Found this out the hard way. Dealer charges $2.40 per washer....ouch!
If you are replacing the pads, you can do this now. If you don't change pads, you don't really need to remove calipers from bike.
This is the kit as supplied by Galfer. Longer banjo bolt is a double bolt and holds both lines secure at the MC. Shorter banjo bolts go on the calipers with one line running directly from the MC to each caliper.
Galfer recommend this order of components (from left to right in picture)
Banjo bolt, washer, right line, washer, left line, washer, MC. (I thought it made more sense to have the left line (the longer of the two) on the left; but I installed my lines as per Galfer's instructions. (video on website). Make sure that the longer of the two lines goes to the left caliper or they won't fit.
Once your lines are routed the way you want, you can torque the banjo bolts to 17ft./lb (Galfer's number...the Honda manual sais 20 ft./lb. I went with 17 and did not have any leaks. ). Then you can begin to bleed the air out of the lines. I suggest you use a vacuum pump to get fluid into the lines. If you try it with just the lever, it will take forever. I actually could not get fluid into the lines without using the pump.
I pumped fluid until I had about 3 ounces in the holding tank on the pump. Make sure that you fill fluid into the MC as you are doing this or you will pull air into the system. This is where the squirt bottles came in very handy since it is easer to fill the MC with a small bottle of fluid and not have to pour from a big bottle of fluid. I might add that you should position your handlebars so that you MC is as level as possible. For me, this did not leave much room between open top of MC and the windscreen. One more reason little bottles came in handy.
THis picture shows the caliper on the bike with old lines still attached. The bleed valve is where you attach the pump. It will pull fluid from MC down the lines and through the caliper. Then, when there is fluid in the lines, you can switch to clear tubing (so you can see bubbles) and bleed the lines until there is resistance in the lever and no bubbles in the tube. This might take a while; but it is important to get all the air out of the lines. Clos valve, pump brake lever, hold brake lever tight while opening bleed valve (8mm open end wrench), close bleed valve, release lever. This will have to be repeated in that sequence several times. I did it about 5 times until I got some pressure in the lever. Then I reapeated it about 12-15 times before the lever felt the way I wanted it to and all the bubbles were gone. Oh, and you will need to switch from one side caliper to the other. Work slowly and methodically and everything should work out fine.
I made several mistakes along the way, so there was much swearing and several pittiful please for help from the real experts on this forum before I got it all working. (For their help and patience, I will be forever grateful). If I were to do this again, I would do it as I described above.
If I left anything out, or did something wrong, I would welcome any suggestions you might have. I hope this might be of some value to someone out there. PM me if you need further clarification or if anything I said is confusing.
Erich


Member
Joined: Aug 2010
Posts: 92
Likes: 0
From: Southern Kentucky
Good write up. I would suggest getting speed bleeder bleed valves, which would have made bleeding the calipers much easier. I have Galfer lines which came with my bike. I had what appeared to be warped rotors. Replaced rotors, bled brakes, better feel but still some vibration. After I got my speed bleeders, I no longer have that warped rotor feeling.

Retired Super Moderator - At large E=MC2
Joined: Feb 2011
Posts: 2,299
Likes: 4
From: Tulsa,OK
You may be a self-professed amateur, but you did a great job on this write-up.
You even noted the cavet, that crush-washers are a one-use item, well done!
You've created an excellent reference tool for assisting others here, which will
give a long life to this thread, even if it never grows any longer, post-wise.
Thanks, Ern
You even noted the cavet, that crush-washers are a one-use item, well done!
You've created an excellent reference tool for assisting others here, which will
give a long life to this thread, even if it never grows any longer, post-wise.
Thanks, Ern

Senior Member
Joined: Aug 2009
Posts: 378
Likes: 2
From: UK
They are one use, but...
If you are desperate, i.e. it is midnight on a Sunday and you need your bike for work the next day, you can reanneal copper/aluminium washers by heating them on the stove/over a flame.
For copper, you want them glowing red hot, for aluminium washers, cover them in soap and expose to the flame, when the soap turns black and stinks they are hot enough - any hotter and they will melt.
The idea is that the heating up realigns the metal crystals, making the metal softer and more compressible. Not something I do if I can help it but it is better than being stranded at home for the sake of a 10p part.
Any copper crush washers are suitable by the way, there is no need to go to a dealer if you need more, a local hardware shop will be a fraction of the price.

Junior Member
Joined: May 2012
Posts: 25
Likes: 0
From: Fargo, ND
Good write up. I would suggest getting speed bleeder bleed valves, which would have made bleeding the calipers much easier. I have Galfer lines which came with my bike. I had what appeared to be warped rotors. Replaced rotors, bled brakes, better feel but still some vibration. After I got my speed bleeders, I no longer have that warped rotor feeling.

Member
Joined: Sep 2011
Posts: 42
Likes: 0
From: Sacramento, Ca
I have noticed with my recent purchase (97 f3) a seemingly warped rotor up front. When I depress my front brakes it has a hard pulse as it rotates. Does that sound similar to the situation you had? If a simple speed bleeder is the answer to this issue, I would be ecstatic!
Warped rotors are not something you want to have on a motorcycle. The front brakes on a motorcycle are a large majority of your stopping power, and if you jam on those brakes in a life and death situation, you don't want a wobbly/sketchy front end trying to keep you from meeting your end.
REPLACE WORN BRAKE COMPONENTS. Your life depends on it.
Junior Member
Joined: May 2012
Posts: 25
Likes: 0
From: Fargo, ND
Warped rotors are not something you want to have on a motorcycle. The front brakes on a motorcycle are a large majority of your stopping power, and if you jam on those brakes in a life and death situation, you don't want a wobbly/sketchy front end trying to keep you from meeting your end.
REPLACE WORN BRAKE COMPONENTS. Your life depends on it.
REPLACE WORN BRAKE COMPONENTS. Your life depends on it.
Retired Super Moderator - At large E=MC2
Joined: Feb 2011
Posts: 2,299
Likes: 4
From: Tulsa,OK
Only way to be sure if it's a warped rotor is to mic it out, using a dial indicator.
Manual allows for 0.30mm or 0.012inches of run-out.
Other possible causes of 'pulsing' in the brakes is a caliper that is hung-up on
the hanger-pin or a piston that is sticking. These are the more likely causes.
I would do a complete cleaning/over-haul of the calipers before settling on a warped
rotor as the cause of your issue.
Ern

Member
Joined: May 2012
Posts: 71
Likes: 0
When you say that you need to switch between the left and right side calipers while bleeding them, do you mean just once as in when you're done with the right side you move over to the left? Or do you have to periodically go back and forth and if so how often?
Thanks for the guide btw
Thanks for the guide btw

Thread
Thread Starter
Forum
Replies
Last Post