


Homemade GPS RAM Mount


Thread Starter
|
Welcome Crew and May 2012 Ride of the Month
Joined: Aug 2010
Posts: 1,563
Likes: 2
From: Kitchener, Ontario
 Homemade GPS RAM Mount
Ok, so you want a mount for your Garmin GPS, and you're the awesome kind of person who'd rather spend $5 and 30 minutes building it (30 minutes is to get the parts, not actually build this, which takes about 5 minutes tops), rather than spending $30 plus shipping on a pre-made one. This tutorial is for you.
Stuff you need (I got most of the loot from Local Hardware store)
Loot:

1x 4" x 1/4" standard issue bolt
1x 5/8" x 1.75" hose (Why 5/8"? Because that seems to be pretty standard a diameter for steering tubes. Measure yours and ask for an appropriate hose that's just slightly smaller than your tube diameter)
2x 5/8" washers -- get more than 2, get 12-20, because not all washers are built to NASA tolerances, and some won't fit.
2x coupler nuts
1x 17 mm bead -- (Craft store usually has these for neclaces and stuff)
Assembly:
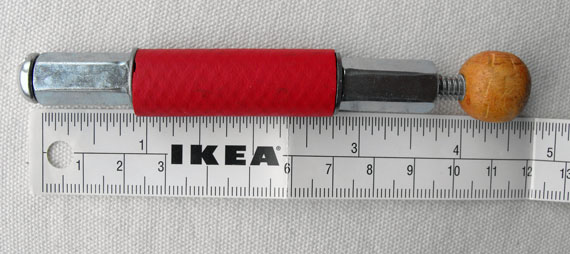
I'll omit actual assembly instructions as a test of your evolution. If you have ever played with Lego, or can count beyond 3, you should be able to pass this test. I hope you all pass. You'll notice I didn't screw on my bead completely. This is because I don't want to. You can if you wish.
Installation (On buddies bike):
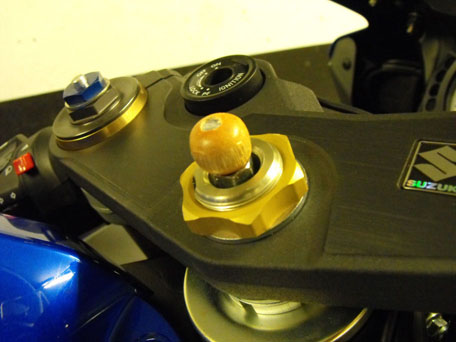
Slide the assembled unit down the steering tube, and make sure it doesn't drop into the tube, or you may never get it back. You're going to want to keep the bead off the bolt for this because you'll need to hold the bolt while you tighten the top coupler nut with a wrench. This will make the hose expand inside the tube and keep your mount super secure. Be sure to tighten the nut and squeeze that hose a LOT. The more friction, the stabler, and the merrier.
Once it's secure to your satisfaction, screw on the bead (with or without loctite/glue, I opted for no loctite/glue in case I need to later switch beads in the future for any reason. I figured I can always glue it later if necessary).
Other stuff you want to know:
1) The beads from Craft store came with a bore hole that's made for fishing line thickness necklace wire, or whatever it is they use. This is far too small for the bolt, so you'll need to bore a hole into the wooden bead. I recommend a 7/32" bore, which will be "one size" smaller than the bolt itself, ensuring maximum friction. Screwing on the bead may feel laborious and difficult, but you'll be safe in knowing the friction will keep your stuff securely in place in every dimension. DO NOT bore a hole too large or the bead will simply slide freely along the bolt, which is counterproductive entirely.
2) Putting the cradle on the unit may require a bit of force that will unnerve you. This is ok. If you find it's too easy or too hard, it means you've used the wrong size bead. That's why you have 11-19 more. It should snugly "snap" into the Garmin cradle. I would advise against popping it on and off repeatedly, as it is made of wood and you will over time degrade its ability to hang onto the cradle. I normally leave my cradle on my bike anyway, with a small plastic bag over it so rain doesn't damage the connectors. Up to you what you do here.
3) Put an additional safety cable directly from my GPS to the bike's frame, "just in case" this stuff all fails. So far, it hasn't even come close to, but safety first.
4) Enjoy this Effing Awesome project!
Stuff you need (I got most of the loot from Local Hardware store)
Loot:
1x 4" x 1/4" standard issue bolt
1x 5/8" x 1.75" hose (Why 5/8"? Because that seems to be pretty standard a diameter for steering tubes. Measure yours and ask for an appropriate hose that's just slightly smaller than your tube diameter)
2x 5/8" washers -- get more than 2, get 12-20, because not all washers are built to NASA tolerances, and some won't fit.
2x coupler nuts
1x 17 mm bead -- (Craft store usually has these for neclaces and stuff)
Assembly:
I'll omit actual assembly instructions as a test of your evolution. If you have ever played with Lego, or can count beyond 3, you should be able to pass this test. I hope you all pass. You'll notice I didn't screw on my bead completely. This is because I don't want to. You can if you wish.
Installation (On buddies bike):
Slide the assembled unit down the steering tube, and make sure it doesn't drop into the tube, or you may never get it back. You're going to want to keep the bead off the bolt for this because you'll need to hold the bolt while you tighten the top coupler nut with a wrench. This will make the hose expand inside the tube and keep your mount super secure. Be sure to tighten the nut and squeeze that hose a LOT. The more friction, the stabler, and the merrier.
Once it's secure to your satisfaction, screw on the bead (with or without loctite/glue, I opted for no loctite/glue in case I need to later switch beads in the future for any reason. I figured I can always glue it later if necessary).
Other stuff you want to know:
1) The beads from Craft store came with a bore hole that's made for fishing line thickness necklace wire, or whatever it is they use. This is far too small for the bolt, so you'll need to bore a hole into the wooden bead. I recommend a 7/32" bore, which will be "one size" smaller than the bolt itself, ensuring maximum friction. Screwing on the bead may feel laborious and difficult, but you'll be safe in knowing the friction will keep your stuff securely in place in every dimension. DO NOT bore a hole too large or the bead will simply slide freely along the bolt, which is counterproductive entirely.
2) Putting the cradle on the unit may require a bit of force that will unnerve you. This is ok. If you find it's too easy or too hard, it means you've used the wrong size bead. That's why you have 11-19 more. It should snugly "snap" into the Garmin cradle. I would advise against popping it on and off repeatedly, as it is made of wood and you will over time degrade its ability to hang onto the cradle. I normally leave my cradle on my bike anyway, with a small plastic bag over it so rain doesn't damage the connectors. Up to you what you do here.
3) Put an additional safety cable directly from my GPS to the bike's frame, "just in case" this stuff all fails. So far, it hasn't even come close to, but safety first.
4) Enjoy this Effing Awesome project!
Last edited by jeffjones; May 9, 2012 at 06:57 AM.
Thread Starter
|
Welcome Crew and May 2012 Ride of the Month
Joined: Aug 2010
Posts: 1,563
Likes: 2
From: Kitchener, Ontario
I ordered a mount from China that I am waiting to come in for $2 and cutting the ball off that and using it instead.
The more you take the GPS clip on and off the ball starts to lose the tight grip.
I will post pics when it comes in.

Thread Starter
|
Welcome Crew and May 2012 Ride of the Month
Joined: Aug 2010
Posts: 1,563
Likes: 2
From: Kitchener, Ontario
As said at the beginning, I personally would much rather build something then buy something


Party Animal, ROTM June 2014
Joined: Oct 2008
Posts: 671
Likes: 0
I too would rather build something than buy it, but if I can't make it look good then I won't. For example, the wiring I made for my new reg/rect looks better than OEM to me.

Super Moderator and Official Welcome Crew Yeti
Joined: Jun 2005
Posts: 2,066
Likes: 6
From: Souf Cackilack
good shade-tree solution, especially if you can't/don't want to go all the way through the neck, and the basic mechanical concept here is quite adaptable. for an alternative, here's my old write-up using 2 pieces of pvc and a nut.


Thread
Thread Starter
Forum
Replies
Last Post
