F4i Rearset Lift: Alternative to silly-expensive rearsets...
#1
 09-04-2006, 01:33 AM


Join Date: Jul 2006
Location:
Posts: 204
Likes: 0
Received 0 Likes
on
0 Posts
DISCLAIMER: If you're wanting those fancy rearsets for the "Bling" factor, look elsewhere. This thread will not help you. If you want to lift your rearsets to keep from dragging them in corners, read on. Also, I can't think of any reason why this wouldn't work. If it seems crazy or irresponsible, please share your thoughts.
CONCEPT: By moving the lower mount of the rearsets rearward, the peg moves up and back, accomplishing almost the same results as spending lots of money on aftermarket rearsets or relocator brackets.
TOOLS: The basics. Allen keys, wrenches, saw, file/sandpaper/grinder
TIME: <1 hour (Depends on your comfort/ability)
COST:$0-$10 (Depends on what you've got lying around and where you shop.)
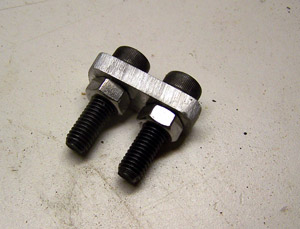
MATERIALS: 1/8 Thick Aluminum, 2 M8x1.25x30mm Allen Bolts, 2 M8x1.25x40 Allen Bolts, 4 nuts to match, 4 nylock nuts to match. Loctite(Everything pictured below)

GET STARTED:
You're gonna have to make 4 brackets that will serve to relocate the lower rearset mount. I used Aluminum as it is easy to work with and the perfect piece happened to be sitting next to my workbench. I used flat, 1.5 wide, 1/8 thick aluminum. I cut two pieces, 5/8 wide. These will become the brackets.
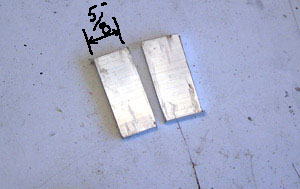
Drill holes 3/4" apart, center to center. This will create approximately 1.25 up and .5 back. Make sure these holes are large enough for the M8 bolts to pass through.

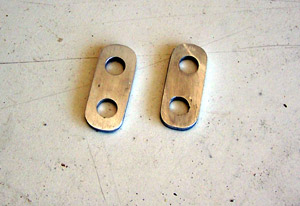
You could leave the brackets as they are, but I chose to clean them up a little. I bolted 2 together at a time to be sure they ended up uniform and to make holding them easier. I used my bench-mounted belt sander. Spent about 5 minutes on each pair. A file is also an ideal tool for this. Aluminum is really fun and super easy to work with. Be not afraid.
Unbolt them, clean them up a bit more, and here you go...
ON TO ASSEMBLY:
First, remove the stock rearset.
Next, using the shorter, 30mm bolt and a nylock nut, attach the two brackets to the lower mount. Don't snug anything up yet, just get it on there.

Now, re-attach the rearset. HOWEVER, since the lower mount is going to be spaced out 1/8" by the bracket, be sure to space the upper mount equally. I happened to have 1/8" washers. If you don't have these and you've just made the brackets above, it's not to hard to bust out your own spacer for the top mount. Using one of the 40mm bolts, begin to assemble the new lower mount--
I had originally planned on finding/making a spacer the exact thickness of the lower mount to place between the brackets, but i figured instead I would use nuts to accomplish the same task. First, put one nut on. (As shown)

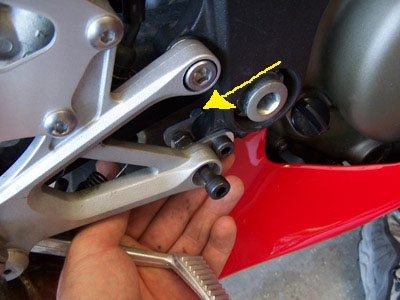
Then, put the second one on... This part's a tad difficult to explain, but once you're in there, it'll make total sense. You're effectively using the 2 nuts to cinch down onto the 2 brackets. So one needs to be tight against the outer bracket and the other needs to be tight against the inner bracket. There should be a small space between them and you should make sure that the brackets aren't bent by improper placement of the nuts. Once you have both brackets lined up, it's a good idea to tighten up the front bolt and its nut (indicated by the arrow). You could wait and do it at the end, but it's gonna be hard to get to that nut once the next one is on.
Finally, put the last nylock nut on the rear bolt. Check the placement of the 2 "spacer" nuts, make sure there's loctite on them, and
CONCEPT: By moving the lower mount of the rearsets rearward, the peg moves up and back, accomplishing almost the same results as spending lots of money on aftermarket rearsets or relocator brackets.
TOOLS: The basics. Allen keys, wrenches, saw, file/sandpaper/grinder
TIME: <1 hour (Depends on your comfort/ability)
COST:$0-$10 (Depends on what you've got lying around and where you shop.)
MATERIALS: 1/8 Thick Aluminum, 2 M8x1.25x30mm Allen Bolts, 2 M8x1.25x40 Allen Bolts, 4 nuts to match, 4 nylock nuts to match. Loctite(Everything pictured below)
GET STARTED:
You're gonna have to make 4 brackets that will serve to relocate the lower rearset mount. I used Aluminum as it is easy to work with and the perfect piece happened to be sitting next to my workbench. I used flat, 1.5 wide, 1/8 thick aluminum. I cut two pieces, 5/8 wide. These will become the brackets.
Drill holes 3/4" apart, center to center. This will create approximately 1.25 up and .5 back. Make sure these holes are large enough for the M8 bolts to pass through.
You could leave the brackets as they are, but I chose to clean them up a little. I bolted 2 together at a time to be sure they ended up uniform and to make holding them easier. I used my bench-mounted belt sander. Spent about 5 minutes on each pair. A file is also an ideal tool for this. Aluminum is really fun and super easy to work with. Be not afraid.
Unbolt them, clean them up a bit more, and here you go...
ON TO ASSEMBLY:
First, remove the stock rearset.
Next, using the shorter, 30mm bolt and a nylock nut, attach the two brackets to the lower mount. Don't snug anything up yet, just get it on there.
Now, re-attach the rearset. HOWEVER, since the lower mount is going to be spaced out 1/8" by the bracket, be sure to space the upper mount equally. I happened to have 1/8" washers. If you don't have these and you've just made the brackets above, it's not to hard to bust out your own spacer for the top mount. Using one of the 40mm bolts, begin to assemble the new lower mount--
I had originally planned on finding/making a spacer the exact thickness of the lower mount to place between the brackets, but i figured instead I would use nuts to accomplish the same task. First, put one nut on. (As shown)
Then, put the second one on... This part's a tad difficult to explain, but once you're in there, it'll make total sense. You're effectively using the 2 nuts to cinch down onto the 2 brackets. So one needs to be tight against the outer bracket and the other needs to be tight against the inner bracket. There should be a small space between them and you should make sure that the brackets aren't bent by improper placement of the nuts. Once you have both brackets lined up, it's a good idea to tighten up the front bolt and its nut (indicated by the arrow). You could wait and do it at the end, but it's gonna be hard to get to that nut once the next one is on.
Finally, put the last nylock nut on the rear bolt. Check the placement of the 2 "spacer" nuts, make sure there's loctite on them, and
#3
09-04-2006, 03:06 PM

Admin Emeritus & MVN

#7
09-05-2006, 04:03 PM
Join Date: Jul 2006
Location:
Posts: 204
Likes: 0
Received 0 Likes
on
0 Posts
It's hard to say how much is psychological and how much is physical. I feel like I can ride more agressively and be more mobile on the bike. It is taking a little getting used to the different position of the brake and shift lever and I may continue to fine tune the location of each. I am very happy with it, though. I'd certainly encourage anyone to give it a go.
#8
09-06-2006, 01:27 AM

Senior Member
Join Date: Jan 2006
Location:
Posts: 1,615
Likes: 0
Received 0 Likes
on
0 Posts
#9
09-06-2006, 02:02 AM

Wow. Great idea. Did you consider making a similar type brake for the top hole as well, so that the entire rearset is moved backward? I can't imagine it would be too hard to make if you had a large enough piece of aluminum. With this simple mod and maybe replacing the stock foot pegs with something a little beefier and stickier you'd have a really inexpensive rearset.
#10
09-07-2006, 05:29 AM

Great idea.
Nice layout of post and description for task.
Any extra flex noticed through the pegs with this mod?
Only comment would be that peeps may wish to adjust rear brake lever up a little to suit new peg position (via locknut/rod on master cylinder behind the heal guard etc).
Nice layout of post and description for task.
Any extra flex noticed through the pegs with this mod?
Only comment would be that peeps may wish to adjust rear brake lever up a little to suit new peg position (via locknut/rod on master cylinder behind the heal guard etc).