
Converting a CA style F4 to rest of the world style

Thread Starter
|
Senior Member
Joined: Nov 2012
Posts: 112
Likes: 0
I have hit another obstacle.  I want so badly to just be done with fixing this bike I am about to lose my mind. I bought brand new OEM grips for both sides put the clutch side on that night and wasn't able to put the throttle side on (didn't know I could just pull the old Rubber portion off instead of removing the throttle cables and what not) so when I came to put the throttle side on it was broke as you see

So I ordered new grips again and didn't know that if you order 'grips' you get rubber grips only. Then the carbs did the rejet kit off carbjetkits.com but found that all 18 screws both vacuum side and jet side of the carb were practically rounded off had to buy new screws luckily cheap.

But then on the last main jet taking it out flat head bit on impact driver slipped and broke the float so that was another $32 or something then one of the little knuckles on the carb insulator broke off so I had to order another one of those $15 I SWEAR this bike is going to be the end of me and my wife is about to kill me.

The left rear taillight broke at the rubber base you know so I tried to epoxy that as I know the way epoxy/ super glue works is a chemical reaction that cause the plastic in this case to melt causing a like bond of that of the original and if you can see there I used the old Cali emissions tubing to make caps for all the emissions stuff on the bike and those are pennies on the end (unfortunately no good luck yet, all the pennies are heads up)

Part I of II
I want so badly to just be done with fixing this bike I am about to lose my mind. I bought brand new OEM grips for both sides put the clutch side on that night and wasn't able to put the throttle side on (didn't know I could just pull the old Rubber portion off instead of removing the throttle cables and what not) so when I came to put the throttle side on it was broke as you see So I ordered new grips again and didn't know that if you order 'grips' you get rubber grips only. Then the carbs did the rejet kit off carbjetkits.com but found that all 18 screws both vacuum side and jet side of the carb were practically rounded off had to buy new screws luckily cheap.
But then on the last main jet taking it out flat head bit on impact driver slipped and broke the float so that was another $32 or something then one of the little knuckles on the carb insulator broke off so I had to order another one of those $15 I SWEAR this bike is going to be the end of me and my wife is about to kill me.
The left rear taillight broke at the rubber base you know so I tried to epoxy that as I know the way epoxy/ super glue works is a chemical reaction that cause the plastic in this case to melt causing a like bond of that of the original and if you can see there I used the old Cali emissions tubing to make caps for all the emissions stuff on the bike and those are pennies on the end (unfortunately no good luck yet, all the pennies are heads up)
Part I of II
Thread Starter
|
Senior Member
Joined: Nov 2012
Posts: 112
Likes: 0
Part II
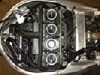
I think it is just the engine coolant from the hose that hooks to the back of the carbs here on the floor but not real sure it started showing up after I removed the carbs so thats the only thing that makes sense to me.

But at least the chain looks good I just have to adjust the tension, man I do love the beefyness of the 525 versus the 520.

I had to get a pic of the front end just for the heck of it all.

I had to vent. I know you all have gone through this too but I have been OVER 3 months without riding and I want to see her run you know. Its even more insulting to be so close and yet so far away.
I think it is just the engine coolant from the hose that hooks to the back of the carbs here on the floor but not real sure it started showing up after I removed the carbs so thats the only thing that makes sense to me.
But at least the chain looks good I just have to adjust the tension, man I do love the beefyness of the 525 versus the 520.
I had to get a pic of the front end just for the heck of it all.
I had to vent. I know you all have gone through this too but I have been OVER 3 months without riding and I want to see her run you know. Its even more insulting to be so close and yet so far away.
Thread Starter
|
Senior Member
Joined: Nov 2012
Posts: 112
Likes: 0
The crew on the left is vacuum side of the carb and the one on the right is obviously jet side but if you can notice the gnarled bit on the head of the vacuum screw someone rounded both of them out but used a pair of plier I guess to get the vacuum side back in.


Track junkie & modaholic
Joined: Aug 2011
Posts: 1,847
Likes: 2
From: USA
Hey sorry Ive been gone for a bit. I just saw this thread and started to read through it. Here is what you need to do to bypass the majority of the emissions junk.

You also need to block off or close the pair valve loop. I can explain or so can boyo if Im not around. I hope I get this to you in time. now that big hunk of metal you are bypassing has wires coming out of it that is your secondary air supply go ahead and unplug that and pack the bikes connection full of dielectric grease or plug it up. next you can remove the extra tubing that's attached to it as well it should go up front underneath your ram air vents. That should help out with how the bike is running.
You also need to block off or close the pair valve loop. I can explain or so can boyo if Im not around. I hope I get this to you in time. now that big hunk of metal you are bypassing has wires coming out of it that is your secondary air supply go ahead and unplug that and pack the bikes connection full of dielectric grease or plug it up. next you can remove the extra tubing that's attached to it as well it should go up front underneath your ram air vents. That should help out with how the bike is running.
Thread Starter
|
Senior Member
Joined: Nov 2012
Posts: 112
Likes: 0
This is what I did now I know I was straight wrong so please correct me and I will post a picture today. The fifth hose I removed and made 4 cylinder vacuum line a straight line up to the air box. Actually I will just post a picture and you tell me what I need to do right.


Thread Starter
|
Senior Member
Joined: Nov 2012
Posts: 112
Likes: 0
I gotta ask CJardine if I leave that one hole plugged up then I would have to run the Crankcase breather to the dirty side of the air box. the way I have it now I have the crankcase ran to the clean side and as you know have the, we will call them breathers for the carbs, all plugged plugged up. The carbs are already plugged into the air box so wouldn't having those 'breathers plugged up to the air box as well just be a redundancy? I guess I am confused on what all are vacuum pullers on our bikes 'Ca versions'?
Track junkie & modaholic
Joined: Aug 2011
Posts: 1,847
Likes: 2
From: USA
Those aren't apart of the emissions "package" (yea I'll go with that) they are apart of the inner-workings of how the carbs function. Go to 5-0 of the factory manual. It has a good illustration of what needs to go and what needs to stay. I can only confirm how I have my bike setup because I am not with my bike I cant get my hands dirty
Edit: Even though it looks like the breather hose looks like it runs to the dirty side of the airbox it's actually separated and has a small catch basin and a tube that travels to the clean side. That was the main reason (followed closely by one other) for me not separating the crankcase breather all together. Its actually rather brilliant on hondas part how they integrated the breather back into the airbox.
Edit: Even though it looks like the breather hose looks like it runs to the dirty side of the airbox it's actually separated and has a small catch basin and a tube that travels to the clean side. That was the main reason (followed closely by one other) for me not separating the crankcase breather all together. Its actually rather brilliant on hondas part how they integrated the breather back into the airbox.
Last edited by CJardine; Dec 12, 2012 at 11:38 PM.

Senior Member
Joined: Sep 2006
Posts: 649
Likes: 0
From: Preston, UK
Hey sorry Ive been gone for a bit. I just saw this thread and started to read through it. Here is what you need to do to bypass the majority of the emissions junk.
You also need to block off or close the pair valve loop. I can explain or so can boyo if Im not around. I hope I get this to you in time. now that big hunk of metal you are bypassing has wires coming out of it that is your secondary air supply go ahead and unplug that and pack the bikes connection full of dielectric grease or plug it up. next you can remove the extra tubing that's attached to it as well it should go up front underneath your ram air vents. That should help out with how the bike is running.
You also need to block off or close the pair valve loop. I can explain or so can boyo if Im not around. I hope I get this to you in time. now that big hunk of metal you are bypassing has wires coming out of it that is your secondary air supply go ahead and unplug that and pack the bikes connection full of dielectric grease or plug it up. next you can remove the extra tubing that's attached to it as well it should go up front underneath your ram air vents. That should help out with how the bike is running.
Great guide and very easy to follow.
I used some of the 5th vac line to replace No1 vac line so there are no joints in any of the vac lines.
He says bike now feels smoother and throttle seems a little sharper.
Thanks for posting it up.