
My CBR F2 '92


Thread Starter
|
Junior Member
Joined: Oct 2012
Posts: 23
Likes: 0
From: Toronto, Canada
Inside the plastic? I don't understand... The clamps are made with a long side on each so they reach the headlight... I could paint them black (probably in the near future).

Retired Super Moderator, Tin Star Man & Hurricane Saloon Prospect, ROTM Feb 2015
Joined: Sep 2011
Posts: 2,382
Likes: 5
From: V��ksy, Finland
I meant like that the end of the clamp would not be visible outside the light housing. I like the clamps that color but IMO it`d look cleaner if the ends wouldn`t come out to the sides of the lamp.
Thread Starter
|
Junior Member
Joined: Oct 2012
Posts: 23
Likes: 0
From: Toronto, Canada
I see what you mean about the clamps, I'll give them some more work over later, at the moment I am focusing on wiring since the rats nest I had zip tied to the side of the bike was interfering with the steering, so I decided to take the main harness out from the right side of the bike, and rout it along side of the air filter between the tank and connect the front controls where there there is a gap in the frame. So today I had some spare time and I took the tank off, and took the main harness out, but there is a cable coming from the main harness going to the top of the cam by the looks of it, and I can't figure out from the service manual if it is for the ignition coils, or the thermal sensor, anyone have a better idea? or most likely someone knows which is correct... no photos for now as there is no new progress... the bike is sitting without a tail and a tank at the moment.
I think with the wiring, I will run the main harness on the inside of the tank hugging the air filter, and shorten all the control cables so they reach the center of the frame (right behind the fork). Re wiring is my priority because I want to make the bike ride-able! once its rewired i'll look to moving the rectifier and what not under the seat (will probably insert aluminum plate between the frame bars), then look to chop the tail and get a solo seat.
I think with the wiring, I will run the main harness on the inside of the tank hugging the air filter, and shorten all the control cables so they reach the center of the frame (right behind the fork). Re wiring is my priority because I want to make the bike ride-able!
once its rewired i'll look to moving the rectifier and what not under the seat (will probably insert aluminum plate between the frame bars), then look to chop the tail and get a solo seat.
Thread Starter
|
Junior Member
Joined: Oct 2012
Posts: 23
Likes: 0
From: Toronto, Canada
Hey guys!
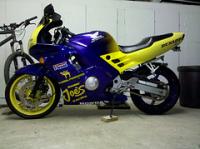
Finally spent a good week / weekend ripping out the main wiring hub and re-wiring and hiding all the cables behind the light. I routed the main wire hub on the inside of the frame (insulated with heavy duty fiberglass/ rubber sleeve) and added molex connectors for all wires at the steering stem. I didn't know where to mount the fuse box and relay, so I used the fuse box holder and attached it to where a fairing bolt would typically mount. The switching relay is zip tied to the frame, so theres a small bit of exposed cables at the front of the bike, which I may clean up later on - the main goal is to get the bike up and running again! Also attached mirrors, but they need some work since they are attached with a single bolt and a bunch of washers (very poor man style). Anyway some photos:


So I think I will keep it like this for the summer, since I've had it in non-working condition for past two weeks, and didn't enjoy missing the nice riding weather. But for the winter I plan to take apart the whole bike and paint the frame black, and clean the engine (on the outside, not confident with my skills taking the whole drivetrain apart, also chop the rear frame (don't know where yet) and convert to a solo seat with a new fender.
I think the streetfighter style is fun, But I do like the stock street style too... now I need a second motorcycle... How many do people usually have? or am I crazy to want another?
Finally spent a good week / weekend ripping out the main wiring hub and re-wiring and hiding all the cables behind the light. I routed the main wire hub on the inside of the frame (insulated with heavy duty fiberglass/ rubber sleeve) and added molex connectors for all wires at the steering stem. I didn't know where to mount the fuse box and relay, so I used the fuse box holder and attached it to where a fairing bolt would typically mount. The switching relay is zip tied to the frame, so theres a small bit of exposed cables at the front of the bike, which I may clean up later on - the main goal is to get the bike up and running again! Also attached mirrors, but they need some work since they are attached with a single bolt and a bunch of washers (very poor man style). Anyway some photos:
So I think I will keep it like this for the summer, since I've had it in non-working condition for past two weeks, and didn't enjoy missing the nice riding weather. But for the winter I plan to take apart the whole bike and paint the frame black, and clean the engine (on the outside, not confident with my skills taking the whole drivetrain apart, also chop the rear frame (don't know where yet) and convert to a solo seat with a new fender.
I think the streetfighter style is fun, But I do like the stock street style too... now I need a second motorcycle... How many do people usually have? or am I crazy to want another?

Senior Member
Joined: May 2010
Posts: 1,753
Likes: 3
From: West Monroe,Louisiana
Looking good.
if it were mine, and had no intention of ever riding 2-up, I'd grind off all the extra mounting points for fairings and passenger rearsets from the tail section. Then do some sort of single seat conversion on the stock seat, and build up some type of small tail section that just fills in where the passenger seat is down to the tail section rails are.
but that's just me :-)
Thread Starter
|
Junior Member
Joined: Oct 2012
Posts: 23
Likes: 0
From: Toronto, Canada
Looking good.
if it were mine, and had no intention of ever riding 2-up, I'd grind off all the extra mounting points for fairings and passenger rearsets from the tail section. Then do some sort of single seat conversion on the stock seat, and build up some type of small tail section that just fills in where the passenger seat is down to the tail section rails are.
but that's just me :-)
if it were mine, and had no intention of ever riding 2-up, I'd grind off all the extra mounting points for fairings and passenger rearsets from the tail section. Then do some sort of single seat conversion on the stock seat, and build up some type of small tail section that just fills in where the passenger seat is down to the tail section rails are.
but that's just me :-)
Have a question or two for those familiar with the street fighter circuit, 1) regarding the painting of engine / frame etc, I understand powdercoating is best, but I don't have the funds for that, and I've been thinking of using the engine paint to do the frame etc, but if i take my time and do it proper should come out right from my understanding... 2) my radiator is already black (don't know if thats OEM) but some of the thermal fins are bent and dirty from rocks or what not has hit them in the past, is there any remedy to cleaning up a radiator?
Last edited by evz; Jun 1, 2013 at 10:35 PM. Reason: adding some questions
Welcome Crew
Joined: Feb 2013
Posts: 688
Likes: 1
From: Waycross, Ga
Thats a winter project! when I have time to leave the bike in non-ride-able conditions!
Have a question or two for those familiar with the street fighter circuit, 1) regarding the painting of engine / frame etc, I understand powdercoating is best, but I don't have the funds for that, and I've been thinking of using the engine paint to do the frame etc, but if i take my time and do it proper should come out right from my understanding... 2) my radiator is already black (don't know if thats OEM) but some of the thermal fins are bent and dirty from rocks or what not has hit them in the past, is there any remedy to cleaning up a radiator?
Have a question or two for those familiar with the street fighter circuit, 1) regarding the painting of engine / frame etc, I understand powdercoating is best, but I don't have the funds for that, and I've been thinking of using the engine paint to do the frame etc, but if i take my time and do it proper should come out right from my understanding... 2) my radiator is already black (don't know if thats OEM) but some of the thermal fins are bent and dirty from rocks or what not has hit them in the past, is there any remedy to cleaning up a radiator?
They make little fine tooth plastic radiator fin brushes that are designed to straighten bent fins. Basically you just comb your radiator and it straightened them out. They can usually be had for under a dollar. Also, grab a can of radiator paint. It's flat, semi, or gloss depending on your preference, and it is made to coat without blocking airflow. Good luck
Thread Starter
|
Junior Member
Joined: Oct 2012
Posts: 23
Likes: 0
From: Toronto, Canada
@gtcole, cool! I found the radiator comb shortly after posting, but didn't know there was a specific radiator paint. Regarding painting the engine - is it typically painted while mounted? It would seem easier to pull out the engine and paint it alone, on that note can the engine be painted with clutch cover and such attached? (I mean is there a need to take the whole engine apart to paint it?) Regarding painting the frame, I'm worried about damage to the steering bearings when removing the stem, should I really get the Honda tool to remove them?
Thanks!
Thanks!
Welcome Crew
Joined: Feb 2013
Posts: 688
Likes: 1
From: Waycross, Ga
I don't know if its easier, but I do know you will achieve a cleaner look, better and more complete coverage, will turn out better if you pull the engine. I have always painted with everything I want painted installed. If you remove the covers to paint, which is up to your personal preference, you will have to tape up the gasket mounting surfaces. When I have time, I pull the engine, remove all wiring, sensors, cable.... basically anything I don't want painted, then clean and degrease the mess out of it. Then paint and reinstall. I leave all covers installed. On that note I also replace the gaskets that are leaking and such while its out, alot easier imo.
As for the stem bearings, if you aren't replacing them, just be careful removing them and give them a good inspection too. I personally have only owned two special "dealer" tools in my life. One is a broken spark plug removal tool for fords triton engines (what a pita) and the other is a spanner for the rear shock assembly. Technically you don't have to remove the bearings if you are careful and precise in your application of tape. Just get a 2 to 3 inch wide piece of painters tape, lay it across the tube opening, take an exacto or razor blade, and run it around the rim. Hope this helps
As for the stem bearings, if you aren't replacing them, just be careful removing them and give them a good inspection too. I personally have only owned two special "dealer" tools in my life. One is a broken spark plug removal tool for fords triton engines (what a pita) and the other is a spanner for the rear shock assembly. Technically you don't have to remove the bearings if you are careful and precise in your application of tape. Just get a 2 to 3 inch wide piece of painters tape, lay it across the tube opening, take an exacto or razor blade, and run it around the rim. Hope this helps