
'93 F2 Mods - Phase 2


Thread Starter
|
Welcome Crew and ROTY 2014
Joined: Dec 2010
Posts: 2,059
Likes: 6
From: Kansas
Holidays-schmolidays... still puttin' this thing together.
Drilled for, and riveted on the receivers for the 1/4 turn quick-connect screws for mounting the inspection panels.

Got the screws and plastic washers on the inpection panel and mounted it.

Put a grommet in the lower, and mounted the tail - there's a little adjustment that needs to be made, but I'll get around to it soon.


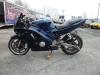
A pic of the overall, so far... things will really start to look better once I get the tank cover on.

Drilled for, and riveted on the receivers for the 1/4 turn quick-connect screws for mounting the inspection panels.
Got the screws and plastic washers on the inpection panel and mounted it.
Put a grommet in the lower, and mounted the tail - there's a little adjustment that needs to be made, but I'll get around to it soon.
A pic of the overall, so far... things will really start to look better once I get the tank cover on.
Thread Starter
|
Welcome Crew and ROTY 2014
Joined: Dec 2010
Posts: 2,059
Likes: 6
From: Kansas
I got the fender positioned just how it needs to be, put the rear bolts through and tightened them into the square-nuts on the inside of the fender, removed the wheel, and used plastic epoxy to secure the square-nuts to the inside of the fender.

I mounted the tank cover - I was shocked at how well it fits - it looks/fits much better than the one that came with the last kit.

I put the Vortex keyless gas cap on as well.


I mounted the tank cover - I was shocked at how well it fits - it looks/fits much better than the one that came with the last kit.
I put the Vortex keyless gas cap on as well.
Last edited by JNSRacing; Nov 30, 2013 at 11:44 PM.
Thread Starter
|
Welcome Crew and ROTY 2014
Joined: Dec 2010
Posts: 2,059
Likes: 6
From: Kansas
Well, the gas cap still is a weak spot, but with this one, it's only at the back that it's an "eyesore", but much less than the one I had before, and others I've seen.
Welcome Crew
Joined: Feb 2013
Posts: 688
Likes: 1
From: Waycross, Ga
I agree, I don't see the "typical" wanna be frenched look, with the gap all around. I was watching this with interest and, to be honest, a critical eye for the detail. There are certain things, such as the issues you have pointed out, but, I have to say, from what I can see, this looks like one of the better hk kits I have seen.
And I'm still loving the color. Keep it up!
Oh, and the brake lines look really good snaking through the fairings, major cosmetic improvement, now just need a functional report
Thread Starter
|
Welcome Crew and ROTY 2014
Joined: Dec 2010
Posts: 2,059
Likes: 6
From: Kansas
I agree, I don't see the "typical" wanna be frenched look, with the gap all around. I was watching this with interest and, to be honest, a critical eye for the detail. There are certain things, such as the issues you have pointed out, but, I have to say, from what I can see, this looks like one of the better hk kits I have seen.
And I'm still loving the color. Keep it up!
Oh, and the brake lines look really good snaking through the fairings, major cosmetic improvement, now just need a functional report
And I'm still loving the color. Keep it up!
Oh, and the brake lines look really good snaking through the fairings, major cosmetic improvement, now just need a functional report
The uppers are a lot more "off" than my last kit, and the lower that I already have worked on is farther off than what my last kit had as well... what helps me with this one, though, is the fact that I can look back at the last installation, and implement better fixes for trouble I run into, AND, with some things, I can be proactive, and have the fix in place before installation is complete.
Bottom line: I have warned guys and gals before, and I just want to reiterate that warning - if you don't have a drill and a Dremel, and/or are not good with those, and with using plastic epoxies, or if you aren't real good with thinking your way around issues, then a Hong Kong fairings set is not for you... they are NOT a direct bolt-on, they are NOT "plug-and-play"!
On the brake lines, I just got the front set bled last night, and with the new mirrors arriving this evening,I hope to have this thing on the road by at least Thursday, maybe Wednesday.

Thread Starter
|
Welcome Crew and ROTY 2014
Joined: Dec 2010
Posts: 2,059
Likes: 6
From: Kansas
Yeah, that is the plan, since I'll get some time to ride around and have a little fun on it anyway, between the "soon to be complete" phase, and next season's "doin' a little bit more to it" phase - once that second wave of mods is done next year, it will immediately go up for sale.
I have a target buyer, but if she passes on it, I'll just keep riding it, and advertise it for sale...I doubt I'll end up sitting on it very long.
I have a target buyer, but if she passes on it, I'll just keep riding it, and advertise it for sale...I doubt I'll end up sitting on it very long.
Thread Starter
|
Welcome Crew and ROTY 2014
Joined: Dec 2010
Posts: 2,059
Likes: 6
From: Kansas
To make things line up without an unsightly gap at the front of the right tail, I had to cut off the tab, shorten it slightly, and reattach it just a smidge closer to the front of the fairing.

The rear-most tab on the same right-side tail panel just sits in the rubber grommet loosely, so I used the same plastic epoxy stuff to add some thickness to the end of the tab - it will be hardened by now, so I need to shape it as needed, for getting a good fit in that grommet.

While the front wheel was off for working on the fender mounting, I decided to touch it up a little - this picture is of how it looked after getting it squeaky clean, but as you can see, there's quite a few scratches and marks in the finish.

Not anymore!!

The rear-most tab on the same right-side tail panel just sits in the rubber grommet loosely, so I used the same plastic epoxy stuff to add some thickness to the end of the tab - it will be hardened by now, so I need to shape it as needed, for getting a good fit in that grommet.
While the front wheel was off for working on the fender mounting, I decided to touch it up a little - this picture is of how it looked after getting it squeaky clean, but as you can see, there's quite a few scratches and marks in the finish.
Not anymore!!


