
'93 F2 Mods - Phase 2


Thread Starter
|
Welcome Crew and ROTY 2014
Joined: Dec 2010
Posts: 2,059
Likes: 6
From: Kansas
I got the new brake lines mounted - these are going to look great with the new plastics!
Rear:

Front:


I'll try to get some pictures up later today, of what I was able to get done with the bodywork, on Sunday.
Rear:
Front:
I'll try to get some pictures up later today, of what I was able to get done with the bodywork, on Sunday.
Thread Starter
|
Welcome Crew and ROTY 2014
Joined: Dec 2010
Posts: 2,059
Likes: 6
From: Kansas
So the tweaking of the HK fairing set begins.
The tab on the center tail fairing was about 3/4 inch too long, making mounting impossible, so I cut it off with my Dremel, broke a tab off a surviving, yet damaged piece of my last HK kit, cut it to the necessary length, and JB Welded it onto the plastic.

Fits perfectly now.


The tab on the center tail fairing was about 3/4 inch too long, making mounting impossible, so I cut it off with my Dremel, broke a tab off a surviving, yet damaged piece of my last HK kit, cut it to the necessary length, and JB Welded it onto the plastic.
Fits perfectly now.
Welcome Crew
Joined: Feb 2013
Posts: 688
Likes: 1
From: Waycross, Ga
I love those brake lines. Do they come with the double banjo bolt or is that a previous add on? Glad you got your bodywork in. So far does the quality look ok? I know theres fitment and what not, but from first appearances? Oh yeah and more pics more pics, I need my fix lol
Thread Starter
|
Welcome Crew and ROTY 2014
Joined: Dec 2010
Posts: 2,059
Likes: 6
From: Kansas
I love those brake lines. Do they come with the double banjo bolt or is that a previous add on? Glad you got your bodywork in. So far does the quality look ok? I know theres fitment and what not, but from first appearances? Oh yeah and more pics more pics, I need my fix lol
The bodywork is just as I expected, which means, sure, they look great overall, but the same disappointment with finish in some areas, and yes, fitment will be the same headache... but, I knew this going in, you get what you pay for, so that's what I got!
I'll have just a couple of pics up after lunch - things are slow-going, because at this time, I've got just a few minutes each day, if that, to focus on the bike.

Thread Starter
|
Welcome Crew and ROTY 2014
Joined: Dec 2010
Posts: 2,059
Likes: 6
From: Kansas
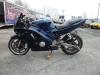
I got the headlight mounted to the center piece of the upper cowl assembly, and then connected the right and left sides - as with the last HK kit, the fitment is not fantastic, and did require me to drill out some holes, just to get things to line up at all.
I then mounted them on the bike, with the windscreen in place.
I also mounted the fender, only securing it with the front mounting bolts, so I could find the best orientation for the fender, and later get the square nuts for the rearmost mounting put in place on the inside of the fender, and use fiberglass resin to permanently adhere them.


As you can see, though the three pieces of the upper cowling go together much better than the last kit I had, the graphics are just a little misaligned, but it's not too bad, really.
As I progress with mounting the other pieces, there will be more tweaking of the parts, with holes and tabs drilled/cut/etc., so that everything goes together the best that it can.
Both of my front turn signal lenses are a touch scuffed, and one of them is damaged more, with the extruded U-nut missing, and the plastic it attaches to broken off entirely, so I went ahead and ordered brand new ones for both sides... these should come in Tuesday or Wednesday.
I then mounted them on the bike, with the windscreen in place.
I also mounted the fender, only securing it with the front mounting bolts, so I could find the best orientation for the fender, and later get the square nuts for the rearmost mounting put in place on the inside of the fender, and use fiberglass resin to permanently adhere them.
As you can see, though the three pieces of the upper cowling go together much better than the last kit I had, the graphics are just a little misaligned, but it's not too bad, really.
As I progress with mounting the other pieces, there will be more tweaking of the parts, with holes and tabs drilled/cut/etc., so that everything goes together the best that it can.
Both of my front turn signal lenses are a touch scuffed, and one of them is damaged more, with the extruded U-nut missing, and the plastic it attaches to broken off entirely, so I went ahead and ordered brand new ones for both sides... these should come in Tuesday or Wednesday.
Thread Starter
|
Welcome Crew and ROTY 2014
Joined: Dec 2010
Posts: 2,059
Likes: 6
From: Kansas
There's unfortunately no adjustment to be made between the three pieces of the upper, so, short of doing some touch up using gloss black touch-up paint, that's how it's going to look... but, like we have observed, it's not too bad.


Thread Starter
|
Welcome Crew and ROTY 2014
Joined: Dec 2010
Posts: 2,059
Likes: 6
From: Kansas
After a lot of re-sizing holes, tabs and slots, stretching and fanangling, fitting and refitting, I got the right lower mounted.

I used my nifty little tool for making a small divet in the back-side or, inside, of the fairing - using this small divet, I drill through to the outside with a small bit, and then use that hole for the pilot bit on the hole cutter - when it's done, I've got a perfectly placed and sized hole for the frame slider.

I used my nifty little tool for making a small divet in the back-side or, inside, of the fairing - using this small divet, I drill through to the outside with a small bit, and then use that hole for the pilot bit on the hole cutter - when it's done, I've got a perfectly placed and sized hole for the frame slider.
Last edited by JNSRacing; Nov 28, 2013 at 10:52 PM.

