
'93 F2 Mods - Phase 2


Thread Starter
|
Welcome Crew and ROTY 2014
Joined: Dec 2010
Posts: 2,059
Likes: 6
From: Kansas
They'll do for now, but my future plan is to get some Woodcraft rearsets for the race bike, and move the Pro-Tek units onto this bike, then put the polished OEM items up for sale again.
And I'm excited to get some ordered! But alas, I must wait until I've got more money!


Last edited by JNSRacing; Oct 15, 2013 at 11:38 AM.
Thread Starter
|
Welcome Crew and ROTY 2014
Joined: Dec 2010
Posts: 2,059
Likes: 6
From: Kansas
Small update...
After getting the air filter re-oiled, I re-installed it, and the air box back together.

I mounted the Two Brothers muffler that was part of the full system I bought, so I could determine where I was going to make my cut.

Not only do I want to shorten it just for looks and lighter weight, I need to do away with the portion that has damage to it.

So in my near future, I will be shortening, refurbishing/polishing, and repacking this muffler, and I might put a new nameplate on it as well.
Also, my new fork seals, fork oil, engine oil, and oil filter, will be arriving tomorrow evening so the fork work and engine oil change will be done by the weekend.
Tonight after work, I'll be picking up my new battery box cover from the dealer, as well as new crush washers for the bottom fork bolts.
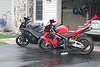
It's kind of starting to look like a motorcycle again!

After getting the air filter re-oiled, I re-installed it, and the air box back together.
I mounted the Two Brothers muffler that was part of the full system I bought, so I could determine where I was going to make my cut.
Not only do I want to shorten it just for looks and lighter weight, I need to do away with the portion that has damage to it.
So in my near future, I will be shortening, refurbishing/polishing, and repacking this muffler, and I might put a new nameplate on it as well.
Also, my new fork seals, fork oil, engine oil, and oil filter, will be arriving tomorrow evening so the fork work and engine oil change will be done by the weekend.
Tonight after work, I'll be picking up my new battery box cover from the dealer, as well as new crush washers for the bottom fork bolts.
It's kind of starting to look like a motorcycle again!
Last edited by JNSRacing; Nov 8, 2013 at 11:13 AM.
Thread Starter
|
Welcome Crew and ROTY 2014
Joined: Dec 2010
Posts: 2,059
Likes: 6
From: Kansas
Just as it seems it was going together, now it's coming back apart! 
Forks back off for new seals, new oil, and to replace a slider.


This little bugger is NOT coming out of there ... thankfully I have two extra sliders that are in excellent shape.

Forks back off for new seals, new oil, and to replace a slider.
This little bugger is NOT coming out of there
Last edited by JNSRacing; Oct 17, 2013 at 03:51 PM.
Thread Starter
|
Welcome Crew and ROTY 2014
Joined: Dec 2010
Posts: 2,059
Likes: 6
From: Kansas
I got the forks rebuilt, replacing the slider with the fender bolt broken off in it, then remounted the forks, front wheel, and brakes, and torqued everything back down to spec.
I mounted the gauge cluster, connected it to the harness, and got the speedo cable hooked up at both ends.
After verifying the petcock diphragm was good, I put it back together, and then put it, and the overflow and vent hoses, back on the tank, and mounted the tank.


I sourced an ignition switch, which I haven't gotten yet, but I need to be able to start the bike so I can change the oil tomorrow.
I back-probed the connector at the red and red/black wires, with a couple of small nails, and used a jumper wire with alligator clips to hot-wire the ignition - it worked just fine... once there was fuel in the bowls, it fired right up!!
I mounted the gauge cluster, connected it to the harness, and got the speedo cable hooked up at both ends.
After verifying the petcock diphragm was good, I put it back together, and then put it, and the overflow and vent hoses, back on the tank, and mounted the tank.
I sourced an ignition switch, which I haven't gotten yet, but I need to be able to start the bike so I can change the oil tomorrow.
I back-probed the connector at the red and red/black wires, with a couple of small nails, and used a jumper wire with alligator clips to hot-wire the ignition - it worked just fine... once there was fuel in the bowls, it fired right up!!
Last edited by JNSRacing; Oct 19, 2013 at 09:20 PM.
Thread Starter
|
Welcome Crew and ROTY 2014
Joined: Dec 2010
Posts: 2,059
Likes: 6
From: Kansas
With the bike hot-wired to start, I added a quart of Gunk Motor Flush to the crankcase, verifying it was not overfilled, and cycled that through the system for about five minutes, drained, replaced filter, and refilled with Lucas Oil semi-synthetic 10W40 race oil.
I had already flushed the cooling system and filled with new 50/50 mix, and used the 5 minutes of idling for the crankcase cleansing to circulate, to get the cooling system burped, and top it off.
With this done, there was still one thing I needed to test - I mentioned before, that I was concerned about the radiator cap sealing properly, and had to do some re-shaping to the eBay-acquired radiator's filler hole - now it was time to see if I had to seek out another radiator.
The fan motor circuit has it's own wire on the ignition harness, so I added another back-probed nail to the connector (still waiting on the ignition switch), and put an additional jumper to that wire, so I could test the fan motor's operation, when the bike reached full temp.

I fired up the bike, and let it run long enough for the fan motor to kick in, and to my delight, there were no leaks at any point in the cooling system.

So with the motor running, and running well, with fresh oil and coolant, I got the wiring finished at the rear, for the signals and such, and put the new battery box cover on.

I mounted the seat, just to make it look more like a motorcycle again.

So as it stands now, the only items I'm lacking to get this bike on the road, is the ignition switch, the bodywork, which I should have ordered by Wednesday, and the re-working of the exhaust, which I'll probably start on in the next day or so.
I had already flushed the cooling system and filled with new 50/50 mix, and used the 5 minutes of idling for the crankcase cleansing to circulate, to get the cooling system burped, and top it off.
With this done, there was still one thing I needed to test - I mentioned before, that I was concerned about the radiator cap sealing properly, and had to do some re-shaping to the eBay-acquired radiator's filler hole - now it was time to see if I had to seek out another radiator.
The fan motor circuit has it's own wire on the ignition harness, so I added another back-probed nail to the connector (still waiting on the ignition switch), and put an additional jumper to that wire, so I could test the fan motor's operation, when the bike reached full temp.
I fired up the bike, and let it run long enough for the fan motor to kick in, and to my delight, there were no leaks at any point in the cooling system.
So with the motor running, and running well, with fresh oil and coolant, I got the wiring finished at the rear, for the signals and such, and put the new battery box cover on.
I mounted the seat, just to make it look more like a motorcycle again.
So as it stands now, the only items I'm lacking to get this bike on the road, is the ignition switch, the bodywork, which I should have ordered by Wednesday, and the re-working of the exhaust, which I'll probably start on in the next day or so.
Last edited by JNSRacing; Nov 8, 2013 at 11:21 AM.
Thread Starter
|
Welcome Crew and ROTY 2014
Joined: Dec 2010
Posts: 2,059
Likes: 6
From: Kansas
Ignition switch arrived Wednesday (thanks Artie! ), and was installed...

...and, bodywork was ordered!! Now I just have to try to remain patient, while it is produced and then shipped!
 No... this will not be easy!
...and, bodywork was ordered!! Now I just have to try to remain patient, while it is produced and then shipped!
Last edited by JNSRacing; Oct 25, 2013 at 11:00 AM.