
'93 F2 Mods - Phase 2


Retired Super Moderator, Tin Star Man & Hurricane Saloon Prospect, ROTM Feb 2015
Joined: Sep 2011
Posts: 2,382
Likes: 5
From: V��ksy, Finland
If JNS will lend me his thread for one post:
R3define: I had a pair of rims for my old 125cc Cagiva which I sanded down to bare metal (a ton of a job) then sprayed with spray filler, water sanded (a ton of a job) base coated, water sanded (a ton...you`ll get the point) then sparyed with three coats of high gloss flakey silver paint which cost a fortune, water sanded, then three coats of clear coat, let dry for a week.
Back onto the bike, and bled the brakes. I didn`t notice that ONE DROP of brake fluid that dropped onto the front rim until the next day when it had the whole night to inch down a spoke, over the hub, down another spoke and along the rim all the way down PEELING ALL THE PAINT FROM THE WHOLE WAY!!! You could probably figure the amount of "#�%&/()s in the garage the next day...
So people, wipe those spills right away, preferably with some sort of solvent to be 100% sure!
Last edited by Mattson; Apr 8, 2013 at 01:23 PM.

Thread Starter
|
Welcome Crew and ROTY 2014
Joined: Dec 2010
Posts: 2,059
Likes: 6
From: Kansas
I got some things done this weekend - it actually seemed like quite a productive time.
I attended to an issue with the throttle tube on the street bike - the Vortex clip-on bars are just a little bit smaller in OD, than the OEM clip-ons, just small enough that the throttle housing/switch gear, and the turn signal/choke/highbeam switch gear, can rotate around and/or slide toward the end of the bar, even with the screws fully tightend.
The OEM right clip-on has a little hole, that holds on to a pin, which is pressed into the lower part of the throttle housing, so that it is locked in position when mounted, but even without that pin in place, when you clamp the assembly shut, and tighten the screws, it doesn't move around - at least mine did not.
I was able to pull that little pin out of an extra throttle housing/switch assembly I had, press it into the one on the street bike, and drill the appropriate hole in the Vortex clip-on bar, so that it's "locked" - this is going to make riding it much easier, especially since the bike accelerates so much harder, after getting the fueling issues resolved!
Next was the deletion of the rear master cylinder reservoir on the race bike. I got the tubing cut, clamped it in place, installed the cap and clamped it, then drilled a little hole in some of the plastic off the bottom of the battery box, so I could zip tie it in place.

The parts used for the original setup total 83 grams, and the replacement tube, cap, and zip tie are 14 grams. Also, whereas the total fluid weight for the original setup was 35 grams, the fluid contained in the Tygon tube is only 8 grams, which makes this setup lighter by just under 1/4 pound... like I said in a previous post, it's not much, but it adds up.
I pulled the street bike's red fender, and got it cleaned painted, and clear coated. In this picture, once again, like the fuel tank, you can see a "milky" appearance, making it look greyish in color. I was getting nervous as the fender had MUCH more of this look, than the tank did, even as I was done for the night last night. The labeling on the can says that this can happen, and that it will clear up in about 24 hours, and the tank did, though it might have been a touch more than 24 hours. On the fender though, it was so much more extreme, that I was worried I was going to have to redo it, since even at 6:30am, it didn't look like it had changed one bit, but, I was happy to see that during my lunch hour, when I checked it again, it had obviously dissipated quite a bit... I'll get a pic again once it's remounted.

I decided to pull the front wheel while I had the fender off, and give it a proper toothbrush detail cleaning, as there has been some grease and grime in some of the little knooks, like the hollow side of each spoke - it looked alright from about ten feet away, but now it looks great up close.
With the forks back on, the newly painted tank installed, and the front wheel and seat back on, the race bike is starting to look like a motorcycle again... a little bit.

I attended to an issue with the throttle tube on the street bike - the Vortex clip-on bars are just a little bit smaller in OD, than the OEM clip-ons, just small enough that the throttle housing/switch gear, and the turn signal/choke/highbeam switch gear, can rotate around and/or slide toward the end of the bar, even with the screws fully tightend.
The OEM right clip-on has a little hole, that holds on to a pin, which is pressed into the lower part of the throttle housing, so that it is locked in position when mounted, but even without that pin in place, when you clamp the assembly shut, and tighten the screws, it doesn't move around - at least mine did not.
I was able to pull that little pin out of an extra throttle housing/switch assembly I had, press it into the one on the street bike, and drill the appropriate hole in the Vortex clip-on bar, so that it's "locked" - this is going to make riding it much easier, especially since the bike accelerates so much harder, after getting the fueling issues resolved!
Next was the deletion of the rear master cylinder reservoir on the race bike. I got the tubing cut, clamped it in place, installed the cap and clamped it, then drilled a little hole in some of the plastic off the bottom of the battery box, so I could zip tie it in place.
The parts used for the original setup total 83 grams, and the replacement tube, cap, and zip tie are 14 grams. Also, whereas the total fluid weight for the original setup was 35 grams, the fluid contained in the Tygon tube is only 8 grams, which makes this setup lighter by just under 1/4 pound... like I said in a previous post, it's not much, but it adds up.
I pulled the street bike's red fender, and got it cleaned painted, and clear coated. In this picture, once again, like the fuel tank, you can see a "milky" appearance, making it look greyish in color. I was getting nervous as the fender had MUCH more of this look, than the tank did, even as I was done for the night last night. The labeling on the can says that this can happen, and that it will clear up in about 24 hours, and the tank did, though it might have been a touch more than 24 hours. On the fender though, it was so much more extreme, that I was worried I was going to have to redo it, since even at 6:30am, it didn't look like it had changed one bit, but, I was happy to see that during my lunch hour, when I checked it again, it had obviously dissipated quite a bit... I'll get a pic again once it's remounted.
I decided to pull the front wheel while I had the fender off, and give it a proper toothbrush detail cleaning, as there has been some grease and grime in some of the little knooks, like the hollow side of each spoke - it looked alright from about ten feet away, but now it looks great up close.
With the forks back on, the newly painted tank installed, and the front wheel and seat back on, the race bike is starting to look like a motorcycle again... a little bit.
Thread Starter
|
Welcome Crew and ROTY 2014
Joined: Dec 2010
Posts: 2,059
Likes: 6
From: Kansas
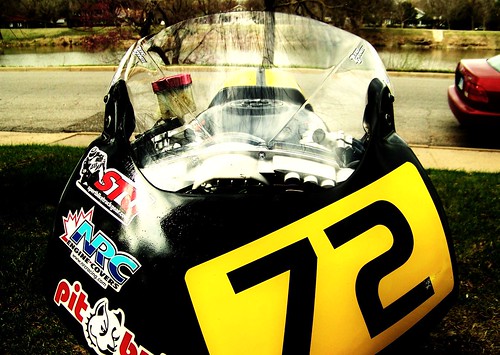
I'm not repainting either one! The race plastics are at this place...

...though there will be some more decals applied, some for just a little more color, and some for sponsor/contingency, and of course, in this pic, that's with the tank cover on, so I just had to paint the red tank that came with the new bike, and install it on the race bike.
The fender for the street bike was only painted because it was an ugly, highly faded red... more on that later today.

Also, I still have to order a fender for the race bike, which will need to be drilled and painted as well.
...though there will be some more decals applied, some for just a little more color, and some for sponsor/contingency, and of course, in this pic, that's with the tank cover on, so I just had to paint the red tank that came with the new bike, and install it on the race bike.
The fender for the street bike was only painted because it was an ugly, highly faded red... more on that later today.
Also, I still have to order a fender for the race bike, which will need to be drilled and painted as well.
Thread Starter
|
Welcome Crew and ROTY 2014
Joined: Dec 2010
Posts: 2,059
Likes: 6
From: Kansas
No, that picture is older, I just painted the red tank black, a few days ago - the tank cover was only used in that photo, because the OEM black/silver/red tank (now on the street bike), didn't look right with the scheme of the plastics... it was always my plan, to score the second F2, install the street fairings and the first OEM tank on that, and then paint the new bike's tank black, for the race bike... unless I got lucky and the second F2 had a tank color that would work, which it did not!
No, that picture is older, I just painted the red tank black, a few days ago - the tank cover was only used in that photo, because the OEM black/silver/red tank (now on the street bike), didn't look right with the scheme of the plastics... it was always my plan, to score the second F2, install the street fairings and the first OEM tank on that, and then paint the new bike's tank black, for the race bike... unless I got lucky and the second F2 had a tank color that would work, which it did not!
 So now it's just the painted tank from your street bike. Yay! Lol.
If JNS will lend me his thread for one post:
R3define: I had a pair of rims for my old 125cc Cagiva which I sanded down to bare metal (a ton of a job) then sprayed with spray filler, water sanded (a ton of a job) base coated, water sanded (a ton...you`ll get the point) then sparyed with three coats of high gloss flakey silver paint which cost a fortune, water sanded, then three coats of clear coat, let dry for a week.
Back onto the bike, and bled the brakes. I didn`t notice that ONE DROP of brake fluid that dropped onto the front rim until the next day when it had the whole night to inch down a spoke, over the hub, down another spoke and along the rim all the way down PEELING ALL THE PAINT FROM THE WHOLE WAY!!! You could probably figure the amount of "#�%&/()s in the garage the next day...
So people, wipe those spills right away, preferably with some sort of solvent to be 100% sure!
R3define: I had a pair of rims for my old 125cc Cagiva which I sanded down to bare metal (a ton of a job) then sprayed with spray filler, water sanded (a ton of a job) base coated, water sanded (a ton...you`ll get the point) then sparyed with three coats of high gloss flakey silver paint which cost a fortune, water sanded, then three coats of clear coat, let dry for a week.
Back onto the bike, and bled the brakes. I didn`t notice that ONE DROP of brake fluid that dropped onto the front rim until the next day when it had the whole night to inch down a spoke, over the hub, down another spoke and along the rim all the way down PEELING ALL THE PAINT FROM THE WHOLE WAY!!! You could probably figure the amount of "#�%&/()s in the garage the next day...
So people, wipe those spills right away, preferably with some sort of solvent to be 100% sure!
Last edited by R3define; Apr 9, 2013 at 02:35 PM.
Thread Starter
|
Welcome Crew and ROTY 2014
Joined: Dec 2010
Posts: 2,059
Likes: 6
From: Kansas
I was going to wait to put the plastics back on, until I had replaced my sprockets, installed steering damper, changed the oil, mounted the slicks, etc., but I've simply gotten tired of looking at the plastics sitting on the dining room floor, and tired of looking at the bike in it's more "undone" state, so I went ahead and re-fit things for now, so I could see how the new windscreen looks.
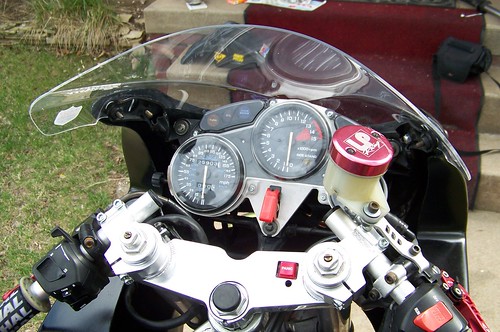

I'm going to be very happy with the double-bubble screen on the track, compared to the stock screen's profile.
Here's how it looks with the newly painted tank, with everything temporarily back together.
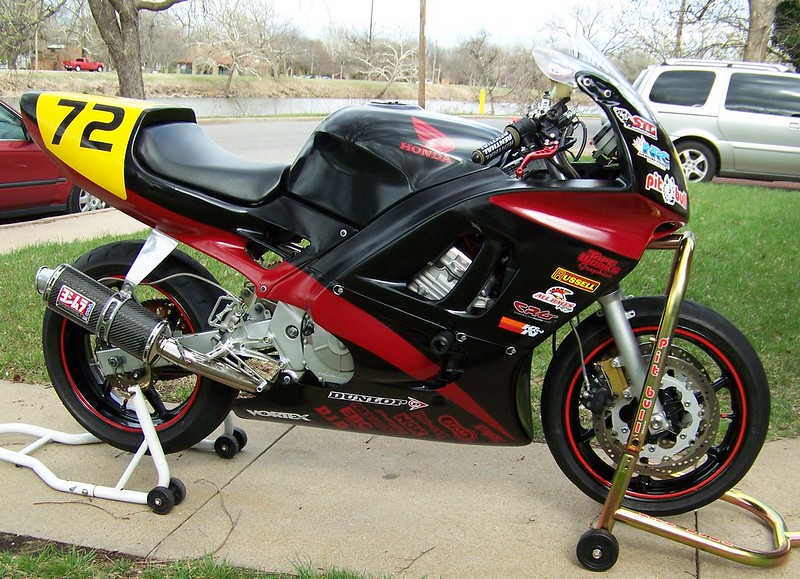
As you can see, the fender wasn't remounted... because it can't be! The front mounting bosses for the fender are not in the same place as they are for my '92 and '93 fork sliders, and I'm not sure why, as these forks came off of a '94 F2, allegedly...
Well, it's because these are not F2 forks, they are from an F3, whether '95-'96, or '97-'98, I don't know, but regardless, this begs the question: WHY was I able to mount my F2 axle, wheel, spacers, and brakes, without any issue?!?


If I remember correctly, I learned that the F2 fork lowers are not compatible with wheel/brakes from an F3, and vice versa... if this is the case, then why did it mount with no play, with the calipers lining up perfectly on the discs, and oriented so that the pads bite the discs in the same surface area as with the old forks?!? With the front components properly torqued on each bike, the clearances all appear to be the same.
I'm going to put both bikes up on the front stands tonight, remove the wheels, and gets some measurements, to be sure, but from what I can tell at this point, if I order an F3 fender, I'm done... we'll see.
Regarding the race bike, since it has been sitting for a while, it would run just a little bit rough, on occasions when I would start it up. After I put the newly painted tank back on, I put 2 gallons of fuel in, with a moderately rich concentration of Sea Foam, and ran if for a bit until the Sea Foam-infused fuel was cycled into the bowls, and it began to run a little rougher yet. Then I completely filled the tank, and ran it for a while again, so the Sea Foam concentration was broken down somewhat, and I could hear the obvious sound of it running nicely - it's screaming once again! I can't wait to get back on the track!
I'm going to be very happy with the double-bubble screen on the track, compared to the stock screen's profile.
Here's how it looks with the newly painted tank, with everything temporarily back together.
As you can see, the fender wasn't remounted... because it can't be! The front mounting bosses for the fender are not in the same place as they are for my '92 and '93 fork sliders, and I'm not sure why, as these forks came off of a '94 F2, allegedly...
Well, it's because these are not F2 forks, they are from an F3, whether '95-'96, or '97-'98, I don't know, but regardless, this begs the question: WHY was I able to mount my F2 axle, wheel, spacers, and brakes, without any issue?!?
If I remember correctly, I learned that the F2 fork lowers are not compatible with wheel/brakes from an F3, and vice versa... if this is the case, then why did it mount with no play, with the calipers lining up perfectly on the discs, and oriented so that the pads bite the discs in the same surface area as with the old forks?!? With the front components properly torqued on each bike, the clearances all appear to be the same.
I'm going to put both bikes up on the front stands tonight, remove the wheels, and gets some measurements, to be sure, but from what I can tell at this point, if I order an F3 fender, I'm done... we'll see.
Regarding the race bike, since it has been sitting for a while, it would run just a little bit rough, on occasions when I would start it up. After I put the newly painted tank back on, I put 2 gallons of fuel in, with a moderately rich concentration of Sea Foam, and ran if for a bit until the Sea Foam-infused fuel was cycled into the bowls, and it began to run a little rougher yet. Then I completely filled the tank, and ran it for a while again, so the Sea Foam concentration was broken down somewhat, and I could hear the obvious sound of it running nicely - it's screaming once again! I can't wait to get back on the track!
Wow!
That looks amazing. Love all the logo's, sponsors, etc.
I just bought a Cheetah Race fairing set and it looks pretty similar to yours (can't remember what race fairings you have). I'm excited to get them mounted and painted.
Oh. Also, your tail section, do you have a single seat or is it the regular seat that just goes under the race tail?
Last edited by R3define; Apr 16, 2013 at 07:09 AM.