
1987 Hurricane to 2003 CBR600RR Conversion


June 2013 ROTM
Joined: Jul 2012
Posts: 1,172
Likes: 1
From: Victoria, BC
Looks great man. Definitely something to go by when I do undertake this on katrina. Couple questions: How are you able to attach/remove the seat if the bolts are underneath? and what are you doing for a undertail cover?
Thread Starter
|
Senior Member
Joined: Dec 2012
Posts: 873
Likes: 8
The corners of the seat are soft. They bend back and the bolts go in from the top not underneath.
In looking at the underside of the tail it will be pretty easy to make a filler panel out of plastic, aluminum or fiberglass. I am working out the license plate mount and the filler panel will need to incorperate that.
So far this is no where near as difficult as I thought it would be. Takes a little thought and time, fabricating skills and tools. You should be able to do the F4i tail without too much trouble.
Thanks for the positive feedback CorruptFile and tuchavito. I really like the way it's turning out. Can't wait to see it in black with the frame, wheels and swing arm powder coated.
I'm very close to being finished with the mounting and will be tearing the bike down soon.
Thread Starter
|
Senior Member
Joined: Dec 2012
Posts: 873
Likes: 8
***UPDATE***
Tail conversion
Final - Rear seat mounts
Some of these pictures have descriptions. You may have to scroll down to see them.
I pretty much finished the tail conversion today. There are some minor things to do, but the mounting is complete.
Here is a picture of the mounts for the rear seat.
Brackets Top | Flickr - Photo Sharing!
Here is a diagram showing the seat and how it fits to the mount.
Rear mounts diagram | Flickr - Photo Sharing!
Here is the underside of the rear seat mounted to the tail.
Under seat diagram | Flickr - Photo Sharing!
Another shot of the rear clip brace. This one was tough since it has compound bends to go from the rake angle of the fairing back to the flat of the seat clip. It also had to change width in order to fit at the seat.
Clip Bracket Bottom | Flickr - Photo Sharing!
Here is a shot of the rear seat mounted to the fairing.
Rear Seat Mounted | Flickr - Photo Sharing!
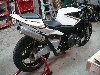
A final shot of the tail mounted
Tail Mounted | Flickr - Photo Sharing!
Here's a fit comparison to the 2003-04 CBR600RR.
fit comparison | Flickr - Photo Sharing!
Here's a 3/4 shot comparison. It would look better painted black...getting sick of that candy orange with different color wheels...can't wait to see it painted black.
Hows the look | Flickr - Photo Sharing!
I still have a few things to do to finish the total mounting and then will be tearing down and prepping for paint and powder coating.
I will take pictures as I tear it down so you all can see the mounting brackets without the fairings.
Tail conversion
Final - Rear seat mounts
Some of these pictures have descriptions. You may have to scroll down to see them.
I pretty much finished the tail conversion today. There are some minor things to do, but the mounting is complete.
Here is a picture of the mounts for the rear seat.
Brackets Top | Flickr - Photo Sharing!
Here is a diagram showing the seat and how it fits to the mount.
Rear mounts diagram | Flickr - Photo Sharing!
Here is the underside of the rear seat mounted to the tail.
Under seat diagram | Flickr - Photo Sharing!
Another shot of the rear clip brace. This one was tough since it has compound bends to go from the rake angle of the fairing back to the flat of the seat clip. It also had to change width in order to fit at the seat.
Clip Bracket Bottom | Flickr - Photo Sharing!
Here is a shot of the rear seat mounted to the fairing.
Rear Seat Mounted | Flickr - Photo Sharing!
A final shot of the tail mounted
Tail Mounted | Flickr - Photo Sharing!
Here's a fit comparison to the 2003-04 CBR600RR.
fit comparison | Flickr - Photo Sharing!
Here's a 3/4 shot comparison. It would look better painted black...getting sick of that candy orange with different color wheels...can't wait to see it painted black.
Hows the look | Flickr - Photo Sharing!
I still have a few things to do to finish the total mounting and then will be tearing down and prepping for paint and powder coating.
I will take pictures as I tear it down so you all can see the mounting brackets without the fairings.
Last edited by dennisgb; Jan 27, 2013 at 03:33 PM.
June 2013 ROTM
Joined: Jul 2012
Posts: 1,172
Likes: 1
From: Victoria, BC
That's looking top notch. Really man. I still maintain I like the lines of the early models, but there is something to be said for good old fashion ingenuity and passion into something like this. Get it done, and you will have my vote for ROTM 
Thread Starter
|
Senior Member
Joined: Dec 2012
Posts: 873
Likes: 8
Thanks. Like I told you before I also like the lines of the earlier bikes, and usually I prefer to be pure to the original, but the cost of those Hurricane fairings were just prohibitive.
I think this is a pretty good compromize and I've kept the cost down to a reasonable amount...and in the end should have a pretty nice bike...the ride of the Hurricane in a RR body.
I realized I haven't posted too many left side pictures. That's because of the tiny room I'm working in. I turned the bike to get this shot.
Left Side 2 | Flickr - Photo Sharing!
It looks tough from that side
Thread Starter
|
Senior Member
Joined: Dec 2012
Posts: 873
Likes: 8
Playing around with filler panels above the foot rests and below the tail fairing. Just don't like all the crap that shows there. Let me know what you guys think. I think it looks okay.
Left Side Panel | Flickr - Photo Sharing!
Left Side Panel | Flickr - Photo Sharing!
Thread Starter
|
Senior Member
Joined: Dec 2012
Posts: 873
Likes: 8
I'm going to wait until it's painted to decide on the tire hugger (fender). Originally I wanted it for the chain guard. Also concerned about water and dirt getting on everything. Even once the underside of the tail is closed in, still lots of places for water and dirt to go. I don't think it will stand out as much once the whole bike is black.
Thread Starter
|
Senior Member
Joined: Dec 2012
Posts: 873
Likes: 8
Haven't updated for a while. Been working on detail stuff.
Was trying to figure out how to deal with the license plate and rear turn signals since the RR has the exhaust up in the tail.
I've enclosed the tail and decided to install an late model Yamaha R6 license holder assembly. This will mount under the tail similar to how it is mounted on the R6.
Red Back | Flickr - Photo Sharing!
I've also decided to keep the hugger but cut it back so there is more tire exposed.
June 2013 ROTM
Joined: Jul 2012
Posts: 1,172
Likes: 1
From: Victoria, BC
Never liked how those things dropped down so much off the rear fairing. Maybe its because the tail is so thin on the bike you have pictured there, like the slim profile is ruined by this big appendage floating in mid-air. Might look better on the F1 seeing as there is more beef back there...