
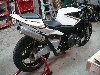
1987 Hurricane to 2003 CBR600RR Conversion


June 2013 ROTM
Joined: Jul 2012
Posts: 1,172
Likes: 1
From: Victoria, BC
Looks spot on man, good work. I'm not a fan of the look of the new bikes, but I can appreciate the time and effort to do this work.
I think if my 'cane mill ever packs it in, and I don't have a spare, I will go and buy an RR and put my F1 fairings on it :P
I think if my 'cane mill ever packs it in, and I don't have a spare, I will go and buy an RR and put my F1 fairings on it :P
Thread Starter
|
Senior Member
Joined: Dec 2012
Posts: 873
Likes: 8
That's funny man 
I actually agree with you. I would much rather have restored it to the old fairings, but the original fairings are so hard to find and very expensive. I did not want to do aftermarket fairings. I got this full set of OEM Honda RR fairings for $200 US. You can see in the pictures they are in very good shape.
Actually, I am not a big fan of sportbikes. I got into this because I bought this bike for the engine to put it on a project UTV, but after looking it over and getting it running, I felt bad tearing it down because it was mostly there without the fairings. I also felt that the engine was just too much HP for the other project.
I am old school and prefer road bikes. I am older and my first real bike was a 1966 BSA Hornet. I bought it used in 1970. I had multiple British bikes the last being one of the last Norton 850 Commando's that I bought new. I haven't riden since 1976

Thread Starter
|
Senior Member
Joined: Dec 2012
Posts: 873
Likes: 8
We'll see. This thing actually scared me when I got it running. It revs so quick and sounds really mean. Not used to that. Those old British twins where "thumpers". It amazes me that they can get these 4 cylinder 4 strokes to rev so high and respond so quickly. Even though this is an older design still quite impressive.
I'm wondering if you could answer a question for me. I am trying to document this conversion. I searched all over the web, and while there are bikes out there, not much info on how to do this. A lot of people have asked me to explain this. I am putting together a "how to" as I go. Is there a good place to post this or should I just put it in this thread?
I'm wondering if you could answer a question for me. I am trying to document this conversion. I searched all over the web, and while there are bikes out there, not much info on how to do this. A lot of people have asked me to explain this. I am putting together a "how to" as I go. Is there a good place to post this or should I just put it in this thread?
Last edited by dennisgb; Jan 12, 2013 at 02:47 PM.
Thread Starter
|
Senior Member
Joined: Dec 2012
Posts: 873
Likes: 8
Okay, I've had a number of people asking that I post some how to information on this conversion I don't know where to post this so I will post it here. In my searches I found nothing that really explains this conversion so I hope this help others. I will update as I go. I wanted to get this information put together while it was still fresh in my head. I am fabricating all the permanent mounting brackets right now, and will post pictures and info on them once complete.
Click on the links to see photos and descriptions of each step. Scroll down on the pictures because there is description info below.
So, to begin with the front upper fairing need to be mounted with the RR fairing stay.
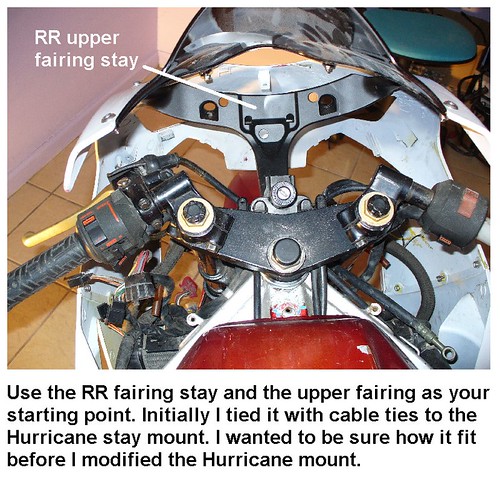
I made a temporary strap to hold the upper fairing on center and still let me move it around some.
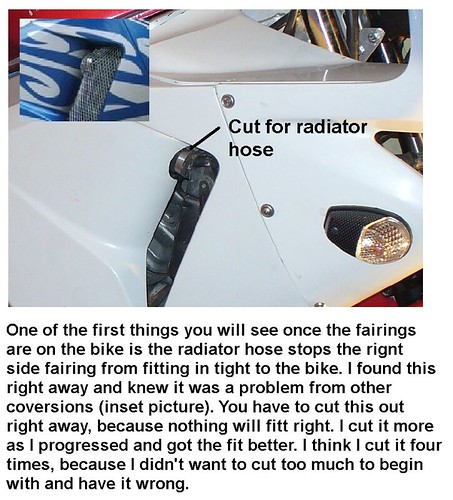
The first interference issue that needs to be addressed once you get the side fairings bolted to the upper is the radiator hose. The Hurricane is wider than the 2003 RR because improvements to the engine made it smaller. The 2003 RR is a smaller bike than the Hurricane which is important to understand during fitment of the fairings. There isn't much room for error.
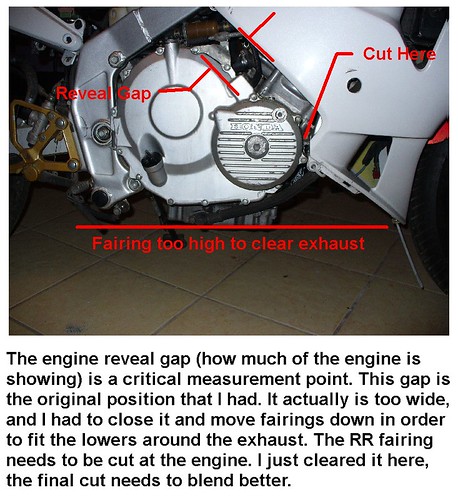
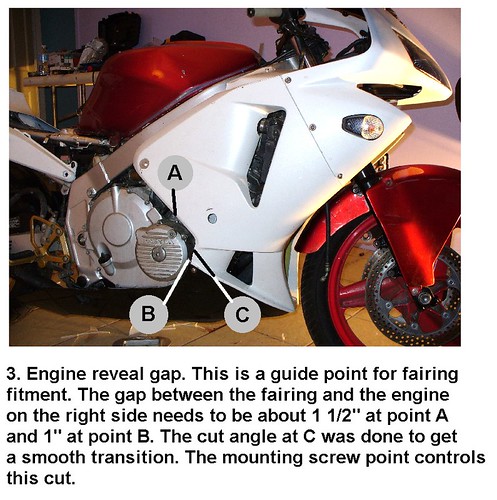
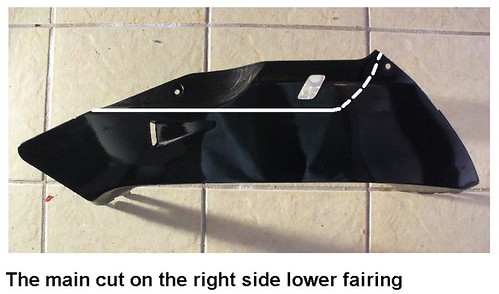
I used the engine reveal on the right side as sort of a control point, because this side requires the most cutting and modification. The engine reveal position is imortant to get the proper look and to "find" the sweet spot where all the fairings fit to the bike.
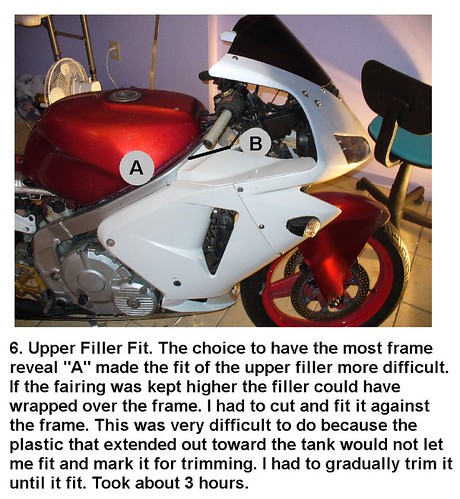
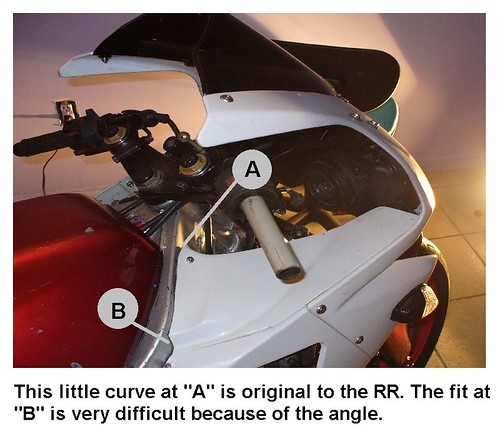
I put together a diagram that shows the critical fits. They all tie together and each adjustment effects one or more of the others.
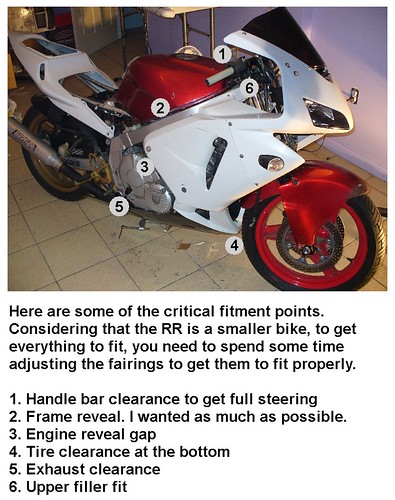
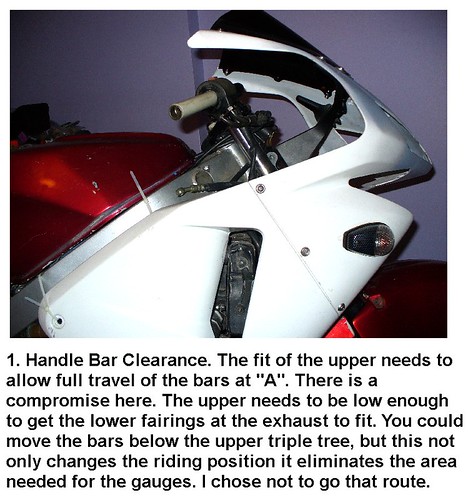
1. Handle Bar clearance is an important consideration in order to get full travel of the steering. The position is higher than center because of the size difference between the two bikes.
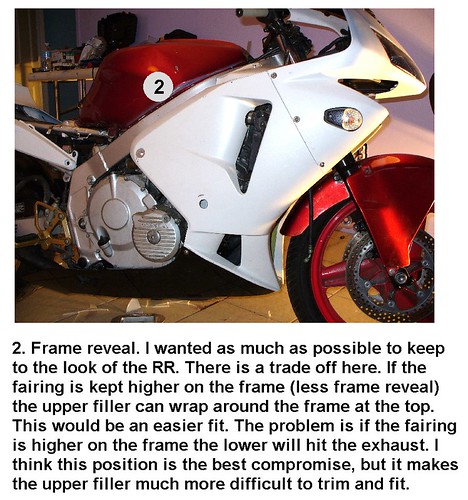
2. Frame Reveal is also important. Some of the conversions I have seen have a very small frame reveal on the side. I didn't think this looked right because the RR has most of the frame showing so I tried to get as much frame reveal as I could. I plan to powder coat the frame in satin black in keeping with the RR look, so I wanted some frame showing.
3. Engine Reveal Gap. As I said earlier, I used this as a control and felt that the transition between the upper could be "cleaner" than some of the other conversions I have seen.
4. Tire Clearance

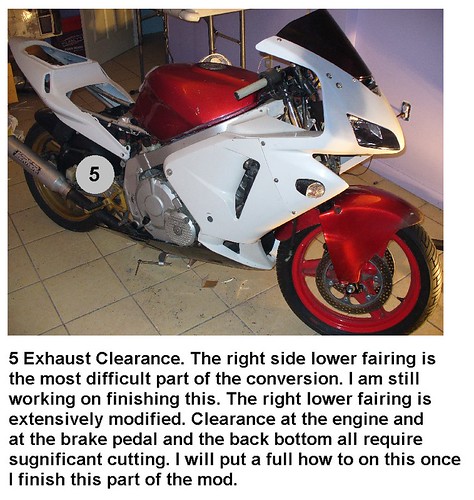
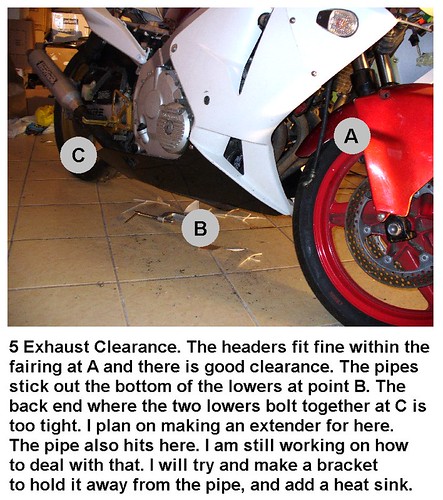
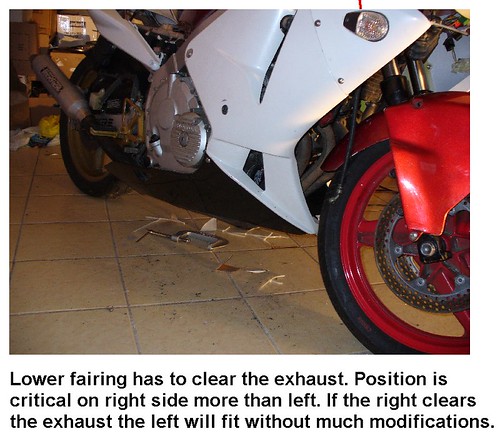
5. Exhaust Clearance is one of the most critical steps so there is a lot of information on this. I will update this fitment later because it isn't complete yet but here is some of the important points.
 [/url]
6 Upper Filler Fit was very difficult. I spent the most time on this. It requires patience and guts because you feel like your going to mess up. You are working blind because you can't fit the part in the space to mark it. You just have to slowly cut and grind until it fits.
I hope this write up helps others who are thinking about doing this conversion. It really is a heck of a transformation and quite a bit of fun at the same time.
Click on the links to see photos and descriptions of each step. Scroll down on the pictures because there is description info below.
So, to begin with the front upper fairing need to be mounted with the RR fairing stay.
I made a temporary strap to hold the upper fairing on center and still let me move it around some.
The first interference issue that needs to be addressed once you get the side fairings bolted to the upper is the radiator hose. The Hurricane is wider than the 2003 RR because improvements to the engine made it smaller. The 2003 RR is a smaller bike than the Hurricane which is important to understand during fitment of the fairings. There isn't much room for error.
I used the engine reveal on the right side as sort of a control point, because this side requires the most cutting and modification. The engine reveal position is imortant to get the proper look and to "find" the sweet spot where all the fairings fit to the bike.
I put together a diagram that shows the critical fits. They all tie together and each adjustment effects one or more of the others.
1. Handle Bar clearance is an important consideration in order to get full travel of the steering. The position is higher than center because of the size difference between the two bikes.
2. Frame Reveal is also important. Some of the conversions I have seen have a very small frame reveal on the side. I didn't think this looked right because the RR has most of the frame showing so I tried to get as much frame reveal as I could. I plan to powder coat the frame in satin black in keeping with the RR look, so I wanted some frame showing.
3. Engine Reveal Gap. As I said earlier, I used this as a control and felt that the transition between the upper could be "cleaner" than some of the other conversions I have seen.
4. Tire Clearance
5. Exhaust Clearance is one of the most critical steps so there is a lot of information on this. I will update this fitment later because it isn't complete yet but here is some of the important points.
[/url]6 Upper Filler Fit was very difficult. I spent the most time on this. It requires patience and guts because you feel like your going to mess up. You are working blind because you can't fit the part in the space to mark it. You just have to slowly cut and grind until it fits.
I hope this write up helps others who are thinking about doing this conversion. It really is a heck of a transformation and quite a bit of fun at the same time.
Last edited by 74demon; Apr 22, 2013 at 12:37 PM. Reason: fix links


Member
Joined: Mar 2011
Posts: 35
Likes: 0
Wow man that cbr is looking so nice, and it's so good that you're making a how to out of it, thanks so much, I'm really liking it, looking forward to seeing how the tail will end up and if it'll be able to carry a passenger though.
Thread Starter
|
Senior Member
Joined: Dec 2012
Posts: 873
Likes: 8
Thanks for the positive feedback. I really thought it might be helpful for others that want to have some refererence to see how this is done because I could not find any detailed explaination on the web, particularly the upper and the front. There are a lot of tail mod threads but little on the whole bike conversion.
Thread Starter
|
Senior Member
Joined: Dec 2012
Posts: 873
Likes: 8
Thanks. Yes, I want to be able to carry a passenger. The tail conversion I'm planning is a little different than the ones I've seen explained. I want to try and use the Hurricane subframe as much as possible rather than cut it off. The plan is to notch the back that sticks out and bend it up to the right angle and then weld the notches to mantain the strength at the passenger seat position. Not sure if that will work yet though.
Thread Starter
|
Senior Member
Joined: Dec 2012
Posts: 873
Likes: 8
I finished the final fairing stay mount today. This is the most critical fit of the whole project so I am posting pictures and this description.
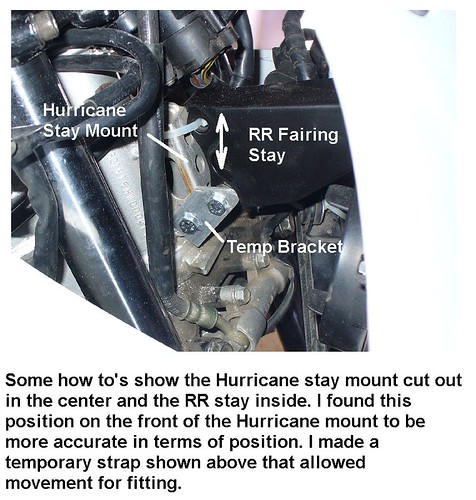
When I searched the web I found some information on mounting RR fairings that I believe is incorrect. There was a partial "how to" that showed the Hurricane fairing stay mount cut out and the RR fairing stay modified to fit inside the Hurricane mount. The pictures only showed the upper fairing mounted. This position is wrong in my opinion. It will result in the fairing positions too far back on the bike.
When I got my RR fairing stay I installed the upper and just strapped the fairing stay to the front of the Hurricane mount with cable ties. I assembled the other fairings and could see right away that this mount position was fairily close. I made a temporary strap that I described earlier and this allowed me to hold the upper on center and move it up and down to find the best position. Once I got all of the fairings mounted I locked this strap and fabricated brackets out of 3/16" aluminum plate.
Here are the pictures of the final mount:
RR Fairing Stay to Hurricane Mount Right Side
Fairing Mount Right | Flickr - Photo Sharing!
RR Fairing Stay to Hurricane Mount Left Side
Fairing Mount Left | Flickr - Photo Sharing!
The width of the RR fairing stay is different than the Hurricane and there are some bolt recesses on the RR part. I put 1/2" spacers on each side to compensate for this. There are (4) four spacers. They are steel shaft collars which you can buy at the hardware store.
This is a solid mount and the fairings feel like part of the bike now.