When you click on links to various merchants on this site and make a purchase, this can result in this site earning a commission. Affiliate programs and affiliations include, but are not limited to, the eBay Partner Network.
Hey folks,
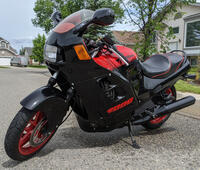
I've got a CBR1000F that's been converted to electric. It's someone else's project I bought semi-finished and need to finish up. It needs some help with the plastics (held on with safety wire now) and I want to make sure the brakes and suspension are good before I go on a ride. If anyone is curious about the electric conversion, there's a little more info here: Honda CBR-1000F conversion [Archive] - ElMoto.net - the electric motorcycle forum There is a lot more information on the now-defunct website, but you can get to it through archive.org here.
I have a concern about maybe something I need to fix on the bike, maybe something I just need to understand better about how it works. The front brake caliper moves when I apply the brakes. This is disconcerting. I know the Hurricane had the Linked Braking System from the factory, so maybe this is just part of how that was designed to work. The LBS was disabled by the previous owner and it looks like there are just lines run straight to each caliper from the respective master cylinders and the extra ports on the calipers blocked off. Can anyone tell me if a moving brake caliper is normal on a CBR1000F? It's be surprisingly challenging to find information on this online.
I'm not sure what year you're looking at and how much motion you're observing
I know the 87-88s have an anti-dive front fork. The caliper will pivot slightly under braking to actuate a small piston on one of the fork tubes, which closes an oil passage in the tube lower
I'm not sure if later years also got it (could also be a front end swap or other funny business going on) but if you see a caliper pivot linkage that runs up to the bottom of one of the forks that would explain the motion
Thanks for your response, maybe that's what it is. I snapped a quick pic before bringing the groceries in tonight. Does the arrangement at the top of the caliper look like that's it?
That's useful, thanks. I didn't recognize it because a previous owner apparently removed most of the system and left only what was needed for the caliper to stay in place. It's disconcerting for it to be moving every time I brake; I am not sure it's OK to leave unrestrained. I'm thinking of finding a way to fix it in place- could be as simple as a threaded stud and some clevises.
That's useful, thanks. I didn't recognize it because a previous owner apparently removed most of the system and left only what was needed for the caliper to stay in place. It's disconcerting for it to be moving every time I brake; I am not sure it's OK to leave unrestrained. I'm thinking of finding a way to fix it in place- could be as simple as a threaded stud and some clevises.
Makes sense. It's a common modification...
Okay wait sorry it's a homebrew e-bike conversion Hurricane? That's so awesome. Like I could see it being an absolute skid machine on those 90's bike tires.
Here's the link for the guy's youtube driving around the block, and the second video is a shed test of the drivetrain. He also bench tests the motor controller. It's worth saving for historical value.
As you work on the bike having a detailed record of the mod is gonna be very nice. Looks like he cut a big hole in the frame, jammed an off-the shelf DC motor in it, fabricated a battery box and stuffed it with some type of battery packs. Current goes through the controller to the motor. Seems simple enough. I'm looking forward to checking out his blog. I've got a partsbike that'd be perfect for this sort of thing. You should post a few pics of the bike for posterity
Anyway it's a great project. You've definitely got a front end from a later Hurricane, and the motion will be possible due to the anti-dive front fork. Check fork oil and verify whether it's working or not. If the bike has a ton of added weight you may be over-taxing the front suspension. Something to keep in mind as you go
Before tackling that issue, Give those brakes a good inspection. It looks a little 'backyardy' to me. Front brake is a bike's first best option for avoiding death. Death sucks. Brakes are cheap. Here's how I'd tackle it
-Spray brake cleaner on all greasy surfaces, and remove all that scum with a rag. While you're at it, clean the rest of the bike too
-Loosen caliper pivot bolt and swing caliper out of the way to look at the pads. They'll be wrecked by grease. Take a look at the rotors and note condition. Pads and rotors don't need to be high-end, but they need to be in good shape.
-Next drain the system. By the time you've opened the reservoir you will know whether you've got a simple flush or a bigger job. Use a vacuum pump to suck out the reservoir. Secure brake lever. Attempt bleed by cracking the lowermost of the bleeder screws. Procedure is described in the manual, but modifications should actually make it easier. Plenty of resources on how to drain and bleed the brake system. For now just drain the system. The bleeder screw is made of aluminum (for ease of manufacture and corrosion resistance) but that also makes it weaker than steel. Don't reef on it. Aluminum is easy to drill if necessary, and responds well to those cheezy 'easy-outs' counter screw bits. If it gives you trouble skip the bleeder screw and just drain by removing the hydraulic line. You can get that bleeder screw out once it's at the bench. Wrap a bit of towel around the bottom fitting and make sure it doesn't drip on anything nice. Loosen remaining pivot bolt and get the caliper to the bench
-Caliper is probably a mess. It's been delinked, which makes sense, but with so many other things wrong with the picture I start to get a bit worried about water encroachment or massive leak. Service by removing piston and all other parts. Douse in brake cleen. Replace seals if possible. Spraypaint if desired. Grease anything that slides. Pop it together and reinstall. Torque the banjo with a crush washer on either side. Replace the bleeder screws, crush washers, and banjos at the brake shop. Probably $20 or so for the hardware. Reassemble, bleed and leak test
-It might be a good idea to rebuild the master cylinder also, especially if they are a real mess. It's less likely to be the source of a leak, but if you're overhauling the system you may as well do the whole thing. Seals are cheap
-The stainless hose should not be routed there. It needs to be held on with clips mounted to the fender fitting points. Loose plastic zip tie on temporary basis if necessary. The lower fitting needs to be pointed away from the wheel. Guessing it's an incompatible part that someone fit to save a buck. Try to find a better way of routing it if possible. Might just be crooked from over-torque, which happens, especially if you don't use fresh crush washers on assembly.
Anyway that should be enough to get started. Once you get the brakes figured out, take a look at the forks next. I've never noticed the motion of the calipers on mine, so if it seems like something ain't right, it's most likely that something ain't right
I know a lot of us feel loyalty to gas, but things like this really give me hope that future generations will find a way build weird and awesome contraptions out of a battery tray and wheels
Good luck - Keep us posted
Last edited by tentacleslap; Mar 13, 2020 at 02:23 AM.
Oh also, make sure that if the frame has been chopped that it has been strengthened also. The engine is a structural member, so if he's just bolted an electric motor to the frame without adding structure to the front half of the cradle it might be significantly weaker. Not something you want to find out by accident
This should help. I can see that yours would move. You need a solid mount.
Read from the beginning but in post #6 in this LINK you can see the original linked system with the secondary master cylinder on the left front side.
The thread also describes the delinking process so you may want to check if the OP did the drilling correctly.
Here is how I did mine.
I used an aluminum cable stop that I cut in half as spacers and big washers, both from Lowe's.
You can see the near side spacer and washer between the bracket and caliper bracket (same on the other side)
I had to drill out the stop just a bit. Here is a LINK of what I used. That may not be the size I used but you can check it out.
Plus that link is for a 10 pack. You can get a two pack.
Last edited by TimBucTwo; Apr 7, 2020 at 10:36 AM.