
87 Starter Clutch Purchase-7 choices?
#22
 05-23-2013 | 08:43 PM

Thread Starter
|
Member
Joined: Dec 2012
Posts: 65
Likes: 0
From: Brisbane, Australia
#23
05-30-2013 | 08:35 AM
Thread Starter
|
Member
Joined: Dec 2012
Posts: 65
Likes: 0
From: Brisbane, Australia
Picked up Seb's Damper today. Finally got my marking done and was able to start fiddling.
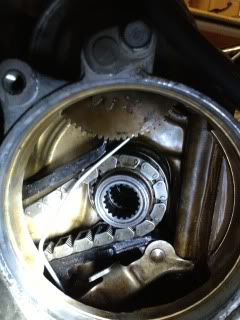
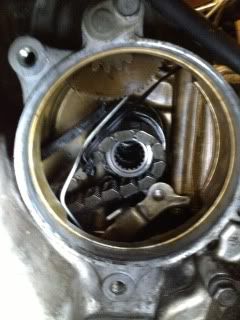
Here is the damper in place, trying to ease the chain on to it.
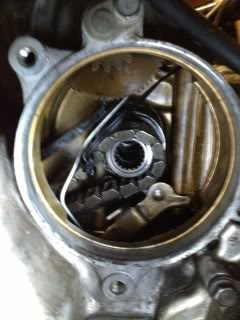
After a more positive approach it was on. You can see the wire that is keeping the pawl disengaged from the tensioner. Its a right bugger to persuade into the right spot.
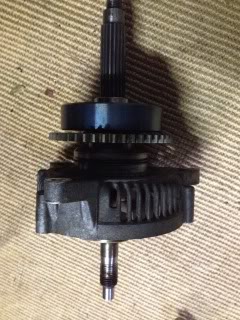
I then had a quick crisis about which way around the starter clutch went. I managed to talk myself out of the obvious and had to check the exploded diagram to be sure - tired i guess.
This is the wrong way-right?
So tired in fact that i forgot to bend the tang for the chain guide back up.
I did tighten the 3 bolts up slowly and the shaft seemed central in the hole. However not nearly enough thread was showing even after the bolts were done up. So something was clearly wrong. i undid them and discovered the tang. Not before proving to myself that the coat hanger wire could be be removed effectively.
In my enthusiasm to start again i managed to rest the coat hanger on the battery - wow!
The battery is now disconnected and removed. The wire is cooling down in the corner where i flung it!
That's enough for now, will play more on the w/e
Owen
Here is the damper in place, trying to ease the chain on to it.

After a more positive approach it was on. You can see the wire that is keeping the pawl disengaged from the tensioner. Its a right bugger to persuade into the right spot.

I then had a quick crisis about which way around the starter clutch went. I managed to talk myself out of the obvious and had to check the exploded diagram to be sure - tired i guess.
This is the wrong way-right?

So tired in fact that i forgot to bend the tang for the chain guide back up.
I did tighten the 3 bolts up slowly and the shaft seemed central in the hole. However not nearly enough thread was showing even after the bolts were done up. So something was clearly wrong. i undid them and discovered the tang. Not before proving to myself that the coat hanger wire could be be removed effectively.
In my enthusiasm to start again i managed to rest the coat hanger on the battery - wow!
The battery is now disconnected and removed. The wire is cooling down in the corner where i flung it!
That's enough for now, will play more on the w/e
Owen
#24
05-30-2013 | 04:25 PM

Super Moderator
Joined: May 2012
Posts: 4,647
Likes: 30
Picked up Seb's Damper today. Finally got my marking done and was able to start fiddling.
Here is the damper in place, trying to ease the chain on to it.
After a more positive approach it was on. You can see the wire that is keeping the pawl disengaged from the tensioner. Its a right bugger to persuade into the right spot.

I then had a quick crisis about which way around the starter clutch went. I managed to talk myself out of the obvious and had to check the exploded diagram to be sure - tired i guess.
This is the wrong way-right?

So tired in fact that i forgot to bend the tang for the chain guide back up.
I did tighten the 3 bolts up slowly and the shaft seemed central in the hole. However not nearly enough thread was showing even after the bolts were done up. So something was clearly wrong. i undid them and discovered the tang. Not before proving to myself that the coat hanger wire could be be removed effectively.
In my enthusiasm to start again i managed to rest the coat hanger on the battery - wow!
The battery is now disconnected and removed. The wire is cooling down in the corner where i flung it!
That's enough for now, will play more on the w/e
Owen
Here is the damper in place, trying to ease the chain on to it.
After a more positive approach it was on. You can see the wire that is keeping the pawl disengaged from the tensioner. Its a right bugger to persuade into the right spot.
I then had a quick crisis about which way around the starter clutch went. I managed to talk myself out of the obvious and had to check the exploded diagram to be sure - tired i guess.
This is the wrong way-right?
So tired in fact that i forgot to bend the tang for the chain guide back up.
I did tighten the 3 bolts up slowly and the shaft seemed central in the hole. However not nearly enough thread was showing even after the bolts were done up. So something was clearly wrong. i undid them and discovered the tang. Not before proving to myself that the coat hanger wire could be be removed effectively.
In my enthusiasm to start again i managed to rest the coat hanger on the battery - wow!
The battery is now disconnected and removed. The wire is cooling down in the corner where i flung it!
That's enough for now, will play more on the w/e
Owen
It's a good thing to have the battery disconnected Owen!

Ok, here's the exploded diagram of the alternator shaft and it's components.

I'd say you have it on the wrong way.
the starter cog faces the other way with two washers between it and the alternator damper.
Cheers, SB
Last edited by Sebastionbear1; 05-30-2013 at 04:34 PM.
#25
05-30-2013 | 09:15 PM
Thread Starter
|
Member
Joined: Dec 2012
Posts: 65
Likes: 0
From: Brisbane, Australia
Seb,
Hi, yep, that's the same diagram i looked out after i had a moment of self doubt. Even putting it on correctly I'm not getting enough of the shaft emerge through to the other side. I'm clearly doing something very wrong. Have the w/e to rethink it through and check every component is on the shaft in the right order and in the right orientation. i cant be far off or it just wouldn't fit at all.
Feeling slightly defeated by it today, so keento get back to it with more time and IQ.
The coat hanger is much harder to get into the pawl when its threaded through the starter hole.. will keep you all posted.
O
#26
05-30-2013 | 10:16 PM
Super Moderator
Joined: May 2012
Posts: 4,647
Likes: 30
Seb,
Hi, yep, that's the same diagram i looked out after i had a moment of self doubt. Even putting it on correctly I'm not getting enough of the shaft emerge through to the other side. I'm clearly doing something very wrong. Have the w/e to rethink it through and check every component is on the shaft in the right order and in the right orientation. i cant be far off or it just wouldn't fit at all.
Feeling slightly defeated by it today, so keento get back to it with more time and IQ.
The coat hanger is much harder to get into the pawl when its threaded through the starter hole.. will keep you all posted.
O
Hi, yep, that's the same diagram i looked out after i had a moment of self doubt. Even putting it on correctly I'm not getting enough of the shaft emerge through to the other side. I'm clearly doing something very wrong. Have the w/e to rethink it through and check every component is on the shaft in the right order and in the right orientation. i cant be far off or it just wouldn't fit at all.
Feeling slightly defeated by it today, so keento get back to it with more time and IQ.
The coat hanger is much harder to get into the pawl when its threaded through the starter hole.. will keep you all posted.
O
Do you have access to one of those Snap On internal cameras? I used one of those to fathom the intracacies of the ratchet pawl on the alternator chain tensioner. Made it MUCH easier.
Good luck
Cheers, SB
#27
05-30-2013 | 10:24 PM

Administrator, MVN / ROTM NOV 2012
Joined: Aug 2008
Posts: 11,003
Likes: 3
From: Republic of Boon Island
Owen you may want to consider this method from Stu in his how to
One of the biggest problems you are going to face now is centering the alternator shaft back through the bearing in the engine case. To get around this, place a socket of the same diameter as the alternator shaft (Picture 8) inside the damper after you've put the chain back on.
The socket negates the threaded section of the shaft so there is no need to try and lift it into position later on.
If you don't do this, you'll get the thread section of the shaft into the bearing ok, but it will be completely off center and you won't be able to get the part of the shaft that needs to be in the bearing in position. This is by design. If the shaft is off-center at the bearing, it means the chain tensioner is doing its job
#28
05-31-2013 | 02:55 AM
Thread Starter
|
Member
Joined: Dec 2012
Posts: 65
Likes: 0
From: Brisbane, Australia
Seb, i wish - how much?
Sprock, yes i read that and did hunt through my sockets but have nothing suitable.
Equally i don't have my chain under any tension so i can lift it up quite easily. Due to the magic of the coat hanger!
what i really need is a 90 bend like an hex key that i can just pull that end up with. I'll try that.
Missus wants an evening on the couch watching tv and drinking. i guess that's ok but i will be thinking about doing this instead.
will update over the w/e.
if anyone has an obvious way of pulling up that shaft slightly using basic tools?
or i raid my mates socket set maybe. wait i have another smaller socket set i didn't check.......
#29
05-31-2013 | 03:40 AM
Super Moderator
Joined: May 2012
Posts: 4,647
Likes: 30
Seb, i wish - how much?
Sprock, yes i read that and did hunt through my sockets but have nothing suitable.
Equally i don't have my chain under any tension so i can lift it up quite easily. Due to the magic of the coat hanger!
what i really need is a 90 bend like an hex key that i can just pull that end up with. I'll try that.
Missus wants an evening on the couch watching tv and drinking. i guess that's ok but i will be thinking about doing this instead.
will update over the w/e.
if anyone has an obvious way of pulling up that shaft slightly using basic tools?
or i raid my mates socket set maybe. wait i have another smaller socket set i didn't check.......
Sprock, yes i read that and did hunt through my sockets but have nothing suitable.
Equally i don't have my chain under any tension so i can lift it up quite easily. Due to the magic of the coat hanger!
what i really need is a 90 bend like an hex key that i can just pull that end up with. I'll try that.
Missus wants an evening on the couch watching tv and drinking. i guess that's ok but i will be thinking about doing this instead.
will update over the w/e.
if anyone has an obvious way of pulling up that shaft slightly using basic tools?
or i raid my mates socket set maybe. wait i have another smaller socket set i didn't check.......
I absolutely, unquestionably and thoroughly concur with Sprock/Stu's recommendation of the socket over the threaded end of the shaft. A must. You really do need to find one that fits and use it.
Cheers, SB