
Guy from Kentucky with an f4i
#11
 02-17-2014, 05:09 AM

Welcome Crew Technician
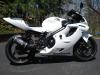
It's the one from pimpbike.com that uses the stock taillight. There were some stickers in the box so I was able to trace it back to here. Here's a link.
HONDA F4I UNDERTAIL 2001,2002,2003 [H-F4I-S-0103] - $99.99 : WWW.PIMPBIKE.COM, YOUR #1 SOURCE FOR MOTORCYCLE UNDERTAILS & ACCESSORIES
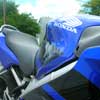
I want to keep my stock turn signals and brakelight, I'm not into being confusing and/or invisible to other drivers. I may swap the signals for more square ones later, maybe with shorter stems, but nothing small. I think I've figured out what I need to do but I'll post pics up when I can. I've got a rear-tire hugger, lever guards, license plate/turn signal brackets, and mirrors with integrated smoke turn signals on order so I may just strip the bike down and do everything all in one go. Real excited about the mirrors, I think I may have found some that will work well on this bike. I know they work really well on the 600RR.
HONDA F4I UNDERTAIL 2001,2002,2003 [H-F4I-S-0103] - $99.99 : WWW.PIMPBIKE.COM, YOUR #1 SOURCE FOR MOTORCYCLE UNDERTAILS & ACCESSORIES
I want to keep my stock turn signals and brakelight, I'm not into being confusing and/or invisible to other drivers. I may swap the signals for more square ones later, maybe with shorter stems, but nothing small. I think I've figured out what I need to do but I'll post pics up when I can. I've got a rear-tire hugger, lever guards, license plate/turn signal brackets, and mirrors with integrated smoke turn signals on order so I may just strip the bike down and do everything all in one go. Real excited about the mirrors, I think I may have found some that will work well on this bike. I know they work really well on the 600RR.
As far as the headlights goes well yea you are right, there are full conversions, and then there are just H7 bulb replacements (Bike uses stock H7's) that they just rate at different colors not unsimilar to what you have if I read your post correctly. Thats what I was wondering, if you did the full install ( with ballasts) or just got differnt color H7's. Cheers.
-Poss
#13
02-17-2014, 09:17 AM

Senior Member
Join Date: Aug 2013
Location: Temecula, CA
Posts: 129
Likes: 0
Received 0 Likes
on
0 Posts
#14
02-17-2014, 11:19 AM

Join Date: Feb 2014
Posts: 183
Likes: 0
Received 0 Likes
on
0 Posts
I have the same undertail on my bike. I already been in touch with pimpbikes at least regarding the wiring. I could give you a little instruction on wiring up however you want it. Lemme know. Ill tell ya, I use the lights from them the circle ones and they are pretty bright, bright enough for me anyway, but to each their own. You talking about the alphamotos intergrated mirrors? They are good, I have them as well.
As far as the headlights goes well yea you are right, there are full conversions, and then there are just H7 bulb replacements (Bike uses stock H7's) that they just rate at different colors not unsimilar to what you have if I read your post correctly. Thats what I was wondering, if you did the full install ( with ballasts) or just got differnt color H7's. Cheers.
-Poss

Last edited by 74demon; 02-17-2014 at 12:22 PM. Reason: fix link
#15
02-17-2014, 11:25 AM
Welcome Crew Technician
Because an undertail rips out that stock fender and or light.
But I see now, I have a pimpbikes one, but not that one that utilizes the stock light. Misunderstanding. Should just be a piece of fiberglass to insert up there. Mines a bit different, comes with different lights, thats why I was saying it.
IIRC, it took mine a few too, did you order on the weekend? Plus be aware that today is presidents day and the post will be delayed a day. CHeers.
-Poss
#16
02-17-2014, 12:08 PM
Join Date: Feb 2014
Posts: 183
Likes: 0
Received 0 Likes
on
0 Posts
Because an undertail rips out that stock fender and or light.
But I see now, I have a pimpbikes one, but not that one that utilizes the stock light. Misunderstanding. Should just be a piece of fiberglass to insert up there. Mines a bit different, comes with different lights, thats why I was saying it.
IIRC, it took mine a few too, did you order on the weekend? Plus be aware that today is presidents day and the post will be delayed a day. CHeers.
-Poss
But I see now, I have a pimpbikes one, but not that one that utilizes the stock light. Misunderstanding. Should just be a piece of fiberglass to insert up there. Mines a bit different, comes with different lights, thats why I was saying it.
IIRC, it took mine a few too, did you order on the weekend? Plus be aware that today is presidents day and the post will be delayed a day. CHeers.
-Poss
I thought about that after I did it. It was really simple though and I think pictures of the parts and an explanation would probably be enough. Other people over complicated it. I tried to copy another guy's DIY guide then realized he was taking something simple and making it way harder than it needed to be so I simplified his. Basically I just bought a rubber stopper from Lowes and chiseled and file it to where it would almost go into the headstock with some force behind it. I drilled a small hole through it then I lubed it with windex "because I don't want it to stay lubed" and jammed that puppy in there. Then I drilled a hole through the stock garmen mount and put a screw through the mount and the rubber stopper, which should make the rubber stopper even tighter since something is taking up space on the inside of it now. I had to grind the back side of the screw down so the GPS had room to clip in but this might just be my fault for not choosing a good screw. I then used liquid nails to glue the gps bracket/and screw and rubber stopper all together and then I went over the liquid nails with my cousin's black nail polish because that's what was on hand and she was gonna throw it away. I think it turned out great and was dirt cheap. I hate the stupid Ram mounts because they stick up about 7 inches off of the handlebars and are super over -priced. Mine is basically flush, stays dry when I drive in the rain because it's flush, and looks great sitting there. I'll try to get some pics of the mount but I'm not gonna pull it out.
Last edited by 74demon; 02-17-2014 at 12:19 PM.
#17
02-17-2014, 02:19 PM
Join Date: Feb 2014
Posts: 183
Likes: 0
Received 0 Likes
on
0 Posts

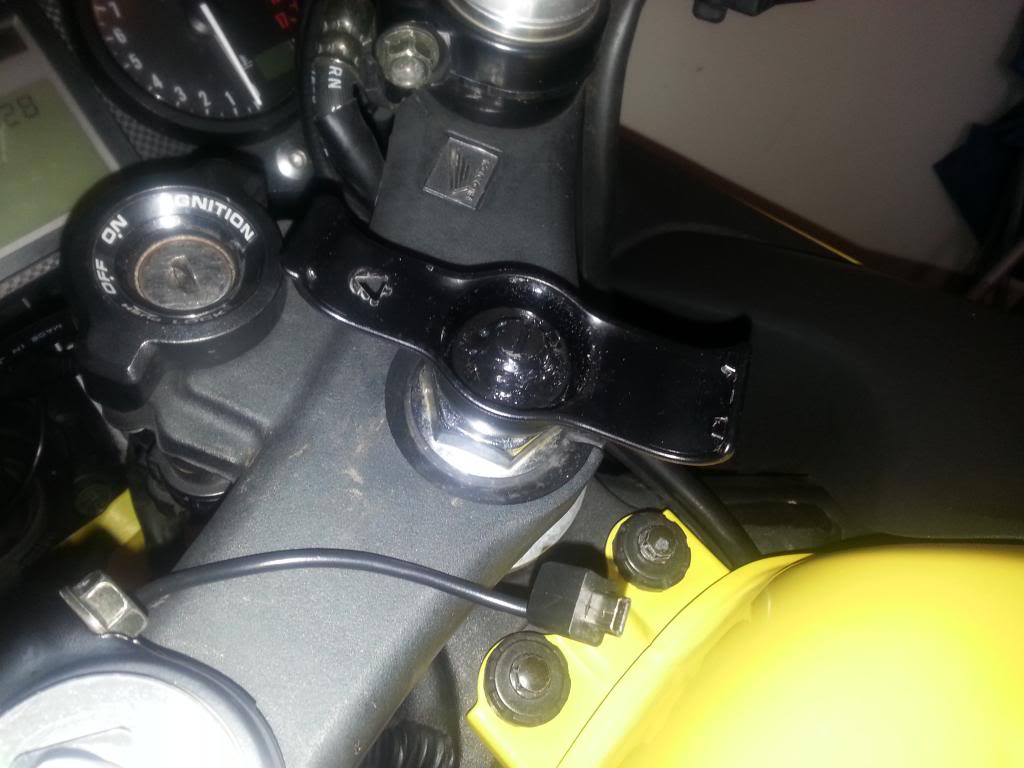
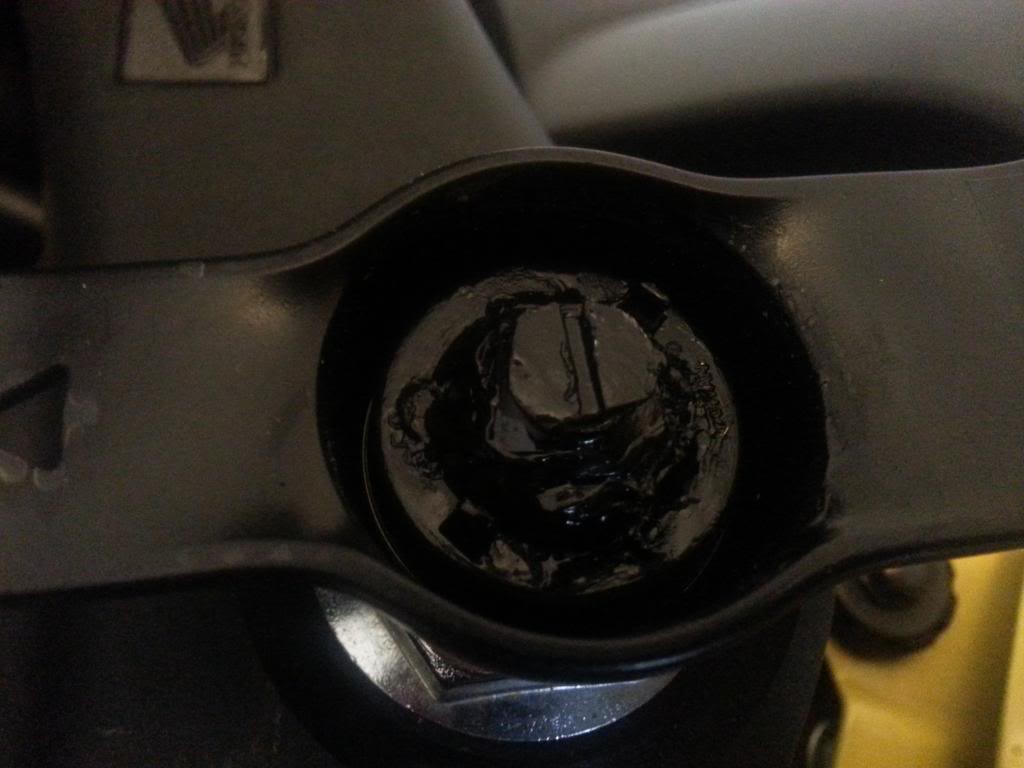
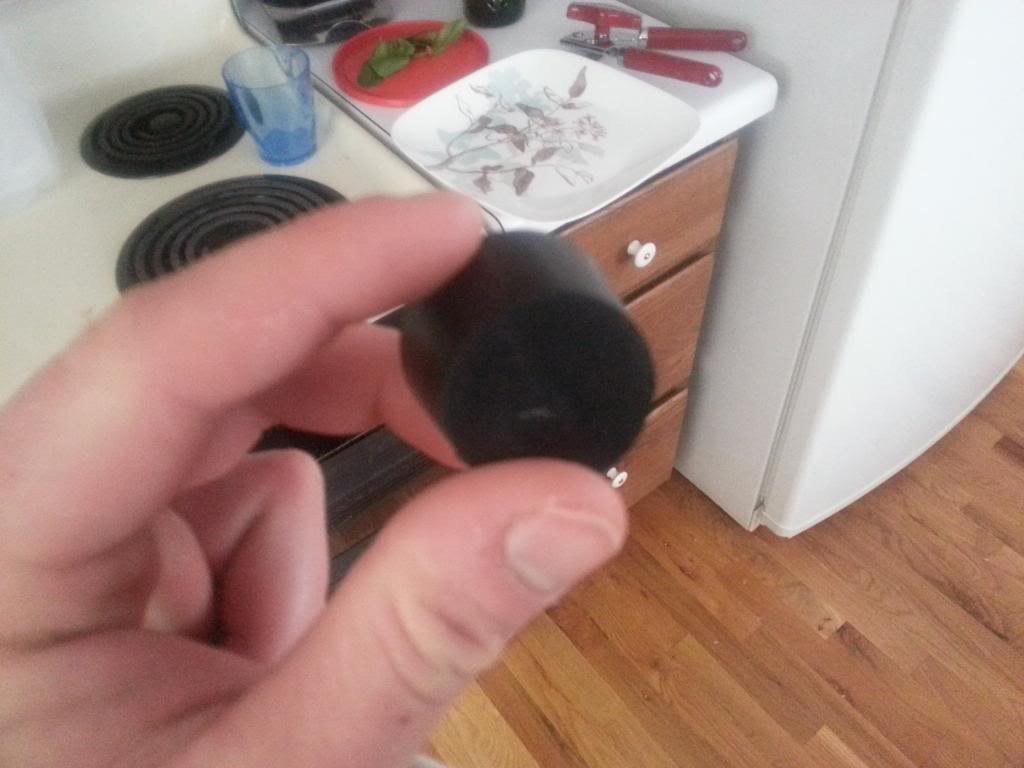
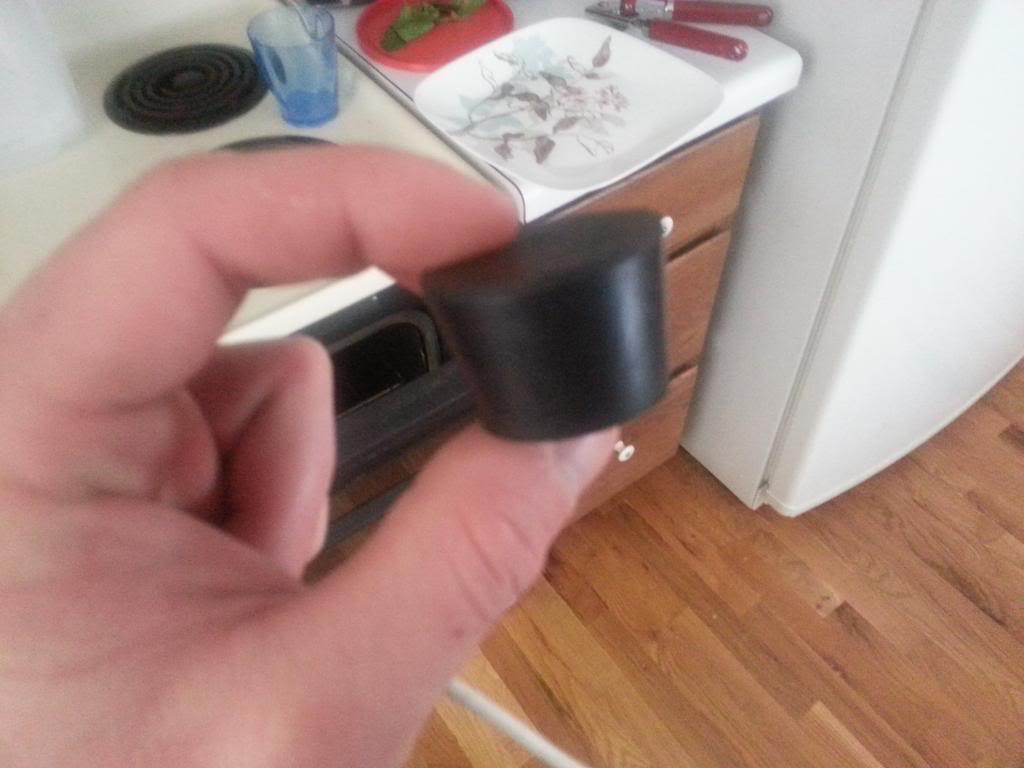
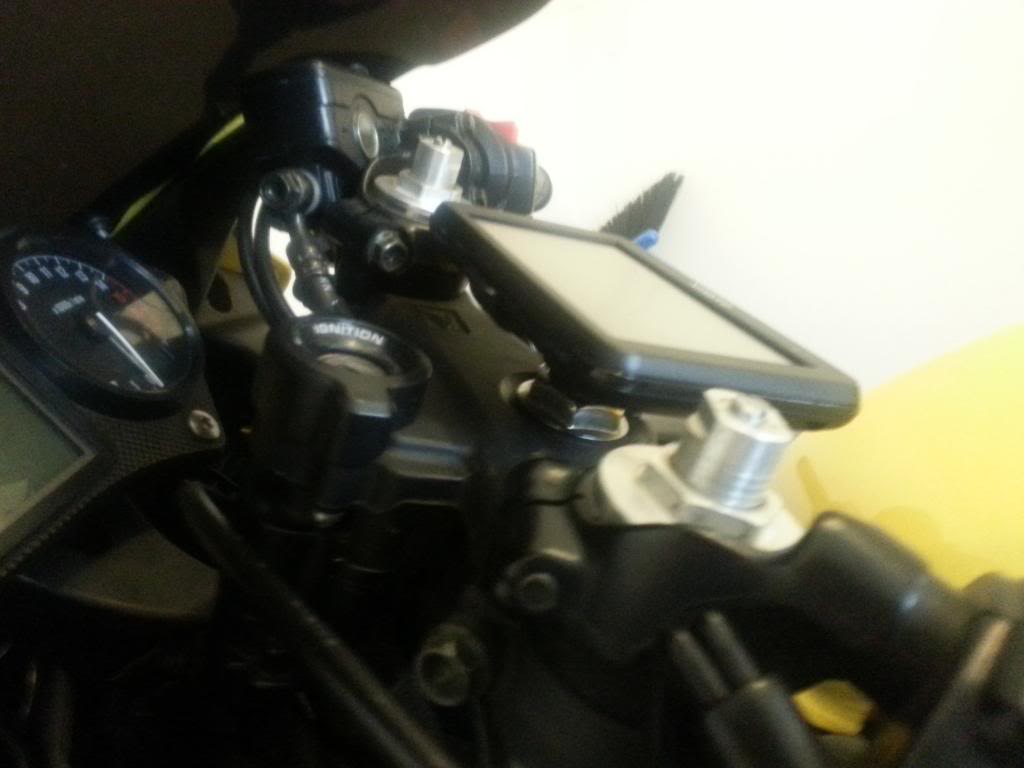
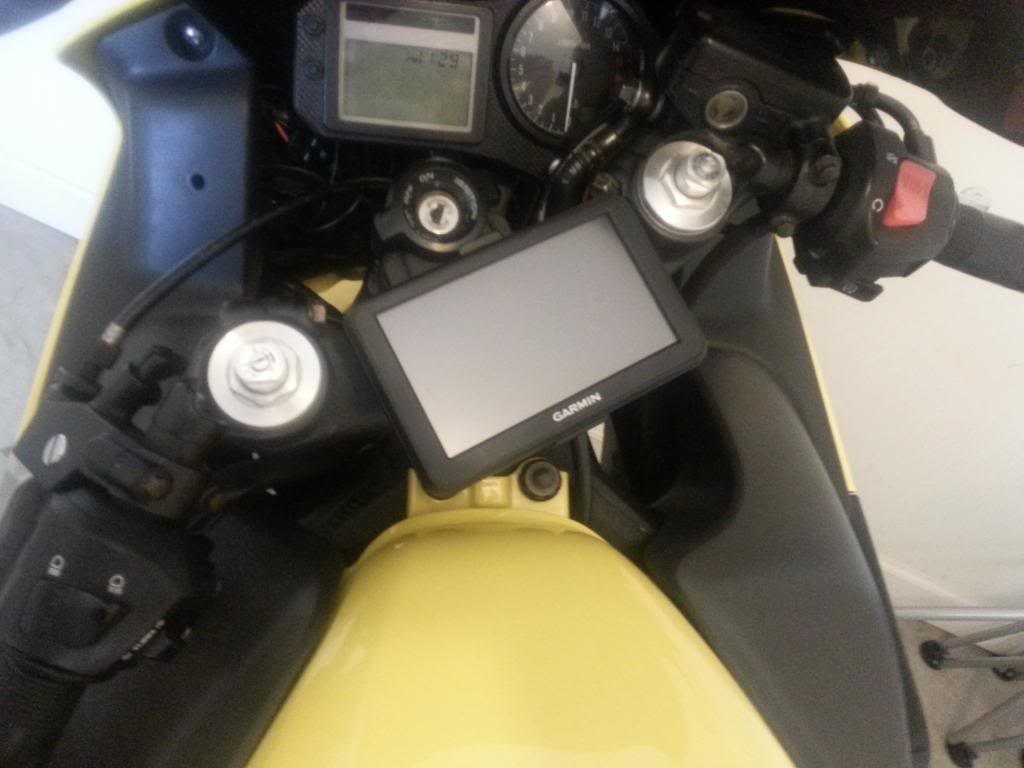
This rubber stopper is TOO BIG. It's one that I had left over because I didn't know what size to get , make sure you get one slightly bigger than the hole and just use a wood chisel and a metal file to fit it to your head-stock. I hope this kind of explains what I did. It was VERY easy, but it just took a little bit of tinkering. ** Notice the screw is all beat to hell, that's because I was working it on a bench grinder so that the GPS had room to fit into the bracket. My screw pressed into the back and it wouldn't snap in, pretty easy fix.***
Paint probably would have looked better, but I don't drive around without my GPS on so I didn't really care, I just didn't want the white liquid nails goo showing.
I'll post this in a DIY section if you guys think it's good.
#18
02-17-2014, 03:53 PM
Welcome Crew Technician
USPS doesn't ship on President's day?? Didn't know that. Yea, I'm gonna be using everything stock on my kit. I'm not into being invisible and confusing to other drivers  No wiring needed. How much should I expect to pay if I have this kit powder coated? I'm not sure if I want to paint it myself or not. I'm having second thoughts.
mine costs about $1 and sits more flush on the handlebars :P
I thought about that after I did it. It was really simple though and I think pictures of the parts and an explanation would probably be enough. Other people over complicated it. I tried to copy another guy's DIY guide then realized he was taking something simple and making it way harder than it needed to be so I simplified his. Basically I just bought a rubber stopper from Lowes and chiseled and file it to where it would almost go into the headstock with some force behind it. I drilled a small hole through it then I lubed it with windex "because I don't want it to stay lubed" and jammed that puppy in there. Then I drilled a hole through the stock garmen mount and put a screw through the mount and the rubber stopper, which should make the rubber stopper even tighter since something is taking up space on the inside of it now. I had to grind the back side of the screw down so the GPS had room to clip in but this might just be my fault for not choosing a good screw. I then used liquid nails to glue the gps bracket/and screw and rubber stopper all together and then I went over the liquid nails with my cousin's black nail polish because that's what was on hand and she was gonna throw it away. I think it turned out great and was dirt cheap. I hate the stupid Ram mounts because they stick up about 7 inches off of the handlebars and are super over -priced. Mine is basically flush, stays dry when I drive in the rain because it's flush, and looks great sitting there. I'll try to get some pics of the mount but I'm not gonna pull it out.
Basically the prep is always the most costly when you talk about paint work. Labor wise, of course there is the cost of the paint itself as well. IF applicable do the prep yourself and save a ton.
No post on P's day.
I am seen very well with my LED lights that came with the kit. Not only that but I have added LED's into my mix. But yea, the lights on those tails hardly make you invisible to cars. Not really confusing either conisdering turns and brake lights HAVE to be certain color by law, but thats a more personal preference thing as far as how they look anyway. I am thinking about taking them out and replacing with a stock-like look one piece integrated tail purely for the look factor however.
Since you have a hugger though I would say go ahead and paint it yourself. You will save yoursefl a lot of money and time. THe piece is rather small and you can layer the hell out of it with paint to protect it. Plus its always down so its not like its a prime piece thats seen very well ya know? Hugger protects from stonechip so you should be all set. Imho.
-Poss
Last edited by PossibleOne; 02-17-2014 at 03:58 PM.
#19
02-17-2014, 04:01 PM

My piece is fiberglass, so they would probably end up just painting it with a gun instead of powder coat, unless they have the same kind of process they use for fiberglass
If you have possibility to cerakote it, it will last forever. It`s a ceramic "paint" that can take extreme abuse, both temperature and mechanical wear and at least here won`t cost that much more no not do it.
#20
02-17-2014, 05:05 PM
Welcome Crew Technician
Powdercoat is always baked on in a large oven, usually in temps around 200c, so only metal parts can be powdercoated.
If you have possibility to cerakote it, it will last forever. It`s a ceramic "paint" that can take extreme abuse, both temperature and mechanical wear and at least here won`t cost that much more no not do it.
If you have possibility to cerakote it, it will last forever. It`s a ceramic "paint" that can take extreme abuse, both temperature and mechanical wear and at least here won`t cost that much more no not do it.

I just wasnt sure if they had another process where they bake paint on fiberglass some how or whatever. Because yea powdercoating is using a material to be painted that must be conductive, due to the charge used in most powder coating processes.
CHeers on the cerakote though, I will have to look into it. Works with plastic too??
Havent heard much about that process here, maybe ceramic paint is costly here, maybe its for specific applications....