When you click on links to various merchants on this site and make a purchase, this can result in this site earning a commission. Affiliate programs and affiliations include, but are not limited to, the eBay Partner Network.
Senior Member & tensioner mod inventor ROTM WINNER FEB 2013
Joined: Sep 2009
Posts: 1,298
Likes: 0
From: Kent, UK
Step 3 isn't in the manual. Most informative. I always wondered why I had that cold turkey feeling after doing the valve timing. Forgot the beer.... damn it!
Thanks Chips. Good work.
Step 3 isn't in the manual. Most informative. I always wondered why I had that cold turkey feeling after doing the valve timing. Forgot the beer.... damn it!
Thanks Chips. Good work.
And here I was thinking somebody was crapping over my thread (got the auto-reminder in my email that somebody posted), had to go back and realize that I always skip step 3. I usually go out riding right after instead.
This write up beats a Haynes manual any day. Trying to set mine and the manual was just confusing the hell out of me! Manual says rotate crank 360 degrees so thats wrong, doesn't say where to start just check X with at point Y.
CBR forum strikes again - i will be adjusting tomorrow but for no i have a smile rather than a frown as I can now get the bike running again. Suspected closed exhaust valve on one cylinder.
one question please (for ignorant me). Looking at the engine as if on the seat which is cyl 1? far left or far right?
I adjusted my valves (they were in need of it pretty badly) and synced my carbs, now I can hear them chattering.
I checked over everything while I was in there and it all looked good, no signs of bad valve springs, lifters, or anything like that, and I made sure that I torqued the lock nuts down to 17 ft lbs like my manual says.
I've checked my oil 3 or 4 times just to make sure it's not low and I'm kinda stumped now, wasn't sure if anyone else has had this problem
I did this today following this thread and the addendum from Mr Chips (which was easier than constantly readjusting the timing) and it really was straight forward once you got used to the feel and the amount of adjustment required. However some ham fisted buffoon had over tightened all the adjusters way past 17 ft/lb so much so that one adjuster on no4 was so tight I left it as I was fearing I'd bust something. I need to make myself an adjuster tool next to make things easier.
I only found 1 x valve where I was able to get the feeler in. The exhausts were that bad that on some I was struggling to get a 0.1mm feeler in not the 0.18mm!
Thanks for the info, it really was a breeze. The bike now starts easier and sounds great when running.
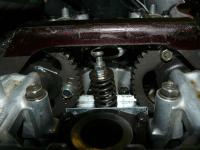
Turn the crankshaft counterclockwise until all the marks are left as in the image below. Then proceed to adjust the clearance of the indicated valves.
https://i.imgur.com/pxqamk6.jpg
Rotate the crankshaft half a turn to the left, so that there are marks like the image below. Then proceed to adjust the clearance of the indicated valves.
Rotate the crankshaft half a turn to the left, so that there are marks like the image below. Then proceed to adjust the clearance of the indicated valves.
Rotate the crankshaft half a turn to the left, so that there are marks like the image below. Then proceed to adjust the clearance of the indicated valves.
Note, on the SC21 the exhaust clearance is 0.16mm and not 0.18mm
P.S.
Rotate left = Rotate counterclockwise.
I have taken the base images from a 2008 cbr1000r tutorial, others from the cbr1000f workshop book, all conveniently modified to make it as easy to understand.
Last edited by soilengreen; Sep 17, 2024 at 12:37 AM.
Hi
Does the CBR 1000 info also apply to the CBR 750 as I cannot find any manual for the Hurricane as it was a Japan only production bike water Cooled so you have the thermostat housing and pipes to remove to get to the Cam Box plus coils and associated throttle cables and breather?


 //i.imgur.com/pxqamk6.jpg


