
How to- Audi light install

okay let start. this is an easy mod. little experience needed.
Supplies needed:
led stripes-eBay - New & used electronics, cars, apparel, collectibles, sporting goods & more at low prices
Rocker Switch--eBay - New & used electronics, cars, apparel, collectibles, sporting goods & more at low prices
Electrical tape/heat shrink(optional)
pliers,wire stripper,knife.
rubbing alcohol
22/2 bell wire
22-10 butt splices
22-10 ends
soldering iron(if you have one)
drill bit size up to 3/8
--------------------------------------------------
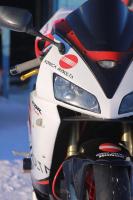
so what i did first was insert the led stripe thru the fairings, and it should go in pretty easy.easier if you insert the the end of the led (not the wire) from inside the tach. then next would be to clean the headlight and make sure they're clean. i use rubbing alcohol, do to both sides. oh and make sure its nice and warm as far as room temperatue. i was in about a 120 degrees shed

nice and warm

Left headlight:

Right headlight

next step is basically fishing the wiring so its nice and clean. i had the wire from the left led fish thru the back of the tach.. and then it meets up with the right led's wire. wire instruction will be shown below. and should be really simple.


during all the splces i used the butt splices, heat shrink them and then on top of that i wrapped it with electrical tape.
So from the headligth to the "'switch box". i fished those wire thru the right ram cover untill it reach the OEM tool kit hold.
yes that is where the rocker switch will be located.. of course you can always have this located somewhere else. i pick it cause it was in arms reach and would stay low profile.

next was getting that wire into the box. i forgot exactly what size drill bit i used, but use one that is about the size of the wires.. prolly 1/4 .
right on top of the key hole for the tool kit, i drill the hole and then fish the wire thru there.
For the rocker switch. I used size 3/8 drill bit and then slowly drill it till it was the size on the rocker switch.. that hole is drill on the tool kit's door.

Next step was to cut about 4' feet of the 22 bell wire. stripe one ends and crimp the ends to it/...

more fishing wire... i fish that wire thru the subframe thru the side fllaps till it got to the tool box. then fish that into the first small hole you drill to insert the wire from the led's.
Almost finish.. next is all the connections that is need to be on the rocker switch. follow the diagram . the switch has three prongs. 2 silver and one that is gold. The gold is your neutral..so the leds came with red and black. black is neutral and red is your hot . connect the neutral from the battery to the neutral coming form the leds, and then have a jumper form that to the golden screw. the silver prong next to the gold is your 2nd HOT. connect the hot coming from the two leds stripe to that terminal. next silver terminal is your main hot. connect the hot from the battery to that. All of the connections made to the rocker switch was solder in, so if u have a solder gun, its deff make it easier.
...thats pretty much it now. tuck everything in and make it look clean. connect it to the battery and it should work !!
Supplies needed:
led stripes-eBay - New & used electronics, cars, apparel, collectibles, sporting goods & more at low prices
Rocker Switch--eBay - New & used electronics, cars, apparel, collectibles, sporting goods & more at low prices
Electrical tape/heat shrink(optional)
pliers,wire stripper,knife.
rubbing alcohol
22/2 bell wire
22-10 butt splices
22-10 ends
soldering iron(if you have one)
drill bit size up to 3/8
--------------------------------------------------
so what i did first was insert the led stripe thru the fairings, and it should go in pretty easy.easier if you insert the the end of the led (not the wire) from inside the tach. then next would be to clean the headlight and make sure they're clean. i use rubbing alcohol, do to both sides. oh and make sure its nice and warm as far as room temperatue. i was in about a 120 degrees shed
nice and warm
Left headlight:
Right headlight
next step is basically fishing the wiring so its nice and clean. i had the wire from the left led fish thru the back of the tach.. and then it meets up with the right led's wire. wire instruction will be shown below. and should be really simple.
during all the splces i used the butt splices, heat shrink them and then on top of that i wrapped it with electrical tape.
So from the headligth to the "'switch box". i fished those wire thru the right ram cover untill it reach the OEM tool kit hold.
yes that is where the rocker switch will be located.. of course you can always have this located somewhere else. i pick it cause it was in arms reach and would stay low profile.
next was getting that wire into the box. i forgot exactly what size drill bit i used, but use one that is about the size of the wires.. prolly 1/4 .
right on top of the key hole for the tool kit, i drill the hole and then fish the wire thru there.
For the rocker switch. I used size 3/8 drill bit and then slowly drill it till it was the size on the rocker switch.. that hole is drill on the tool kit's door.
Next step was to cut about 4' feet of the 22 bell wire. stripe one ends and crimp the ends to it/...
more fishing wire... i fish that wire thru the subframe thru the side fllaps till it got to the tool box. then fish that into the first small hole you drill to insert the wire from the led's.
Almost finish.. next is all the connections that is need to be on the rocker switch. follow the diagram . the switch has three prongs. 2 silver and one that is gold. The gold is your neutral..so the leds came with red and black. black is neutral and red is your hot . connect the neutral from the battery to the neutral coming form the leds, and then have a jumper form that to the golden screw. the silver prong next to the gold is your 2nd HOT. connect the hot coming from the two leds stripe to that terminal. next silver terminal is your main hot. connect the hot from the battery to that. All of the connections made to the rocker switch was solder in, so if u have a solder gun, its deff make it easier.
...thats pretty much it now. tuck everything in and make it look clean. connect it to the battery and it should work !!


sorry last 2 pics of the finish work was on my phone's camera,meanwhile all other pics was done on my old man's "high" quality Canon.
Hope ya enjoy this how to, leave a comment if you have any questions.
Member
Joined: Jan 2012
Posts: 74
Likes: 0
From: Bellevue, WA
This is cool! Hopefully they have a white version.
One question about connecting leads to the battery..can I have other prongs going to the battery as well without issues? Many of the HID kits I've seen (if not all of them) require that you connect directly to the battery. Would it be an electrical no-no to have numerous leads heading towards the battery?
One question about connecting leads to the battery..can I have other prongs going to the battery as well without issues? Many of the HID kits I've seen (if not all of them) require that you connect directly to the battery. Would it be an electrical no-no to have numerous leads heading towards the battery?

Super Moderator and Official Welcome Crew Yeti
Joined: Jun 2005
Posts: 2,066
Likes: 6
From: Souf Cackilack
i recommend having as few connections at the battery terminal as possible, and collect the connections into a single line away from the battery connection. it's not that electricity won't work otherwise; just good practice. and make sure your connections are fused.
This is cool! Hopefully they have a white version.
One question about connecting leads to the battery..can I have other prongs going to the battery as well without issues? Many of the HID kits I've seen (if not all of them) require that you connect directly to the battery. Would it be an electrical no-no to have numerous leads heading towards the battery?
One question about connecting leads to the battery..can I have other prongs going to the battery as well without issues? Many of the HID kits I've seen (if not all of them) require that you connect directly to the battery. Would it be an electrical no-no to have numerous leads heading towards the battery?
oh and since having all of those terminal to the battery (they act like spacers), the screw isnt long enough to reach the nut anymore so what i did what replace the battery's screws with ones that are just a bit longer.
Last edited by nuttynu; Jan 30, 2012 at 11:07 PM. Reason: edits
Member
Joined: Jan 2012
Posts: 74
Likes: 0
From: Bellevue, WA
Thank you!
Super Moderator and Official Welcome Crew Yeti
Joined: Jun 2005
Posts: 2,066
Likes: 6
From: Souf Cackilack
This makes sense, less leads and ways to short circuit, the better. I was thinking of doing T connections using those small clamps to the main lines leading to the battery instead of having numerous lines running to the battery. What do you mean by the connections being "fused"? I'm assuming electrical taped?
Thank you!
Thank you!
space is always an issue in the motorcycle battery box, but my strategy for adding multiple circuits is to install a small fuse panel off the switched leads going to the factory fuse box. makes a clean and easy place to integrate the new connections.

having a multitude of connectors on the same post can leave connection problems if things aren't tight -- which can produce arcs, sparks, and broken circuits.
Last edited by regener8ed; Jan 31, 2012 at 02:15 PM.

yes i believe so , but its only going to be on when its "show" such as it being park . just to show off looks. and with my 5000k hid's you dont really notice the red at all. ill see if i can get pics of that.