

PCV and Auto Tune install on 2009 CBR1000RR.


Thread Starter
|
Member
Joined: Nov 2007
Posts: 32
Likes: 0
Ok. So seeing I was told by Boner (from a different site) that I was �not mechanically inclined enough� to complete the Dyno Jet PCV and Auto Tune install on my 2009 CBR1000RR I decided to photograph the install and give the real step by step instruction.
So after not being too pleased with Dyno Jets description and instructions this is what I did.
Step 1.
Remove the seat by pulling the molding of each side and using a large Philips tip screw driver to remove the screws on both sides.


Step 2.
Remove the four 5mm screws from the tank cover. Two are in the rear under the seat and two are up front by the bars.


Step 3.
Next remove the two forward screws on the tank. This will allow you to rotate the tank up.


Step 4.
Now you can disconnect the brown and black electrical connections and the fuel line. NOTE, The fuel line has a piece that locks it in place. Remove that piece and then you can squeeze the little blue locking tabs down and remove the fuel line. Then you can remove the two rear screws on the tank and completely remove it. The first photo is of the locking piece.


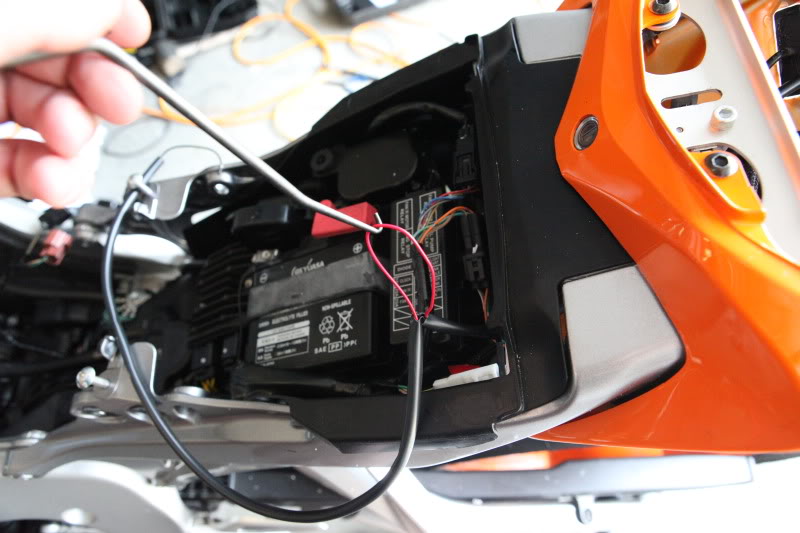
Step 5.
So in the last picture you can see what is under the tank. Installing the PCV is pretty simple. Just run the wires down the left side of the bike and connect the PCV connections to the number 1 and number 4 injectors. Then complete the connection on the lower throttle bodies.


Ok that is all for the PCV. Now for the fun part! The Auto tune. Now don�t let Dyno Jet trick you. This is not a TRUE universal fit product. You will need to drill holes, cut wires and weld bungs for O2 sensors. So here we go.
Step 1.
Ok so the first thing you are going to need to do is see if you need to drill and weld. This is simple. Just look at your exhaust and see if it has an O2 bung already. If it does then see if it is the right size. If it is not the right size follow me!
Step 2.
With the exhaust on the bike find the best place for the O2 sensor. You will need a permanent marker. Take the included bung WITH THE O2 sensor in it and find a good spot for it. Once you find a spot that is out of the way and won�t have outside heat affecting the sensor trace the location.


Step 3.
Remove the exhaust that you just traced the location on and measure you trace. Then measure the supplied bung and make sure the circles are close. Once that is done you can use a punch the put a small dent in the center of the circle so your drill bit doesn�t walk all over the place. Then drill your hole. I used a step bit and drilled a � inch hole. Make sure you take the burrs off your hole so the bung with sit right. I used my dremel with a regular sanding wheel. Then check you fit.


Step 4.
Welding is always fun. I am more of an arc welder but that would have just burned a hole right though the mid pipe. So I used a tig welder. I used the following settings. 1/16th tungsten electrode, 120 amps, argon gas with 3/32 filler. The mid pipe is mild steel so sorry about the look of the weld.
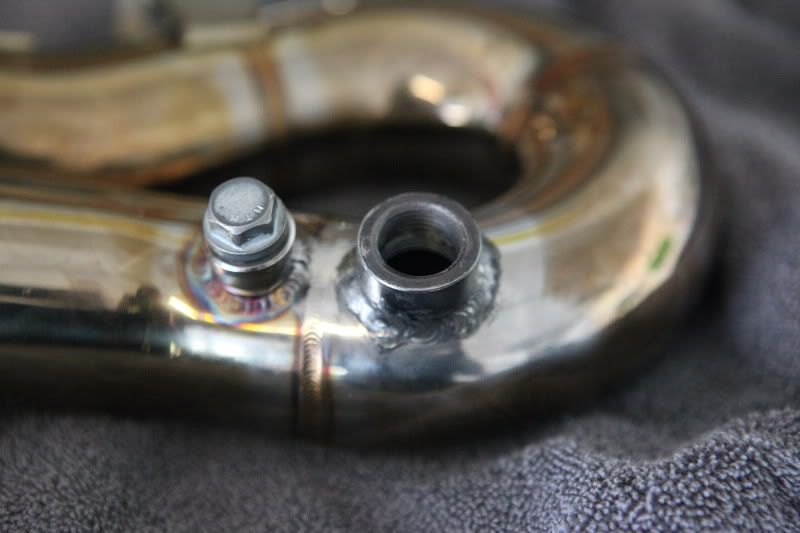

Ok back to work!
Step 5.
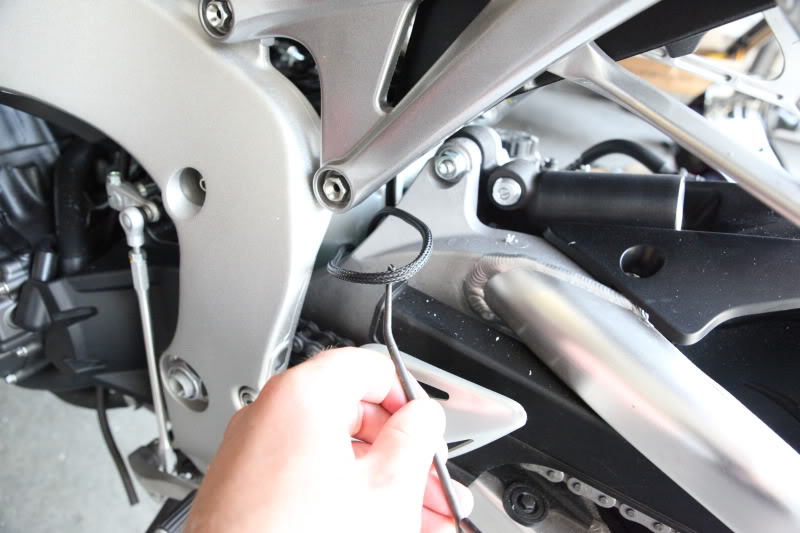
Ok so now you can place the auto tune in your tail section. Don�t mind mine I put the hot bodies undertail on my bike. I placed the auto tune on the right side and ran the red and black wire down the left side of the bike. The rid wire is extra long and needs to be cut. So rather than just stripping the entire plastic sleeve off, I just cut a small hole in it and pulled the red wire through using the spring puller the came with the exhaust. This tool came in very handy by the way. Clipped and stripped the red wire gets spliced into the brown and white taillight wire. The black wire gets get the red eyelet crimped on it and then ran down to the bikes ground bolt.


Step 6.
Now you can connect the wire with the O2 connection and the six stripped wires to the O2 sensor in your exhaust. The wire then gets ran up the back side to the engine all the way to the auto tune module. This was the hardest part and the wires just barely made it. I used the spring puller once again to get the wire through some of those hard to reach places. I drilled a hole on the RIGHT side of the plastic going into the undertail because there is no hole over there and I didn�t want to run the wires where the seat sits. It is a � hole and the wires fit perfectly. The stripped ends of the wires where then plugged into the auto module. You will want to take your very small flat tip screw driver and loosen and the screws. Then carefully punch a hole in each one of the openings for the wires. This will put a hole in the fabric used to help seal the unit. The wires and connections are color for color. The photo�s didn�t come out all that well, sorry.


Step 7.
Almost done. Now take the can connection cable and plug the auto tune into the PCV. Make sure you also plug the supplied black plastic �CAN Termination� plug into the open port on the auto tune module.

And that is it people. Now you just have to put everything back together. So as you can see this is not a simple plug and play module like the PCV. It is not hard at all. If you have no welding skills just do everything but the weld. Have a shop do it for you. Seeing you will have already measure drilled and check they should not charge you more the 10 bucks to weld the bung.
So Boner. How mechanically inclined am I.
So after not being too pleased with Dyno Jets description and instructions this is what I did.
Step 1.
Remove the seat by pulling the molding of each side and using a large Philips tip screw driver to remove the screws on both sides.
Step 2.
Remove the four 5mm screws from the tank cover. Two are in the rear under the seat and two are up front by the bars.
Step 3.
Next remove the two forward screws on the tank. This will allow you to rotate the tank up.
Step 4.
Now you can disconnect the brown and black electrical connections and the fuel line. NOTE, The fuel line has a piece that locks it in place. Remove that piece and then you can squeeze the little blue locking tabs down and remove the fuel line. Then you can remove the two rear screws on the tank and completely remove it. The first photo is of the locking piece.
Step 5.
So in the last picture you can see what is under the tank. Installing the PCV is pretty simple. Just run the wires down the left side of the bike and connect the PCV connections to the number 1 and number 4 injectors. Then complete the connection on the lower throttle bodies.
Ok that is all for the PCV. Now for the fun part! The Auto tune. Now don�t let Dyno Jet trick you. This is not a TRUE universal fit product. You will need to drill holes, cut wires and weld bungs for O2 sensors. So here we go.
Step 1.
Ok so the first thing you are going to need to do is see if you need to drill and weld. This is simple. Just look at your exhaust and see if it has an O2 bung already. If it does then see if it is the right size. If it is not the right size follow me!
Step 2.
With the exhaust on the bike find the best place for the O2 sensor. You will need a permanent marker. Take the included bung WITH THE O2 sensor in it and find a good spot for it. Once you find a spot that is out of the way and won�t have outside heat affecting the sensor trace the location.
Step 3.
Remove the exhaust that you just traced the location on and measure you trace. Then measure the supplied bung and make sure the circles are close. Once that is done you can use a punch the put a small dent in the center of the circle so your drill bit doesn�t walk all over the place. Then drill your hole. I used a step bit and drilled a � inch hole. Make sure you take the burrs off your hole so the bung with sit right. I used my dremel with a regular sanding wheel. Then check you fit.
Step 4.
Welding is always fun. I am more of an arc welder but that would have just burned a hole right though the mid pipe. So I used a tig welder. I used the following settings. 1/16th tungsten electrode, 120 amps, argon gas with 3/32 filler. The mid pipe is mild steel so sorry about the look of the weld.
Ok back to work!
Step 5.
Ok so now you can place the auto tune in your tail section. Don�t mind mine I put the hot bodies undertail on my bike. I placed the auto tune on the right side and ran the red and black wire down the left side of the bike. The rid wire is extra long and needs to be cut. So rather than just stripping the entire plastic sleeve off, I just cut a small hole in it and pulled the red wire through using the spring puller the came with the exhaust. This tool came in very handy by the way. Clipped and stripped the red wire gets spliced into the brown and white taillight wire. The black wire gets get the red eyelet crimped on it and then ran down to the bikes ground bolt.
Step 6.
Now you can connect the wire with the O2 connection and the six stripped wires to the O2 sensor in your exhaust. The wire then gets ran up the back side to the engine all the way to the auto tune module. This was the hardest part and the wires just barely made it. I used the spring puller once again to get the wire through some of those hard to reach places. I drilled a hole on the RIGHT side of the plastic going into the undertail because there is no hole over there and I didn�t want to run the wires where the seat sits. It is a � hole and the wires fit perfectly. The stripped ends of the wires where then plugged into the auto module. You will want to take your very small flat tip screw driver and loosen and the screws. Then carefully punch a hole in each one of the openings for the wires. This will put a hole in the fabric used to help seal the unit. The wires and connections are color for color. The photo�s didn�t come out all that well, sorry.
Step 7.
Almost done. Now take the can connection cable and plug the auto tune into the PCV. Make sure you also plug the supplied black plastic �CAN Termination� plug into the open port on the auto tune module.
And that is it people. Now you just have to put everything back together. So as you can see this is not a simple plug and play module like the PCV. It is not hard at all. If you have no welding skills just do everything but the weld. Have a shop do it for you. Seeing you will have already measure drilled and check they should not charge you more the 10 bucks to weld the bung.
So Boner. How mechanically inclined am I.
Thread Starter
|
Member
Joined: Nov 2007
Posts: 32
Likes: 0
Ya If they can move it, that would work.

Thread
Thread Starter
Forum
Replies
Last Post