
Summer Bike Overhaul Project


#32
 05-21-2011, 01:13 AM

Yesterday and today have been a lot of minor, time consuming tasks.
Yesterday I soaked all the metal bits I've taken off in kerosene, soaked my chain for a bit, and got my tires taken off.
Today I finished cleaning around the swingarm and back of the engine (finding an allen key I'd lost probably 8 months ago when I was working on my bike) then finished wrapping all the electrics. I stripped the paint off of my wheels (mostly), destroyed my test sheet trying to cure it on the BBQ, and blasted a new sheet. I don't think I'm going to worry about curing the paint and I'll just hope for the best. I sanded my headlights down, finishing with a rubbing compound and polish. They look a lot better now.
Still no fairings, but I'm a long way from needing them anyway. I'm hoping to order all my bits this weekend or Monday. If I can strip the paint off the subframe and the bike this weekend and blast primer on the wheels and frame I'll be in good shape. If I'm really good I'll get my undertail cut, sand down and primer the headers too.
Any thoughts on painting the sprocket? Would it affect the operation of the chain at all, or should it be OK?
#33
05-21-2011, 09:44 AM
#34
05-21-2011, 11:15 AM
#35
05-21-2011, 01:57 PM
My concern about the primer is two fold.
1. The thicker the paint, the more it will insulate the header pipes. This will cause gases further down the line to be hotter.
2. The thicker the paint is the greater the chance of it baking off, leaving the header pipes exposed to the elements.
These things may be negligable, and you might not have any problems, but I really see no reason to use the primer and find out. If you are worried about it chipping, I would suggest you test the paint. Once the full 7 day curing process has elapsed this stuff gets really hard!
#36
05-23-2011, 01:20 PM
Sounds good, F3 
Over the weekend I:
Stripped and primed both wheels
Re-sanded and primed the gas tank.
Stripped and primed the sub-frame.
Started trying to strip the headers.
Completely destroyed my undertail project - Metal shears were useless, and my Dremel is even more useless. I'll just buy an undertail.
I also got a wicked sunburn from being outside for about 14 hours over the last two days.
Today is a school / house cleaning kind of day, so I probably won't do much with the bike aside from try to strip a little more header stuff. Tomorrow I may try to begin stripping the paint from the frame, because I want to have everything ready to paint before I start painting anything. By waiting, I can make the painting area a little more sterile to try and mitigate any crud getting in my paint.
Pics attached of paint peeling off the wheel and my wheel painting setup (there's twine attached to a bungee that you can see).
#37
05-26-2011, 01:13 PM
A couple minor updates.
I've been busy with school lately, so not too much has gotten done. I've spent the last 2 1/2 days trying to remove the coating from my headers so that the paint can stick to bare steel. After trying about 5 things that didn't work, I found that wire brush attachments are awesome for removing paint generally. Both brushes were less than $10 total, and they've saved me -hours- of hand sanding and probably a lot of money in sand paper also. I wish I would have had them for the subframe, tank, and wheels.
LasVegasHarley helped me out with some stuck bolts in my rear sets. It was mostly a minor problem where the heel guard wasn't removable, but if I'm going to strip the bike down to the engine I'm certainly not going to put f-ed up bolts back on the bike. So, mad props to LVH.
I still haven't gotten to the frame, but I hope to this weekend. I have about 8-10 hours worth of paper writing that I have to do, but otherwise I'd like to strip the paint from my frame and have it primed by the end of this weekend. After the frame, only the rear sets and sprocket require prep, and I think the sprocket is going sans primer.
I may have decided to paint my wheels white, instead of red. that's how the Playboy race bike was set up, and there is a certain cleanness about white wheels. Plus, red is more of an accessory color in my scheme, and I'm afraid that putting red wheels on the bike overemphasizes that color near the bottom. Instead, I may paint the brake calipers red, and the sprocket red, and throw on some red rim tape to give the red some presence down low without being overpowering.
Any thoughts? I've attached some pics, and here are some SFW and NSFW snaps from the Playboy sponsorship debut.
#38
05-27-2011, 11:21 PM
I got a lot done today, with the help of a buddy of mine.
Today I:
Stripped apart my footpegs and passenger footpegs.
Stripped apart my kickstand.
Stripped apart my gauge holder.
Stripped the paint off all of those, plus my sprocket holder, and scuffed up my sprocket and chain guard.
Primed everything except the sprocket and the actual foot pegs.
Blew out all the carbon buildup inside my headers after the overnight soak in Easy Off. All the black stuff you see on the ground in the first picture came from inside the headers.
Also, my fairings came today.
I ordered from CBRFairings.com on 5/4, they shipped 5/17, and I received them 5/27.
Communication was excellent. There was one small hiccup with my custom graphic, but they quickly resolved that and everything was fine afterwards.
Their website tracking system is adequate, but nothing special.
The last attached picture is the box. It was approximately 38" x 20" x 28".
These fairings came with plenty of heatwrap. I can't be careless cutting it, but I don't think I'll run short.
My roomie works at a packing store and said that the packing was substandard. That said, nothing was broken or scratched or harmed at all when I got into the box.
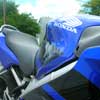
I took the nose piece out first, as the custom graphic was going to make or break the whole order.

I'm very, very happy. I've had an aftermarket nose piece of unknown origin and an OEM nose piece, and this feels more substantial than both. The inside had all the connectors I would expect.

The side fairings were also of excellent quality, both front and back.


I'm unsure of whether the frame slider looking hole is actually in the correct place. I don't think it is, but it's not cut out on the front, so whatever I suppose. It'll be covered by heat shielding anyway.
I didn't take individual pictures from then, but did take a picture of the whole set together.

The whole set is darker than I thought it would be (more black than white) but I'm not upset - it looks great and the tank and white wheels will lighten it up some. I think going from the yellow to the red, and the gold to the gray, was a good choice but that's what made it darker.
There are two or three minor runs, and one noticeable discoloration on the rear fairing where the rear seat sits (the lip there) but nothing horrible. I can either touch it up or leave it.
I can't speak to how well they fit yet - I'm about four weeks away from putting my fairings on - but I'm encouraged so far.
Today I:
Stripped apart my footpegs and passenger footpegs.
Stripped apart my kickstand.
Stripped apart my gauge holder.
Stripped the paint off all of those, plus my sprocket holder, and scuffed up my sprocket and chain guard.
Primed everything except the sprocket and the actual foot pegs.
Blew out all the carbon buildup inside my headers after the overnight soak in Easy Off. All the black stuff you see on the ground in the first picture came from inside the headers.
Also, my fairings came today.
I ordered from CBRFairings.com on 5/4, they shipped 5/17, and I received them 5/27.
Communication was excellent. There was one small hiccup with my custom graphic, but they quickly resolved that and everything was fine afterwards.
Their website tracking system is adequate, but nothing special.
The last attached picture is the box. It was approximately 38" x 20" x 28".
These fairings came with plenty of heatwrap. I can't be careless cutting it, but I don't think I'll run short.
My roomie works at a packing store and said that the packing was substandard. That said, nothing was broken or scratched or harmed at all when I got into the box.
I took the nose piece out first, as the custom graphic was going to make or break the whole order.
I'm very, very happy. I've had an aftermarket nose piece of unknown origin and an OEM nose piece, and this feels more substantial than both. The inside had all the connectors I would expect.
The side fairings were also of excellent quality, both front and back.
I'm unsure of whether the frame slider looking hole is actually in the correct place. I don't think it is, but it's not cut out on the front, so whatever I suppose. It'll be covered by heat shielding anyway.
I didn't take individual pictures from then, but did take a picture of the whole set together.
The whole set is darker than I thought it would be (more black than white) but I'm not upset - it looks great and the tank and white wheels will lighten it up some. I think going from the yellow to the red, and the gold to the gray, was a good choice but that's what made it darker.
There are two or three minor runs, and one noticeable discoloration on the rear fairing where the rear seat sits (the lip there) but nothing horrible. I can either touch it up or leave it.
I can't speak to how well they fit yet - I'm about four weeks away from putting my fairings on - but I'm encouraged so far.
Last edited by vegas_rebel; 05-28-2011 at 10:56 AM.
#39
05-28-2011, 06:49 AM
#40
05-29-2011, 08:52 PM
Thanks, Turbulenz!
Today I went a long way toward putting my bike back together instead of taking it apart. I got the frame stripped and primed.
Next week school starts again, so I won't be able to spend quite so much time working on it. However, that works out well because of the drying time required for the paint - 7 days to dry between priming and color, and between color and clear. So, it'll be two full weeks before all my parts are painted and ready to put back on the bike, which means I have time for my parts to come in and to reassemble what makes sense as I can.
There are a few things yet I have to do or fabricate. My engine covers need to come off, but I'm going to wait until next week when I paint the frame to do that. I need to cut the grills for my side fairings - I'll do that and prime those up early next week.
Also on deck for next week is painting my headers, sprocket, and wheels. Throughout the week, I hope to tear apart my brake calipers for an overhaul and to prime the outside of the brakes. I'll also be ordering the remainder of my mods. So far I've ordered my JISU exhaust and mailed my gauge to bluegauges.com to get lit up. I ordered an undertail, but realized too late that it wouldn't fit my bike, cancelled my order and am trying to decide between the e-bay undertails. My brake light is tinted, and I'd rather get an undertail with new lights and lenses than one that reuses my own brake light.
By next weekend, I hope to have a coat of paint on everything except those engine covers.
Fixing my bike makes me want to get some new gear to match it. I could really use a tracksuit for weekend excursions, but I don't think I can justify springing for it so soon after what these mods are going to cost. So ... maybe toward fall. I ride year round(ish) anyway.
At this point, I'm debating -really- frivolous mods. Like using a paint pen to color in the grooves of my tire. Thoughts on painted tires? Also, does anyone know of a good guide to replacing a throttle cable? I have a Haynes and a factory manual, but I can't seem to wrap my head around the cable attachment near the engine.
Pics attached.