
At Home Powder Coating A Sucess


So I had been kicking around the idea of buying an at home powder coating kit for a while now. I read reviews and watched videos on the Craftsman Kit, the Eastwood Hot Coat Kit and the Harbor Freight Kit. Sometimes I drive myself crazy over analyzing and doing my research, but finally I pulled the trigger and treated myself for fathers day to The Harbor Freight Chicago Brand Powder Coating Kit. Let me just Say I couldn't be happier and it's probably the best new addition to my garage in a long time.
To get myself up and running I spent Just under $100. The Kit was $55 after using a 20% off coupon, matte black powder was $5 for a pound, A cheap toaster oven from Walmart ran me $20, and a large spray bottle of orange degreaser was $8. With this kit you will need a source of compressed air, but only need something capable of putting out 25psi
Most of what I plan on coating is small so I made myself a small booth out of a cardboard box. This just lets me contain the powder so it doesn't get all over the garage, and gives me a place to hang the pieces being coated.

Prior to coating you need to make sure all your pieces are free of paint, grease, oils, or road debris. That's what I used the orange degreaser for.

All you do is fill the gun with your choice of powder, hook up your air, plug the unit into the wall and attach your ground cable to the part. There is a foot pedal that negatively charges the part to be coated. The gun has an electrode that positively charges the powder as it leaves the gun. Step on the foot pedal and pull the trigger on the gun and spray powder like you were spray painting.
The powder needs to cure at 400 degrees for about 25mins or whatever the powder says on the can. For me a toaster oven was perfect. NOTE: you can not use a gas oven or anything that you plan on preparing food in again. The curing process lets off fumes that the gas can ignite and can poision food if it was to be prepared in it after powder coating.

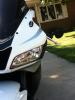
Bake it and in less than half an hour you have yourself a nice new powder coated part. Here's my gas cap done and installed. It was the factory silver color only a few minutes before this.

Just thought I'd share my extremely positive experience with at home powder coating for anyone like me who is debating back and forth about getting one, trust me it is SOOOOO worth it. I'm going to keep looking on craigslist for a cheap used electric kitchen oven so I can do larger parts.
After doing a few parts I told my cousin about it and he wished I had told him sooner. He paid over $100 to have two small brackets for a harley sissy bar powder coated black. I have coated my rear sets, gas cap, and almost every bolt I can take off and coat for under $100 and still have plenty of powder left over to hook up some of my buddies and all for under $100.
To get myself up and running I spent Just under $100. The Kit was $55 after using a 20% off coupon, matte black powder was $5 for a pound, A cheap toaster oven from Walmart ran me $20, and a large spray bottle of orange degreaser was $8. With this kit you will need a source of compressed air, but only need something capable of putting out 25psi
Most of what I plan on coating is small so I made myself a small booth out of a cardboard box. This just lets me contain the powder so it doesn't get all over the garage, and gives me a place to hang the pieces being coated.
Prior to coating you need to make sure all your pieces are free of paint, grease, oils, or road debris. That's what I used the orange degreaser for.
All you do is fill the gun with your choice of powder, hook up your air, plug the unit into the wall and attach your ground cable to the part. There is a foot pedal that negatively charges the part to be coated. The gun has an electrode that positively charges the powder as it leaves the gun. Step on the foot pedal and pull the trigger on the gun and spray powder like you were spray painting.
The powder needs to cure at 400 degrees for about 25mins or whatever the powder says on the can. For me a toaster oven was perfect. NOTE: you can not use a gas oven or anything that you plan on preparing food in again. The curing process lets off fumes that the gas can ignite and can poision food if it was to be prepared in it after powder coating.
Bake it and in less than half an hour you have yourself a nice new powder coated part. Here's my gas cap done and installed. It was the factory silver color only a few minutes before this.
Just thought I'd share my extremely positive experience with at home powder coating for anyone like me who is debating back and forth about getting one, trust me it is SOOOOO worth it. I'm going to keep looking on craigslist for a cheap used electric kitchen oven so I can do larger parts.
After doing a few parts I told my cousin about it and he wished I had told him sooner. He paid over $100 to have two small brackets for a harley sissy bar powder coated black. I have coated my rear sets, gas cap, and almost every bolt I can take off and coat for under $100 and still have plenty of powder left over to hook up some of my buddies and all for under $100.

It's really worth it man. I'm kind of a tight *** when it comes to my money but I would gladly shell out the cash again. It's really satisfying to see the end result and a lot of fun too.


Senior Member
Joined: Mar 2009
Posts: 901
Likes: 1
From: Baltimore Maryland
Powder coating is def the way to go. My brother got the Craftsman Gun ($50) and it's sort of falling apart with several plastic parts cracking on it. Still fuctional though.
The KEY to good PC is preparation. He had access to a sandblaster at work which cleaned up parts with ease. But hell they sell them at habor freight too.
lets see some pics of the finished product!
The KEY to good PC is preparation. He had access to a sandblaster at work which cleaned up parts with ease. But hell they sell them at habor freight too.
lets see some pics of the finished product!

Powder coating is def the way to go. My brother got the Craftsman Gun ($50) and it's sort of falling apart with several plastic parts cracking on it. Still functional though.
The KEY to good PC is preparation. He had access to a sandblaster at work which cleaned up parts with ease. But hell they sell them at harbor freight too.
lets see some pics of the finished product!
The KEY to good PC is preparation. He had access to a sandblaster at work which cleaned up parts with ease. But hell they sell them at harbor freight too.
lets see some pics of the finished product!
Just like paint your end product is all about the preparation. In some cases the prep might be more than paint since you need to get it to bear metal but the end product is in my opinion much better than paint and almost dummy proof on application.
The Gas Cap I posted up is the only end product picture I have right now. Ill take more and get them up.
Last edited by zimdbw74; Jun 19, 2012 at 10:14 AM.

Junior Member
Joined: Jun 2012
Posts: 5
Likes: 0
This is amazing, great work! Just curious for those of us without air tools, what method of spraying did you use (compressed air)? Does the kit require an air compressor or are there canisters that can be attached? 25psi is nothing, I know HF has those small pancake air compressors for dirt cheap.