
Fairing repair
#1
 08-09-2010, 11:35 AM

*Admin - I posted this in the General tech section as well, cause it probably would help more than F2 owners. Feel free to move/delete/whatever you deem fit*
Ok - before starting this project, I did a lot of research on ABS/Urethane fairing repair - youtube, about 6 motorcycle forums, read some bodywork books, and asked my local auto body supply house guys what they recommended.
What I found is that there's no universal method/product for trying to repair fairings, that diff manufacturer's fairings are constructed differently, and that what some people call "done" is what I still call half-finished.
To that point - I wasn't ready to trash the OEM fairings on my F2 before giving it a go on my own.
*disclaimer - I'm no bodywork guy - I'm doing the best I can, if anyone has constructive criticism, please lemme know*
Phase 1 - Damage Assessment
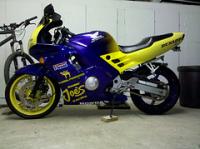
Prev. owner laid the bike down - relatively low speed from what I can tell. some other previous owner had painted the bike up as a Smokin Joe replica, and the paintwork was very well done. (possibly before the F3 SJR was even released - who knows) I'm a fan of that paintscheme, so I'm going to try and save it. Well - the OEM fairings have a little flex to them - which is a bonus, I suppose, since they didn't completely shatter. The right side lower was ground all the way through to the case where the pulse generator cover is, and some scrapes/scratching here and there. The access cover took a lot of it, and I'm still working on it to try and get it saved as well. The upper fairing was cracked in several places, and missing 2 large chunks.


Phase 2 - Prep
You start out this process by trimming away the edges of the ground-down parts til you have almost full-thickness edges - I used a dremel tool for this. Also find all of the cracks, and drill a hole at the ends to keep the cracks from running. Use the dremel again and cut a groove along all of the running cracks to give some more raw surface area for the plastic-repair material to bond to.


Along the way - you can see I'm using 80-grit sandpaper to rough up the surface to give the plastic repair something to bite into. FYI - there's a ton of sanding involved, so if you're not a fan of sanding - just stop reading now :-)
Now that you have your grooves cut, and all the plastic jigsawed back in line, you have to come up with something to fill the gaps and holes - Bondo is NOT what you want for this. I used a product a local body shop supply company recommended called Evercoat Maxim 813 adhesive. This is the stuff body shops use to bond new outer door skins and bed sides onto cars/trucks instead of spot welding these days - so it's pretty dang strong. It bonds with the ABS somehow. It also sets up in about 15 minutes, is roughly sandable in an hour or so, and fully cured in around 8 hours. It has a slight amount of flex when cured, so it seems to be pretty well suited for our semi-rigid fairings.

It also is a 2part epoxy - but both parts are contained in the 1 tube, and it loads up in a standard caulk gun - super easy to use & mix. It did cost about $35 for the tube - but I didn't use much of it in all my repair.
Next you need to give that stuff something to adhere to in the sections where material is missing. I used screen door mesh - local hardware store had a box of screen door repair panels that were roughly 4" square and were perfect for this. The mesh is metal, so it is flexible, and will hold a basic contour. I used packing tape to tape the mesh in from the back side of the panels.


Phase 3 - Goop
I mixed the epoxy in workable batches and laid it into each panel, until I had enough of it built up to be thicker than the surrounding bodywork. I've found over the years, epoxies adhere well to whatever you stick them to - but they don't always like being adhered to themselves sometime if you have to reapply - so build it up, sand it down.

You can see where the epoxy seeped through the mesh and cured into it - this will strengthen the repair a lot.

Phase 4 - Sand, and Sand, and Sand, then Sand some more...
After everything sets up - you can start rough sanding - I used a DA sander on my compressor on the lower. That wasn't an option on the upper. I used a sanding drum on my dremel to get down close to a flush surface, and then finished by hand.


Once you have the panels flush sanded, time for some good ole body filler to fill in any dips or pinholes. Yes - NOW you can use Bondo. Contrary to the mini-trucking crowd's beliefs, body filler is for minor surface smoothing - not molding new body panels out of.
Again - with body filler, build it up, and sand it down. Rough it up w/80 grit before you apply. Sand it back down after the filler cures w/ progressively finer and finer grit sand paper until you're in the 400 grit range. This is what mine looked like after the 220 grit stage.

After a bit more 600-grit final sanding, and you've done 98% of the prep work a paint shop would need to get your panels ready for spraying. Hopefully you just saved a good bit of cost if you're paying someone to do the paintwork.
From here I dunno if I'm going to let someone try and do a paint match, or attempt it myself, but I knew I was ready to start priming - I used a combination of good quality aerosol can high-build primer to fill in surface scratches and a few coats of sandable primer, finally finishing with a coat of sealing primer for the time being.
Hope this helps someone - the work really isn't that hard, or expensive compared to buying even used fairings
Ok - before starting this project, I did a lot of research on ABS/Urethane fairing repair - youtube, about 6 motorcycle forums, read some bodywork books, and asked my local auto body supply house guys what they recommended.
What I found is that there's no universal method/product for trying to repair fairings, that diff manufacturer's fairings are constructed differently, and that what some people call "done" is what I still call half-finished.
To that point - I wasn't ready to trash the OEM fairings on my F2 before giving it a go on my own.
*disclaimer - I'm no bodywork guy - I'm doing the best I can, if anyone has constructive criticism, please lemme know*
Phase 1 - Damage Assessment
Prev. owner laid the bike down - relatively low speed from what I can tell. some other previous owner had painted the bike up as a Smokin Joe replica, and the paintwork was very well done. (possibly before the F3 SJR was even released - who knows) I'm a fan of that paintscheme, so I'm going to try and save it. Well - the OEM fairings have a little flex to them - which is a bonus, I suppose, since they didn't completely shatter. The right side lower was ground all the way through to the case where the pulse generator cover is, and some scrapes/scratching here and there. The access cover took a lot of it, and I'm still working on it to try and get it saved as well. The upper fairing was cracked in several places, and missing 2 large chunks.
Phase 2 - Prep
You start out this process by trimming away the edges of the ground-down parts til you have almost full-thickness edges - I used a dremel tool for this. Also find all of the cracks, and drill a hole at the ends to keep the cracks from running. Use the dremel again and cut a groove along all of the running cracks to give some more raw surface area for the plastic-repair material to bond to.
Along the way - you can see I'm using 80-grit sandpaper to rough up the surface to give the plastic repair something to bite into. FYI - there's a ton of sanding involved, so if you're not a fan of sanding - just stop reading now :-)
Now that you have your grooves cut, and all the plastic jigsawed back in line, you have to come up with something to fill the gaps and holes - Bondo is NOT what you want for this. I used a product a local body shop supply company recommended called Evercoat Maxim 813 adhesive. This is the stuff body shops use to bond new outer door skins and bed sides onto cars/trucks instead of spot welding these days - so it's pretty dang strong. It bonds with the ABS somehow. It also sets up in about 15 minutes, is roughly sandable in an hour or so, and fully cured in around 8 hours. It has a slight amount of flex when cured, so it seems to be pretty well suited for our semi-rigid fairings.
It also is a 2part epoxy - but both parts are contained in the 1 tube, and it loads up in a standard caulk gun - super easy to use & mix. It did cost about $35 for the tube - but I didn't use much of it in all my repair.
Next you need to give that stuff something to adhere to in the sections where material is missing. I used screen door mesh - local hardware store had a box of screen door repair panels that were roughly 4" square and were perfect for this. The mesh is metal, so it is flexible, and will hold a basic contour. I used packing tape to tape the mesh in from the back side of the panels.
Phase 3 - Goop
I mixed the epoxy in workable batches and laid it into each panel, until I had enough of it built up to be thicker than the surrounding bodywork. I've found over the years, epoxies adhere well to whatever you stick them to - but they don't always like being adhered to themselves sometime if you have to reapply - so build it up, sand it down.
You can see where the epoxy seeped through the mesh and cured into it - this will strengthen the repair a lot.
Phase 4 - Sand, and Sand, and Sand, then Sand some more...
After everything sets up - you can start rough sanding - I used a DA sander on my compressor on the lower. That wasn't an option on the upper. I used a sanding drum on my dremel to get down close to a flush surface, and then finished by hand.
Once you have the panels flush sanded, time for some good ole body filler to fill in any dips or pinholes. Yes - NOW you can use Bondo. Contrary to the mini-trucking crowd's beliefs, body filler is for minor surface smoothing - not molding new body panels out of.
Again - with body filler, build it up, and sand it down. Rough it up w/80 grit before you apply. Sand it back down after the filler cures w/ progressively finer and finer grit sand paper until you're in the 400 grit range. This is what mine looked like after the 220 grit stage.
After a bit more 600-grit final sanding, and you've done 98% of the prep work a paint shop would need to get your panels ready for spraying. Hopefully you just saved a good bit of cost if you're paying someone to do the paintwork.
From here I dunno if I'm going to let someone try and do a paint match, or attempt it myself, but I knew I was ready to start priming - I used a combination of good quality aerosol can high-build primer to fill in surface scratches and a few coats of sandable primer, finally finishing with a coat of sealing primer for the time being.
Hope this helps someone - the work really isn't that hard, or expensive compared to buying even used fairings
Last edited by adrenalnjunky; 08-09-2010 at 11:42 AM.
#2
08-09-2010, 12:12 PM

Member
Join Date: Nov 2006
Location: Waco, TX USA
Posts: 92
Likes: 0
Received 0 Likes
on
0 Posts
#3
08-09-2010, 05:05 PM

Banned
Join Date: Jul 2010
Location: hixson ,tennessee
Posts: 167
Likes: 0
Received 0 Likes
on
0 Posts

Thread
Thread Starter
Forum
Replies
Last Post