
Carb sync with home-made sync tool

#12
 08-13-2010 | 08:18 PM

Member
Joined: Jul 2010
Posts: 97
Likes: 0
From: Northern Minnesota
Wow, fancy. I just used a Radiator box (had to buy a rad for my car, it sprung a BIG leak). You even drew lines on your to judge by, I just eyed mine. I found the same with the adjustment screws and decided eyeballing it was as close as I was goint to get, even after swiching from water with red food color to ATF.
#13
08-14-2010 | 07:33 AM

Thread Starter
|
Member
Joined: May 2010
Posts: 68
Likes: 0
From: Canada
BULK HOSE (3.5X1000)
95005-35001-20M
On my bike, #1 carb has a permanent tube with a vacuum hose connected back to the petcock (as shown in photo). #2 carb had the Boost Joint and Cap. Carbs #3 and 4 had screws that had to be removed and replaced with the Boost Joint. You need the cap and clip to seal them for normal use. The cap is removed when you attach your sync tool.
Below are the parts you need. If your setup is like mine, you need 2 of each part.
JOINT, BOOST
16214-MB0-000 $3.51
CAP, BOOST
16215-MV4-000 $2.13
CLIP, TUBE (B7)
95002-02070 $2.50

Last edited by compster; 08-14-2010 at 07:39 AM.
#14
08-14-2010 | 08:10 AM
Thread Starter
|
Member
Joined: May 2010
Posts: 68
Likes: 0
From: Canada
You need 20 feet of 3/16" ID tubing and two T connectors. I matched the diameter of the tubing to the T connector I was able to find. Ideally, you would use only one size of tubing, but because I could only find a certain size of T connector, I had to use another smaller size tubing and connect it the tubing on the board to connect properly to the carb. If you look at the photo at the beginning of this thread you'll see what I mean.
Presuming you can get a T connector to match, the ideal size tubing would be the same as the tube that connects from the petcock to carb #1 vacuum tube. I believe it was .17" internal diameter. 3/16 ID is probably too big.
I also bought a package of 1/4" coaxial nail-in clips to hold the hosing to the board.
I cut a 1'x3' piece of plywood.
Cut the tubing into 4 equal pieces (approx. 5' each). You also need a small piece to connect the T joints in the middle. Once connected, equalize the length of the tubes. You'll probably need to shorten the two middle ones a bit.
Once you have everything connected to the board, you need to suck the fluid you plan to use into the tube. It's best to do this in a vertical position and really easy if you have a vacuum tool. In any case, put one tube in the liquid and suck liquid in by mouth or tool until it levels out a bit below the the half way mark on your board.
Here is a useful site, but I didn't do the yard stick method.
http://www.airheads.org/content/view/183/56/
Last edited by compster; 08-14-2010 at 09:53 AM.
#15
09-23-2010 | 08:16 AM

Member
Joined: Aug 2010
Posts: 31
Likes: 0
From: Dallas Fort Worth Metroplex
I built one and it worked fine for about 5 min then sucked air into it and I have not been able to get ot it act normal since, I even went for motor oil in it to slow down the draw. I have for the short time used feeler gauges to get the bike running but I want to use my tool I built  .
.
I put restrictors in it and I even bought aquarium valves to slow down the draw.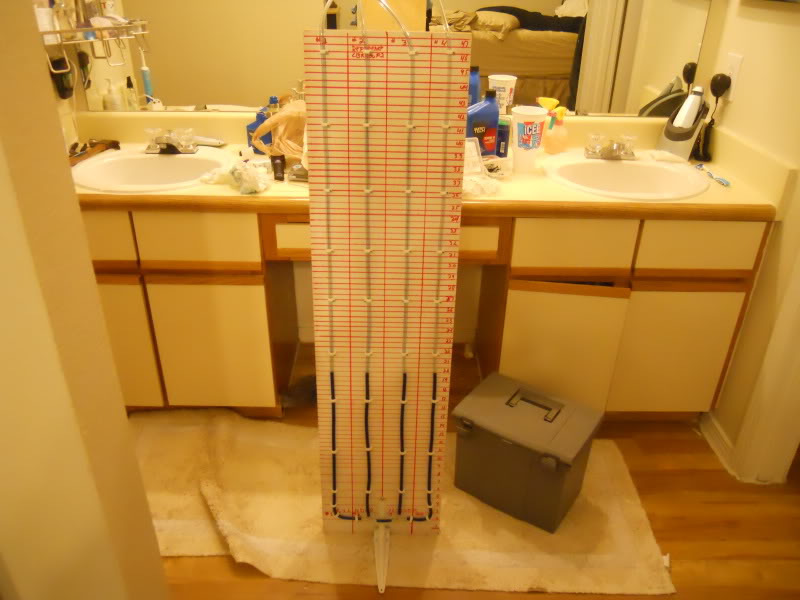
any Ideas? I really want this thing to work and HATE wasting money but I just need the tool to work. Or I have been looking at just getting some vacuum gauges.
I put restrictors in it and I even bought aquarium valves to slow down the draw.
any Ideas? I really want this thing to work and HATE wasting money but I just need the tool to work. Or I have been looking at just getting some vacuum gauges.
#16
09-24-2010 | 09:53 AM
Thread Starter
|
Member
Joined: May 2010
Posts: 68
Likes: 0
From: Canada
I built one and it worked fine for about 5 min then sucked air into it and I have not been able to get ot it act normal since, I even went for motor oil in it to slow down the draw. I have for the short time used feeler gauges to get the bike running but I want to use my tool I built .
I put restrictors in it and I even bought aquarium valves to slow down the draw.
any Ideas? I really want this thing to work and HATE wasting money but I just need the tool to work. Or I have been looking at just getting some vacuum gauges.
I put restrictors in it and I even bought aquarium valves to slow down the draw.
any Ideas? I really want this thing to work and HATE wasting money but I just need the tool to work. Or I have been looking at just getting some vacuum gauges.
Nice looking tool, by the way. Too bad it's not working. Kind of a strange place to store it though (in the bathroom)
 .
.When I did my first sync, it was way out of wack and I had to be careful to not draw transmission fluid up into the carb vacuum port. Those carb screws are very sensitive. Otherwise , it worked perfectly.
#17
09-25-2010 | 03:54 AM
Member
Joined: Jul 2010
Posts: 97
Likes: 0
From: Northern Minnesota
I attempted to reply via email, but it did not post. I had the same issue, I used zip ties at all the fittings. The engine creates enough vacuum to draw air between the hose and the fitting. Heat shrink may work and look better. I also found water to be too jumpy so I used Mex/Merc3, red for good vis and a good viscosity for the project.
#18
09-25-2010 | 10:10 PM

Senior Member
Joined: Feb 2009
Posts: 133
Likes: 0
.............I cannot understand - why you all you complicate things - you have to remove the carburettors to them apart to clean better - then before reattaching them to adjust the throttle position! these days I will make some pictures in the service of "bench" which I made myself for 1-2 hours - so I can give you an idea and to obtain a visual image - for easy and high quality way to repair ...................
That should be used only as a reference. Fine tuning by vacuum is the only way to get them perfect.
#19
09-26-2010 | 03:18 AM

Senior Member
Joined: Aug 2008
Posts: 159
Likes: 0
I beg to differ. When my carbs were out of wack, I synched them by eye. Once they looked equal, I put it back together and rode my bike and decided I should probably hook the manometer up to get it for sure in synch even though it felt good. After hooking up my manometer, I realized it was a waste of time because all 4 carbs were perfectly balanced
I probably got lucky. But with the carbs secure, and a lightsource shining through underneath them I got all the butterflys pretty identical.
I probably got lucky. But with the carbs secure, and a lightsource shining through underneath them I got all the butterflys pretty identical.
#20
09-26-2010 | 04:25 PM
Member
Joined: Aug 2010
Posts: 31
Likes: 0
From: Dallas Fort Worth Metroplex
When you say "sucked air into it", do you mean there may be an air leak either in the tubing or the connection to the carbs.
Nice looking tool, by the way. Too bad it's not working. Kind of a strange place to store it though (in the bathroom).
When I did my first sync, it was way out of wack and I had to be careful to not draw transmission fluid up into the carb vacuum port. Those carb screws are very sensitive. Otherwise , it worked perfectly.
Nice looking tool, by the way. Too bad it's not working. Kind of a strange place to store it though (in the bathroom)
.When I did my first sync, it was way out of wack and I had to be careful to not draw transmission fluid up into the carb vacuum port. Those carb screws are very sensitive. Otherwise , it worked perfectly.
I replaced the oil with ATF and tried it again. I synced 3 and 4 using y connctors 2 into 1 and each to a carb. I then hooked all 4 up, while it did not suck fluid up this time I did manage to get the carbs synced at 1200 or so RPM but when I raised the RPMs it was all out of whack could this be that each carb is drawing against the others since they are all connected at the bottom? or bad valves it seems to run fine at higher RPMs?
wouldn't this be better if each had its own reseivor? I think I am going to buy a real carbsync tool as I have wasted 2 weekends jacking with this thing to save a few bucks.those I see have independent tubes or gauges. I think that is a big part of my issue.
Alot of the sputtering is gone but I still have some 2-5k and at idle with the sync done.
I just put new plugs but maybe I fouled one jacking around.
I am getting frustrated with this thing.