
Regulator/Rectifier or How To Plug Into a Suzuki R/R


Thread Starter
|
Super Moderator
Joined: Aug 2006
Posts: 5,304
Likes: 512
From: South Florida, USA
A few years ago I posted up on my problems that I had with my Regulator/Rectifier here. I was never really happy with the way it turned out. I really wished that I could just plug the Honda wiring harness into the one from the Suzuki GSX/R unit. But I couldn't do that because the connectors were different.
Well, I did a little research and found a guy (a fellow motorcycle enthusiast) that sells the Honda replacement wiring harness connector and pins. We've all seen the burnt up brittle connector. For the Honda R/R, the male side of the connector is built into it. So I asked if he could get the other side as well as the pins to go with it. He responded the same day and indicated that he though he could, but it would take a couple of weeks. Well, that was a week ago and now I've got everything I need to replace my old Honda wiring harness connector as well as put the matching connector on the GSX/R regulator wiring harness so that they just plug in together. Not to bad if you asked me.
So, this is how it went.
For this you're going to need a Crimping Tool, some Wire cutters, and a Wire Stripper.
You're also going to need a new 30A fuse if you forget that the Hot wire going to the R/R has battery voltage to it all the time, regardless of whether the key is turned on or not. DOH!
Here is the kit that he put together for me.
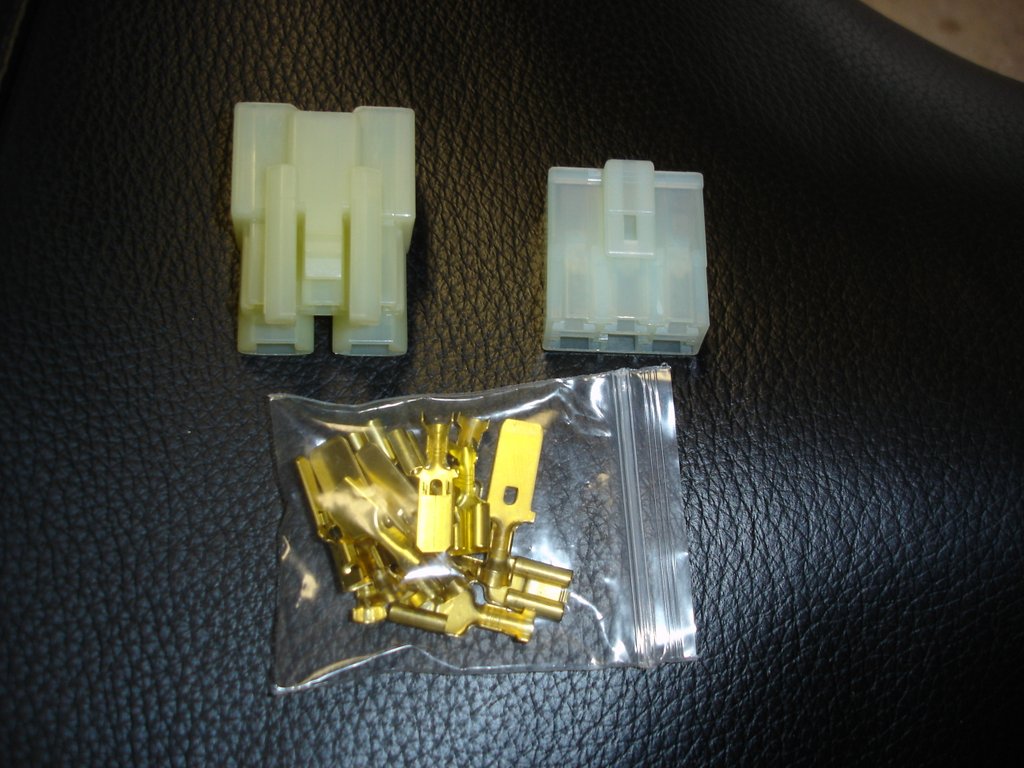

This replaces the motorcycle side of the wiring harness and provides a matching part for the R/R side. Here you can see it's the same connector that matches the Honda.


So, first thing first is to remove all the tape and old pins that I had attached to the Suzuki R/R. I cut the old pins off and stripped the wires so I could crimp on the new pins.


This what it looks like with the new pin crimped onto the wire.

There are 2 different sizes of pins for the wires. The larger ones are for the Hot/Positive wire going to the battery, and the Ground wire. The other 3 are smaller and go to the Stator coils. They don't carry nearly as much current through them.
Here we have the larger pins inserted into the R/R side of the connector. They're a perfect fit.

This is getting ready to do the 3 wires for the Stator.

Here with the pins attached, it's just a matter of inserting them into the back of the connector.

The GSX/R side is not complete and can plug directly into the Honda wiring harness.


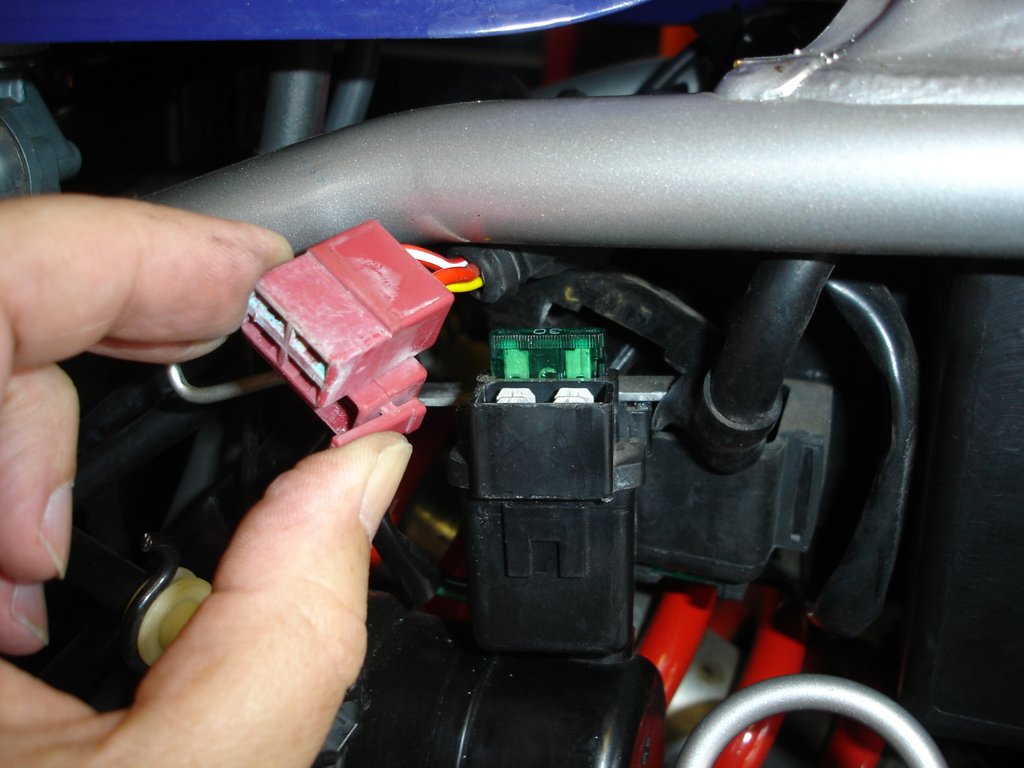
I want to replace the motorcycle side of the connector too because here you can see that the connector is not making very good connection with the male part. You can see that there is only one scratch line on that blade. It also didn't offer much resistance when sliding it into the other side. Yes it's true I could have just squeezed the female connector so that it made better contact, but it certainly wouldn't have been very even contact, and besides I had nice new ones to install.


Here is where you'll be going if you forget that the Positive wire is always Hot.
It's nice that Honda includes a spare 30A fuse on the bottom of the Start Relay rubber housing.
Burnt fuse.

Good fuse.

You can see the spare fuse on the bottom of the housing.

All ready for the inserting into the new connector on the wiring harness.


And the finished product. It looks like factory.

Here it is with the choke on at 3000 RPM.

So that's how I plugged in my Honda wiring harness into the GSX/R's R/R.
Well, I did a little research and found a guy (a fellow motorcycle enthusiast) that sells the Honda replacement wiring harness connector and pins. We've all seen the burnt up brittle connector. For the Honda R/R, the male side of the connector is built into it. So I asked if he could get the other side as well as the pins to go with it. He responded the same day and indicated that he though he could, but it would take a couple of weeks. Well, that was a week ago and now I've got everything I need to replace my old Honda wiring harness connector as well as put the matching connector on the GSX/R regulator wiring harness so that they just plug in together. Not to bad if you asked me.
So, this is how it went.
For this you're going to need a Crimping Tool, some Wire cutters, and a Wire Stripper.
You're also going to need a new 30A fuse if you forget that the Hot wire going to the R/R has battery voltage to it all the time, regardless of whether the key is turned on or not. DOH!
Here is the kit that he put together for me.
This replaces the motorcycle side of the wiring harness and provides a matching part for the R/R side. Here you can see it's the same connector that matches the Honda.
So, first thing first is to remove all the tape and old pins that I had attached to the Suzuki R/R. I cut the old pins off and stripped the wires so I could crimp on the new pins.
This what it looks like with the new pin crimped onto the wire.
There are 2 different sizes of pins for the wires. The larger ones are for the Hot/Positive wire going to the battery, and the Ground wire. The other 3 are smaller and go to the Stator coils. They don't carry nearly as much current through them.
Here we have the larger pins inserted into the R/R side of the connector. They're a perfect fit.
This is getting ready to do the 3 wires for the Stator.
Here with the pins attached, it's just a matter of inserting them into the back of the connector.
The GSX/R side is not complete and can plug directly into the Honda wiring harness.
I want to replace the motorcycle side of the connector too because here you can see that the connector is not making very good connection with the male part. You can see that there is only one scratch line on that blade. It also didn't offer much resistance when sliding it into the other side. Yes it's true I could have just squeezed the female connector so that it made better contact, but it certainly wouldn't have been very even contact, and besides I had nice new ones to install.
Here is where you'll be going if you forget that the Positive wire is always Hot.
It's nice that Honda includes a spare 30A fuse on the bottom of the Start Relay rubber housing.
Burnt fuse.
Good fuse.
You can see the spare fuse on the bottom of the housing.
All ready for the inserting into the new connector on the wiring harness.
And the finished product. It looks like factory.
Here it is with the choke on at 3000 RPM.
So that's how I plugged in my Honda wiring harness into the GSX/R's R/R.

Retired Super Moderator - At large E=MC2
Joined: Feb 2011
Posts: 2,299
Likes: 4
From: Tulsa,OK
Nice write-up IDo. You da man!
Here's a link to add to your scooter connection...
OEM-Type Bullet & Spade Electrical Connectors for 1960's through 1970's Japanese Vehicles... Bridgestone, Datsun, Hodaka, Honda, Kawasaki, Landcruiser, Suzuki, Tohatsu, VW, & Yamaha
Ern
Here's a link to add to your scooter connection...
OEM-Type Bullet & Spade Electrical Connectors for 1960's through 1970's Japanese Vehicles... Bridgestone, Datsun, Hodaka, Honda, Kawasaki, Landcruiser, Suzuki, Tohatsu, VW, & Yamaha
Ern

I forget what year gsxr r/r I got but I went off of the sticky here. To get it to plug in to the honda harness I depinned and swapped two wires on the gsxr r/r. Abracadabra! Plugs right in and works. I just bought it to have a spare, I still use the original r/r.
Thread Starter
|
Super Moderator
Joined: Aug 2006
Posts: 5,304
Likes: 512
From: South Florida, USA
Yes, there are lots of different methods for connecting other manufacturers R/R's to our bikes. Many riders are just soldering the wires. I knew my connector had a little corrosion and was a little Mickey Mouse. I just took the opportunity to upgrade my current situation. It sounds like you found pretty much a plug and play option. Maybe post up some info on exactly what you used and a couple photo's. I'm sure others would appreciate it.


Thread
Thread Starter
Forum
Replies
Last Post