F3 to F4i Gauge Swap
#81
 05-22-2010, 01:23 AM


Senior Member
Join Date: Mar 2010
Location: So. Cal.
Posts: 170
Likes: 0
Received 0 Likes
on
0 Posts
Stole this from CBRworld.net because it's always crashed..
Ok. Decided to finally make a tutorial on this since there are alot of questions floating around about it. I did not cover the removal of the f3 gauges because its in the service manual and, well, I never had any gauges So...moving on. You need to remove your gas tank, and air box (well, you might not NEED to remove the airbox, but its definately worth it!) Anyways, again those are covered in the service manual, and thats really easy to do, so figure it out
  . lol Also, it might be easier to remove your upper fairing, but I ran naked, so wasnt an issue for me. haha!
Ok, now that thats out of the way, moving on to the acutal swap itself. Its really simple, but its kind of a pain in the *** too, just to get the connectors on and what not.
What you need:
F4I Gauges and F3motor!!!
- needle nose pliers
- wire cutters (some pliers have this built in towards the bottom of the clamps) or a razor blade
- wire strippers, or your teeth (what I used, and they get soar after a bit)
- about 3-4 ft of wire
- a service manual helps, but I'll include the wire color connections, so you dont need one if you can get the tank and airbox off yourself.
- male and female connectors for small wires. You can get these pretty much anywhere. I got em at meijers, but autozone, murrays, radioshack, walmart, etc...(I think I used 18-22 gauge or something)
- electrical tape, a soldering iron if you want to solder connections, but not necessary at all!
EDIT: 98-99 900rr thermostat fits the f3 and works with the f4i guages - thanks dementedf3!
Time to dive in. Locate the connectors on the F3's wiring harness that the gauges plug into. There are two, and they have little rubber boots that go around em. If you had to disconnect your gauges, you know where they are. They look like this:

Set your f4i gauges on the bike where they arent gonna fall. I just set mine on top of my upper triple, and then put the wires through the triples. You just wanna make sure that the connections are gonna reach even when the forks are turned lock to lock.. If they arent, you may have to move your wiring around, but they should!

Cut the connectors off the F3 harness and the f4i gauge harness. Just use wire cutters and cut as close to the connector as possible. Also, you may want to cut away a little of the heatshrink tubing or tape so you can expose and spread the wires apart more - easier to see the colors, more room to work. Just cut it with a razor blade, be careful not to cut the wires underneath. I just pulled it up, sliced a slot down it, then pulled it away from the wires and cut it all the way around.

Attach the connectors to each wire. With the type of connectors I chose you just strip the wire, then slide the connector on, then squeeze it down with pliers. Make sure to squeeze em good and tight so there is no chance of the connector coming off. If you wanna go overboard, you can solder them too, but its not at all necessary. I didnt, and I had a soldering iron lying 2ft away - it just wasnt at all needed, in my opinion.
Male Connector:

Female Connector

I decided half way through the process to just take off the little red plastic things that go around the base of the connectors and not use em. If you are using connectors with those things on them, just grab the connector with your fingers, and pull the plastic part off with pliers. The twist and pull method is the easiest. They make it hard to squeeze the connectors on tight, and they make the connections bulky when you wrap them with electrical tape. They are pointless.
I decided to make all the wires from the f3 harness female connectors, and all the wires from the f4i gauges male. Maybe I'm ****, it doesnt matter, but for me its easier to keep track whats what when i am connecting them that way.
F3 Harness with female connectors attached to each wire:

F4i Gauges with male connectors attached to each wire:

You will need to run one wire straight from the battery to connect to the gauges so that the clock does reset every time you turn off the bike. How you route it is up to you, but it needs to go up from the battery to where all the other connections are so it can connect to the red/green wire of the f4i gauges. I just stripped the end and put it under my battery positive connector.

I plan to electrical tape around each conection when I connect them permanently, so they dont touch each other and cause a short or something. I am swapping front ends and so I just hooked em up to test em and take pics.
Connect all the wires. This is the fun part... Not really hard, just make sure you connect the right wires. Heres how they go:
F3 to F4i
Green/Blue ---- Green/Blue
Pink/Green ---- Pink/Green
Black/Brown ---- Black/Brown
Brown ---- Brown/White
Light Green/Red ---- Light Green/Red
Orange ---- Orange
Light Blue ---- Light Blue
Blue ---- Blue
Blue/Red ---- Blue/Red
Green (one) ---- Green
Green/Black ---- Green/Black
Yellow/Green ---- Yellow/Green
Yellow/Black ---- Green/White
Pink (solid pink) - ground this out (other green)
Brown/Black - fuel reserve sensor - not used
White/Blue - fi indicator - not used.
Red/Green - battery(+) - connect to battery
All connected:

Now, turn the key, and if everything is connected right, you should see a glorious spinning of the tach and countdown on the speedo, as well as some pretty blinking lights. oooohhhhhhhh.....ahhhhhhhhh. Oh, and make sure your regulator is connected and the ground is connected. Mine wasnt, and I couldnt figure out why the gauges werent working the second time I connected them (they worked great the first time ). lol.
Gauges are a go!

I got some cool blueish white leds installed in mine:

they look really blue in the pic, but they are a little more whiteish. Really nice looking I think. I would have done this myself and posted a tutorial on it, but they were already done when I bought em
Heres a video of the gauges when you turn the key. video hehe, I turned em on and off like 30 times when I got done... so pretty.
edit: fixed video
edit: courtesy of iwanta900rr: .....I finally discovered how to use the 'FI' bulb as the kickstand indicator!! To add, it is also functional in that if you put the kickstand down in gear, it stalls!
f3's yellow/black wire connects to f4i's white/blue wire AND NOT it's green/black wire.

I couldn't have the signal all the way to the right on because I had the left one on :P
Ok. Decided to finally make a tutorial on this since there are alot of questions floating around about it. I did not cover the removal of the f3 gauges because its in the service manual and, well, I never had any gauges
So...moving on. You need to remove your gas tank, and air box (well, you might not NEED to remove the airbox, but its definately worth it!) Anyways, again those are covered in the service manual, and thats really easy to do, so figure it out . lol Also, it might be easier to remove your upper fairing, but I ran naked, so wasnt an issue for me. haha!Ok, now that thats out of the way, moving on to the acutal swap itself. Its really simple, but its kind of a pain in the *** too, just to get the connectors on and what not.
What you need:
F4I Gauges and F3motor!!!
- needle nose pliers
- wire cutters (some pliers have this built in towards the bottom of the clamps) or a razor blade
- wire strippers, or your teeth (what I used, and they get soar after a bit
)- about 3-4 ft of wire
- a service manual helps, but I'll include the wire color connections, so you dont need one if you can get the tank and airbox off yourself.
- male and female connectors for small wires. You can get these pretty much anywhere. I got em at meijers, but autozone, murrays, radioshack, walmart, etc...(I think I used 18-22 gauge or something)
- electrical tape, a soldering iron if you want to solder connections, but not necessary at all!
EDIT: 98-99 900rr thermostat fits the f3 and works with the f4i guages - thanks dementedf3!
Time to dive in. Locate the connectors on the F3's wiring harness that the gauges plug into. There are two, and they have little rubber boots that go around em. If you had to disconnect your gauges, you know where they are. They look like this:
Set your f4i gauges on the bike where they arent gonna fall. I just set mine on top of my upper triple, and then put the wires through the triples. You just wanna make sure that the connections are gonna reach even when the forks are turned lock to lock.. If they arent, you may have to move your wiring around, but they should!
Cut the connectors off the F3 harness and the f4i gauge harness. Just use wire cutters and cut as close to the connector as possible. Also, you may want to cut away a little of the heatshrink tubing or tape so you can expose and spread the wires apart more - easier to see the colors, more room to work. Just cut it with a razor blade, be careful not to cut the wires underneath. I just pulled it up, sliced a slot down it, then pulled it away from the wires and cut it all the way around.
Attach the connectors to each wire. With the type of connectors I chose you just strip the wire, then slide the connector on, then squeeze it down with pliers. Make sure to squeeze em good and tight so there is no chance of the connector coming off. If you wanna go overboard, you can solder them too, but its not at all necessary. I didnt, and I had a soldering iron lying 2ft away - it just wasnt at all needed, in my opinion.
Male Connector:
Female Connector
I decided half way through the process to just take off the little red plastic things that go around the base of the connectors and not use em. If you are using connectors with those things on them, just grab the connector with your fingers, and pull the plastic part off with pliers. The twist and pull method is the easiest. They make it hard to squeeze the connectors on tight, and they make the connections bulky when you wrap them with electrical tape. They are pointless.
I decided to make all the wires from the f3 harness female connectors, and all the wires from the f4i gauges male. Maybe I'm ****, it doesnt matter, but for me its easier to keep track whats what when i am connecting them that way.
F3 Harness with female connectors attached to each wire:
F4i Gauges with male connectors attached to each wire:
You will need to run one wire straight from the battery to connect to the gauges so that the clock does reset every time you turn off the bike. How you route it is up to you, but it needs to go up from the battery to where all the other connections are so it can connect to the red/green wire of the f4i gauges. I just stripped the end and put it under my battery positive connector.
I plan to electrical tape around each conection when I connect them permanently, so they dont touch each other and cause a short or something. I am swapping front ends and so I just hooked em up to test em and take pics.
Connect all the wires. This is the fun part...
Not really hard, just make sure you connect the right wires. Heres how they go:F3 to F4i
Green/Blue ---- Green/Blue
Pink/Green ---- Pink/Green
Black/Brown ---- Black/Brown
Brown ---- Brown/White
Light Green/Red ---- Light Green/Red
Orange ---- Orange
Light Blue ---- Light Blue
Blue ---- Blue
Blue/Red ---- Blue/Red
Green (one) ---- Green
Green/Black ---- Green/Black
Yellow/Green ---- Yellow/Green
Yellow/Black ---- Green/White
Pink (solid pink) - ground this out (other green)
Brown/Black - fuel reserve sensor - not used
White/Blue - fi indicator - not used.
Red/Green - battery(+) - connect to battery
All connected:
Now, turn the key, and if everything is connected right, you should see a glorious spinning of the tach and countdown on the speedo, as well as some pretty blinking lights. oooohhhhhhhh.....ahhhhhhhhh. Oh, and make sure your regulator is connected and the ground is connected. Mine wasnt, and I couldnt figure out why the gauges werent working the second time I connected them (they worked great the first time
). lol.Gauges are a go!
I got some cool blueish white leds installed in mine:
they look really blue in the pic, but they are a little more whiteish. Really nice looking I think. I would have done this myself and posted a tutorial on it, but they were already done when I bought em
Heres a video of the gauges when you turn the key. video hehe, I turned em on and off like 30 times when I got done... so pretty.
edit: fixed video
edit: courtesy of iwanta900rr: .....I finally discovered how to use the 'FI' bulb as the kickstand indicator!! To add, it is also functional in that if you put the kickstand down in gear, it stalls!
f3's yellow/black wire connects to f4i's white/blue wire AND NOT it's green/black wire.
I couldn't have the signal all the way to the right on because I had the left one on :P
Last edited by 999 Customs; 07-01-2010 at 03:06 PM.
#82
05-24-2010, 01:45 PM
July 2011 ROTM
i have one of these gauges for sale. it is an off and 04 and has less than 5000 miles (so i am told) and it is spotless condition. i am not going to use it. let me know if you are interested. it is going to go up for sale on ebay with all the other stuff this week unless someone lets me know they want it.
thanks
~Chris
thanks
~Chris
#83
05-24-2010, 01:50 PM
Senior Member
Join Date: Mar 2010
Location: So. Cal.
Posts: 170
Likes: 0
Received 0 Likes
on
0 Posts
#84
05-24-2010, 01:54 PM
July 2011 ROTM
#85
05-24-2010, 02:10 PM
Senior Member
Join Date: Mar 2010
Location: So. Cal.
Posts: 170
Likes: 0
Received 0 Likes
on
0 Posts
#86
05-24-2010, 02:31 PM
July 2011 ROTM
#87
05-24-2010, 02:35 PM
Senior Member
Join Date: Mar 2010
Location: So. Cal.
Posts: 170
Likes: 0
Received 0 Likes
on
0 Posts
#88
05-25-2010, 03:33 PM

Senior Member
Join Date: Aug 2009
Location: Denver, CO
Posts: 503
Likes: 0
Received 0 Likes
on
0 Posts
#89
05-25-2010, 08:44 PM
Official Welcome Crew Spicy Cat
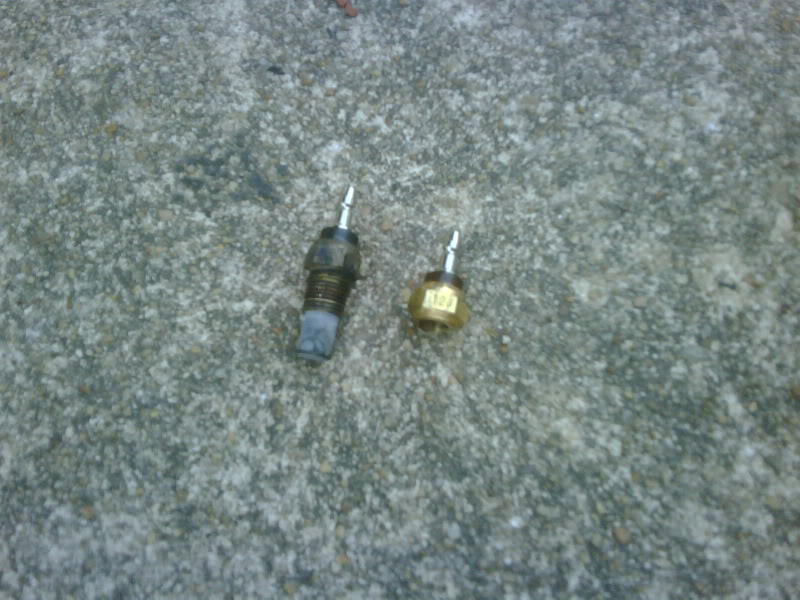
alrighty take a look at this.
here's the sensor, broken right next to the old one.
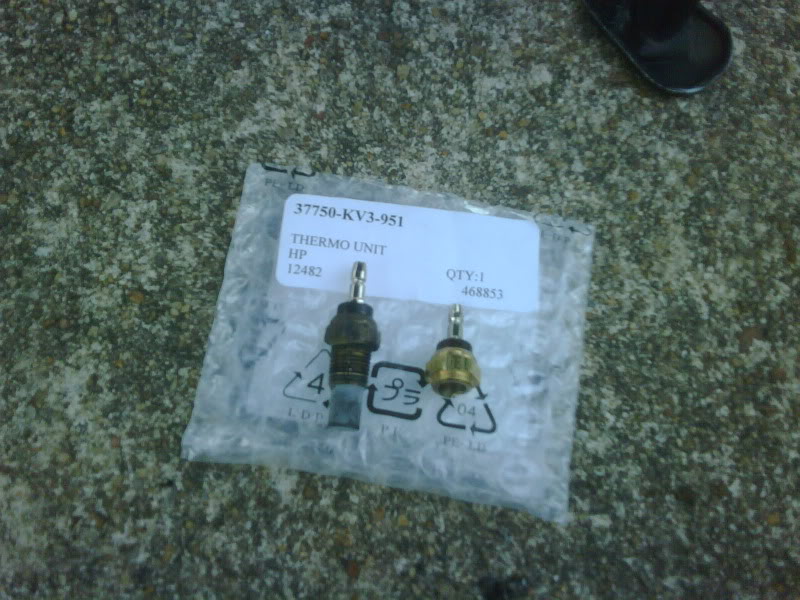
1) when you take the old one out, you have remove the air box.
2)then use a long socket extension to remove the old one after unhooking the sensor cable through the top between the carbs and frame (it will take some maneuvering, be patient)
3)when putting the new one in, do not, do not, not not not overtighten it, and ill tell you why most of us did... after its finger tight and a quarter turn more like it should be, there are still plenty of threads left (looks like it needs to be screwed in more) and it doesn't sit flush because of it. looks like it should be tighter because it doesn't sit as far in as the last one... so just a heads up.
but don't worry, it's not going anywhere, and the angle to reach it prevents a tighter seal without damaging the unit. just throw the cable back on and you're good to go.
here's the sensor, broken right next to the old one.
1) when you take the old one out, you have remove the air box.
2)then use a long socket extension to remove the old one after unhooking the sensor cable through the top between the carbs and frame (it will take some maneuvering, be patient)
3)when putting the new one in, do not, do not, not not not overtighten it, and ill tell you why most of us did... after its finger tight and a quarter turn more like it should be, there are still plenty of threads left (looks like it needs to be screwed in more) and it doesn't sit flush because of it. looks like it should be tighter because it doesn't sit as far in as the last one... so just a heads up.
but don't worry, it's not going anywhere, and the angle to reach it prevents a tighter seal without damaging the unit. just throw the cable back on and you're good to go.
#90
05-25-2010, 08:58 PM
Senior Member
Join Date: Apr 2008
Location: northern il
Posts: 605
Likes: 0
Received 0 Likes
on
0 Posts
yeah FYI "pipe fittings" have threads that are cut on a taper, meaning they get tighter the more you tighten them unlike a bolt thats only tight once the head makes contact. that includes almost anything made of brass or that deals with coolant and use a teflon thread tape or paste whenever installing to prevent leaks