
96' CBR F3 Winter Project! (F4i Race bodywork, 05' RR Tail)


Thread Starter
|
Member
Joined: Apr 2013
Posts: 33
Likes: 0
Hi Folks,
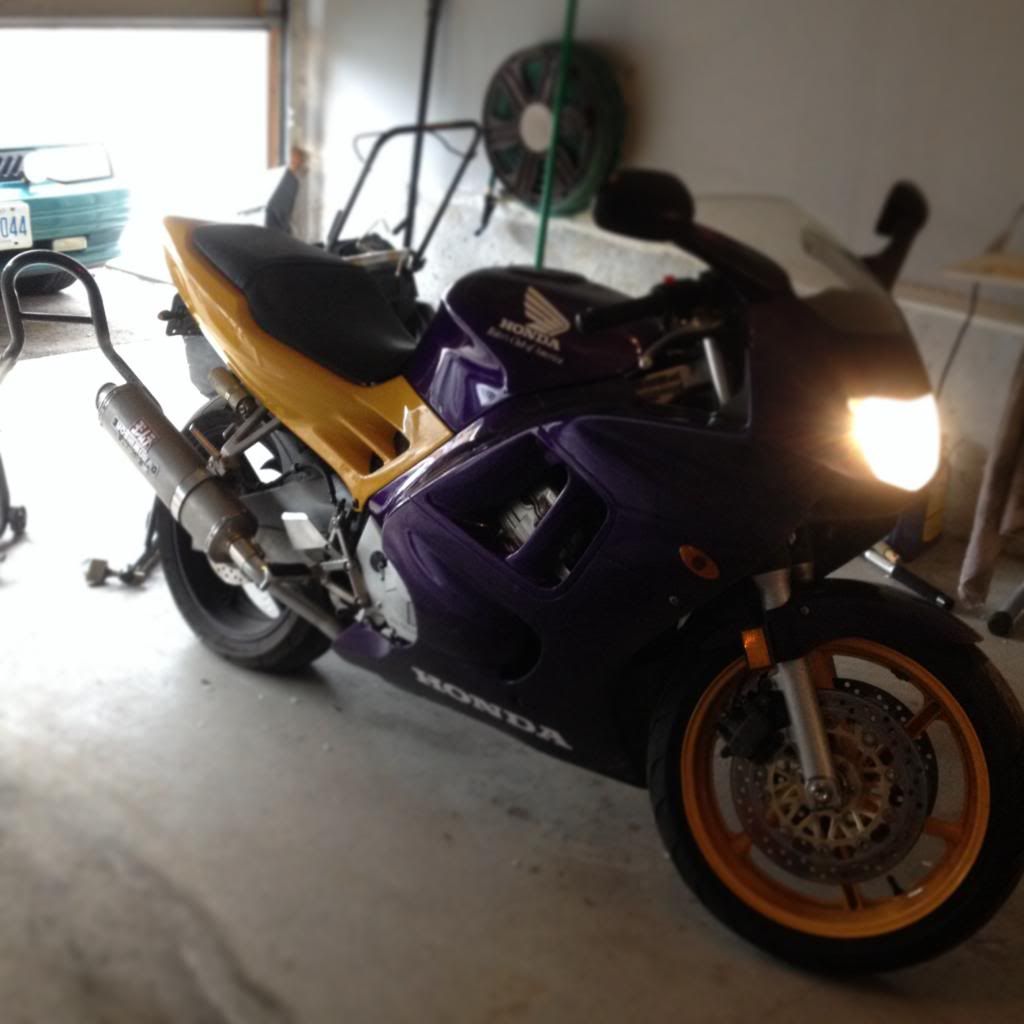
I've had my F3 for a season and I absolutely love it! But it needs some TLC. The poor beast was neglected by its previous owner. I picked her up (upgrade from my CBR 125R from an owner in Montreal who had her sitting around collecting dust / falling apart)
So I've decided to give it a face lift but retain its colour scheme. I totally love the Smokin' Joe theme & the tank's got the signed decal which i'd like to keep.
A lot of the project's inspiration and technical knowledge came from you guys and the work numerous members of this forum done over the years. Demented, Streetfighter88, Nvanvlymen, Valkyre, Idodirt ... just to name a few
I must mention major props to Nvanvlymen - Lord knows the amount of times I've pestered you (and continue to do so) for random tid bits of information.
What I'm doing is not in anyway original at this point, but hopefully every new conversion brings out something that can help the next guy that comes along
I've broken down my project in to 7 phases:
Phase 1 - Remove Body Work
Phase 2 - F4i Gauge cluster wiring / Test
Phase 3 - Wire Harness cleanup
Phase 4 - F4i Race body mock-up and secure
Phase 5 - 05' 600RR Tail w/ working passenger seat & lock
Phase 6 - Clean up
Phase 7 - Paint & Final touches
I'll probably have tons of questions along the way - who doesn't right?
Learning tons as I go along.
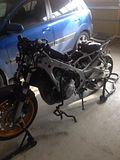
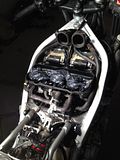
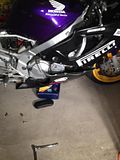
Phase 1 - Remove Body Work
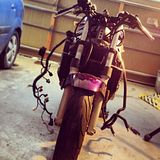
This was fairly easy - your basically just removing bolts. I did find it useful to have a few zip lock bags handy for all those nuts and bolts.

After all the fairings were taken off it ended up looking like this:
Phase 2 - F4i Gauge cluster wiring / Test
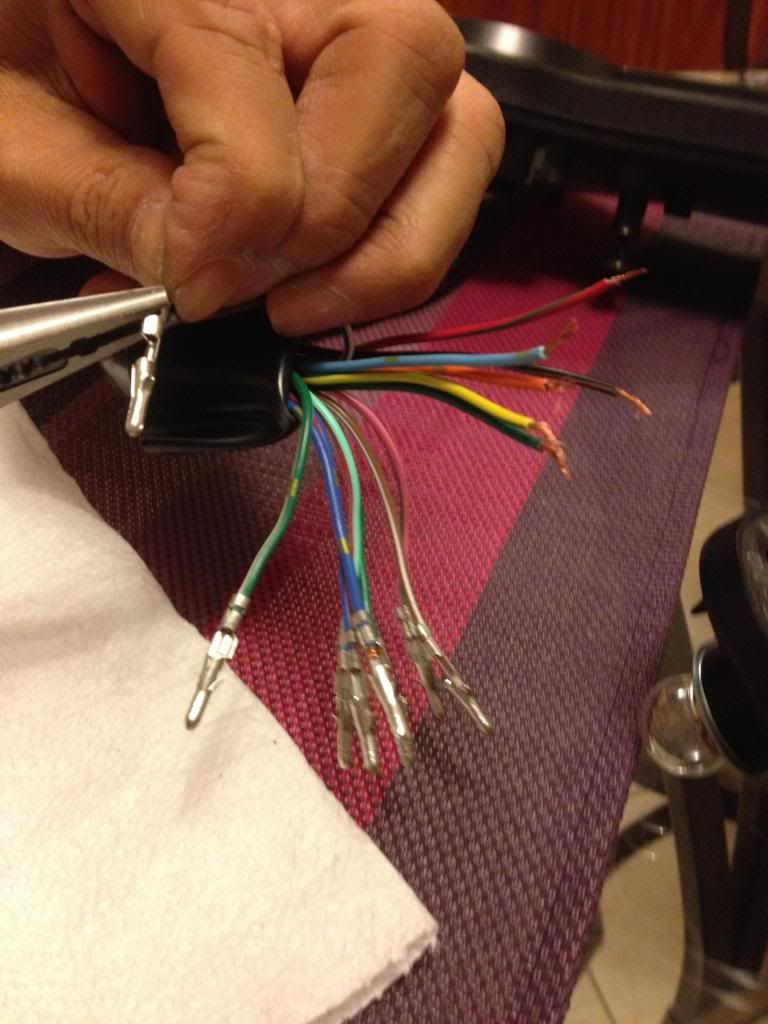
Arguably the most painful moment I've had so far (and this project just started). A lot of folks had simply snipped off the wires on both ends and sodered / taped / twisted together. I wanted to keep this clean with a stock harness feel. With some great tips from Nvanvlymen i headed to the local electronics depot (Sayal for those in Toronto) and picked up 2x 9pin molex connectors with pins (5 bucks each).
The wiring guides are all over the net but I'll link one here just in case:
https://cbrforum.com/forum/cbr-600f3...4/#post1018793
As To_Endanger mentioned in his post - If you take the F3's Yellow/Black wire and connect it to the F4i's White/Blue. The Red FI light on the gauge pod will function as the kick stand light. Engine cut off w/ kick stand down & being in gear still functions.

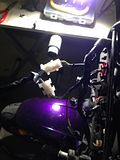
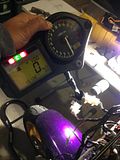
* I'll put up a youtube video at some point on the gauge startup but a quick google search will yield a ton of results.
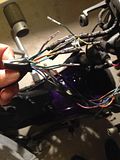
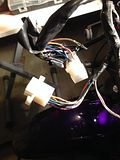
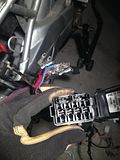
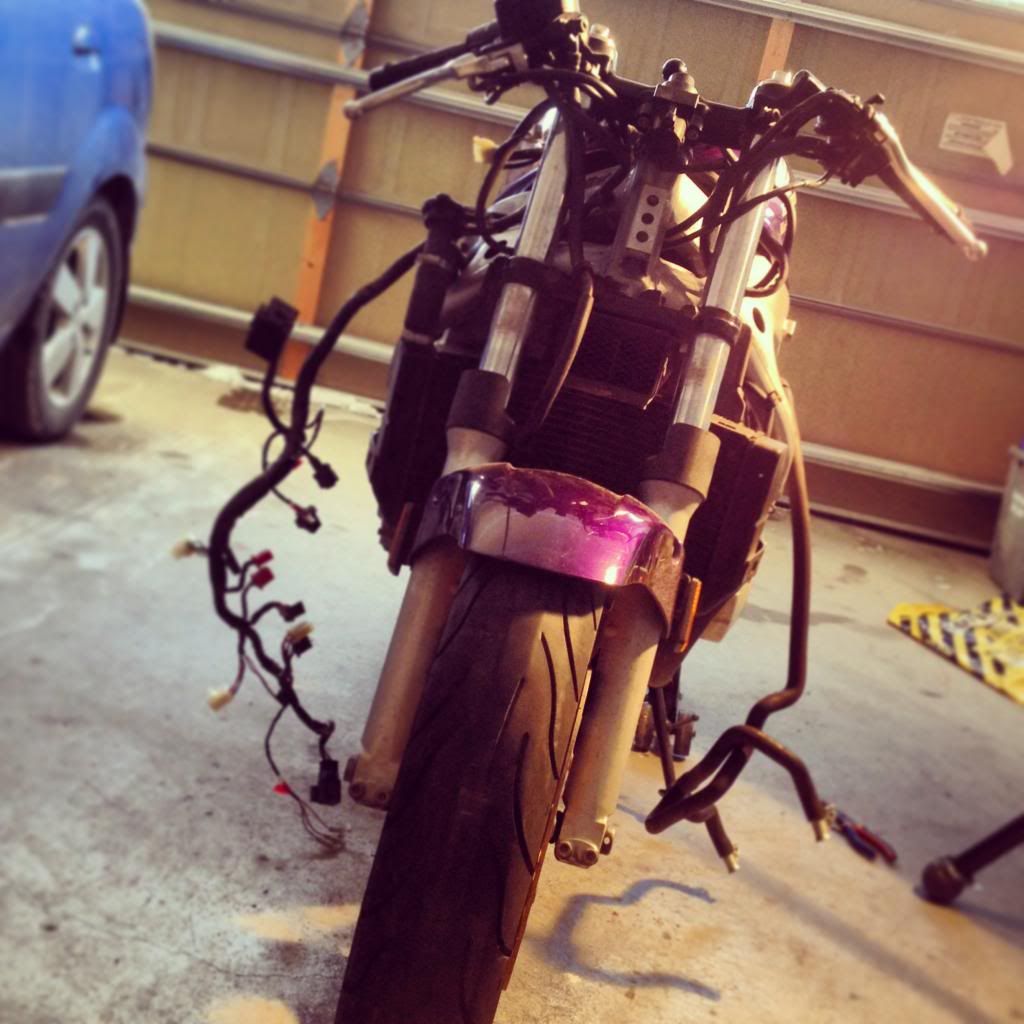
Phase 3 - Wire Harness cleanup
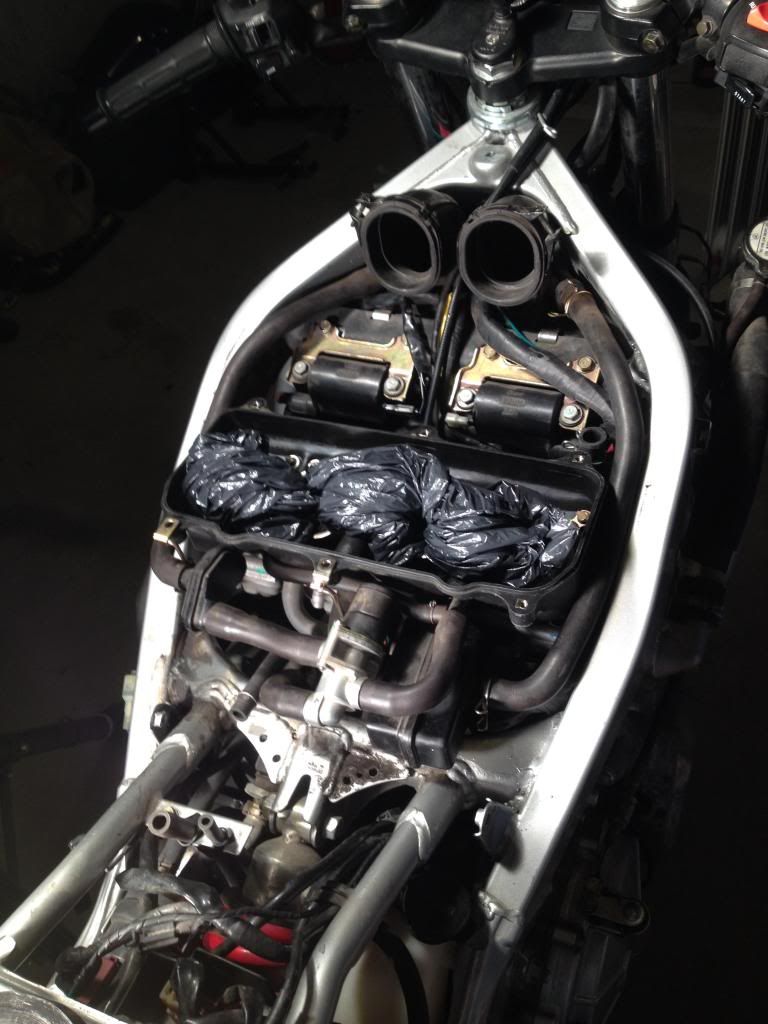
Holy crow - this harness is a beast. I've worked an entire Sunday on this so far (kudo's to the wife for understanding).
So far I've had to pull the wires all the way back to the clutch cover.
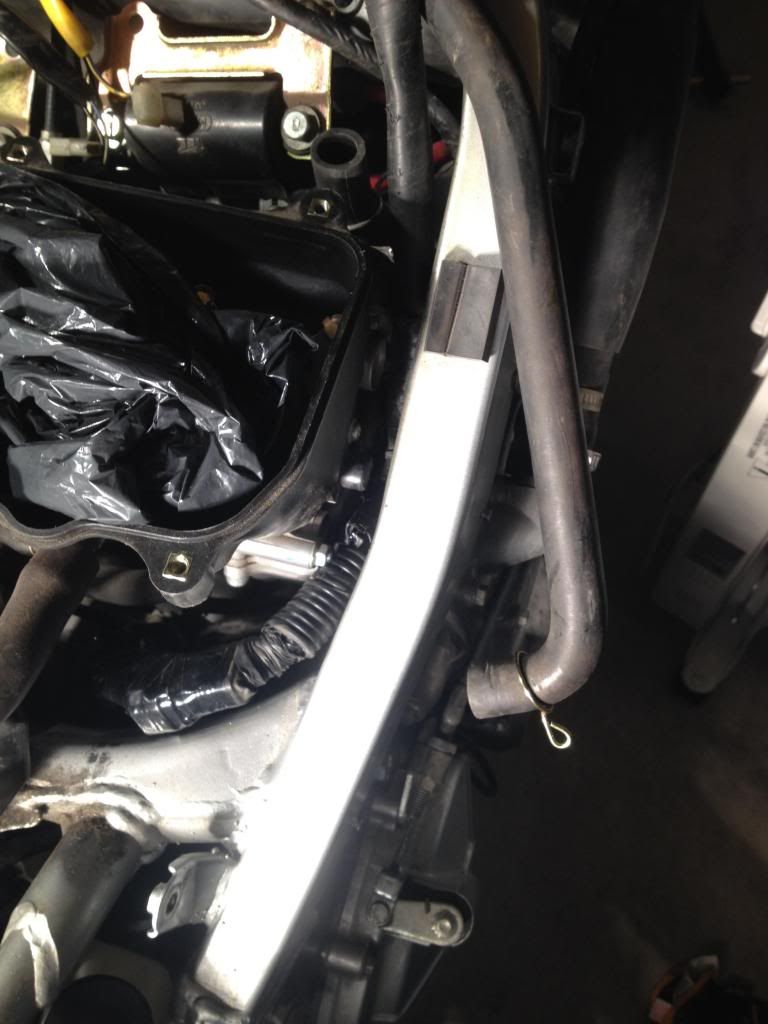
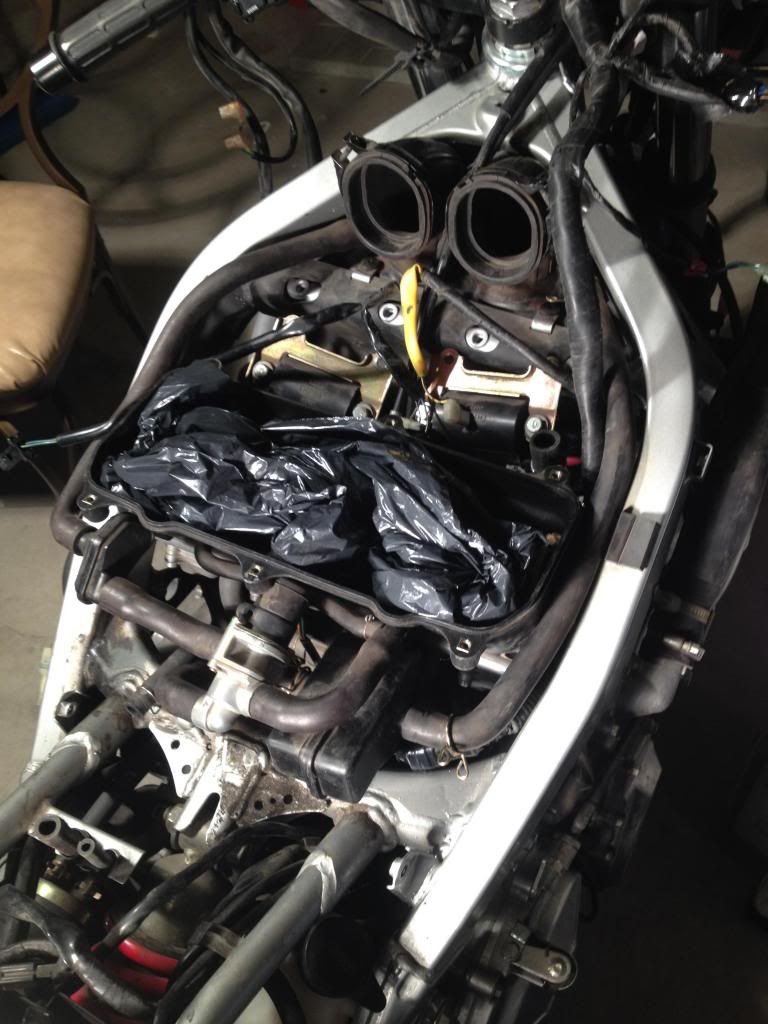
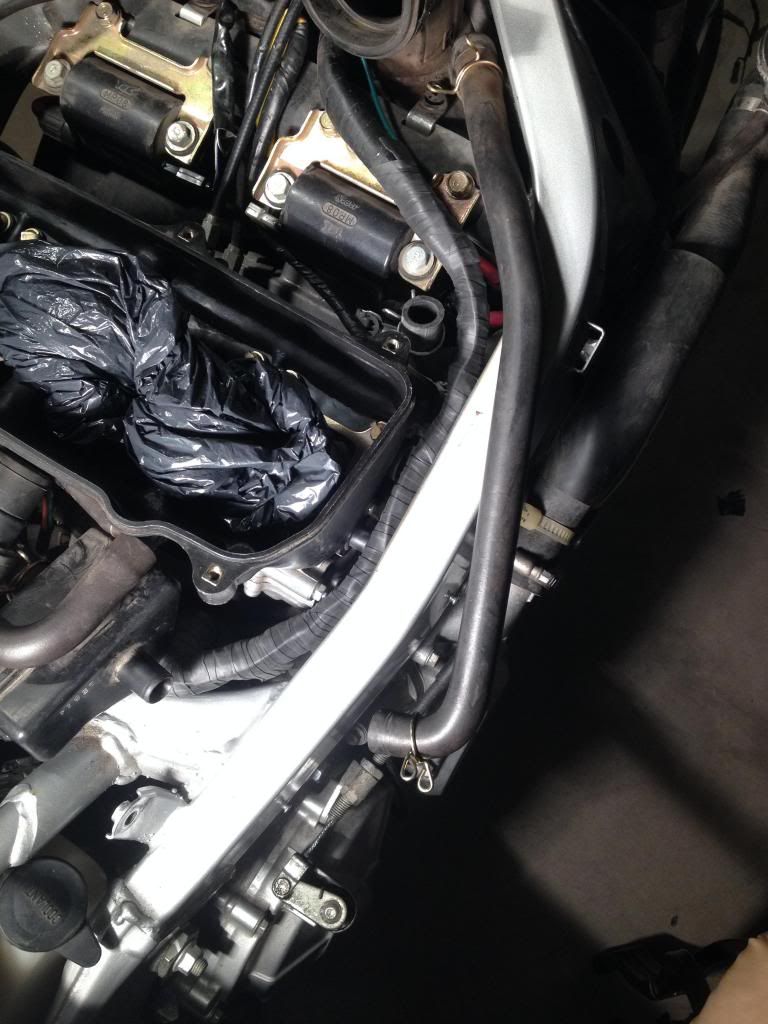
To accomplish this you must lift the tank & the airbox, since one of the wires from the harness splits off and goes underneath here to connect to the 2 solenoids and out the left side and into the radiator fan. This wire needs to be pulled back all the way.
I've taped up all the extra connectors that were part of the wiring harness so they are protected from any heat. The harness was then pushed into the frame (space between the clutch case & engine mount) and pulled back out next to the carbs. If you tape up everything properly, the entire harness should fit in snugly just below the existing air tube. It will be snugly in place between the carb assembly and the frame. Images below will explain.
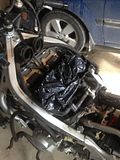
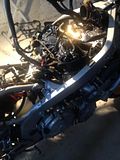

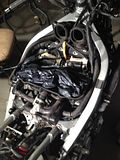
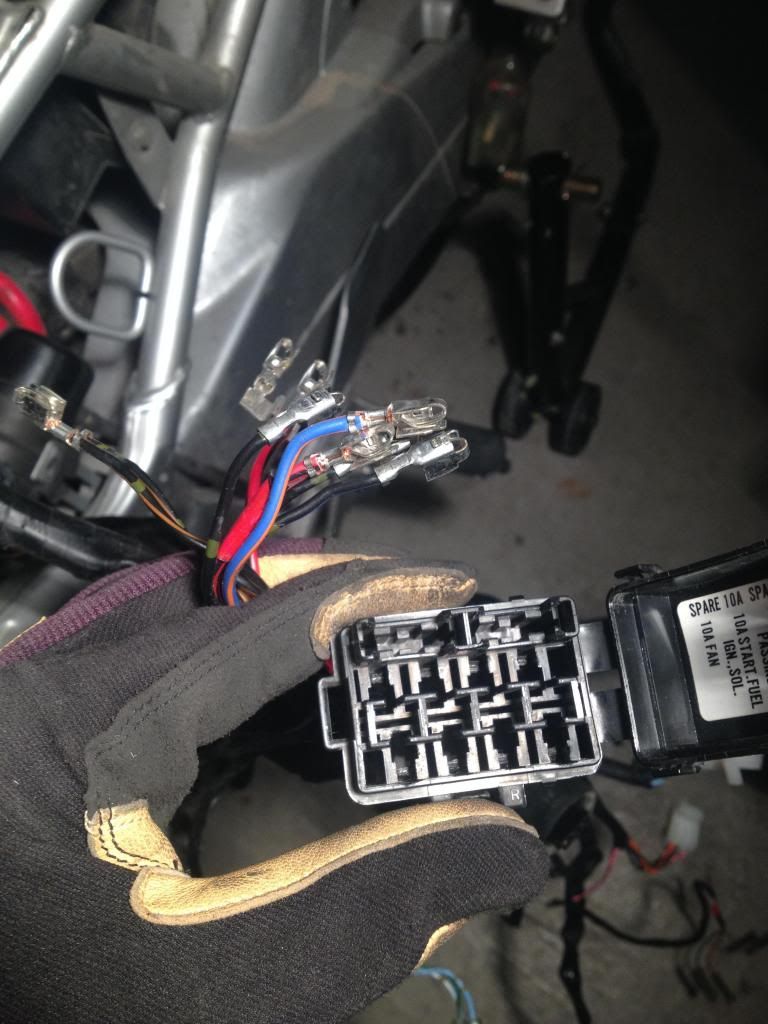
Be VERY careful pushing the harness into the frame from the space around the clutch cover. The Fuse box is a mother of a pain to deal with. I ended up removing all the wires (after making tons of diagrams and notes) from the fuse box. I'll re attach it later once my wiring is complete.
*NOTE: DO NOT ATTEMPT to remove wires from the fuse box if you DO NOT have the proper tools or one super slim flat head (computer repair tools?)*
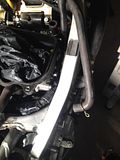
Update: Feb 3, 2014:
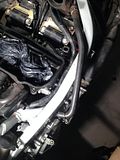
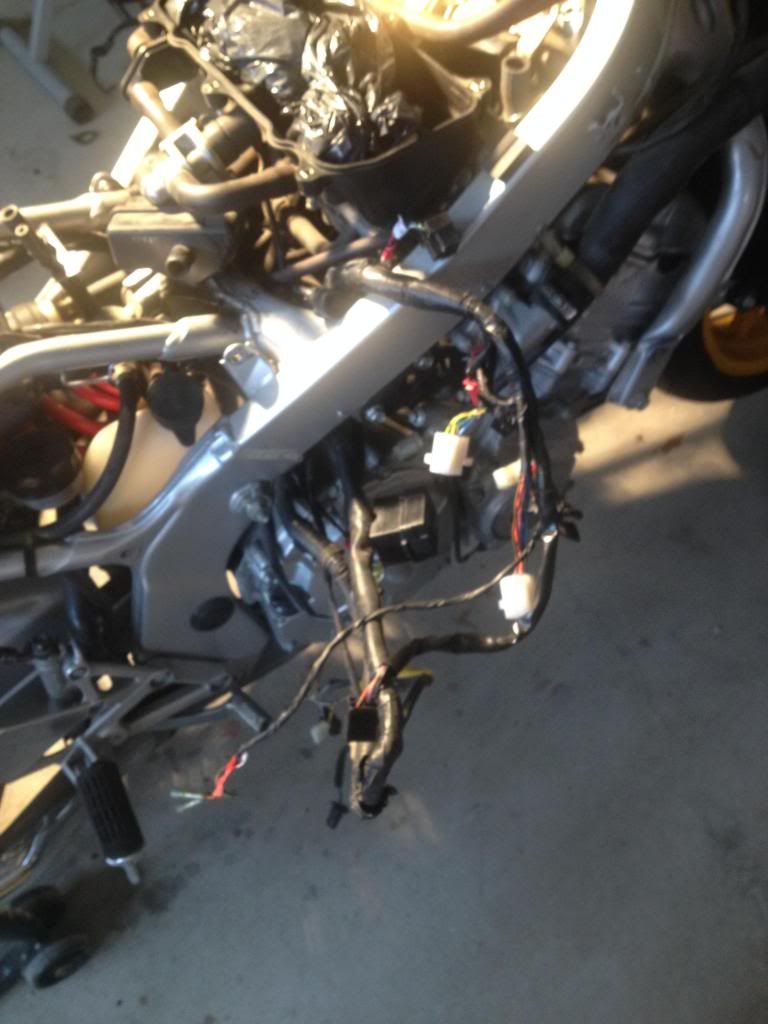
I've unwraped a large portion of the wiring harness and re-wrapped it with Scotch 130C. It's a much better material than the stock electrical tape which was shredding apart. The result is super clean install. I also wraped in the new Power line I ran to keep the clock running on the F4i Gauge. A few pics below!
-----
This is as far as I've gotten - I have a few questions i'll post below
I'm going to reserve the next three posts in hopes of keeping this entire log together in one piece (moderator, please chime in if i break any rules!)
I've had my F3 for a season and I absolutely love it! But it needs some TLC. The poor beast was neglected by its previous owner. I picked her up (upgrade from my CBR 125R from an owner in Montreal who had her sitting around collecting dust / falling apart)
So I've decided to give it a face lift but retain its colour scheme. I totally love the Smokin' Joe theme & the tank's got the signed decal which i'd like to keep.
A lot of the project's inspiration and technical knowledge came from you guys and the work numerous members of this forum done over the years. Demented, Streetfighter88, Nvanvlymen, Valkyre, Idodirt ... just to name a few
I must mention major props to Nvanvlymen - Lord knows the amount of times I've pestered you (and continue to do so) for random tid bits of information.
What I'm doing is not in anyway original at this point, but hopefully every new conversion brings out something that can help the next guy that comes along
I've broken down my project in to 7 phases:
Phase 1 - Remove Body Work
Phase 2 - F4i Gauge cluster wiring / Test
Phase 3 - Wire Harness cleanup
Phase 4 - F4i Race body mock-up and secure
Phase 5 - 05' 600RR Tail w/ working passenger seat & lock
Phase 6 - Clean up
Phase 7 - Paint & Final touches
I'll probably have tons of questions along the way - who doesn't right?
Learning tons as I go along.
Phase 1 - Remove Body Work
This was fairly easy - your basically just removing bolts. I did find it useful to have a few zip lock bags handy for all those nuts and bolts.
After all the fairings were taken off it ended up looking like this:


Phase 2 - F4i Gauge cluster wiring / Test
Arguably the most painful moment I've had so far (and this project just started). A lot of folks had simply snipped off the wires on both ends and sodered / taped / twisted together. I wanted to keep this clean with a stock harness feel. With some great tips from Nvanvlymen i headed to the local electronics depot (Sayal for those in Toronto) and picked up 2x 9pin molex connectors with pins (5 bucks each).
The wiring guides are all over the net but I'll link one here just in case:
https://cbrforum.com/forum/cbr-600f3...4/#post1018793
As To_Endanger mentioned in his post - If you take the F3's Yellow/Black wire and connect it to the F4i's White/Blue. The Red FI light on the gauge pod will function as the kick stand light. Engine cut off w/ kick stand down & being in gear still functions.


* I'll put up a youtube video at some point on the gauge startup but a quick google search will yield a ton of results.
Phase 3 - Wire Harness cleanup
Holy crow - this harness is a beast. I've worked an entire Sunday on this so far (kudo's to the wife for understanding).
So far I've had to pull the wires all the way back to the clutch cover.
To accomplish this you must lift the tank & the airbox, since one of the wires from the harness splits off and goes underneath here to connect to the 2 solenoids and out the left side and into the radiator fan. This wire needs to be pulled back all the way.
I've taped up all the extra connectors that were part of the wiring harness so they are protected from any heat. The harness was then pushed into the frame (space between the clutch case & engine mount) and pulled back out next to the carbs. If you tape up everything properly, the entire harness should fit in snugly just below the existing air tube. It will be snugly in place between the carb assembly and the frame. Images below will explain.


Be VERY careful pushing the harness into the frame from the space around the clutch cover. The Fuse box is a mother of a pain to deal with. I ended up removing all the wires (after making tons of diagrams and notes) from the fuse box. I'll re attach it later once my wiring is complete.
*NOTE: DO NOT ATTEMPT to remove wires from the fuse box if you DO NOT have the proper tools or one super slim flat head (computer repair tools?)*
Update: Feb 3, 2014:
I've unwraped a large portion of the wiring harness and re-wrapped it with Scotch 130C. It's a much better material than the stock electrical tape which was shredding apart. The result is super clean install. I also wraped in the new Power line I ran to keep the clock running on the F4i Gauge. A few pics below!

-----
This is as far as I've gotten - I have a few questions i'll post below
I'm going to reserve the next three posts in hopes of keeping this entire log together in one piece (moderator, please chime in if i break any rules!)
Last edited by BioRouge; Feb 4, 2014 at 08:14 AM. Reason: Updated for Feb 3, 2014
Thread Starter
|
Member
Joined: Apr 2013
Posts: 33
Likes: 0
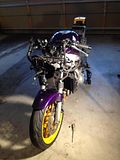
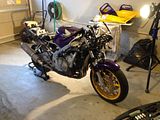
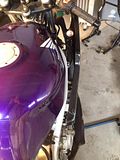
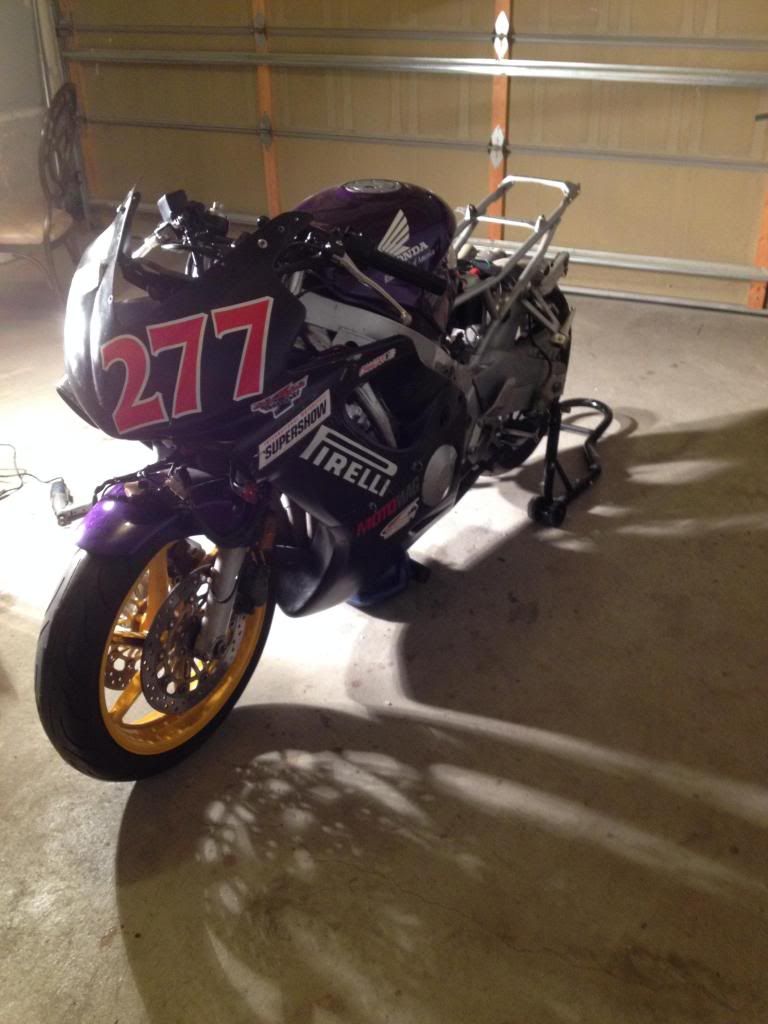
Phase 4 - F4i Race body mock-up and secure
*Update: Feb 18, 2014
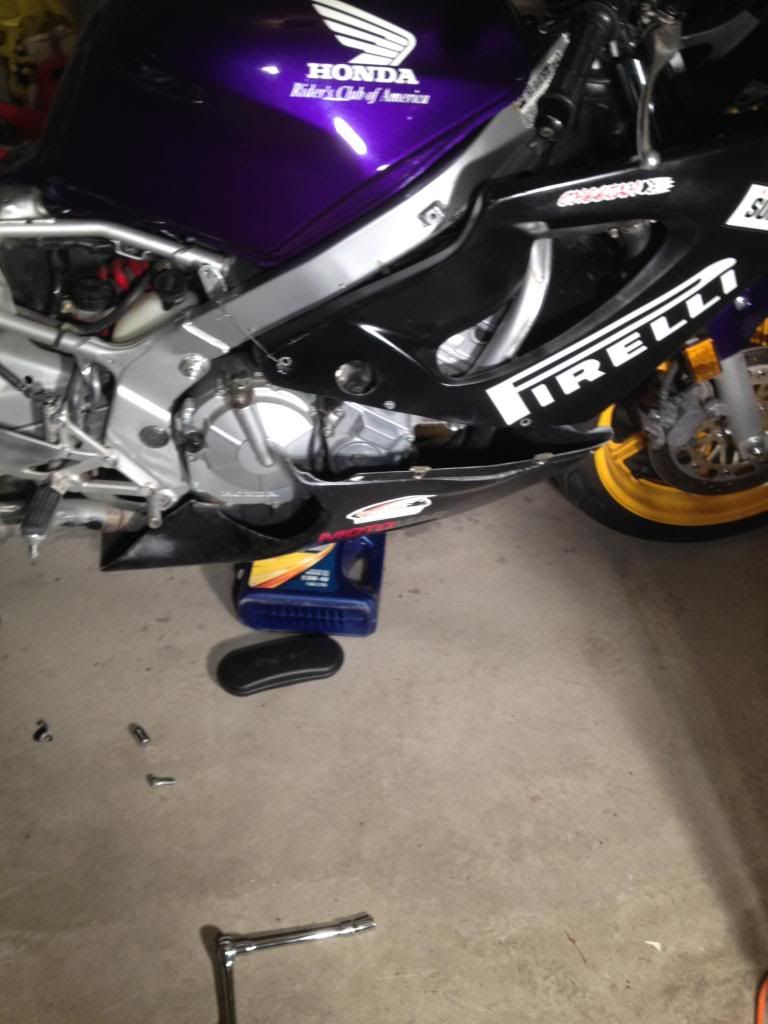
I was finally able to get the F4i Race body work installed and fitted to the F3.
The fiberglass fairings are made by Cheetah, I picked them up second hand, they were super cheap so I didn't mind. I do notice some fitment issues but nothing that can't be fixed with a bit of body work.
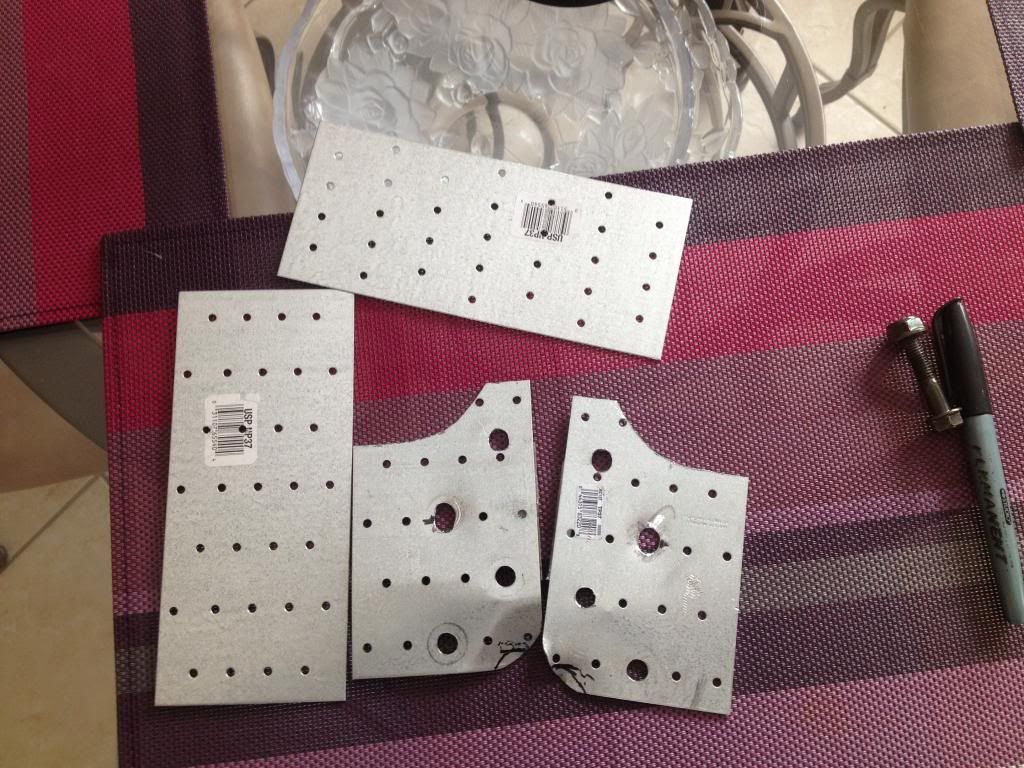
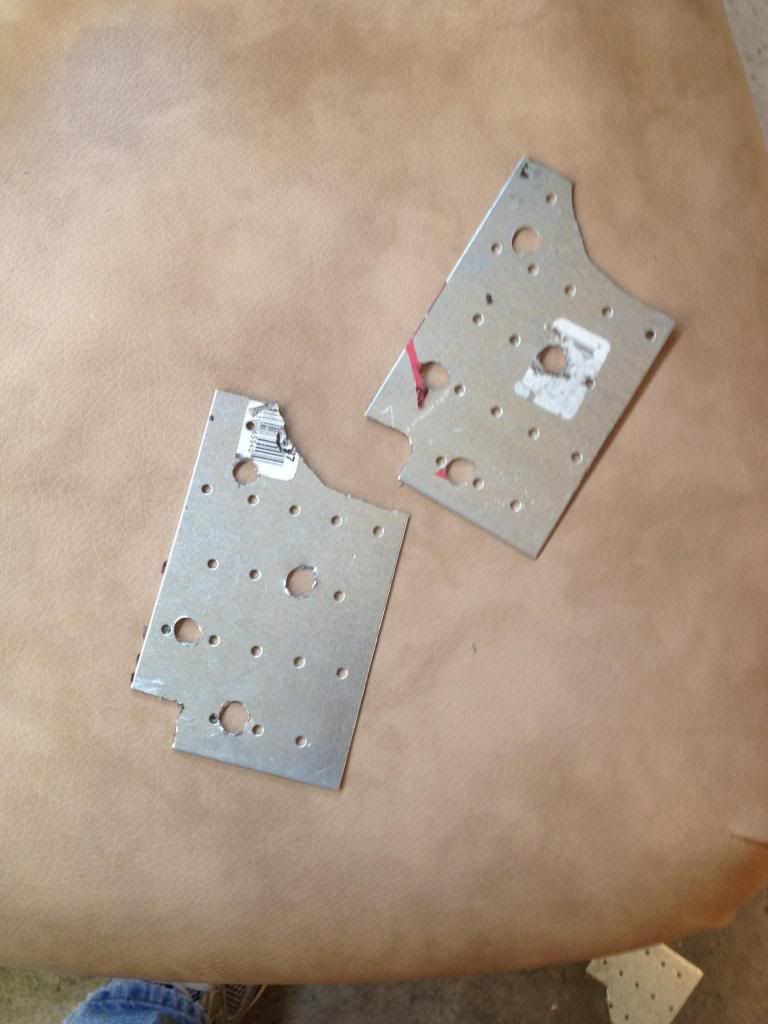
As previous threads on this subject have mentioned, there's quite a bit of fabrication work involved in making this work. The fairing stay bracket is one them. I must have gone through at least 3 iterations to get it right.
A few things to note and be aware of on the bracket:

Additional "L" brackets on the engine mounts are required to hold the fairings up along the side. Since mine are made from fiberglass and extremely light - this is all I needed to securely hold the upper in place.
From here, there's just a bunch of mocking up and adjustment to do till you are comfortable with how it looks. The lower pretty much just attached on. I did have to make some cuts for the right rear part to fit in snug. The original mounting hole was getting in the way of the brake pegs, it had to be cut out and new mounting hole drilled to line up with the frame.
I would say between the fabrication work and the mocking up, this probably took me a good 7 hours over 2 weekends, including beer brakes

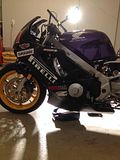
Next up for the bodywork is to get repaired. There are a lot cracks, holes, fitment fillings that I need to go through. That may wait till close to summer, just before it get's painted.
These will be road legal by the time I'm finished, where i place the headlights is a secret for now
*Update: Feb 18, 2014
I was finally able to get the F4i Race body work installed and fitted to the F3.
The fiberglass fairings are made by Cheetah, I picked them up second hand, they were super cheap so I didn't mind. I do notice some fitment issues but nothing that can't be fixed with a bit of body work.
As previous threads on this subject have mentioned, there's quite a bit of fabrication work involved in making this work. The fairing stay bracket is one them. I must have gone through at least 3 iterations to get it right.
A few things to note and be aware of on the bracket:
- You will need a Notch on the top for the wiring harness / starter tumbler to clear
- You will need a notch on the bottom for the steering stopper to clear - or it'll bend your bracet to hell

Additional "L" brackets on the engine mounts are required to hold the fairings up along the side. Since mine are made from fiberglass and extremely light - this is all I needed to securely hold the upper in place.
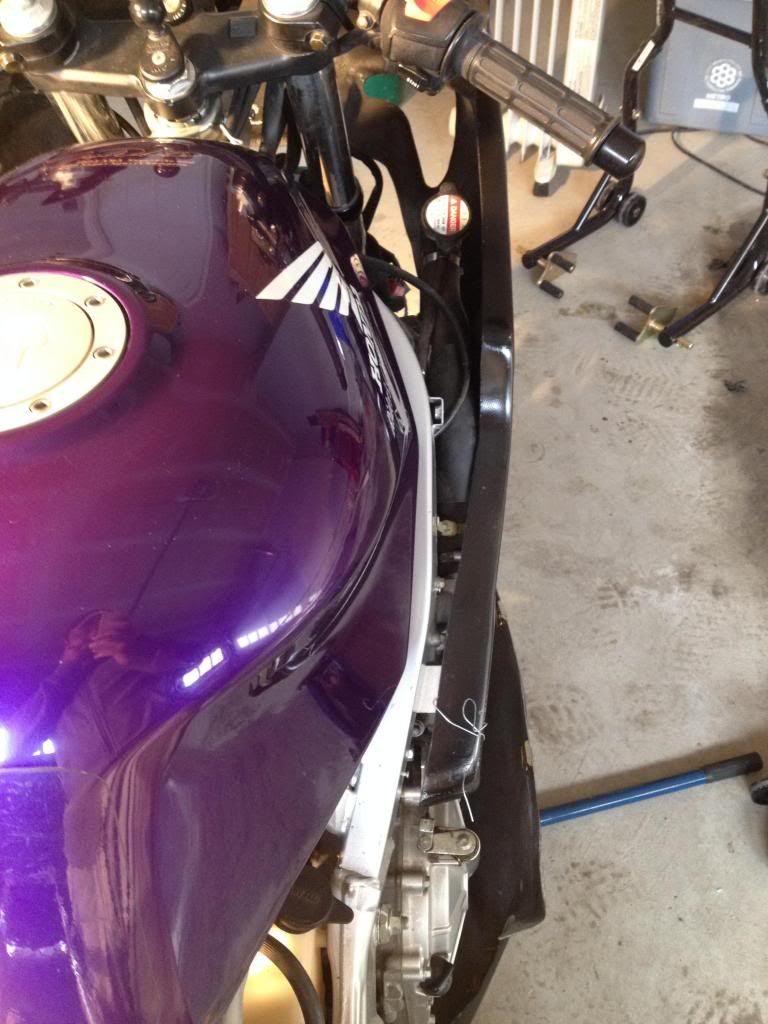
From here, there's just a bunch of mocking up and adjustment to do till you are comfortable with how it looks. The lower pretty much just attached on. I did have to make some cuts for the right rear part to fit in snug. The original mounting hole was getting in the way of the brake pegs, it had to be cut out and new mounting hole drilled to line up with the frame.
I would say between the fabrication work and the mocking up, this probably took me a good 7 hours over 2 weekends, including beer brakes


Next up for the bodywork is to get repaired. There are a lot cracks, holes, fitment fillings that I need to go through. That may wait till close to summer, just before it get's painted.
These will be road legal by the time I'm finished, where i place the headlights is a secret for now
Last edited by BioRouge; Feb 18, 2014 at 09:53 AM.
Thread Starter
|
Member
Joined: Apr 2013
Posts: 33
Likes: 0
Couple of things I'm stuck with -
I haven't the slightest clue if placing my wiring harness in the spot that've got it at is dangerous? I don't know how hot it gets in that location.
I'm assuming since its next to the carbs right below a big rubber air tube - it must not be too bad. Can any one chime in on this?
My next concern is the air tubes (dinky deer whistles) - anyone doing the F4i body, how did you deal with this? I cant find a location to move it to. the frame looks pretty darn cramped as it is.
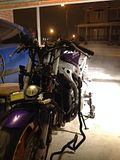
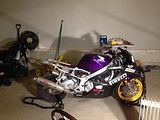
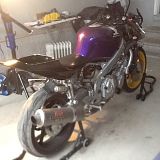
*While i was in a frenzy taking pictures yesterday I got a little ahead of myself and did a mini mock-up with the new tail. Check it out below! Comments and thoughts are always welcome!
I haven't the slightest clue if placing my wiring harness in the spot that've got it at is dangerous? I don't know how hot it gets in that location.
I'm assuming since its next to the carbs right below a big rubber air tube - it must not be too bad. Can any one chime in on this?
My next concern is the air tubes (dinky deer whistles) - anyone doing the F4i body, how did you deal with this? I cant find a location to move it to. the frame looks pretty darn cramped as it is.
*While i was in a frenzy taking pictures yesterday I got a little ahead of myself and did a mini mock-up with the new tail. Check it out below! Comments and thoughts are always welcome!

Thread Starter
|
Member
Joined: Apr 2013
Posts: 33
Likes: 0
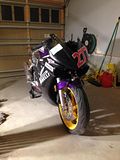
Quick Update!
Weather has been super crappy. I finally got around to finishing all the wiring.
I undid a lot of the loom and re-wrapped it Scotch 130C tape. Super stretchy, heat dissipating material.
I've added some pictures up top and updated the main post.
I've put the tank back up on the bike and ran it for about an hour. Checked all the wiring, looked peachy!
Notice the snow
Next up is the fairing stay bracket and front bodywork! *stay tuned!*

Thread Starter
|
Member
Joined: Apr 2013
Posts: 33
Likes: 0
When I was originally looking for the bike, I just wanted to upgrade from my CBR 125 and found a wicked deal on this one. It needed allot of TLC and I was ready to get my hands dirty lol.

awesome job buddy!
I totally went out and got some of that tape the other night. Im going to "eventually" strip it back and re-tape it back to the battery box. I need to take the tank and air cover off to get to that pesky thermal sensor anyhow.
As for the air intakes. I will take a pic of what I did. I only used 1 of the 2 hoses (left side) and ran it to the opening in the front fairing. I then just made a screw harness and put one screw into the bottom of the fairing ( i will take pics to better describe ).
also, I found a gem of a pic for how the headlight attaches to the fairing, I know we were talking about it the other day.
It's an actual SE - I learned more about the bike after I had purchased it and started wondering about the signature on the gas tank. I'm the 2nd owner of this bike, the original lady decided to remove the fairing decals after she dropped it on both sides and scraped the daylights out of it.
When I was originally looking for the bike, I just wanted to upgrade from my CBR 125 and found a wicked deal on this one. It needed allot of TLC and I was ready to get my hands dirty lol.
When I was originally looking for the bike, I just wanted to upgrade from my CBR 125 and found a wicked deal on this one. It needed allot of TLC and I was ready to get my hands dirty lol.
apparently these bikes are cursed