My first cbr! Its a project & I need some pointers


#42
 05-24-2012, 09:28 PM

#43
05-26-2012, 01:09 AM

Member
Join Date: Aug 2011
Location: wolverhampton england
Posts: 66
Likes: 0
Received 0 Likes
on
0 Posts
#45
06-07-2012, 09:48 AM
You don't have to remove the tire hugger, but getting it out of the way makes things a touch easier, until you get the swing of it.
(1) Undo the four screws that hold the tire hugger, and pry open the bracket attached to the hugger, that guides the rear brake line - then you can pull the tire hugger/chain guard out the back.
(2) Loosen the axle nut - you'll need a 22mm for the axle, and 27mm for the axle nut.
(3) Looosen the chain adjuster nuts and locking nuts, and back them out far enough that you can push the wheel forward, and get the chain off the rear sprocket, setting it on a shop rag draped over the swing arm.
(4) Make a mental note, take a picture, draw a diagram...whatever! so you can remember how the rear caliper bracket sits in regards to the swing arm - this item has a rectangular bit of metal that slides in a slot on the swing arm, has holes used for mounting the caliper to, and acts as an additional spacer for the axle, between the actual wheel spacer and the swing arm itself.
(5) I usually unscrew the rear caliper mounting bolt, which allows the caliper to be rotated up and forward on its mounting, so you can more easily slide the wheel out, and for you, to get another good look at how it goes back together and operates when in use - be careful not to lose any of the little retaining bits that connect to the caliper at the pads.
(6) With the axle nut fully removed, sit down behind the rear tire, up real close, so you can use your right arm to be able to support/lift/wiggle the rim and tire, while you use your left hand to pull out the axle - a little twisting and wiggling might be needed, depending on how much grime, grit, and maybe even rust, might be present. As the axle backs out to the point that the caliper bracket's wheel spacer bit is free of the axle, you might switch arms, and use your right hand to pull the caliper/bracket assembly out of the way, so that you don't scratch up the rim when you pull it out.
(7) That's it, dude, your tire is now in your lap!
#46
06-13-2012, 07:28 PM
#48
06-17-2012, 11:17 AM

Senior Member
If all you have is a clear lens with no housing, something is wrong. This is what the housing.g should look like, and the lens is molded into it. If you don't have the housing portion I guess you'll have to figure out how to cut the orange lens out of a factory housing and glue in your clear lens.
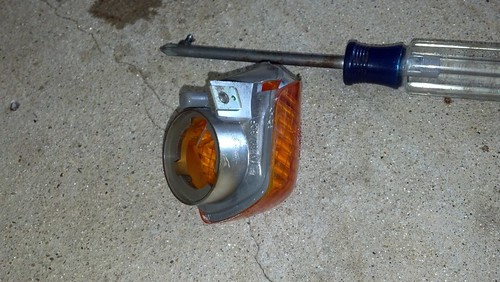
If what u have has the housing that looks like the OEM I pictured above, then all you do is twist the OEM bulb socket into it and call it a day.
Last edited by adrenalnjunky; 06-17-2012 at 11:42 AM.
#50
06-17-2012, 09:56 PM
Senior Member
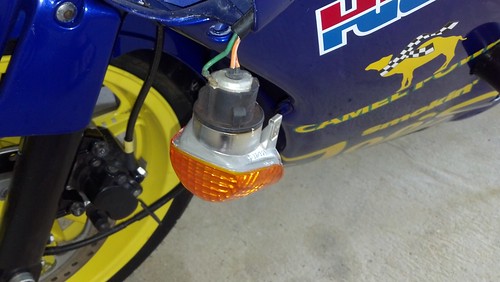
That might be a problem unless you find someone willing to chop up a spare wiring harness, or someone that has gone to flush mounts or LED's or something.
You might get lucky at a auto parts store or salvage yard - there might be universal fit bulb holders that match the cutouts in the back of the housing.
If you have a bike salvage yard around, might be easier to take your signal housing and find something that fits into it.
You might get lucky at a auto parts store or salvage yard - there might be universal fit bulb holders that match the cutouts in the back of the housing.
If you have a bike salvage yard around, might be easier to take your signal housing and find something that fits into it.