
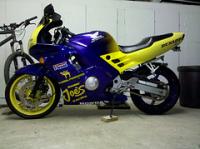
Building F2 race bike


Thread Starter
|
Member
Joined: Aug 2010
Posts: 43
Likes: 0
From: SE England
I'm in the process of converting an F2 to race. I'd been taking pictures as i go, so decided to convert it into a blog in case anyone else was interested in making similar mods. I dont think i'm doing anything that hasnt been done before, but if you're interested take a look here:
http://pmbelenkin.blogspot.com/
http://pmbelenkin.blogspot.com/

Senior Member
Joined: Oct 2009
Posts: 151
Likes: 0
From: Troy, NY
Hi Phil,
That's a great blog. Thank you for demonstrating a build style besides simply replace-and-bolt-on. It's refreshing and interesting to see some machine work in there. If the wheel hub doesn't fit between the swing arm? Chuck it up on the faceplate and cut it down, of course!
How much did it cost you to have your cylinders bored and honed? How does the surface seem? Are you concerned at all about the "coating" that Honda engine bores are supposedly given from the factory, or is that misinformation?
Thread Starter
|
Member
Joined: Aug 2010
Posts: 43
Likes: 0
From: SE England
Thanks for the kind words,
It cost me about �100, or maybe �120 for the re-bore, not very much. I used Tony Hartlen who i've been using for years. There's only two people/companies in the UK who do really good rebores, Tony is one of them and looking to retire very soon, the other is PJ engineering. Everyone else either posts off to these guys or cant be trusted. Boring out a CBR like this is not an easy job as you cant run all the way through the cases.
The barrels are steel lined, so dont have that special coating, I'm not sure when honda started that on the CBR600, but i know my mates 05 RR had it, and used to scuff up the pistons. The finish (honing) on my bores is excellent, as you'd expect from Tony.
I didnt get it dyno'd before hand so wont have a before/after but i'm hoping for around 90bhp. The class i want to race in is BHP/Weight restricted and if it get lots of BHP i have to add lead to the bike!
My only regret re the blog is not taking more notes of the fork conversion. I wouldn't recommend the USD conversion as once you slip the clip ons under the yokes the standard fairings won't fit. A swap the fx forks would be quite simple.
Lots more pictures, mainly of the engine rebuild can be found here:
http://picasaweb.google.co.uk/pmbelenkin/Thunderbike#
This was my first 4-stroke rebuild, so I took lots of pictures.


Here is my question, I am also doing a 180 rear, is the machined spacer from a F2 or Cbr900rr?  Anybody have a part number for the stock spacer, I know it has to be machined? Would like to use 160 tire for streets and 180 for racing.
 Anybody have a part number for the stock spacer, I know it has to be machined? Would like to use 160 tire for streets and 180 for racing.
Senior Member
Joined: May 2010
Posts: 1,753
Likes: 3
From: West Monroe,Louisiana
Parts 6 & 7 here:
http://www.bikebandit.com/houseofmot.../m2041#sch7527
Or you can look @ ebay and find axles + spacers for about the same price:
http://shop.ebay.com/i.html?_nkw=cbr...1&_from=&_ipg=
http://www.bikebandit.com/houseofmot.../m2041#sch7527
Or you can look @ ebay and find axles + spacers for about the same price:
http://shop.ebay.com/i.html?_nkw=cbr...1&_from=&_ipg=
Thread Starter
|
Member
Joined: Aug 2010
Posts: 43
Likes: 0
From: SE England
I only used the old spacer as it saved me boring out the middle of some solid bar stock, you dont need to buy a spacer to machine down... it's actually harder to get/grip in the lathe chuck as it's a bit too short to work with... if you're giving it to someone else to do they wont thank you. Any machine shop should have loads of bar stock that size kicking about.
I didnt work mine out to be quite the same measurements, as that other guys. My frame is a little tweeked, by about 1mm, not enough to really affect the measurements and not worth getting straightened.
In that other dudes measurements he ends up with the bit where the sprocket sits as 20.2 mm, mine worked out to be 20.5mm. I also dont get why he has the 5 little spacers for the sprocket nuts. Mine needed to sit straight onto the carrier. So with those spacers his sprockets will be be 21.2mm out where as mine is 20.5mm. I got the wheel alignment exactly the same as that dude, that picture you've linked to shows that spacer. On the other side the spacers needed to add up to 28mm, including the brake carrier.... which is the bit i've not sorted yet.
I had to do the job in two steps, i milled down the carrier around the bearing first so i could measure up the wheel alignment, then once i was sure of all the measurements, put it in the lathe.
I like your idea of bolting the sproket straight onto the carrier. This info is good to know! I already have the wheel and a machine shop is right around the corner from work. Let me know on total measurements in millimeters for the spacers you used, PM if you please? More knowledge the better.